Vert.xとは、公式ページより
JVM上にリアクティブアプリケーションを構築するためのツールキットです
@timfox氏が中心となって、現在2015年6月22日を目標にversion 3が開発されています。この投稿含め何回かに分けてVert.x 3の動くサンプルを実装していこうと思います。
概要
「サービス」はversion 3から導入された概念です。
サービスは任意の機能を実現するVerticleです。
以下にシンプルなサービスの例を示します、このhoge-serviceはデプロイメントされたときにhogeをログ出力するだけのサービスです。
サービスを実現するHogeServiceVerticle.javaの中身は以下の通りです:
package com.example.hogeservice.services;

import io.vertx.core.AbstractVerticle;
import io.vertx.core.logging.Logger;
import io.vertx.core.logging.impl.LoggerFactory;

public class HogeServiceVerticle extends AbstractVerticle {
  private final static Logger log = LoggerFactory.getLogger(HogeServiceVerticle.class);

  @Override
  public void start() {
    log.info("hogehoge");
  }
}
サービスを利用してもらうために、サービス識別子と呼ばれるJSONファイルを提供する必要があります。hoge-serviceのサービス識別子com.example.hogeservice.hoge-service.jsonの中身はは以下の通りです:
{
  "main": "com.example.hogeservice.services.HogeServiceVerticle",
  "options": {
    "config": {
      "address": "hogeservice.product"
    }
  }
}
利用者側は、dependencyにVert.x Service Factoryを指定した上で、以下の通りhoge-serviceをデプロイメントすることで利用できます。
vertx.deployVerticle("service:com.example.hogeservice.hoge-service");
このように任意の機能をサービスとして実装することで、サービスの利用者と実際にデプロイメントされるサービスVerticleを分離することができます。
Vert.x Service Proxy
Verticle間で通信するにはEventBusを用います。サービスもVerticleなので、サービスを実装する際には、EventBusに対するハンドラの登録やEventBusを通した結果の応答等冗長なコードを記述する必要があります。Vert.x Service Proxyを用いることでこれらボイラープレートなコードを減らすことができます。
Vert.x Service Proxiyは以下を実現します:
- ボイラープレートなコードの削減
- サービスの利用者向けのプロキシの自動生成―利用者はこのプロキシを用いることで、
EventBusに直接メッセージを送信する代わりに、統一されたAPIを通じてサービスを利用することができる - Vert.xのサポートするプログラミング言語向けのサービススタブの自動生成―一度Javaでサービスを実装すれば、JavaScriptやGroovyからもこのサービスを利用することができる
今回は、データベース関連の処理を担うサービスをVert.x Service Proxiyを用いて実装し、これを利用するシンプルなRESTサーバを動かしてみます。
前提
Vert.x 3はJava 8が必須となります、あらかじめJava 8をインストールしておいてください。Java 8がインストールできているかは以下コマンドで確認できます:
$ java -version
java version "1.8.0_45"
Java(TM) SE Runtime Environment (build 1.8.0_45-b14)
Java HotSpot(TM) 64-Bit Server VM (build 25.45-b02, mixed mode)
また、IntelliJを前提に解説しています、Eclipse等他のIDEの場合適宜読み替えてください。
データベースにはMySQLを用いています、PostgreSQL等他のデータベースを利用する場合適宜読み替えてください。
データベースのユーザはroot(パスワードもroot)を用いています、別のものを用いる場合適宜読み替えてください。
サンプルの構成
GradleのMulti-projectを用います、以下のディレクトリ構成を作ります
myservice
  build.gradle
  settings.gradle
  servicies/      // データベース関連の処理を担うサービスを格納
  server/         // 上記サービスを利用するサーバを格納
手順
データベースの準備
予めサンプルデータを格納するデータベースを作成しておきます、MySQLに接続して以下SQL文を実行します。
$ msql -u root -p
> create database vertx_example;

> create table products (
  id int not null auto_increment primary key,
  name varchar(20),
  price float,
  weight int
) engine=InnoDB;

> insert into products (name, price, weight) values
("Egg Whisk", 3.88, 150), ("Tea Cosy", 5.99, 100), ("Spatula", 1.00, 80);
ひな形のクローン
ひな形となるプロジェクトをクローンします。
$ git clone https://github.com/p-baleine/vertx-gradle-template.git my-service
$ cd my-service
$ git remote rm origin # origin削除
IntelliJでインポート
IntelliJを起動してWelcomeダイアログで[Import Project]を選択し、クローンした際にできたディレクトリを選択します。
Import Projectのダイアログで、[Import project from external model]にチェックを入れて、[Gradle]を選択し[Next]をクリックし、次に表示される画面で[Finish]をクリックします。
Multi-projectの準備
IntelliJでトップ階層のmy-serviceを右クリックして、[New]→[File]をクリックし、New Fileダイアログでsettings.gradleを入力して[OK]をクリックします。settings.gradleを以下内容で編集します。
include 'server', 'services:productService'
build.gradleを開いて以下内容で編集します。
subprojects {
    apply plugin: 'java'

    repositories {
        mavenCentral()
        maven {
            url = 'http://oss.sonatype.org/content/repositories/snapshots/'
        }
    }
}

project(':server') {
    dependencies {
        compile 'io.vertx:vertx-apex:3.0.0-milestone4'
        compile 'io.vertx:vertx-core:3.0.0-milestone4'
        compile 'io.vertx:vertx-service-factory:3.0.0-milestone4'
        compile project(':services:productService')
    }
}

project(':services:productService') {
    ext {
        generated = file("$projectDir/src/main/generated")
    }
    configurations {
        annotationProcessor
    }
    sourceSets {
        main {
            java {
                srcDirs generated
            }
        }
    }
    dependencies {
        compile 'io.vertx:vertx-auth-service:3.0.0-milestone4'
        compile 'io.vertx:vertx-codegen:3.0.0-milestone4'
        compile 'io.vertx:vertx-core:3.0.0-milestone4'
        compile 'io.vertx:vertx-lang-js:3.0.0-milestone4'
        compile 'io.vertx:vertx-service-proxy:3.0.0-milestone4'
        compile 'com.mchange:c3p0:0.9.5'
        compile 'com.mchange:mchange-commons-java:0.2.9'
        compile 'mysql:mysql-connector-java:5.1.35'
        compile 'org.jdbi:jdbi:2.62'

        annotationProcessor 'io.vertx:vertx-codegen:3.0.0-milestone4'
    }

    task cleanGenerated(type: Delete) {
        delete generated
    }

    compileJava {
        dependsOn cleanGenerated
        doFirst {
            mkdir generated
        }
        options.compilerArgs += [
                "-s", generated,
                "-AoutputDirectory=$projectDir/src/main",
                "-processor", "io.vertx.codegen.CodeGenProcessor"
        ]
        classpath += configurations.annotationProcessor
    }
}
IntelliJで[View]→[Tool Windows]→[Gradle]を選択してGradle Projectsビューを表示したら、同期アイコンをクリックして依存関係を読み込みます。
シェルより、srcディレクトリは不要なので削除します。
$ rm -r src
server及びservicesのためのディレクトリを作ります。
$ mkdir -p {server,services/productService}/src/main/java/com/example/myservice
$ mkdir services/productService/src/main/java/com/example/myservice/services
ProductService
Vert.x Service Proxyを参考にして、データベース関連の処理を担うProductServiceを実装します。
ProductServiceインタフェース
まず利用者側に対するインタフェースとなるProductSericeを作成します。
services/productService/src/main/java/com/example/myservice/services/ProductService.java
package com.example.myservice.services;

import com.example.myservice.services.impl.ProductServiceImpl;
import io.vertx.codegen.annotations.ProxyGen;
import io.vertx.codegen.annotations.ProxyIgnore;
import io.vertx.codegen.annotations.VertxGen;
import io.vertx.core.AsyncResult;
import io.vertx.core.Handler;
import io.vertx.core.Vertx;
import io.vertx.core.json.JsonArray;
import io.vertx.core.json.JsonObject;
import io.vertx.serviceproxy.ProxyHelper;

@ProxyGen
@VertxGen
public interface ProductService {

  static ProductService create(Vertx vertx, JsonObject config) {
    return new ProductServiceImpl(vertx, config);
  }

  static ProductService createProxy(Vertx vertx, String address) {
    return ProxyHelper.createProxy(ProductService.class, vertx, address);
  }

  @ProxyIgnore
  public void start();

  @ProxyIgnore
  public void stop();

  void list(Handler<AsyncResult<JsonArray>> resultHandler);
}
ProductServiceインタフェースの実装
実態であるProductServiceImplを実装します。
services/productService/src/main/java/com/example/myservice/services/impl/ProductServiceImpl.java
package com.example.myservice.services.impl;

import com.example.myservice.services.ProductService;
import com.mchange.v2.c3p0.ComboPooledDataSource;
import io.vertx.core.AsyncResult;
import io.vertx.core.Future;
import io.vertx.core.Handler;
import io.vertx.core.Vertx;
import io.vertx.core.json.JsonArray;
import io.vertx.core.json.JsonObject;
import io.vertx.core.logging.Logger;
import io.vertx.core.logging.impl.LoggerFactory;
import org.skife.jdbi.v2.DBI;
import org.skife.jdbi.v2.DefaultMapper;
import org.skife.jdbi.v2.Handle;
import org.skife.jdbi.v2.ResultIterator;

import java.util.Map;

public class ProductServiceImpl implements ProductService {

  private static final Logger log = LoggerFactory.getLogger(ProductService.class);

  private final Vertx vertx;
  private final JsonObject config;

  private ComboPooledDataSource dataSource = null;
  private DBI dbi = null;

  public ProductServiceImpl(Vertx vertx, JsonObject config) {
    this.vertx = vertx;
    this.config = config;
  }

  @Override
  public void start() {
    String url = config.getString("url");

    if (url == null) {
      throw new NullPointerException("url cannot be null");
    }

    ComboPooledDataSource cpds = new ComboPooledDataSource();
    cpds.setJdbcUrl(url);
    dataSource = cpds;
    dbi = new DBI(dataSource);
  }

  @Override
  public void stop() {
    dataSource.close();
  }

  @Override
  public void list(Handler<AsyncResult<JsonArray>> resultHandler) {
    Handle handle = dbi.open();
    ResultIterator<Map<String, Object>> iter = handle.createQuery("select * from products")
        .map(new DefaultMapper())
        .iterator();
    JsonArray results = new JsonArray();
    while (iter.hasNext()) {
      results.add(iter.next());
    }
    resultHandler.handle(Future.succeededFuture(results));
  }
}
ProductServiceVerticle
ProductServiceを起動するProductServiceVerticleを実装します。
services/productService/src/main/java/com/example/myservice/services/ProductServiceVerticle.java
package com.example.myservice.services;

import io.vertx.core.AbstractVerticle;
import io.vertx.core.logging.Logger;
import io.vertx.core.logging.impl.LoggerFactory;
import io.vertx.serviceproxy.ProxyHelper;

public class ProductServiceVerticle extends AbstractVerticle {

  private static final Logger log = LoggerFactory.getLogger(ProductServiceVerticle.class);

  private ProductService service;

  @Override
  public void start() {
    service = ProductService.create(vertx, config());

    String address = config().getString("address");
    if (address == null) {
      throw new IllegalStateException("address field must be specified in config for service verticle");
    }

    ProxyHelper.registerService(ProductService.class, vertx, service, address);

    service.start();
  }
}
package-info
services/productService/src/main/java/com/example/myservice/servicesに以下内容でpackage-info.javaを作成します。
@GenModule(name = "myservice-product", groupPackageName="com.example.myservice")
package com.example.myservice.services;

import io.vertx.codegen.annotations.GenModule;
サービス識別子
services/productService/src/main/resourcesに以下内容でこのサービスの識別子であるcom.example.myservice.product-service.jsonを作成します。
{
  "main": "com.example.myservice.services.ProductServiceVerticle",
  "options": {
    "config": {
      "address": "myservice.product"
    },
    "worker": true
  }
}
ServerVerticle
利用者側であるServerVerticleを実装します。
server/src/main/java/com/example/myservice/ServerVerticle.java
package com.example.myservice;

import com.example.myservice.services.ProductService;
import io.vertx.core.AbstractVerticle;
import io.vertx.core.DeploymentOptions;
import io.vertx.core.json.JsonObject;
import io.vertx.core.logging.Logger;
import io.vertx.core.logging.impl.LoggerFactory;
import io.vertx.ext.apex.Router;
import io.vertx.ext.apex.RoutingContext;
import io.vertx.ext.apex.handler.BodyHandler;

public class ServerVerticle extends AbstractVerticle {

  private static final Logger log = LoggerFactory.getLogger(ServerVerticle.class);

  @Override
  public void start() throws Exception {
    JsonObject config = new JsonObject().put("url", "jdbc:mysql://127.0.0.1:3306/vertx_example?user=root&password=root");
    DeploymentOptions options = new DeploymentOptions().setConfig(config);

    vertx.deployVerticle("service:com.example.myservice.product-service", options, res -> {
      if (res.succeeded()) {
        Router router = Router.router(vertx);

        router.route().handler(BodyHandler.create());
        router.route().handler(routingContext -> {
          routingContext.response().putHeader("Content-Type", "application/json");
          routingContext.next();
        });

        router.get("/products").handler(this::handleListProduct);

        vertx.createHttpServer().requestHandler(router::accept).listen(8080);
      } else {
        throw new RuntimeException(res.cause());
      }
    });
  }

  private void handleListProduct(RoutingContext routingContext) {
    ProductService service = ProductService.createProxy(vertx, "myservice.product");

    service.list(res -> {
      if (res.succeeded()) {
        routingContext.response().end(res.result().encode());
      } else {
        routingContext.fail(res.cause());
      }
    });
  }
}
アプリの起動
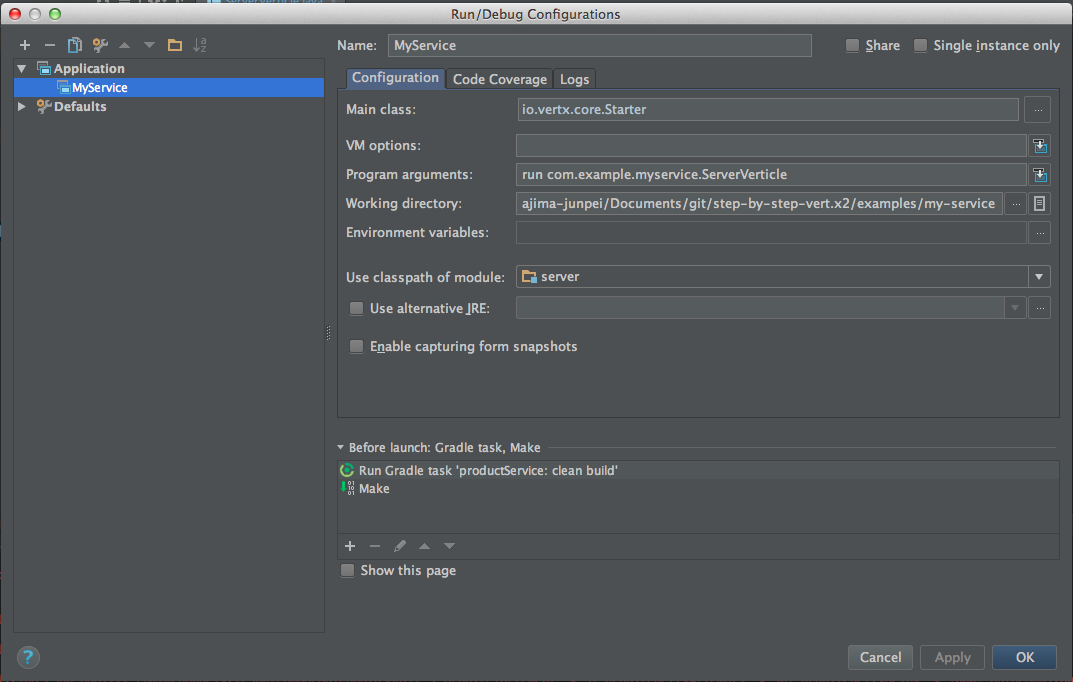
IntelliJの[Run]→[Edit Configurations...]を選択します。
Run/Debug Configurationsダイアログで[+]→[Application]を選択します。
以下の通り入力します:
- Name: MyService
- Main classs: io.vertx.core.Starter
- Program arguments: run com.example.myservice.ServerVerticle
また、下部Before launchの[+]をクリックしてRun Gradle Takを選択します。Select Gradle taskダイアログが開いたら、以下の通り入力します:
- Gradle Project: :services:productService
- Tasks: clean build
最終的にRun/Debug Configurationsダイアログは以下の様な内容となります:
IntelliJの[Run]→[Run 'MyService']を選択します、IntelliJ上のコンソールで、エラーなく起動することを確認します
確認
以下コマンドを実行して、プロダクト一覧が返却されることを確認します:
$ curl -D - localhost:8080/products
HTTP/1.1 200 OK
Content-Type: application/json
Content-Length: 123

[{"id":"1","name":"Egg Whisk","price":150},{"id":"2","name":"Tea Cosy","price":100},{"id":"3","name":"Spatula","price":30}]
解説
サービス識別子com.example.myservice.product-service.jsonにはデプロイメント時の設定を指定することができます。optionsフィールドに記述する内容はDeploymentOptionsに対応します。基本的にここで定義された値は利用者側から上書きすることはできませんが、configフィールドの値のみ利用者側で上書きすることができます。今回の例で行けば、addressはデフォルト値がmyservice.productで、これを任意の値で上書きすることは可能ですが、worker: trueの設定は利用者側から変更することはできません。
Vert.x Service Proxyを用いているので、利用者側であるServerVerticleではEventBusを介してメッセージを送信する代わりに、以下のようにProducServiceの提示するメソッドを通して処理を依頼することができます。
ProductService service = ProductService.createProxy(vertx, "myservice.product");
service.list(res -> {
...
また、Vert.x Service Proxyがコンパイル時にJavaScript向けインタフェースも自動的に生成してくれるので、以下のようにJavaScript側からProductServiceを利用することができます。
var Router = require("vertx-apex-js/router");
var BodyHandler = require("vertx-apex-js/body_handler");
var ProductService = require("myservice-product-js/product_service");

var config = { url: "jdbc:mysql://127.0.0.1:3306/vertx_example?user=root&password=root" };

vertx.deployVerticle("service:com.example.myservice.product-service", { config: config }, function(res, err) {
    if (err) {
      throw err;
    }

    var router = Router.router(vertx);

    router.route().handler(BodyHandler.create().handle);

    router.get("/products").handler(handleListProduct);

    vertx.createHttpServer().requestHandler(router.accept).listen(8082);
});

function handleListProduct(routingContext) {
  var proxy = ProductService.createProxy(vertx, "myservice.product");
  proxy.list(function(res, err) {
    if (err) {
      routingContext.fail(err);
    } else {
      routingContext.response().putHeader("Content-Type", "application/json").end(JSON.stringify(res));
    }
  });
}
今回の完全なソースはこちらにあげてあります。
サービスについてまとまったドキュメントはまだあまり見つけられませんが、こちらのGoogle Groupsに@timfox氏によるサービスの紹介があります。
色々なサービス
Vert.x公式はいろいろなサービスを提供しています、以下に一部を抜粋します、より詳細は公式ページを参照してください。
- MongoDB client: MongoDBに非同期にアクセスするためのサービス
- JDBC client: JDBCに非同期にアクセスするためのサービス
- Vert.x Auth service: 認証機能を提供するサービス