初めに
この記事では以下について解説し、PythonのコードでMaxout関数を実装します。
1.Maxout関数とは
2.Maxout関数のコードおよび使用方法
なお、本記事ではMaxout関数はKerasのLayerとして使用できるよう実装してあります。
コードと説明は最後に記載してあります。
Maxout関数とは
Maxout関数とはCNNやDNN等のDeep Learningのモデルで層の活性化関数として用いられています。
Maxout関数を活性化関数として利用するメリットとしては、主に、前の層から与えられたデータのサイズを変えることなくデータを次の層に渡すことができることです。
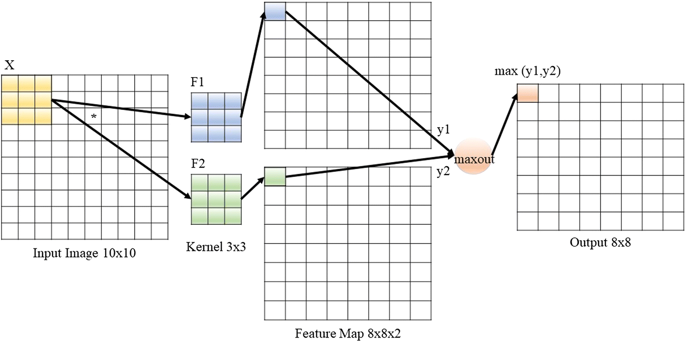
これについて説明すると、一般にCNNやDNNではPooling層などを用いてデータのサイズを小さくすることをよく行いますが、それに対しMaxout関数はサイズを小さくする代わりにチャンネル数に当たる次元数を削減するといったことをおこなっています。
これにより、Pooling層を用いる必要がなく、層でのデータのサイズをできるだけ保ちたい場合等に用いられます。(実際にはCNN層で用いられPooling層と組み合わせて使われることが多いです)
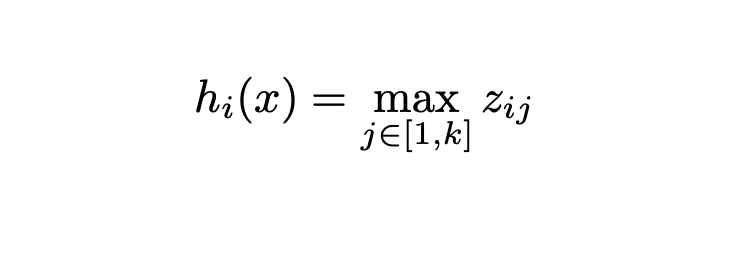
数式で書くとMaxout関数とは以下のように表すことができます。

実際にMaxout関数がおこなっていることというのは、各次元(チャンネル、特徴量マップ)における同じ場所に位置するピクセルのMaxを取り、それを出力データのピクセルとします。絵にすると以下の図のようになります。
実際にコードとして実装する場合には、出力後の次元数を指定できるようにします。
例えば出力の次元数を2とし、入力の次元数をN次元とします。
この場合は、入力のデータをn/2次元の2つの塊に分けて、それぞれにMaxoutを行うということをします。

Keras Layerとしての実装
以下のように実装します。
Tensorflow2または1の両方で動作は確認済みです。
import tensorflow as tf
from typeguard import typechecked
import keras

class Maxout(keras.layers.Layer):
    #num_unitで出力後の次元数を指定
    #axisでMaxをとりたい軸を指定(通常はデフォルト値。Channel firstの場合は1を指定してください)
    @typechecked
    def __init__(self, num_units: int, axis: int = -1, **kwargs):
        super().__init__(**kwargs)
        self.num_units = num_units
        self.axis = axis

    def call(self, inputs):
        inputs = tf.convert_to_tensor(inputs)
        shape = inputs.get_shape().as_list()
        # Dealing with batches with arbitrary sizes
        for i in range(len(shape)):
            if shape[i] is None:
                shape[i] = tf.shape(inputs)[i]

        num_channels = shape[self.axis]
        if not isinstance(num_channels, tf.Tensor) and num_channels % self.num_units:
            raise ValueError(
                "number of features({}) is not "
                "a multiple of num_units({})".format(num_channels, self.num_units)
            )

        if self.axis < 0:
            axis = self.axis + len(shape)
        else:
            axis = self.axis
        assert axis >= 0, "Find invalid axis: {}".format(self.axis)

        expand_shape = shape[:]
        expand_shape[axis] = self.num_units
        k = num_channels // self.num_units
        expand_shape.insert(axis, k)

        outputs = tf.math.reduce_max(
            tf.reshape(inputs, expand_shape), axis, keepdims=False
        )
        return outputs

    def compute_output_shape(self, input_shape):
        input_shape = tf.TensorShape(input_shape).as_list()
        input_shape[self.axis] = self.num_units
        return tf.TensorShape(input_shape)

    def get_config(self):
        config = {"num_units": self.num_units, "axis": self.axis}
        base_config = super().get_config()
        return {**base_config, **config}
利用例を以下に示します。こんな感じで呼び出してもらえば動きます。
from Maxout import Maxout

conv2d = Conv2D(64, kernel_size, strides, padding)(input)
maxout = Maxout(n_units)(conv2d)
おわりに
今回はMaxout関数について説明しました。
Maxoutは最近の研究ではLCNN等の活性化関数としてしばしば使用されています。
この記事が役に立てば幸いです。
Reference
Maxout Networks (https://arxiv.org/pdf/1302.4389.pdf)
A Light CNN for Deep Face Representation with Noisy Labels
(https://arxiv.org/pdf/1511.02683.pdf)
