QGIS3でpythonプラグインを作る その4
目標
前回作ったプラグインに、ポイントの追加、移動、削除を行う機能を追加する。
押さえたいところは
- レイヤへ地物を追加する方法
- レイヤから地物の取得
- レイヤの地物を編集する方法
- レイヤの地物を削除する方法
下準備
- ポイントのシェープファイルがレイヤ登録されたQGISプロジェクトを用意
- 前回作ったプラグインを有効にしておく
- QGISのPluginReloaderプラグインを有効にしておく(任意)
GUI編集
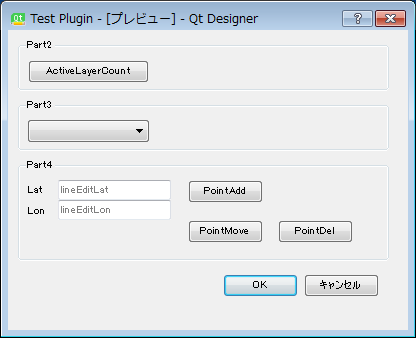
入力要素が増えますのでQGIS付属の「Qt Designer with QGIS 3.0.0 custom widgets」を使ってGUIを編集します。
QtCreator入れなくてもQtDesignerを利用できるのは知りませんでした。
プラグインフォルダに入っているuiファイル「test_plugin_dialog_base.ui」をデザイナにドラッグ&ドロップして開きます。
今回使用するオブジェクトを追加するついでにその2、その3で作ったオブジェクトも追加しておきます。

| 物理名 | 論理名 | 備考 |
|---|---|---|
| btn1 | 地物カウントボタン |
その2で使用 アクティブレイヤの地物数を表示 |
| cmb | レイヤコンボ |
その3で使用 選択したレイヤの地物数を表示 |
| lineEditLat | 緯度入力 | ポイント追加する緯度を入力 |
| lineEditLon | 経度入力 | ポイント追加する経度を入力 |
| btnAdd | ポイント追加ボタン | ポイントを追加 |
| btnMove | ポイント移動ボタン | ポイントを移動 |
| btnDel | ポイント削除ボタン | ポイントを削除 |
地物を追加する
地物を生成する
まずは追加する地物の器を生成しましょう。
QgsFeature API
QgsVectorLayer API
レイヤからフィールド情報を取得するのはpendingFields()からfields()に変わっています。
fields = maplayer.fields()
feature = QgsFeature(fields)
地物の器ができました。
次はジオメトリを作ります。
QgsGeometry API
QgsGeometry.fromPoint(QgsPoint)が無くなってQgsGeometry.fromPointXY(QgsPointXY)になったようですね。
QgsPoint(x,y)していたところはQgsPointXY(x,y)に変更ですね。
QgsPointXY(QgsPoint)もありますのでQgsPointから変換してもいいでしょう。
pointxy = QgsPointXY(x,y)
geom = QgsGeometry.fromPointXY(pointxy)
地物にジオメトリをセットします。
feature.setGeometry(geom)
属性値をセットするならfeature[フィールド名]=値とします。
feature['id'] = 6
feature['name'] = 'tokyo'
レイヤに追加する
この操作はこれまでと変わりありません。
編集状態にしてから追加して確定します。
maplayer.startEditing()
maplayer.addFeature(feature)
maplayer.commitChanges()
地物を移動する
地物を取得する
QGIS本体で選択中の地物を取得してみます。
features = maplayer.selectedFeatures
for feature in features:
    pass
地物IDとジオメトリを取得します。
fid = feature.id()
geom = feature.geometry()
取得した地物をポイントに変換して値を取得。
asPoint()は変わりませんが戻り値の型がpointからpointXYに変更されていますので注意です。
罠っぽい仕様変更。
pointxy = geom.asPoint()
x = pointxy.x()
y = pointxy.y()
座標を南東に移動したジオメトリを作ります。
pointxy.setX(x + 0.001)
pointxy.setY(y - 0.001)
new_geom = QgsGeometry.fromPointXY(pointxy)
地物を移動したジオメトリに更新します。
地物だけならchangeGeometry()を使用しましょう。
maplayer.startEditing()
maplayer.changeGeometry(fid, new_geom)
maplayer.commitChanges()
属性だけならchangeAttributeValue()、両方変わるならupdateFeature()を使います。
こちらは初期値で更新するかどうかの任意引数が追加になっていますので注意しましょう。
地物を削除する
QGIS本体で選択中の地物を削除します。
これは変更ありません。
maplayer.startEditing()
maplayer.deleteSelectedFeatures()
maplayer.commitChanges()
ソースに反映する
...
    def dlgUpdate(self):
        if self.first_flg:
            self.dlg.btn1.clicked.connect(self.buttonClicked)
            self.dlg.cmb.activated.connect(self.comboActivated)
            self.dlg.btnAdd.clicked.connect(self.btnAddClicked)
            self.dlg.btnMove.clicked.connect(self.btnMoveClicked)
            self.dlg.btnDel.clicked.connect(self.btnDelClicked)
            self.first_flg = False

...
    def btnAddClicked(self):
        act_layer = self.iface.activeLayer()
        if act_layer is None \
                or act_layer.type() != QgsMapLayer.VectorLayer\
                or act_layer.geometryType() != QgsWkbTypes.PointGeometry:
            QMessageBox.warning(self.dlg,
                                    'error', u'ポイントレイヤを選択してください')
            return

        # 適宜入力チェックをかけましょう
        lon = float(self.dlg.lineEditLon.text())
        lat = float(self.dlg.lineEditLat.text())

        pointxy = QgsPointXY(lon, lat)
        geom = QgsGeometry.fromPointXY(pointxy)

        fields = act_layer.fields()
        feature = QgsFeature(fields)
        feature.setGeometry(geom)
        # 属性を変更するなら
        # feature['id'] = 6
        # feature['name'] = 'tokyo'

        act_layer.startEditing()
        act_layer.addFeature(feature)
        act_layer.commitChanges()

    def btnMoveClicked(self):
        act_layer = self.iface.activeLayer()
        if act_layer is None \
                or act_layer.type() != QgsMapLayer.VectorLayer\
                or act_layer.geometryType() != QgsWkbTypes.PointGeometry:
            QMessageBox.warning(self.dlg,
                                    'error', u'ポイントレイヤを選択してください')
            return

        features = act_layer.selectedFeatures()
        act_layer.startEditing()
        for feature in features:
            fid = feature.id()
            geom = feature.geometry()
            pointxy = geom.asPoint()
            x = pointxy.x()
            y = pointxy.y()
            pointxy.setX(x + 0.001)
            pointxy.setY(y - 0.001)
            new_geom = QgsGeometry.fromPointXY(pointxy)
            act_layer.changeGeometry(fid, new_geom)
        act_layer.commitChanges()

    def btnDelClicked(self):
        act_layer = self.iface.activeLayer()
        if act_layer is None \
                or act_layer.type() != QgsMapLayer.VectorLayer\
                or act_layer.geometryType() != QgsWkbTypes.PointGeometry:
            QMessageBox.warning(self.dlg,
                                    'error', u'ポイントレイヤを選択してください')
            return

        act_layer.startEditing()
        act_layer.deleteSelectedFeatures()
        act_layer.commitChanges()
動作確認
この記事のプラグインをGitHubに公開しました。
https://github.com/ozo360/TestPlugin/tree/part4
使用した地図はこちらにアップしてあるので解凍してQGISで開いてください。
test_pointsレイヤを選択している状態で、
緯度経度を入力して追加ボタンをクリックすると指定した位置にポイントが発生する。
test_pointsレイヤの地物を選択している状態で、
移動ボタンをクリックすると選択中の地物が南東に移動する。
test_pointsレイヤの地物を選択している状態で、
削除ボタンをクリックすると選択中の地物が削除される。
目的達成です。
まとめ
フィールド情報の取得はpendingFields()からfields()に変更
fields = maplayer.fields()
ポイントジオメトリの生成はQgsGeometry.fromPoint(QgsPoint)からQgsGeometry.fromPointXY(QgsPointXY)に変更
pointxy = QgsPointXY(x,y)
geom = QgsGeometry.fromPointXY(pointxy)
地物の追加方法自体は変更なし。
地物からポイントジオメトリを取得する際はasPoint()を使用する。
メソッド名はこれまでと変わらないが戻り値の型がQgsPointXYに変更
pointxy = geom.asPoint()
ジオメトリの更新に変更なし。
changeAttributeValue()、updateFeature()は任意引数が追加になっているので注意。
選択地物の削除方法に変更なし。
次回予告
次回はキャンバスをクリックしたイベントを拾って地物を選択したいと思います。
関連記事
QGIS3でpythonプラグインを作ってみた その1 ベース作成
QGIS3でpythonプラグインを作ってみた その2 QButtonと選択レイヤ取得について
QGIS3でpythonプラグインを作ってみた その3 QComboBoxとレイヤ取得について
QGIS3でpythonプラグインを作ってみた その4 地物の追加編集削除について
QGIS3でpythonプラグインを作ってみた その5 地図をクリックして地物を選択する
本記事のライセンス

この記事は クリエイティブ・コモンズ 表示 4.0 国際 ライセンスの下に提供されています。