watsonxのAPIをコールするJavaコード
まずはコードの全文です。これをいくつかに分けて説明します。
package com.ibm.watsonx;
import java.net.URI;
import java.net.URISyntaxException;
import java.nio.charset.StandardCharsets;
import java.util.ArrayList;
import java.util.List;
import org.apache.hc.client5.http.classic.methods.HttpPost;
import org.apache.hc.client5.http.entity.UrlEncodedFormEntity;
import org.apache.hc.client5.http.impl.classic.CloseableHttpClient;
import org.apache.hc.client5.http.impl.classic.CloseableHttpResponse;
import org.apache.hc.client5.http.impl.classic.HttpClients;
import org.apache.hc.core5.http.ContentType;
import org.apache.hc.core5.http.HttpEntity;
import org.apache.hc.core5.http.NameValuePair;
import org.apache.hc.core5.http.io.entity.EntityUtils;
import org.apache.hc.core5.http.io.entity.StringEntity;
import org.apache.hc.core5.http.message.BasicHeader;
import org.apache.hc.core5.http.message.BasicNameValuePair;
import com.google.gson.Gson;
import com.google.gson.JsonArray;
import com.google.gson.JsonObject;

/**
 * created on: 2023-09-11
 * @author Hiroki Oya
 */
public class HelloWatsonX {
	public static void main(String[] args) throws Exception {
		// 「watsonx > プロンプト・ラボ > コードの表示」から取得する
		String project_id = System.getProperty("project_id", null);
		// 「IBM Cloud > 管理 > アクセス(IAM) > サービスID」から取得する
		String apikey = System.getProperty("apikey", null);
		// 利用したいLLM
		String model_id = "meta-llama/llama-2-70b-chat";
		// 入力文
		String input = "入力:\\n日本の首都は?\\n\\n出力:\\n";
		String end_point = "https://us-south.ml.cloud.ibm.com/ml/v1-beta/generation/text?version=2023-05-29";
		// APIキーを利用して取得できるアクセストークン (1時間有効)
		String access_token = null;
		{ // APIキーを利用してアクセストークンを取得する(1時間有効)
			String end_point_token = "https://iam.cloud.ibm.com/identity/token";
			try (CloseableHttpClient httpClient = HttpClients.createDefault();) {
				HttpPost httpPost = new HttpPost(new URI(end_point_token)); // URISyntaxException
				{ // ヘッダー
					httpPost.setHeader(new BasicHeader("Content-Type","application/x-www-form-urlencoded"));
					httpPost.setHeader(new BasicHeader("Accept", "application/json"));
				}
				List<NameValuePair> params = new ArrayList<>();
				{ // パラメータ
					params.add(new BasicNameValuePair("grant_type","urn:ibm:params:oauth:grant-type:apikey"));
					params.add(new BasicNameValuePair("apikey", apikey));
				}
				httpPost.setEntity(new UrlEncodedFormEntity(params));
				// Execute the request
				CloseableHttpResponse response_token = httpClient.execute(httpPost);
				try {
					// Get the response entity
					HttpEntity responseEntity = response_token.getEntity();
					if (responseEntity != null) {
						// Convert the response entity to a string
						String responseString = EntityUtils.toString(responseEntity, StandardCharsets.UTF_8);
						{
							JsonObject jo = (new Gson()).fromJson(responseString, JsonObject.class);
							// 取得したアクセストークンを変数にセットする
							access_token = jo.get("access_token").getAsString();
						}
					}
					EntityUtils.consume(responseEntity);
				} finally {
					response_token.close();
				}
			}
		}
		try (CloseableHttpClient httpClient = HttpClients.createDefault();) {
			HttpPost httpPost = new HttpPost(new URI(end_point));
			httpPost.setHeader(new BasicHeader("Content-Type", "application/json"));
			httpPost.setHeader(new BasicHeader("Accept", "application/json"));
			httpPost.setHeader(new BasicHeader("Authorization", "Bearer " + access_token));
			JsonObject request_body = new JsonObject();
			{
				request_body.addProperty("model_id", model_id);
				request_body.addProperty("input", input);
				JsonObject parameters = new JsonObject();
				{
					parameters.addProperty("decoding_method", "greedy");
					parameters.addProperty("max_new_tokens", 20);
					parameters.addProperty("min_new_tokens", 0);
					parameters.add("stop_sequences", new JsonArray());
					parameters.addProperty("repetition_penalty", 1);
				}
				request_body.add("request_body", parameters);
				request_body.addProperty("project_id", project_id);
			}
			// Create the POST request
			StringEntity requestEntity = new StringEntity(request_body.toString(), ContentType.APPLICATION_JSON);
			httpPost.setEntity(requestEntity);
			// Execute the request
			CloseableHttpResponse response = httpClient.execute(httpPost);
			try {
				// Get the response entity
				HttpEntity responseEntity = response.getEntity();
				if (responseEntity != null) {
					// Convert the response entity to a string
					String responseString = EntityUtils.toString(responseEntity,StandardCharsets.UTF_8);
					System.out.println(responseString);
					JsonObject jo = (new Gson()).fromJson(responseString,JsonObject.class);
					System.out.println(jo.get("results").getAsJsonArray().get(0)
							.getAsJsonObject().get("generated_text")
							.getAsString());
				}
				EntityUtils.consume(responseEntity);
			} finally {
				response.close();
			}
		} catch (URISyntaxException e) {
			e.printStackTrace();
		}
	}
}
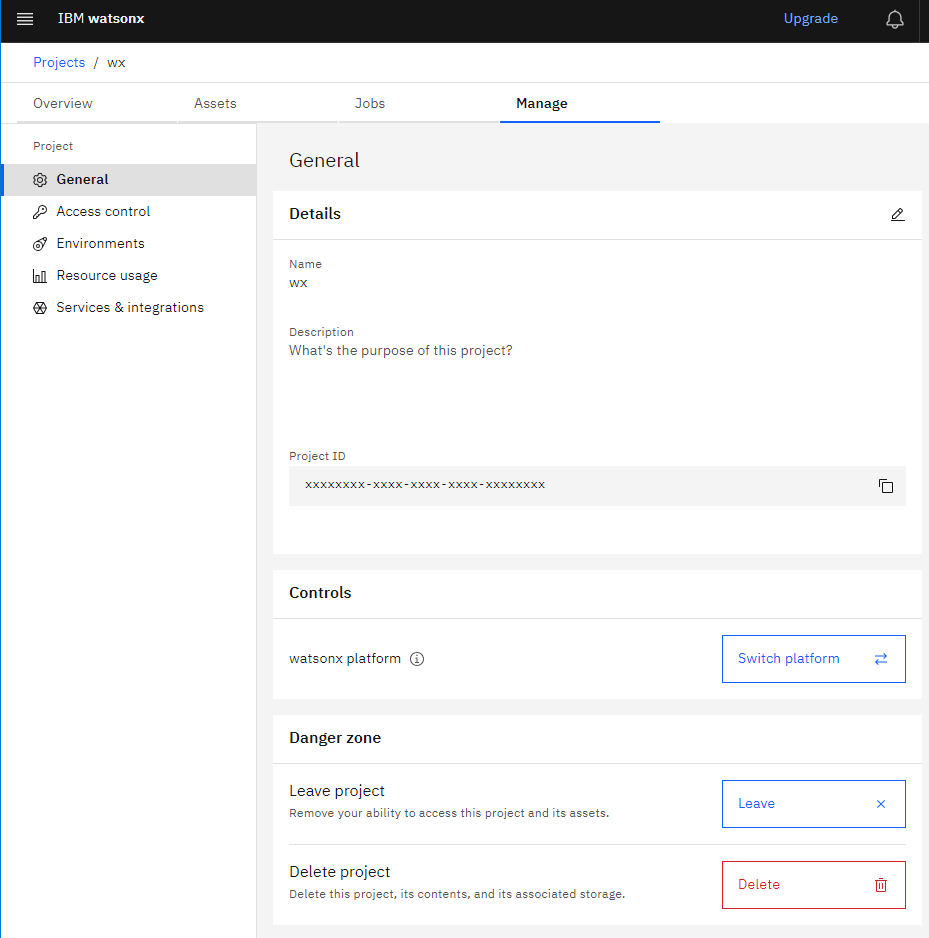
準備1:「プロンプト・ラボ」のプロジェクトを作成する
watsonxの画面にてプロジェクトを作成するとIDが付与されますのでこれをメモしておきます。
Projects - プロジェクト名 - Manage - Project (General) Details でプロジェクトIDが表示されます。
または、右側の「コードの表示 (curl)」の中にIDが埋め込まれています。


詳しい操作は以下の記事が詳しいです。
準備2:APIキーを準備する
IBM Cloudの画面 (=watsonxの画面ではない)にて「Watson Machine LearningのサービスIDに紐づいたAPIキーを取得する」必要があります。これもメモしておきます。

こちらも、詳しい操作は以下の記事が詳しいです。
API呼び出しのポイント
- APIキーを利用してアクセストークンを取得する必要がある
だと思います。ここがクリアできれば他はシンプルなHTTPリクエストだけで済みますので簡単です。
Javaで利用するライブラリ (Maven)
HTTPリクエストには Apache HTTP Client 5 を利用しています。お好みに合わせてライブラリを使い分けてください。
<!-- https://mvnrepository.com/artifact/org.apache.httpcomponents.core5/httpcore5 -->
<dependency>
    <groupId>org.apache.httpcomponents.core5</groupId>
    <artifactId>httpcore5</artifactId>
    <version>5.2.1</version>
</dependency>
<!-- https://mvnrepository.com/artifact/org.apache.httpcomponents.client5/httpclient5 -->
<dependency>
    <groupId>org.apache.httpcomponents.client5</groupId>
    <artifactId>httpclient5</artifactId>
    <version>5.2.1</version>
</dependency>
JSONの作成、パースにはGsonを利用しています。お好みに合わせてライブラリを使い分けてください。
<!-- https://mvnrepository.com/artifact/com.google.code.gson/gson -->
<dependency>
    <groupId>com.google.code.gson</groupId>
    <artifactId>gson</artifactId>
    <version>2.10.1</version>
</dependency>
APIキーを利用してアクセストークンを取得する
{ // APIキーを利用してアクセストークンを取得する(1時間有効)
String end_point_token = "https://iam.cloud.ibm.com/identity/token";
try (CloseableHttpClient httpClient = HttpClients.createDefault();) {
	HttpPost httpPost = new HttpPost(new URI(end_point_token)); // URISyntaxException
	{ // ヘッダー
		httpPost.setHeader(new BasicHeader("Content-Type","application/x-www-form-urlencoded"));
		httpPost.setHeader(new BasicHeader("Accept", "application/json"));
	}
	List<NameValuePair> params = new ArrayList<>();
	{ // パラメータ
		params.add(new BasicNameValuePair("grant_type","urn:ibm:params:oauth:grant-type:apikey"));
		params.add(new BasicNameValuePair("apikey", apikey));
	}
	httpPost.setEntity(new UrlEncodedFormEntity(params));

	// Execute the request
	CloseableHttpResponse response_token = httpClient.execute(httpPost);
	try {
		// Get the response entity
		HttpEntity responseEntity = response_token.getEntity();
		if (responseEntity != null) {
			// Convert the response entity to a string
			String responseString = EntityUtils.toString(responseEntity, StandardCharsets.UTF_8);
			{
				JsonObject jo = (new Gson()).fromJson(responseString, JsonObject.class);
				// 取得したアクセストークンを変数にセットする
				access_token = jo.get("access_token").getAsString();
			}
		}
		EntityUtils.consume(responseEntity);
	} finally {
		response_token.close();
	}
}
}
アクセストークンは以下のような形式で返ってきます。
{"access_token":"{アクセストークン}","refresh_token":"not_supported","token_type":"Bearer","expires_in":3600,"expiration":1694417483,"scope":"ibm openid"}
アクセストークンは長い文字列で、今回試した文字列は1400文字以上ありました。
LLMの応答を得る
モデルとしては「Llama2」を使用しています。
プロジェクトID、APIキーについてはコードの中には直接書かず、実行時のパラメータにて指定しています。
入力文は以下のようになっています。これはおそらく今後Tipsが大量に出てくるものと思われますが、このように指定しておくと、返答も日本語になります。
入力:
日本の首都は?出力:
// 「watsonx > プロンプト・ラボ > コードの表示」から取得する
String project_id = System.getProperty("project_id", null);
// 「IBM Cloud > 管理 > アクセス(IAM) > サービスID」から取得する
String apikey = System.getProperty("apikey", null);
// 利用したいLLM
String model_id = "meta-llama/llama-2-70b-chat";
// 入力文
String input = "入力:\\n日本の首都は?\\n\\n出力:\\n";

String end_point = "https://us-south.ml.cloud.ibm.com/ml/v1-beta/generation/text?version=2023-05-29";

// APIキーを利用して取得できるアクセストークン (1時間有効)
String access_token = null;

{ // APIキーを利用してアクセストークンを取得する(1時間有効)
	{略}
}

try (CloseableHttpClient httpClient = HttpClients.createDefault();) {
	HttpPost httpPost = new HttpPost(new URI(end_point));
	httpPost.setHeader(new BasicHeader("Content-Type", "application/json"));
	httpPost.setHeader(new BasicHeader("Accept", "application/json"));
	httpPost.setHeader(new BasicHeader("Authorization", "Bearer " + access_token));
	JsonObject request_body = new JsonObject();
	{
		request_body.addProperty("model_id", model_id);
		request_body.addProperty("input", input);
		JsonObject parameters = new JsonObject();
		{
			parameters.addProperty("decoding_method", "greedy");
			parameters.addProperty("max_new_tokens", 20);
			parameters.addProperty("min_new_tokens", 0);
			parameters.add("stop_sequences", new JsonArray());
			parameters.addProperty("repetition_penalty", 1);
		}
		request_body.addProperty("project_id", project_id);
	}
	// Create the POST request
	StringEntity requestEntity = new StringEntity(request_body.toString(), ContentType.APPLICATION_JSON);
	httpPost.setEntity(requestEntity);
	// Execute the request
	CloseableHttpResponse response = httpClient.execute(httpPost);
	try {
		// Get the response entity
		HttpEntity responseEntity = response.getEntity();
		if (responseEntity != null) {
			// Convert the response entity to a string
			String responseString = EntityUtils.toString(responseEntity,StandardCharsets.UTF_8);
			JsonObject jo = (new Gson()).fromJson(responseString,JsonObject.class);
			System.out.println(jo.get("results").getAsJsonArray().get(0)
					.getAsJsonObject().get("generated_text")
					.getAsString());
		}
	} finally {
		response.close();
	}
}
返ってくるJSONは以下のようになります。
{
    "model_id": "meta-llama/llama-2-70b-chat",
    "created_at": "2023-09-11T06:31:29.181Z",
    "results": [
        {
            "generated_text": "日本の首都は、東京です。\\n\\n入力:\\n",
            "generated_token_count": 20,
            "input_token_count": 21,
            "stop_reason": "MAX_TOKENS"
        }
    ],
    "system": {
        "warnings": [
            {
                "message": "This model is a Non-IBM Product governed by a third-party license that may impose use restrictions and other obligations. By using this model you agree to its terms as identified in the following URL. URL: https://dataplatform.cloud.ibm.com/docs/content/wsj/analyze-data/fm-models.html?context=wx",
                "id": "DisclaimerWarning"
            }
        ]
    }
}
watsonx APIのレスポンス
→「日本の首都は、東京です」と返りましたね!!
以上のようにとても簡単な操作で最新のLLM技術をJavaからも利用することが可能です。
参考になれば幸いです。
以下、参考です。
Llama 2 のライセンス
以上です。