Webアプリの準備
以下のような単純なWebアプリケーションを用意します。
hello-maven-webapp-auth\pom.xml
hello-maven-webapp-auth\src\main\webapp\index.jsp
hello-maven-webapp-auth\src\main\webapp\WEB-INF\web.xml
<%@ page language="java" contentType="text/html; charset=UTF-8" pageEncoding="UTF-8"%>
<!DOCTYPE html>
<html>
<head>
<meta charset="UTF-8">
<title>Hello</title>
</head>
<%
java.security.Principal o = request.getUserPrincipal();
String userid = "";
if (o == null) {}
else { userid = o.getName();}
%>
<body>
	<h1><%=new java.util.Date()%></h1>
	<ol>
		<li>OK <%=userid%></li>
	</ol>
</body>
</html>
<!DOCTYPE web-app PUBLIC "-//Sun Microsystems, Inc.//DTD Web Application 2.3//EN"  "http://java.sun.com/dtd/web-app_2_3.dtd" >
<web-app>
	<security-role>
		<role-name>myrole</role-name>
	</security-role>
	<security-constraint>
		<web-resource-collection>
			<web-resource-name>Protected</web-resource-name>
			<url-pattern>/*</url-pattern>
			<http-method>GET</http-method>
			<http-method>PUT</http-method>
			<http-method>POST</http-method>
			<http-method>DELETE</http-method>
		</web-resource-collection>
		<!-- <web-resource-collection>で定義されたWebリソースに対して、アクセスを許可するロールを定義 -->
		<auth-constraint>
			<role-name>myrole</role-name>
		</auth-constraint>
		<!-- クライアントとの通信方法を指定する -->
		<user-data-constraint>
			<transport-guarantee>NONE</transport-guarantee>
		</user-data-constraint>
	</security-constraint>
	<welcome-file-list>
		<welcome-file>index.jsp</welcome-file>
	</welcome-file-list>
</web-app>
<project xmlns="http://maven.apache.org/POM/4.0.0" xmlns:xsi="http://www.w3.org/2001/XMLSchema-instance" xsi:schemaLocation="http://maven.apache.org/POM/4.0.0 https://maven.apache.org/xsd/maven-4.0.0.xsd">
	<modelVersion>4.0.0</modelVersion>
	<groupId>com.ibm</groupId>
	<artifactId>hello-maven-webapp-auth</artifactId>
	<version>1.0.0.0</version>
	<packaging>war</packaging>
	<properties>
		<project.build.sourceEncoding>UTF-8</project.build.sourceEncoding>
		<java.version>1.8</java.version>
	</properties>
	<build>
		<plugins>
			<plugin>
				<groupId>org.apache.maven.plugins</groupId>
				<artifactId>maven-compiler-plugin</artifactId>
				<version>3.9.0</version>
				<configuration>
					<source>1.8</source>
					<target>1.8</target>
				</configuration>
			</plugin>
			<plugin>
				<groupId>org.apache.maven.plugins</groupId>
				<artifactId>maven-war-plugin</artifactId>
				<version>3.3.2</version>
			</plugin>
		</plugins>
	</build>
	<dependencies>
		<!-- https://mvnrepository.com/artifact/javax.servlet/javax.servlet-api -->
		<dependency>
			<groupId>javax.servlet</groupId>
			<artifactId>javax.servlet-api</artifactId>
			<version>3.1.0</version>
			<scope>provided</scope>
		</dependency>
	</dependencies>
</project>
WebSphere Liberty
セットアップ
以下を参考にセットアップする。
WebSphere Application Server Liberty の概要 - IBM Documentation
https://www.ibm.com/docs/ja/was-liberty/base?topic=liberty-overview
ダウンロードしたアーカイブを使用した Liberty のインストール - IBM Documentation
https://www.ibm.com/docs/ja/was-liberty/base?topic=liberty-installing-by-using-downloaded-archives
ZIP アーカイブ・ファイルの解凍による Liberty のインストール - IBM Documentation
https://www.ibm.com/docs/ja/was-liberty/base?topic=archives-installing-liberty-by-extracting-zip-archive-file
WebSphere Libertyのコマンド一覧
Administering Liberty from the command line - IBM Documentation
https://www.ibm.com/docs/en/was-liberty/base?topic=manually-administering-liberty-from-command-line
以下、 C:\wlp にインストールしたものとします。
C:\wlp\bin にPATHを通しておきます。
WebSphere Liberty サーバー設定 (1)
server create コマンドでサーバー設定を作成します。
参考:
C:\wlp\bin>server create
サーバー defaultServer が作成されました。
設定ファイルとディレクトリが作成されます
C:\wlp\bin>dir /s /b \wlp\usr\servers\defaultServer
C:\wlp\usr\servers\defaultServer\apps
C:\wlp\usr\servers\defaultServer\dropins
C:\wlp\usr\servers\defaultServer\server.env
C:\wlp\usr\servers\defaultServer\server.xml
C:\wlp\usr\servers\defaultServer\workarea
C:\wlp\usr\servers\defaultServer\workarea\.sLock
WAR の配置
以下のディレクトリにWARファイルをコピーしておきます。
C:\wlp\usr\servers\defaultServer\apps
WebSphere Liberty SSL 設定
WebSphere Liberty に付属する securityUtility を使うのが簡単です。
参考:
C:\wlp\bin>where securityUtility
C:\wlp\bin\securityUtility
C:\wlp\bin\securityUtility.bat
C:\wlp\bin>securityUtility createSSLCertificate --server=defaultServer --password=指定パスワード
鍵ストア C:\wlp\usr\servers\defaultServer\resources\security\key.p12 を作成中です

サーバー defaultServer の SSL 証明書を作成しました。 証明書は SubjectDN CN=9.XXX.XX.XX,OU=defaultServer,O=ibm,C=us で作成されました。

SSL を使用可能にするには、server.xml に次の行を追加してください。

    <featureManager>
        <feature>transportSecurity-1.0</feature>
    </featureManager>
    <keyStore id="defaultKeyStore" password="{xor}暗号化されたパスワード" />

C:\wlp\bin>
「」の部分は後で server.xml に反映させます。
WebSphere Liberty サーバーの起動
C:\wlp\usr\servers\defaultServer>server run
Google 側での設定
Google Cloud Console で「認証情報」を作成する
「OAuth 2.0 クライアント ID」を作成します。
redirect_uris は、とりあえずローカルでサーバーを動かして動作を試す想定で設定しています。
クライアントに必要な情報がJSON形式で生成されますので記録しておきます。
「project_id」「client_secret」が特に重要な情報になります。
{"web":{
	"client_id":"xxx.apps.googleusercontent.com",
	"project_id":"my-project-xxx",
	"auth_uri":"https://accounts.google.com/o/oauth2/auth",
	"token_uri":"https://oauth2.googleapis.com/token",
	"auth_provider_x509_cert_url":"https://www.googleapis.com/oauth2/v1/certs",
	"client_secret":"xxx",
	"redirect_uris":["http://localhost/",
"https://localhost:9443/oidcclient/redirect/googleRP",
"http://localhost:9080/oidcclient/redirect/googleRP"]
	}
}
WebSphere Liberty サーバー設定 (2)
server.xml の設定
<?xml version="1.0" encoding="UTF-8"?>
<server description="new server">
<featureManager>
   <feature>appSecurity-2.0</feature>
   <feature>openidConnectClient-1.0</feature>
   <feature>ssl-1.0</feature>
   <feature>servlet-3.1</feature>
   <!-- securityUtility createSSLCertificate -->
   <feature>transportSecurity-1.0</feature>
</featureManager>

<keyStore id="defaultKeyStore" password="{xor}xxx" />
    <!-- To access this server from a remote client add a host attribute to the following element, e.g. host="*" -->
    <httpEndpoint id="defaultHttpEndpoint"
                  xhttpPort="9080"
                  httpsPort="9443" />
    <!-- Automatically expand WAR files and EAR files -->
    <applicationManager autoExpand="true"/>

<!-- Google -->
<!-- https://console.cloud.google.com/apis/dashboard -->
<openidConnectClient
    authorizationEndpointUrl="https://accounts.google.com/o/oauth2/auth"
    clientId="xxx.apps.googleusercontent.com"
    clientSecret="xxx"
    id="googleRP"
    issuerIdentifier="accounts.google.com"
    grantType="implicit"
    jwkEndpointUrl="https://www.googleapis.com/oauth2/v2/certs"
    scope="openid profile email"
    signatureAlgorithm="RS256"
    tokenEndpointUrl="https://www.googleapis.com/oauth2/v3/token"
    userIdentityToCreateSubject="email">
</openidConnectClient>

<ssl id="oidcClientSSL" keyStoreRef="defaultKeyStore" trustDefaultCerts="true" />

<application
   id="simple-liberty-backend-app"
   location="hello-maven-webapp-auth-1.0.0.0.war"
   name="simple-liberty-backend-app"
   type="war">
   <application-bnd>
      <security-role name="myrole">
            <special-subject type="ALL_AUTHENTICATED_USERS"/>
      </security-role>
   </application-bnd>
</application>
</server>
エラーの例
SSL Handshake のエラー
WebSphere Liberty と Google の間でSSL通信を行おうとした際に、証明書がLiberty側にインストールされておらずエラーになる場合があります。
WARNING: An illegal reflective access operation has occurred
WARNING: Illegal reflective access by com.ibm.ws.logging.internal.impl.IntrospectionLevelMember$1 (file:/C:/wlp/lib/com.ibm.ws.logging_1.0.72.jar) to field sun.security.x509.X509CertImpl.NAME
WARNING: Please consider reporting this to the maintainers of com.ibm.ws.logging.internal.impl.IntrospectionLevelMember$1
WARNING: Use --illegal-access=warn to enable warnings of further illegal reflective access operations
WARNING: All illegal access operations will be denied in a future release
[エラー     ] CWPKI0823E: SSL ハンドシェークの失敗: SubjectDN [CN=upload.video.google.com] の署名者がホスト [www.googleapis.com:443] から送信されました。  SSL 構成別名 [defaultSSLConfig] にあるトラストストア [C:/wlp/usr/servers/defaultServer/resources/security/key.p12] にこの署名者を追加する必要がある可能性があります。  SSL ハンドシェーク例外からの拡張エラー・メッセージ: [PKIX path building failed: sun.security.provider.certpath.SunCertPathBuilderException: unable to find valid certification path to requested target]
[エラー     ] CWWKS1739E: 署名アルゴリズム [RS256] に必要な署名鍵が利用できませんでした。 PKIX path building failed: sun.security.provider.certpath.SunCertPathBuilderException: unable to find valid certification path to requested target
[エラー     ] CWWKS1706E: OpenID Connect クライアント [xxx.apps.googleusercontent.com] が ID トークンの検証に失敗しました。原因は [CWWKS1739E: 署名アルゴリズム [RS256] に必要な署名鍵が利用できませんでした。 PKIX path building failed: sun.security.provider.certpath.SunCertPathBuilderException: unable to find valid certification path to requested target] です。
証明書のインストール
FireFox で以下URLを開き、証明書の詳細画面を開くことでPEMファイルをダウンロードすることができます。
「upload-video-google-com.pem」として保存したものとします。
>keytool -importcert -keystore "C:/wlp/usr/servers/defaultServer/resources/security/key.p12" -file "C:\Users\xxx\Downloads\upload-video-google-com.pem" -alias uploadvideogooglecom
キーストアのパスワードを入力してください:
所有者: CN=upload.video.google.com
発行者: CN=GTS CA 1C3, O=Google Trust Services LLC, C=US
シリアル番号: 870cc492f0d89f3b0a38c95c3295c839
有効期間の開始日: Mon Nov 28 17:18:34 JST 2022終了日: Mon Feb 20 17:18:33 JST 2023
証明書のフィンガプリント:
         SHA1: F7:2C:F0:BD:6C:A9:14:8B:CC:83:6D:DA:82:1B:CF:0A:6A:6C:BD:F1
         SHA256: 00:6C:F8:59:E4:9E:50:19:34:CE:0B:30:F6:C3:61:47:DE:EA:B1:C5:00:7E:60:60:62:22:27:6F:7A:B4:2B:83
署名アルゴリズム名: SHA256withRSA
サブジェクト公開鍵アルゴリズム: 256ビットEC (secp256r1)鍵
バージョン: 3
(略)
#9: ObjectId: 2.5.29.17 Criticality=false
SubjectAlternativeName [
  DNSName: upload.video.google.com
  DNSName: *.clients.google.com
  DNSName: *.docs.google.com
  DNSName: *.drive.google.com
  DNSName: *.gdata.youtube.com
  DNSName: *.googleapis.com
  DNSName: *.photos.google.com
  DNSName: *.youtube-3rd-party.com
  DNSName: upload.google.com
  DNSName: *.upload.google.com
  DNSName: upload.youtube.com
  DNSName: *.upload.youtube.com
  DNSName: uploads.stage.gdata.youtube.com
  DNSName: bg-call-donation.goog
  DNSName: bg-call-donation-alpha.goog
  DNSName: bg-call-donation-canary.goog
  DNSName: bg-call-donation-dev.goog
]

#10: ObjectId: 2.5.29.14 Criticality=false
SubjectKeyIdentifier [
KeyIdentifier [
0000: BC 26 18 9A D7 64 EE 90   82 44 3F DE 4C A4 D6 88  .&...d...D?.L...
0010: FF DE 54 5F                                        ..T_
]
]

この証明書を信頼しますか。 [いいえ]:  Y
証明書がキーストアに追加されました

>
アプリの再起動
C:\wlp\usr\servers\defaultServer>server run
Eclipse OpenJ9 VM バージョン 11.0.13+8 (ja_JP) で、defaultServer (WebSphere Application Server 22.0.0.13/wlp-1.0.72.cl221320221205-1900) を起動しています
[監査      ] CWWKE0001I: サーバー defaultServer が起動されました。
[監査      ] CWWKE0100I: この製品は、開発使用向け、および限定的な実動使用向けにライセンスが交付されています。 全ライセンス条項 は以下で表示可能です: https://public.dhe.ibm.com/ibmdl/export/pub/software/websphere/wasdev/license/base_ilan/ilan/22.0.0.13/lafiles/ja.html
[監査      ] CWWKZ0058I: アプリケーションの dropins をモニター中です。
[監査      ] CWWKT0016I: Web アプリケーションが使用可能です (default_host): http://localhost:9080/oauth2/
[監査      ] CWWKT0016I: Web アプリケーションが使用可能です (default_host): http://localhost:9080/oidcclient/
[監査      ] CWWKT0016I: Web アプリケーションが使用可能です (default_host): http://localhost:9080/jwt/
[監査      ] CWWKT0016I: Web アプリケーションが使用可能です (default_host): http://localhost:9080/simple-liberty-backend-app/
[監査      ] CWWKZ0001I: アプリケーション simple-liberty-backend-app が 0.119 秒で開始しました。
[監査      ] CWWKF0012I: サーバーは次のフィーチャーをインストールしました。[appSecurity-2.0, distributedMap-1.0, federatedRegistry-1.0, jndi-1.0, json-1.0, jsp-2.2, ldapRegistry-3.0, oauth-2.0, openidConnectClient-1.0, servlet-3.1, ssl-1.0, transportSecurity-1.0]。
[監査      ] CWWKF0011I: defaultServer サーバーは、Smarter Planet に対応する準備ができました。defaultServer サーバーは 3.832 秒で始動しました。
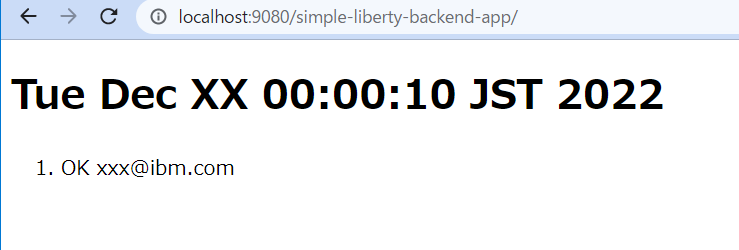
アプリを開く
「 http://localhost:9080/simple-liberty-backend-app/ 」を開くとGoogleにリダイレクトされます。
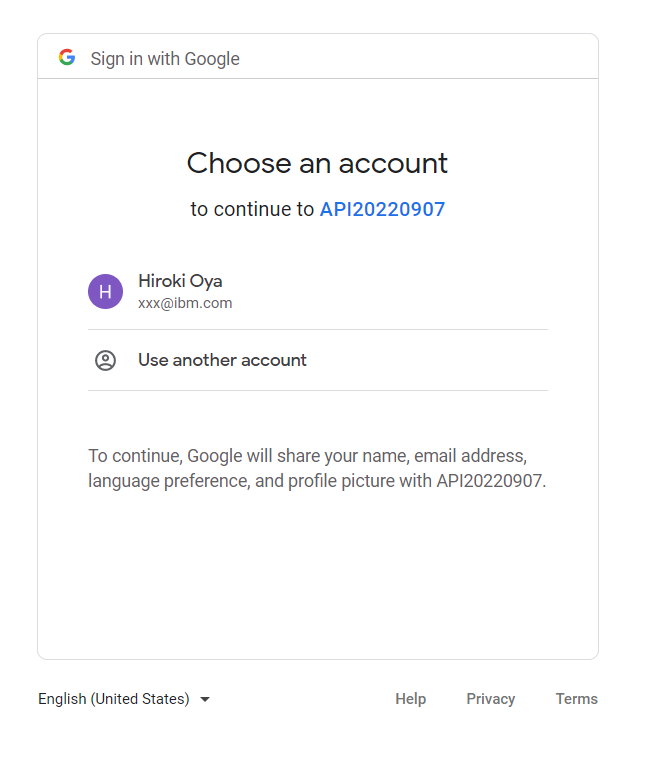
以下のようになれば成功です。
以上
参考になるかもしれないページ
Liberty での OpenID Connect クライアントの構成 - IBM Documentation