はじめに
初心者エンジニアです。初めてコードに触れて数ヶ月が経ちました。
勉強のために、Vue3とTypeScriptとelement-plusを用いて新しくページを作成してみました。
内容は以下の通りです。データは固定です。
- 環境構築
- Vue Routerとelement-plusでナビゲーションタブを実装(クリックアクション)
- element-plusでモーダルダイアログを実装(クリックアクション)
対処したエラー:
-
TS2339 :
Property 'XXX' does not exist on type '{ openDialog(row?: any): Promise<void>; closeDialog(): void; onCancel(): void; onSubmit(): void; initForm(): void; }'. Component name "XXX" should always be multi-wordAn empty interface is equivalent to `{}`. (no-empty-interface)
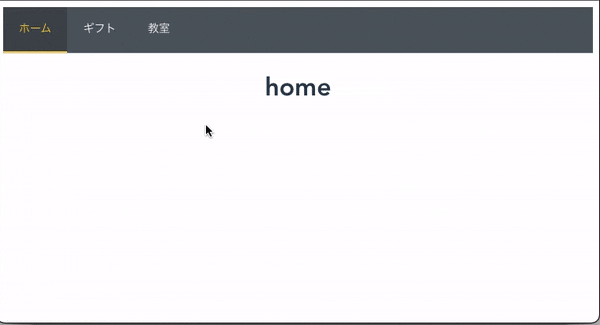
完成形
本記事はARISE analytics Advent Calender 2022の9日目です。
環境構築
環境:
yarn 1.22.19
@vue/cli 5.0.8
element-plus
vue-router@4
- まずyarnをインストールします。
$ npm install --global yarn
2. Vue-CLIをインストールします。
$ yarn global add @vue/cli
$ vue --version
3. 任意の名前でプロジェクトを作成します。今回はsampleという名前で作成しました。インストールを開始するとpresetの選択画面が表示されるので、”Manually select features”を選択してください。その後の選択肢はをこちらを参考にしました。TypeScriptも忘れずに選択してください。
$ vue create sample
4. Vueを起動してみます。
$ cd sample
$ yarn serve
起動できたら、ブラウザでローカルにアクセスしてみます。Vue.js + TypeScriptの文字が表示されていたらOKです。
5. あとはelement-plusとvue-routerもインストールしてください。
$ yarn add element-plus
$ npm install vue-router@4
これで環境構築は完了です。
Vue Routerとelement-plusでナビゲーションタブを実装
- まず、main.tsです。使用するelement-plusやrouterを入れていきます。
ディレクトリ構成は最後に載せています。
import { createApp } from 'vue'
import ElementPlus from 'element-plus'
import 'element-plus/dist/index.css'
import router from "./router";
import App from './App.vue'

createApp(App)
.use(ElementPlus)
.use(router)
.mount('#app')
2. ルーティングを実装していきます。
今回作るタブのは3つで、ホーム、ギフト、教室のタブを作ります。
srcの下にrouterディレクトリを作成し、index.tsも作成します。
中身は以下のようにします。
補足:こちらの記事を参考にさせていただきました。vueプロジェクトを作成する際からVue Routerを入れる方法もあるようです。
import { createRouter, createWebHistory } from 'vue-router'
import Home from '@/components/Home.vue'
import Gift from '@/components/Gift.vue'
import Lesson from '@/components/Lesson.vue'

const routes = [
  {
    path: '/',
    name: 'home',
    component: Home
  },
  {
    path: '/gift',
    name: 'gift',
    component: Gift
  },
  {
    path: '/lesson',
    name: 'lesson',
    component: Lesson
  }
]

const router = createRouter({
  history: createWebHistory(process.env.BASE_URL),
  routes
})

export default router
2. タブを選択したときに表示する内容のコンポーネントを作成します。
componentsディレクトリにGift.vue, Home.vue, Lesson.vueを次のように作成します。ここら辺は自由に作成してください。
<template>
    <h1>gift</h1>
</template>
<template>
    <h1>home</h1>
</template>
<template>
    <h1>lesson</h1>
</template>
3. ナビゲーションバーを設置するのにもう一つコンポーネントを用意しました。
el-menuを使っています。
エラー: TS2339 : Property 'XXX' does not exist on type '{ openDialog(row?: any): Promise<void>; closeDialog(): void; onCancel(): void; onSubmit(): void; initForm(): void; }'.
環境構築の際に選択した設定で、defineComponentをつけないといけなくなっています。最初つけていなくて1日動かなかった、、
<template>
  <div class="navbar">
    <el-menu
      :router="true"
      :default-active="$route.path"
      class="el-menu"
      mode="horizontal"
      background-color="#545c64"
      text-color="#fff"
      active-text-color="#ffd04b"
    >
      <el-menu-item index="1" :route="{ name:'home' }">ホーム</el-menu-item>
      <el-menu-item index="2" :route="{ name:'gift' }">ギフト</el-menu-item>
      <el-menu-item index="3" :route="{ name:'lesson' }">教室</el-menu-item>
    </el-menu>
  </div>
</template>

<script lang="ts">
import { defineComponent } from 'vue';

export default defineComponent({
  name: 'NavBarIndex',
});

</script>
4. App.vueを変更します。
router-viewとnavBarIndexはここで入れてます。スタイルはほぼデフォルトです。
<template>
  <NavBarIndex />
  <router-view />
</template>

<script lang="ts">
import { defineComponent } from 'vue';
import NavBarIndex from './components/NavBarIndex.vue';

export default defineComponent({
  name: 'App',
  components: {
    NavBarIndex
  }
});
</script>

<style>
#app {
  font-family: Avenir, Helvetica, Arial, sans-serif;
  -webkit-font-smoothing: antialiased;
  -moz-osx-font-smoothing: grayscale;
  text-align: center;
  color: #2c3e50;
  margin-top: 0;
}
</style>
ここまでで大体終わりなのですが、エラーが出ました。
エラー: Component name "XXX" should always be multi-word
調べてみるとeslintのエラーで、命名規則を制御するエラーのようなので、.eslintrc.jsのrules:の中に以下を追記して解消しました。
'vue/multi-word-component-names': 0
これで動くはずです。
element-plusでモーダルダイアログを実装
Gift.vueを書き換えて、ボタンをクリックすると、モーダルダイアログが出現するようにしました。el-dialogを使用しています。
ダイアログの中身にはel-formを使用して入力フォームを作ってみました。
<template>
    <div class="app-container">
        <h1>gift</h1>
    <el-row>
      <el-button round :icon="Edit" @click="openDialog">コメント</el-button>
    </el-row>

  <el-dialog v-model="dialogVisible" title="コメント" width="80%">
        <el-form
        :model="form"
        :rules="rules"
        >
        <el-form-item label="ジャンル">
          <el-select
            v-model="form.genre"
            placeholder="ジャンル"
          >
            <el-option label="ご意見" value="issue" />
            <el-option label="ご要望" value="request" />
          </el-select>
        </el-form-item>
          <el-form-item label="内容">
            <el-input v-model="form.content" type="textarea" />
          </el-form-item>
      </el-form>
        <template #footer>
          <span class="dialog-footer">
            <el-button
              type="primary"
              @click="onCancel"
              >Cancel
            </el-button>
            <el-button
              type="primary"
              @click="onSubmit"
              >送信
            </el-button>
          </span>
        </template>
      </el-dialog>
    </div>
</template>

<script lang="ts">
import { reactive } from 'vue';
import { defineComponent } from 'vue';

interface ReactiveStateType {
    dialogVisible: boolean;
    form: {
      genre?: string;
      content?: string;
    };
    rules: {
      [name: string]: {
        [name: string]: any;
      }
    }
}


export default defineComponent({
    name: 'Gift',
    components: {
    },
    data() {
        const reactiveTarget: ReactiveStateType = {
        dialogVisible: false,
        form: {
          genre: undefined,
          content: '',
        },
        rules: {},
    };
        const state: any = reactive(reactiveTarget);
        return {
            form: {
                genre: undefined,
                content: '',
            },
            ...state,
        };
    },
    methods: {

      async openDialog(row?: any) {
        this.initForm();
        this.dialogVisible = true;
      },
      closeDialog(){
        this.dialogVisible = false;
      },
      onCancel() {
        this.closeDialog();
        this.initForm();
      },
      onSubmit() {
        this.closeDialog();
      },
      initForm() {
        this.form.genre = undefined;
        this.form.content = '';
      },
    }
})
</script>
エラー: An empty interface is equivalent to `{}`. (no-empty-interface)
作成している途中、空のinterfaceを設定したらエラーが出て怒られました。.eslintrc.jsのrules:の中に以下を追記して解消しました。
'@typescript-eslint/no-empty-interface': 'off'
ディレクトリ構成
作成したsampleディレクトリ配下の構成です。
├── public
│   ├── favicon.ico
│   └── index.html
│── src
│   ├── assets
│   │   └── logo.png
│   ├── components
│   │   ├── Gift.vue //追加
│   │   ├── Home.vue //編集
│   │   ├── Lesson.vue //追加
│   │   └── NavBarIndex.vue //追加
│   ├── router
│   │   └── index.vue //編集
│   ├── App.vue //編集
│   ├── main.ts //編集
│   └── shims-vue.d.ts
├── .browserslistrc
├── .eslintrc.js  //設定を追加
├── .gitignore
├── babel.config.js
├── package-lock.json
├── package.json
├── README.md
├── tsconfig.json
├── vue.config.js
├── yarn.lock
├── node_modules //中身は省略
おわりに
el-menuのサンプルを検索してもrouterとどう動くのかわからず苦戦しました、、エラーがTS2339とかで出るからわからない、、
が、なんとか目標にしてたところまでできました。
今後この入力フォームに入れたデータをどうにかしたりしていきたいです。