前回の電源管理の続きです。
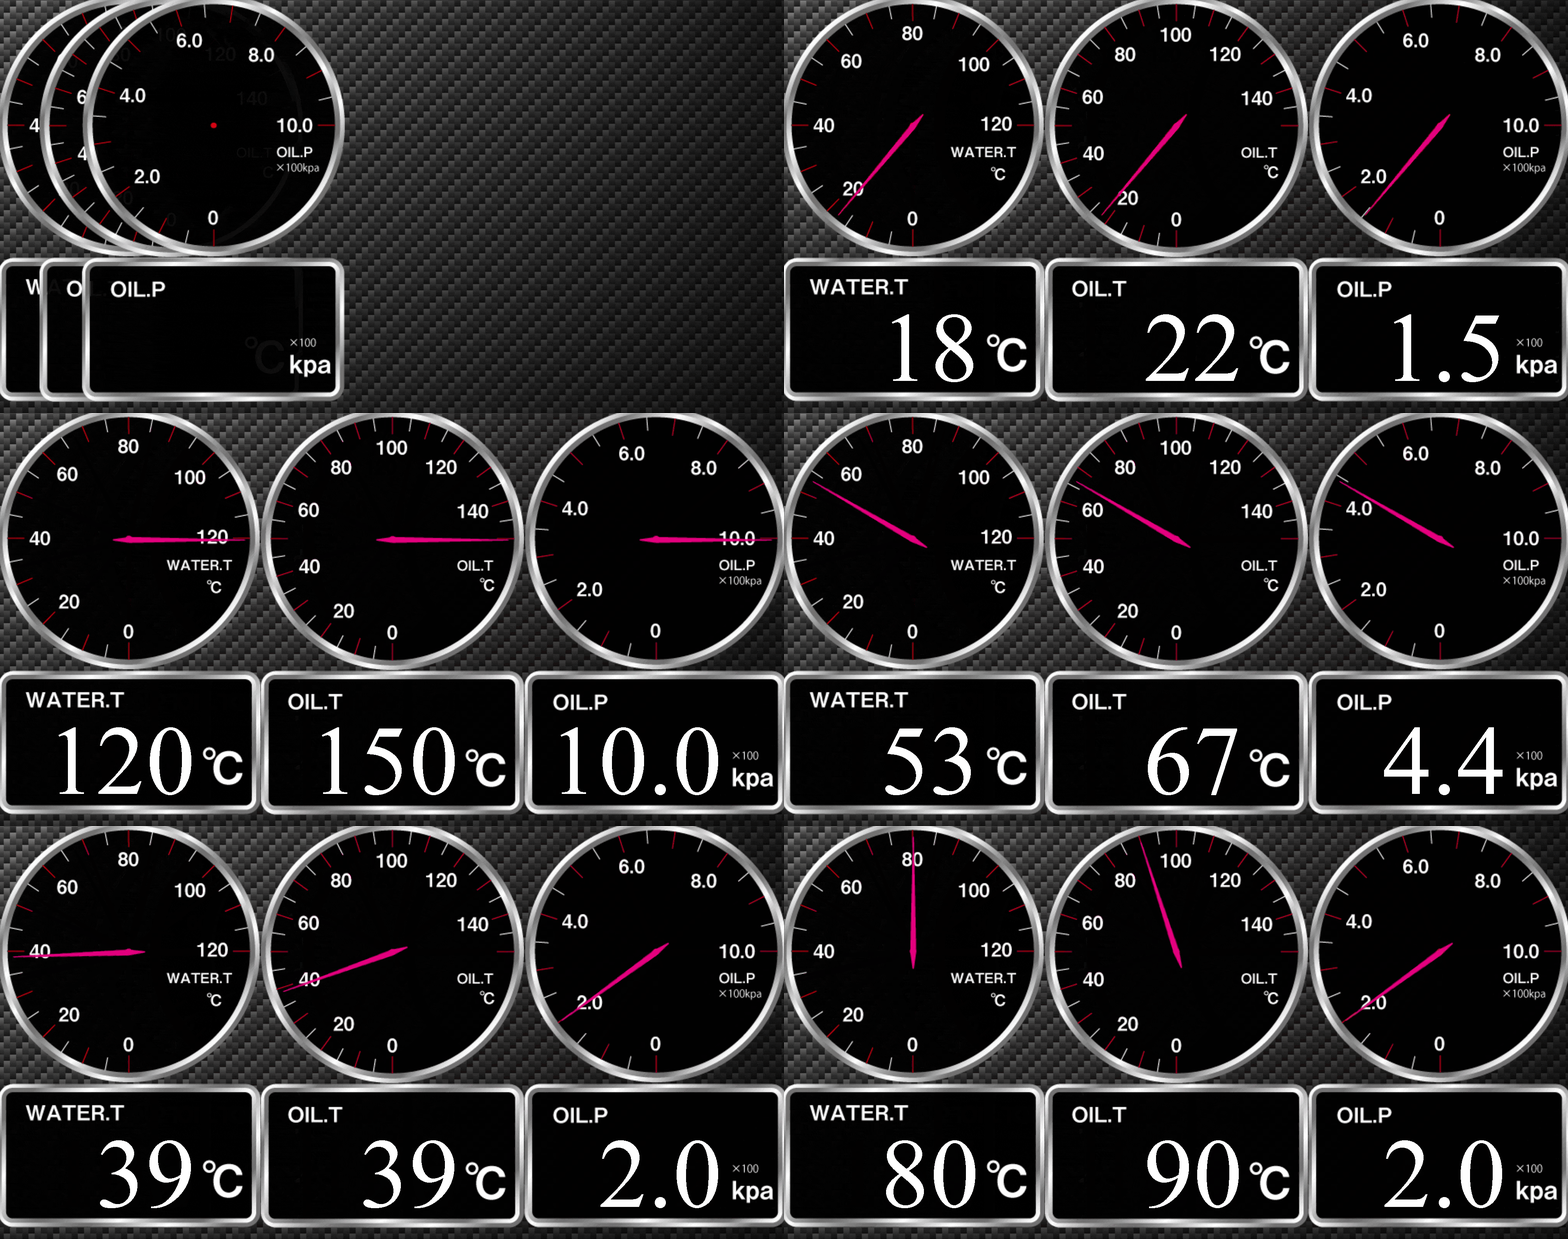
今回はelectronを使用してメーター表示側を作ってみました。
この程度であればwindowsで作った物がほぼそのまま動いたので楽でした。
全てのコードを見たい方はこちらをpi_meter
※背景画像はフリーの素材を拾って使用しているのでこちらには入れてません。
ちょっと説明
- arduinoのアナログ入力を温度センサーと油圧センサーからの入力に利用します。
- サーミスタでの計測についてはこちらを参考にさせて頂いてます。Arduinoとサーミスタで温度を計ってみる(2)
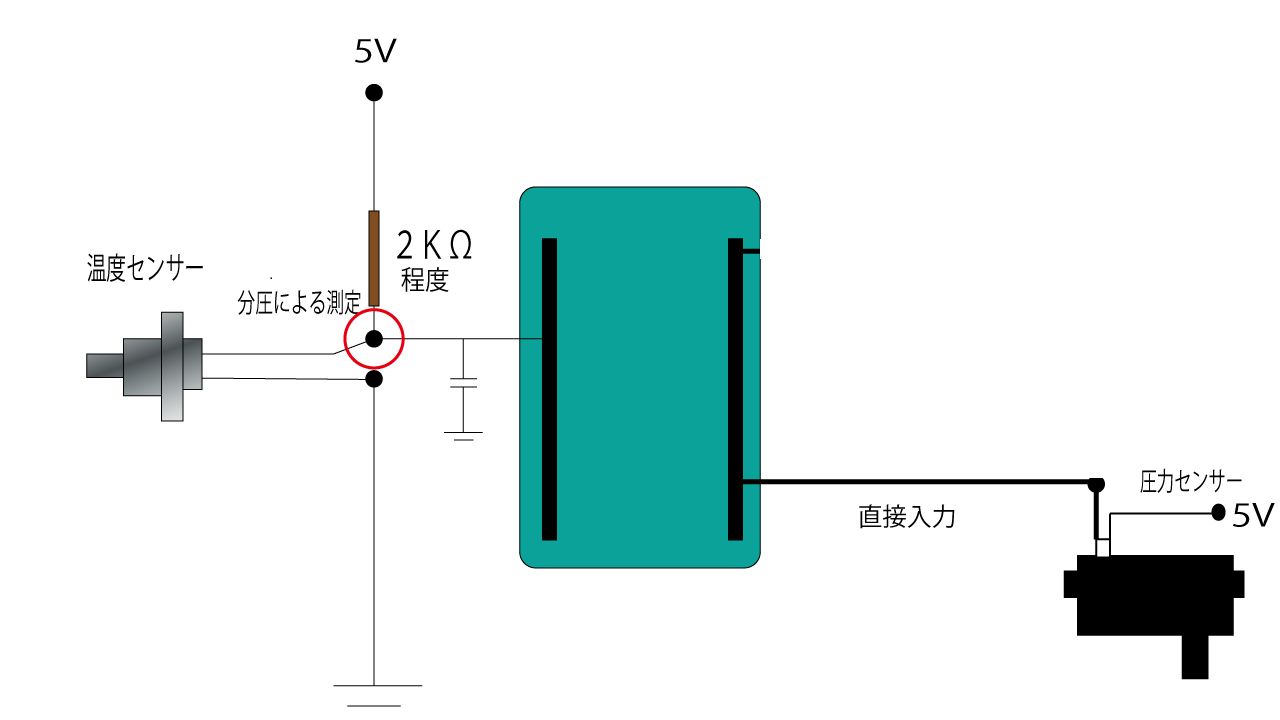
- 温度センサーは分圧して入力へ、油圧センサーは出力電圧をそのまま接続
- arduino側は取得した値をpiに送り、pi側でデータを処理
- 温度センサーはサーミスタ用の式を利用、油圧センサーは電圧に比例するので適当に式を作成
- 取得したデータはjson形式で
meter_data.jsonに書き込み -
meter_data.jsonに保存されたデータをelectron側で読み込みます。 - electron側ですが、見た目優先のやっつけ仕様という事もあり、画面サイズが変わったときに文字サイズの調整が上手くいかなかったので、画面幅から算出するようにしてます。
- 左上のメーターをクリックすると終了、右上のメーターをクリックすると終了します。
- ~~画像を回転させているので、シークバーが伸び縮みするけど気にしない。~~overflow:hiddenにて対応
- piで起動したらHDMI越しだとカックカク。。。描画が追い付いてない?解像度が大きいとなるようです
- 実際に使用する時はファイルのパス指定の部分は修正が必要です。
- アナログ入力は10bitなのでupperとlowerビットに分割して送信を行います。
コード
electron側
index.html
<!DOCTYPE html>
<html>
<header>
	<link rel="stylesheet" type="text/css" href="./style.css">
</header>
<head>
	<meta charset="UTF-8">
	<title>pi_meter</title>
</head>
<body>
	<div class="wrapper">
		<div class="analog" >
			<div class="analog_li" id="a_wtmp">
				<img src="./img/a_water_t.png" alt="panel" />
			</div>
			<div class="analog_li" id="a_otmp">
				<img n src="./img/a_oil_t.png" alt="panel" />
			</div>
			<div class="analog_li" id="a_opls">
				<img  src="./img/a_oil_p.png" alt="panel" />
			</div>
		</div>
		<div class="degital">
			<div class="d_li" id="d_wtmp">
				<img class="d_p"  src="./img/d_water_t.png" alt="panel" />
			</div>
			<div class="d_li" id="d_otmp">
				<img class="d_p"  src="./img/d_oil_t.png" alt="panel" />
			</div>
			<div class="d_li" id="d_opls">
				<img class="d_p"  src="./img/d_oil_p.png" alt="panel" />
			</div>
		</div>
		<div class="analog_bar">
			<div class="b_bar_li" id="b_wtmp">
				<img class="b_a" src="./img/a_bar.png" id="im_wtmp"  alt="meter_bar" />
			</div>
			<div class="b_bar_li" id="b_otmp">
				<img class="b_a" src="./img/a_bar.png" alt="meter_bar" />
			</div>
			<div class="b_bar_li" id="b_opls">
				<img class="b_a" src="./img/a_bar.png" id="im_opls" alt="meter_bar" />
			</div>
		</div>
		<div class="digital_str">
			<div class="digital_str_li" id="str_wtmp">
			</div>
			<div class="digital_str_li" id="str_otmp">
			</div>
			<div class="digital_str_li" id="str_opls">
			</div>
		</div>
	</div>
</body>
<script type="text/javascript" src="script.js"></script>
</html>
main.js
'use strict';

const electron = require("electron");
const app = electron.app;
const BrowserWindow = electron.BrowserWindow;
let mainWindow;

app.on('window-all-closed', function() {
  if (process.platform != 'darwin') {
    app.quit();
  }
});

app.on('ready', function() {
  mainWindow = new BrowserWindow({
        frame: true,
        fullscreen: true,
  });
  mainWindow.loadURL('file://' + __dirname + '/index.html');
  mainWindow.on('closed', function() {
    mainWindow = null;
  });
});
script.js
'use strict';


const remote = require('electron').remote;
//ブラウザウィンドウの取得
const browserWindow = remote.getCurrentWindow();
//画面サイズ配列の取得 [0]が横幅、[1]が縦幅
const win_size = browserWindow.getSize();

//オープニングで使用するカウンター
var counter=0;
//オープニングで使用するカウンターの最大数
var animaton_counter=100;//10msec * 200 = 2seconds
//各メーターの移動オープニングで使用するカウンター
var counter1=0;
var counter2=0;
var counter3=0;
//各メーターの移動オープニングで使用するカウンターを進める値
var add_counter1 = 0;
var add_counter2 = (win_size[0]/3)/animaton_counter;
var add_counter3 = (win_size[0]/3*2)/animaton_counter;

//カウンターの最大値=固定地点
var count_max1 = 0;
var count_max2 = (win_size[0]/3);
var count_max3 = (win_size[0]/3*2);

//各丸メーター背景の取得
var a_wtmp = document.getElementById("a_wtmp");
var a_otmp = document.getElementById("a_otmp");
var a_opls = document.getElementById("a_opls");

//各文字メーター背景の取得
var d_wtmp = document.getElementById("d_wtmp");
var d_otmp = document.getElementById("d_otmp");
var d_opls = document.getElementById("d_opls");

//各文字メーター用の文字表示部の取得
var str_wtmp = document.getElementById("str_wtmp");
var str_otmp = document.getElementById("str_otmp");
var str_opls = document.getElementById("str_opls");

//各丸メーターの針画像の取得
var bar_wtmp = document.getElementById("b_wtmp");
var bar_otmp = document.getElementById("b_otmp");
var bar_opls = document.getElementById("b_opls");

//各メーター用針の表示角度
var rt_wtmp=0;
var rt_otmp=0;
var rt_opls=0;

//水温の取得用変数と一時保存用変数
var tmp_wtmp1=0;
var tmp_wtmp2=0;

//油温の取得用変数と一時保存用変数
var tmp_otmp1=0;
var tmp_otmp2=0;

//油圧の取得用変数と一時保存用変数
var tmp_opls1=0;
var tmp_opls2=0;

//オープニグで使用する折り返しフラグ
var turn_flg=0;

//メーター用データファイルの取得
var fs = require('fs');
var filepath = './meter_data.json';

//ウィンドウの最小化
document.getElementById("im_opls").addEventListener("click", function (e) {
	browserWindow.minimize();
});

//終了処理
document.getElementById("im_wtmp").addEventListener("click", function (e) {
	browserWindow.close();
});

//丸メーターの移動
function mv_analog_p(){
	a_wtmp.style.left = 0+'px';
	a_wtmp.style.top= 0+'px';

	a_otmp.style.left = counter2+'px';
	a_otmp.style.top= 0+'px';

	a_opls.style.left = counter3+'px';
	a_opls.style.top= 0+'px';
}

//文字メーターの移動
function mv_dgital_p(){
	d_wtmp.style.left = 0+'px';
	d_wtmp.style.top= (win_size[0]/3)+'px';

	d_otmp.style.left = counter2+'px';
	d_otmp.style.top= (win_size[0]/3)+'px';

	d_opls.style.left = counter3+'px';
	d_opls.style.top= (win_size[0]/3)+'px';
}

//モジメーター用表示部の移動
function mv_dgital_str(){
	str_wtmp.style.right = (counter3+(win_size[0]/12))+'px';
	str_wtmp.style.top= (win_size[0]/24*9)+'px';
	str_wtmp.style.zIndex = '4';
	str_wtmp.style.fontSize=(win_size[0]/8)+"px";

	str_otmp.style.right = (counter2+(win_size[0]/12))+'px';
	str_otmp.style.top= (win_size[0]/24*9)+'px';
	str_otmp.style.zIndex = '4';
	str_otmp.style.fontSize=(win_size[0]/8)+"px";

	str_opls.style.right = (win_size[0]/12)+'px';
	str_opls.style.top= (win_size[0]/24*9)+'px';
	str_opls.style.zIndex = '4';
	str_opls.style.fontSize=(win_size[0]/8)+"px";
}

//丸メーター針の移動
function mv_analog_bar(){
	bar_wtmp.style.left = 0+'px';
	bar_wtmp.style.top= 0+'px';
	bar_wtmp.style.zIndex = '5';
	bar_wtmp.style.webkitTransform = "rotate("+rt_wtmp+"deg)";

	bar_otmp.style.left = count_max2+'px';
	bar_otmp.style.top= 0+'px';
	bar_otmp.style.zIndex = '5';
	bar_otmp.style.webkitTransform = "rotate("+rt_otmp+"deg)";

	bar_opls.style.left = count_max3+'px';
	bar_opls.style.top= 0+'px';
	bar_opls.style.zIndex = '5';
	bar_opls.style.webkitTransform = "rotate("+rt_opls+"deg)";
}

//オ-プニングの描画用
function draw_data(){
	bar_wtmp.style.webkitTransform = "rotate("+rt_wtmp+"deg)";
	document.getElementById("str_wtmp").innerHTML = (rt_wtmp/2.25).toFixed(0);
	bar_otmp.style.webkitTransform = "rotate("+rt_otmp+"deg)";
	document.getElementById("str_otmp").innerHTML = (rt_otmp/1.8).toFixed(0);
	bar_opls.style.webkitTransform = "rotate("+rt_opls+"deg)";
	document.getElementById("str_opls").innerHTML = (rt_opls/27).toFixed(1);
}

//パネルの移動オープニング
function start_meter(){
	if(counter<animaton_counter){
		mv_analog_p();
		mv_dgital_p();
		counter2=counter2+add_counter2;
		counter3=counter3+add_counter3;
		counter++;
		setTimeout('start_meter()',10);
	}else{
		counter1=count_max1;
		counter2=count_max2;
		counter3=count_max3;
		mv_analog_p();
		mv_dgital_p();
		mv_dgital_str();
		mv_analog_bar();
		opening();
	}
}

//オープニング
function opening() {
	if( (rt_wtmp!=270) && (turn_flg==0) ){
		rt_wtmp+=2;
		rt_otmp+=2;
		rt_opls+=2;
		draw_data();
		setTimeout("opening()",10);
	}else if( (rt_wtmp==270) && (turn_flg==0)  ){
		turn_flg=1;
		setTimeout("opening()",200);
	}else if((rt_wtmp!=0) && (turn_flg==1)){
		rt_wtmp-=2;
		rt_otmp-=2;
		rt_opls-=2;
		draw_data();
		setTimeout("opening()",10);
	}else if ((rt_wtmp==0) && (turn_flg==1)){
		turn_flg=0;
		setTimeout("mainloop()",15);
	}
}

//データの読み出し
function check_data() {
        try{
                var json_data = JSON.parse(fs.readFileSync(filepath, 'utf8'));
                tmp_wtmp1=parseInt(json_data["wtmp"]);
                tmp_otmp1=parseInt(json_data["otmp"]);
                tmp_opls1=parseInt(json_data["opls"]);
        }catch (err){
        }
}
//テスト用 check_data() の代わり 今は使用していない
function test_data() {
	if(turn_flg==0){
		tmp_wtmp1++;
		tmp_otmp1++;
		tmp_opls1++;
	}else{
		tmp_wtmp1--;
		tmp_otmp1--;
		tmp_opls1--;
	}
	if(tmp_wtmp1==100){
		turn_flg=1;
	}else if(tmp_wtmp1==0){
		turn_flg=0;
	}
}

//メインループ
function mainloop(){
	check_data();
	if(tmp_wtmp1!=tmp_wtmp2){
		if(tmp_wtmp1 > tmp_wtmp2){
			tmp_wtmp2++;
		}else{
			tmp_wtmp2--;
		}
		rt_wtmp=tmp_wtmp2*2.25;
		bar_wtmp.style.webkitTransform = "rotate("+rt_wtmp+"deg)";
		document.getElementById("str_wtmp").innerHTML = tmp_wtmp2 ;
	}

	if(tmp_otmp1!=tmp_otmp2){
		if(tmp_otmp1 > tmp_otmp2){
			tmp_otmp2++;
		}else{
			tmp_otmp2--;
		}
		rt_otmp=tmp_otmp2*1.8;
		bar_otmp.style.webkitTransform = "rotate("+rt_otmp+"deg)";
		document.getElementById("str_otmp").innerHTML =tmp_otmp2;
	}

	if(tmp_opls1!=tmp_opls2){
		if(tmp_opls1 > tmp_opls2){
			tmp_opls2++;
		}else{
			tmp_opls2--;
		}
		rt_opls=tmp_opls2*2.7;
		bar_opls.style.webkitTransform = "rotate("+rt_opls+"deg)";
		document.getElementById("str_opls").innerHTML =(tmp_opls2/10).toFixed(1);
	}
	setTimeout("mainloop()",15);
}


window.onload = function(){
	start_meter();
}
以下は前回の差分です。
arduino側
- アナログ入力の設定と読み込みメソッド、ループ内に実行処理を入れています。
- アナログ入力の読み込みは時間が掛かるので間隔を置いて実行し、メッセージのやり取り内とは別で処理しています。
arduino.ino
# define WTMP_IN (A0) //water temp
# define OTMP_IN (A1) //oil temp
# define OPLS_IN (A2) //oil press
# define B_LV_IN (A3) //battery level

~~~~~~~~~~~~~~

/get message from pi
void get_message(int n){
~~~~~~~~
  }else if((cmd[0] >= 48) && (cmd[0] < 79)) //0x30~0x4F return message state
  {
  	message_state = cmd[0];
  }
~~~~~~~~
}


~~~~~~~~~~~~~~

//send message to pi
void send_message(){
  //when get cmd switch
  switch (message_state) {
~~~~~~~~
   //analog read
   case 0x31: //water temp upper bit
   Wire.write(r_wtmp >> 8);
   break;
   case 0x32: //water temp low bit
   Wire.write(r_wtmp & 0xFF);
   break;
   case 0x33: //oil temp upper bit
   Wire.write(r_otmp >> 8 );
   break;
   case 0x34: //oil temp low bit
   Wire.write(r_otmp & 0xFF);
   break;
   case 0x35: //oil press upper bit
   Wire.write(r_opls >> 8);
   break;
   case 0x36: //oil press low bit
   Wire.write(r_opls & 0xFF);
   break;
   case 0x37: //battery level upper bit
   Wire.write(r_b_lv >> 8);
   break;
   case 0x38: //battely level low bit
   Wire.write(r_b_lv & 0xFF);
   break;

~~~~~~~~
 }
}

~~~~~~~~~~~~~~

void check_input()
{
  switch (read_counter){
    case 0:
    r_wtmp=analogRead(WTMP_IN);
    read_counter++;
    break;

    case 1:
    r_otmp=analogRead(OTMP_IN);
    read_counter++;
    break;

    case 2:
    r_opls=analogRead(OPLS_IN);
    read_counter++;
    break;

    case 3:
    r_b_lv=analogRead(B_LV_IN);
    read_counter++;
    break;

    case 4:
    read_counter=0;
    break;

  }

}

~~~~~~~~~~~~~~

//main loop
void loop()
{
~~~~~~~~
  switch(ino_state)
  {
~~~~~~~~
    case 0x01: //arduino normal state
      if( (acc==0) && (!slp_interbal_flg) )
      {
        ino_state++; //pi shutdown state
      }
      //check sleep interbal
      else if(slp_interbal_flg)
      {
        if(counter_switch)
        {
          if(millis() > onslp_max_time)
          {
            slp_interbal_flg = false;
          }
        }
        else
        {
          if( (millis() < onslp_past_time) && (millis() > onslp_max_time) )
          {
            slp_interbal_flg = false;
          }
        }
      }else
      {
        check_input();
      }
      break;
~~~~~~~~
}
raspberry piのpython側
- サーミスタの処理と電圧から圧力への変換処理を追加
- 読み取ったデータのjsonファイルへの書き込みを追加
- メインループでは0.1秒ごとに
各処理を行う
arduino_meter.py
import math
~~~~~~~~~~~~~~

# thermistor config
THERM_B=4181
THERM_R1=3.00
THERM_R0=2.3
THERM_T0=298.15

~~~~~~~~~~~~~~

# get thermistor
def get_therm(tmp):
    if ( tmp <= 0) | ( tmp > 1023):
        TMP = 1
    else:
       TMP = tmp
    temp = 0
    rr1 = THERM_R1 * TMP / (1024.0 - TMP)
    t = 1 / ( math.log( rr1/THERM_R0 ) / THERM_B  +  1/THERM_T0 )
    temp = (t - 273.5)
    return int(temp)

# get oil_press
def get_oil_press(tmp):
    vol = (5000/1023)*tmp
    press = (vol-600)/40
    return press

~~~~~~~~~~~~~~
# get car data
def get_analog_level(addr,u_data,l_data):
    TRY1 = I2C_TRY
    TRY2 = I2C_TRY
    analog_leve=0
    while TRY1:
        try:
            reading = int(bus.read_byte_data(addr,u_data))
            analog_level = reading << 8
        except IOError as e:
            print "get car data IO error"
            TRY1-=1
        except :
            print "get car date Unexcepted error"
            raise
        else:
            break

    if not TRY1:
        raise

    while TRY2:
        try:
            reading = int(bus.read_byte_data(addr,l_data))
            analog_level = analog_level | reading
            return analog_level
        except IOError as e:
            print "get car data IO error"
            TRY2-=1
        except :
            print "get car date Unexcepted error"
            raise
        else:
            break

    if not TRY2:
        raise
~~~~~~~~~~~~~~

# write data
def write_data():
    m_data = {"wtmp":"" , "otmp":"" ,"opls": ""}
    m_data["wtmp"]=get_therm(w_temp)
    m_data["otmp"]=get_therm(o_temp)
    m_data["opls"]=get_oil_press(o_press)
    with open('meter_data.json','w') as f:
        json.dump(m_data, f, sort_keys=True, indent=4)

~~~~~~~~~~~~~~

    #main loop
    while True:
        check_state(SLAVE_ADDRESS)
        w_temp = get_analog_level(SLAVE_ADDRESS,0x31,0x32)
        o_temp = get_analog_level(SLAVE_ADDRESS,0x33,0x34)
        o_press = get_analog_level(SLAVE_ADDRESS,0x35,0x36)
        b_level = get_analog_level(SLAVE_ADDRESS,0x38,0x38)
        write_data()
        time.sleep(0.1)

~~~~~~~~~~~~~~
簡易接続図
センサーは温度、油圧共に市販のオートゲージ製のPKシリーズ用を使用しています。データを取ればメーカーは問わないですが、以前工作した時のデータがあるので、そのまま使用してます。

