はじめに
AOSP Android10 全体のビルド時間を測定したので、結果を共有します。
ビルド環境には Docker ubuntu:18.04 を用いました。
ビルド時間短縮のポイントは、これまで AOSP のワークスペースに組み込まれてきた C/C++ の
コンパイラーキャッシュ ccache が Android10 からはサポートされなくなった事 を受けて、
Our binary was rather old, and for a variety of reasons we haven't kept
it updated.
ビルド環境に ccache をインストールし、有効化する必要がありました。
but if you still want to use ccache, continue setting USE_CCACHE
and also set CCACHE_EXEC to the path of your ccache executable.
実行結果
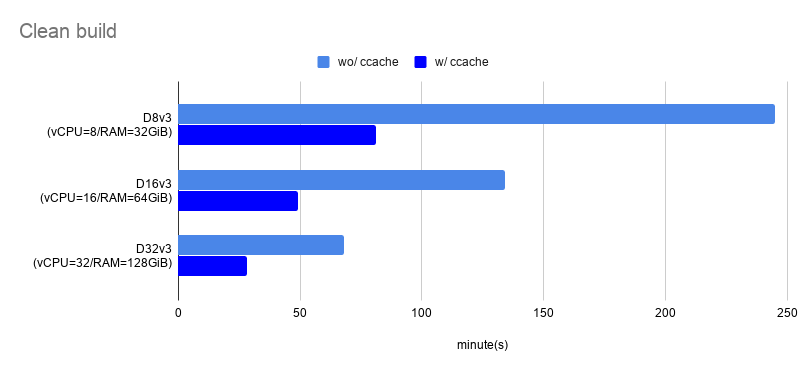
クリーンビルド
| Azure VM | ccache | ビルド時間(分) |
|---|---|---|
| D8v3 (vCPU=8/RAM=32GiB) |
ccache なし | 245m |
| ccache あり | 81m | |
| D16v3 (vCPU=16/RAM=64GiB) |
ccache なし | 134m |
| ccache あり | 49m | |
| D32v3 (vCPU=32/RAM=128GiB) |
ccache なし | 68m |
| ccache あり | 28m | |
 |
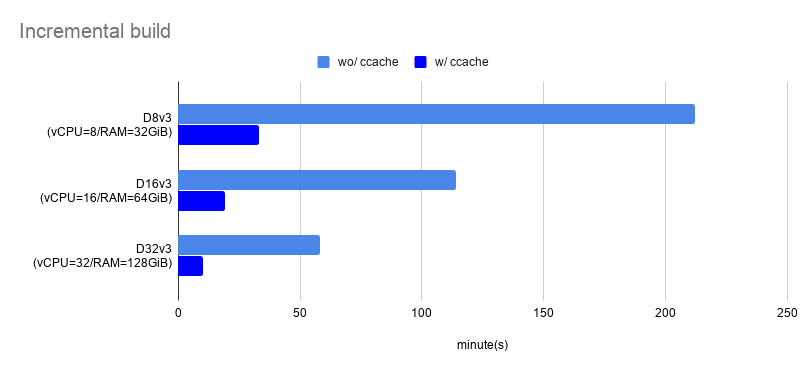
AOSP Android10 インクリメンタルビルド
| Azure VM | ccache | ビルド時間(分) |
|---|---|---|
| D8v3 (vCPU=8/RAM=32GiB) |
ccache なし | 212m |
| ccache あり | 33m | |
| D16v3 (vCPU=16/RAM=64GiB) |
ccache なし | 114m |
| ccache あり | 19m | |
| D32v3 (vCPU=32/RAM=128GiB) |
ccache なし | 58m |
| ccache あり | 10m | |
 |
実行環境
- Azure VM
- Docker
19.03.6- ベースイメージは
ubuntu:18.04 - ccache
3.4.1
- ベースイメージは
環境構築
ホストについて
ホスト OS は Ubuntu 18.04.4 LTS とします。また、Android のビルドには必要なパッケージが多いため、ホストに直接インストールする代わりに Docker を活用します。Ubuntu に Docker をインストールする手順やインストール後の便利な設定は、こちらをご確認ください。
-
Get Docker Engine >> Install using the repository
- SET UP THE REPOSITORY
- INSTALL DOCKER ENGINE
-
Post-installation steps for Linux >> Manage Docker as a non-root user
-
Post-installation steps for Linux >> Configure Docker to start on boot
Dockerfile
AOSP がサポートしている(と言っても少々古い) build/tools/docker を参考にしながら、
ベースイメージ ubuntu:18.04 で Android10 がビルドできるように少し修正を加えました。
FROM ubuntu:18.04
ARG userid
ARG groupid
ARG username

RUN apt-get update && apt-get install -y \
    git-core \
    gnupg \
    flex \
    bison \
    gperf \
    build-essential \
    zip \
    curl \
    zlib1g-dev \
    gcc-multilib \
    g++-multilib \
    libc6-dev-i386 \
    lib32ncurses5-dev \
    x11proto-core-dev \
    libx11-dev \
    lib32z-dev \
    ccache \
    libgl1-mesa-dev \
    libxml2-utils \
    xsltproc \
    unzip \
    python \
    python3-minimal \
    rsync \
 && apt-get clean \
 && rm -rf /var/lib/apt/lists/*

RUN curl -o /usr/local/bin/repo https://storage.googleapis.com/git-repo-downloads/repo \
 && chmod a+x /usr/local/bin/repo

RUN groupadd -g $groupid $username \
 && useradd -m -u $userid -g $groupid $username \
 && echo $username >/root/username \
 && echo "export USER="$username >>/home/$username/.gitconfig
COPY gitconfig /home/$username/.gitconfig
RUN chown $userid:$groupid /home/$username/.gitconfig
ENV HOME=/home/$username

ENTRYPOINT chroot --userspec=$(cat /root/username):$(cat /root/username) / /bin/bash -i
元 Dockerfile との差分をハイライトすると、次のようになります。
-FROM ubuntu:14.04
+FROM ubuntu:18.04

RUN apt-get update && apt-get install -y \
-    openjdk-7-jdk
+    python3-minimal \
+    rsync \
+ && apt-get clean \
+ && rm -rf /var/lib/apt/lists/*


- RUN curl -o jdk8.tgz https://android.googlesource.com/platform/prebuilts/jdk/jdk8/+archive/master.tar.gz \
- && tar -zxf jdk8.tgz linux-x86 \
- && mv linux-x86 /usr/lib/jvm/java-8-openjdk-amd64 \
- && rm -rf jdk8.tgz

RUN curl -o /usr/local/bin/repo https://storage.googleapis.com/git-repo-download
- && echo "e147f0392686c40cfd7d5e6f332c6ee74c4eab4d24e2694b3b0a0c037bf51dc5  /usr/local/bin/repo" | sha256sum --strict -c - \
修正箇所について補足します。
-
openjdk-7-jdk / jdk8.tgz削除- Software requirements >> JDK によると、ビルド済 OpenJDK は既にワークスペースに組み込まれているため、古いバージョンの Android のために必要な JDK は削除しました
-
python3-minimal追加-
python3.xがないと AssertionError: Could not find python binary: python3 とエラーになるため追加しました
-
-
rsync追加-
rsyncがないと FAILED: out/target/product/generic/ramdisk-debug.img とエラーになるため追加しました(ベースイメージubuntu:18.04に含まれていませんでした)
-
-
repoのチェックサムの確認の省略- 元コードでは
repoの正真性をハッシュ値で確認していましたがe147f039は古いため削除しました - その代わりに現時点の repo
2.4.1のハッシュ値d2e17c4bとしても良かったのですが git-repo を読む限り、ここ最近頻繁に更新されていることを受け、今回はチェックそのものをやめておきます
- 元コードでは
ただし、十分にメンテナンスされていないように見える AOSP の Dockerfile を起点として作業をしているため、他にも既に不要なパッケージが含まれているかもしれません。今後 AOSP から新しい世代向けの Dockerfile が公開されたら、そちらに移行した方が無難です。
Docker イメ―ジのビルド
build/tools/docker/README.md を参考に Docker イメージをビルドします。
# Copy your host gitconfig, or create a stripped down version
$ cp ~/.gitconfig gitconfig
$ docker build --build-arg userid=$(id -u) --build-arg groupid=$(id -g) --build-arg username=$(id -un) -t android-build-bionic .
ビルドされたイメージを確認します。
$ docker image list
REPOSITORY             TAG                 IMAGE ID            CREATED              SIZE
android-build-bionic   latest              ff2cb9986cd7        About a minute ago   612MB
ソースコード取得
今回は Android10 Release revision 14 を題材としてビルド時間の測定することにします。
# /mnt/work/aosp をワークスペースとします
$ sudo chown -R $USER:$USER /mnt
$ mkdir -p /mnt/work/aosp
$ cd /mnt/work/aosp
$ repo init -u https://android.googlesource.com/platform/manifest -b android-10.0.0_r14
$ time repo sync -j8

repo sync has finished successfully.

real	51m0.159s
user	133m47.445s
sys 	13m13.264s
構築されたワークスぺースを確認します。
$ repo list | wc -l
745

$ du -sh .
90G	.
このように、745 もの Git リポジトリからワークスペースが構成され、ビルド前にも関わらず 90GB もディスクを使用していることが確認できました。相変わらず巨大なプロジェクトです。
ビルド
さて、いよいよビルドします。
build/tools/docker/README.md を参考に、少し手直ししながら Docker コンテナを起動します。
# Docker 用のキャッシュディレクトリを用意します
$ mkdir -p /mnt/.cache /mnt/.ccache

$ docker run -it --rm \
    -v /mnt/work/aosp:/src \
    -v /mnt/.cache:/mnt/.cache \
    -v /mnt/.ccache:/mnt/.ccache \
    -e XDG_CACHE_HOME=/mnt/.cache \ # Docker 用キャッシュディレクトリを参照します
    -e CCACHE_DIR=/mnt/.ccache \ # Docker 用キャッシュディレクトリを参照します
    -e CCACHE_COMPRESS=1 \ # キャッシュサイズの圧縮のため
    -e CCACHE_EXEC=/usr/bin/ccache \ # 後述
    -e USE_CCACHE=1 \ # 後述
    android-build-bionic
こちら のコミットログによると、ccache を有効化するためには
-e USE_CCACHE=1 と -e CCACHE_EXEC=/usr/bin/ccache の設定が必要でした。
So if you still want to use ccache, continue setting USE_CCACHE, but also set
the CCACHE_EXEC environment variable to the path to your ccache executable.
これでビルド用 Docker コンテナが起動できたはずです。
続いて ccache の有無やビルド方式の違いについて比較していきます。
なお、以降のコマンドはすべて Azure D8v3 をホストとした Docker コンテナ上で実行します。
クリーンビルド
中間生成物やビルド成果物を削除して、イチからビルドする方式となります。
リリースビルドの場合は、こちらになると思います。
コンフィギュレーションやビルドターゲットについては以下の公式手順を参考にしています。
クリーンビルド(ccache なし)
$ cd src
$ rm -rf out

$ source build/envsetup.sh
$ lunch aosp_arm-userdebug
$ unset USE_CCACHE # 実験的に ccache を無効化するため
$ time m

#### build completed successfully (04:05:56 (hh:mm:ss)) ####
real	245m55.990s
user	1790m50.629s
sys 	97m4.830s
クリーンビルド(ccache あり)
キャッシュが保存されていない環境では、以下のビルド手順を 2 回 実行して計測する必要があります。( 1 回目のビルドはキャッシュを蓄えるため )
$ cd src
$ rm -rf out
$ ccache -z # キャッシュ統計情報のクリア

$ source build/envsetup.sh
$ lunch aosp_arm-userdebug
$ time m

#### build completed successfully (01:21:53 (hh:mm:ss)) ####
real	81m52.620s
user	557m28.541s
sys 	39m36.687s
ccache が効果的に作用したことで ビルド時間が約 1/3 に短縮されました。![]()
この状態で、キャッシュのヒット数やヒット率などの統計情報を見てみます。
$ ccache -s

cache directory                     /mnt/.ccache
primary config                      /mnt/.ccache/ccache.conf
secondary config      (readonly)    /etc/ccache.conf
stats zero time                     Thu Feb 27 00:55:12 2020
cache hit (direct)                 33652
cache hit (preprocessed)             325
cache miss                             0
cache hit rate                    100.00 %
called for link                       77
called for preprocessing              18
unsupported code directive             2
cleanups performed                     0
files in cache                    101488
cache size                           3.9 GB
max cache size                       5.0 GB
期待通り cache hit rate 100.00 % となっていることが確認できました。
cache hit (direct) 33652
このヒット数が妥当な数値であるかについては、ビルド対象となった C/C++ ファイルの数を調べるなどして、検証する必要があると感じています。(今回は調べ切れていません)
インクリメンタルビルド
インクリメンタルビルド(差分ビルド)は、依存関係が正しく書かれたビルドシステムを前提として、変更されたファイルとその依存ファイルがビルドされる方式です。したがって、通常クリーンビルドと比べて処理数が少なくなるため、その分高速になります。開発者がローカル環境でビルドするときは、多くの場合がこちらになると思います。
何も更新されていない場合
$ cd src
$ ccache -z

$ source build/envsetup.sh
$ lunch aosp_arm-userdebug
$ time m

#### build completed successfully (5 seconds) ####
real	0m5.080s
user	0m11.956s
sys 	0m3.644s
Android のビルドシステムは依存関係の記述が正しくメンテナンスされているため、差分がまったくない状態でインクリメンタルビルドをすると、あっという間に完了します。なお、このケースではコンパイルもされないため期待通り cache hit rate 0.00 % のままになっています。
インクリメンタルビルド(ccache なし)
さて、今度はソースコードの更新をシミュレーションするため AOSP の一部のファイルのタイムスタンプを更新します。それによって変更されたファイルとその依存ファイルの再ビルドが実行されます。
$ cd src
$ ccache -z
$ touch external/protobuf/src/google/protobuf/*

$ source build/envsetup.sh
$ lunch aosp_arm-userdebug
$ unset USE_CCACHE # 実験的に ccache を無効化するため
$ time m

#### build completed successfully (03:32:32 (hh:mm:ss)) ####
real	212m31.772s
user	1586m36.813s
sys 	69m56.492s
前回の クリーンビルド(ccache なし)と比べて、わずかに短縮されていたものの、かなり時間がかかってしまいました。
インクリメンタルビルド(ccache あり)
$ cd src
$ ccache -z
$ touch external/protobuf/src/google/protobuf/*

$ source build/envsetup.sh
$ lunch aosp_arm-userdebug
$ time m

#### build completed successfully (33:53 (mm:ss)) ####
real	33m53.000s
user	237m48.218s
sys 	10m31.486s
インクリメンタルビルドのおいてもやはり ccache は効果的で、無効時と比べて ビルド時間が約 1/6 ~ 1/7 に短縮されました。ただし、どのファイルが更新されたかで依存関係やビルド対象となるファイル数は大きく変わるため、これはあくまで一例となります。この状態で、キャッシュのヒット数やヒット率などの統計情報を見てみます。
$ ccache -s

cache directory                     /mnt/.ccache
primary config                      /mnt/.ccache/ccache.conf
secondary config      (readonly)    /etc/ccache.conf
stats zero time                     Thu Feb 27 04:28:46 2020
cache hit (direct)                  1737
cache hit (preprocessed)              35
cache miss                             0
cache hit rate                    100.00 %
called for link                        8
cleanups performed                     0
files in cache                    101503
cache size                           3.9 GB
max cache size                       5.0 GB
今回も期待通り cache hit rate 100.00 % となっていることが確認出来ました。
cache hit (direct) 1737
クリーンビルド(ccache あり)の時と比べて、再コンパイルの必要なファイルが少ないため、このようにヒット数自体が下がることは妥当だと思います。
おわりに
今回は Docker を用いた AOSP Android10 のビルド方法とビルド時間の測定結果についてまとめました。今後、更にビルド時間を短縮化するために、
- 更に高パフォーマンスなホストを試してみる
- より新しい https://ccache.dev (例えば
3.7+) を試してみる
などのチャレンジをしてみても面白いと思います。
補足資料
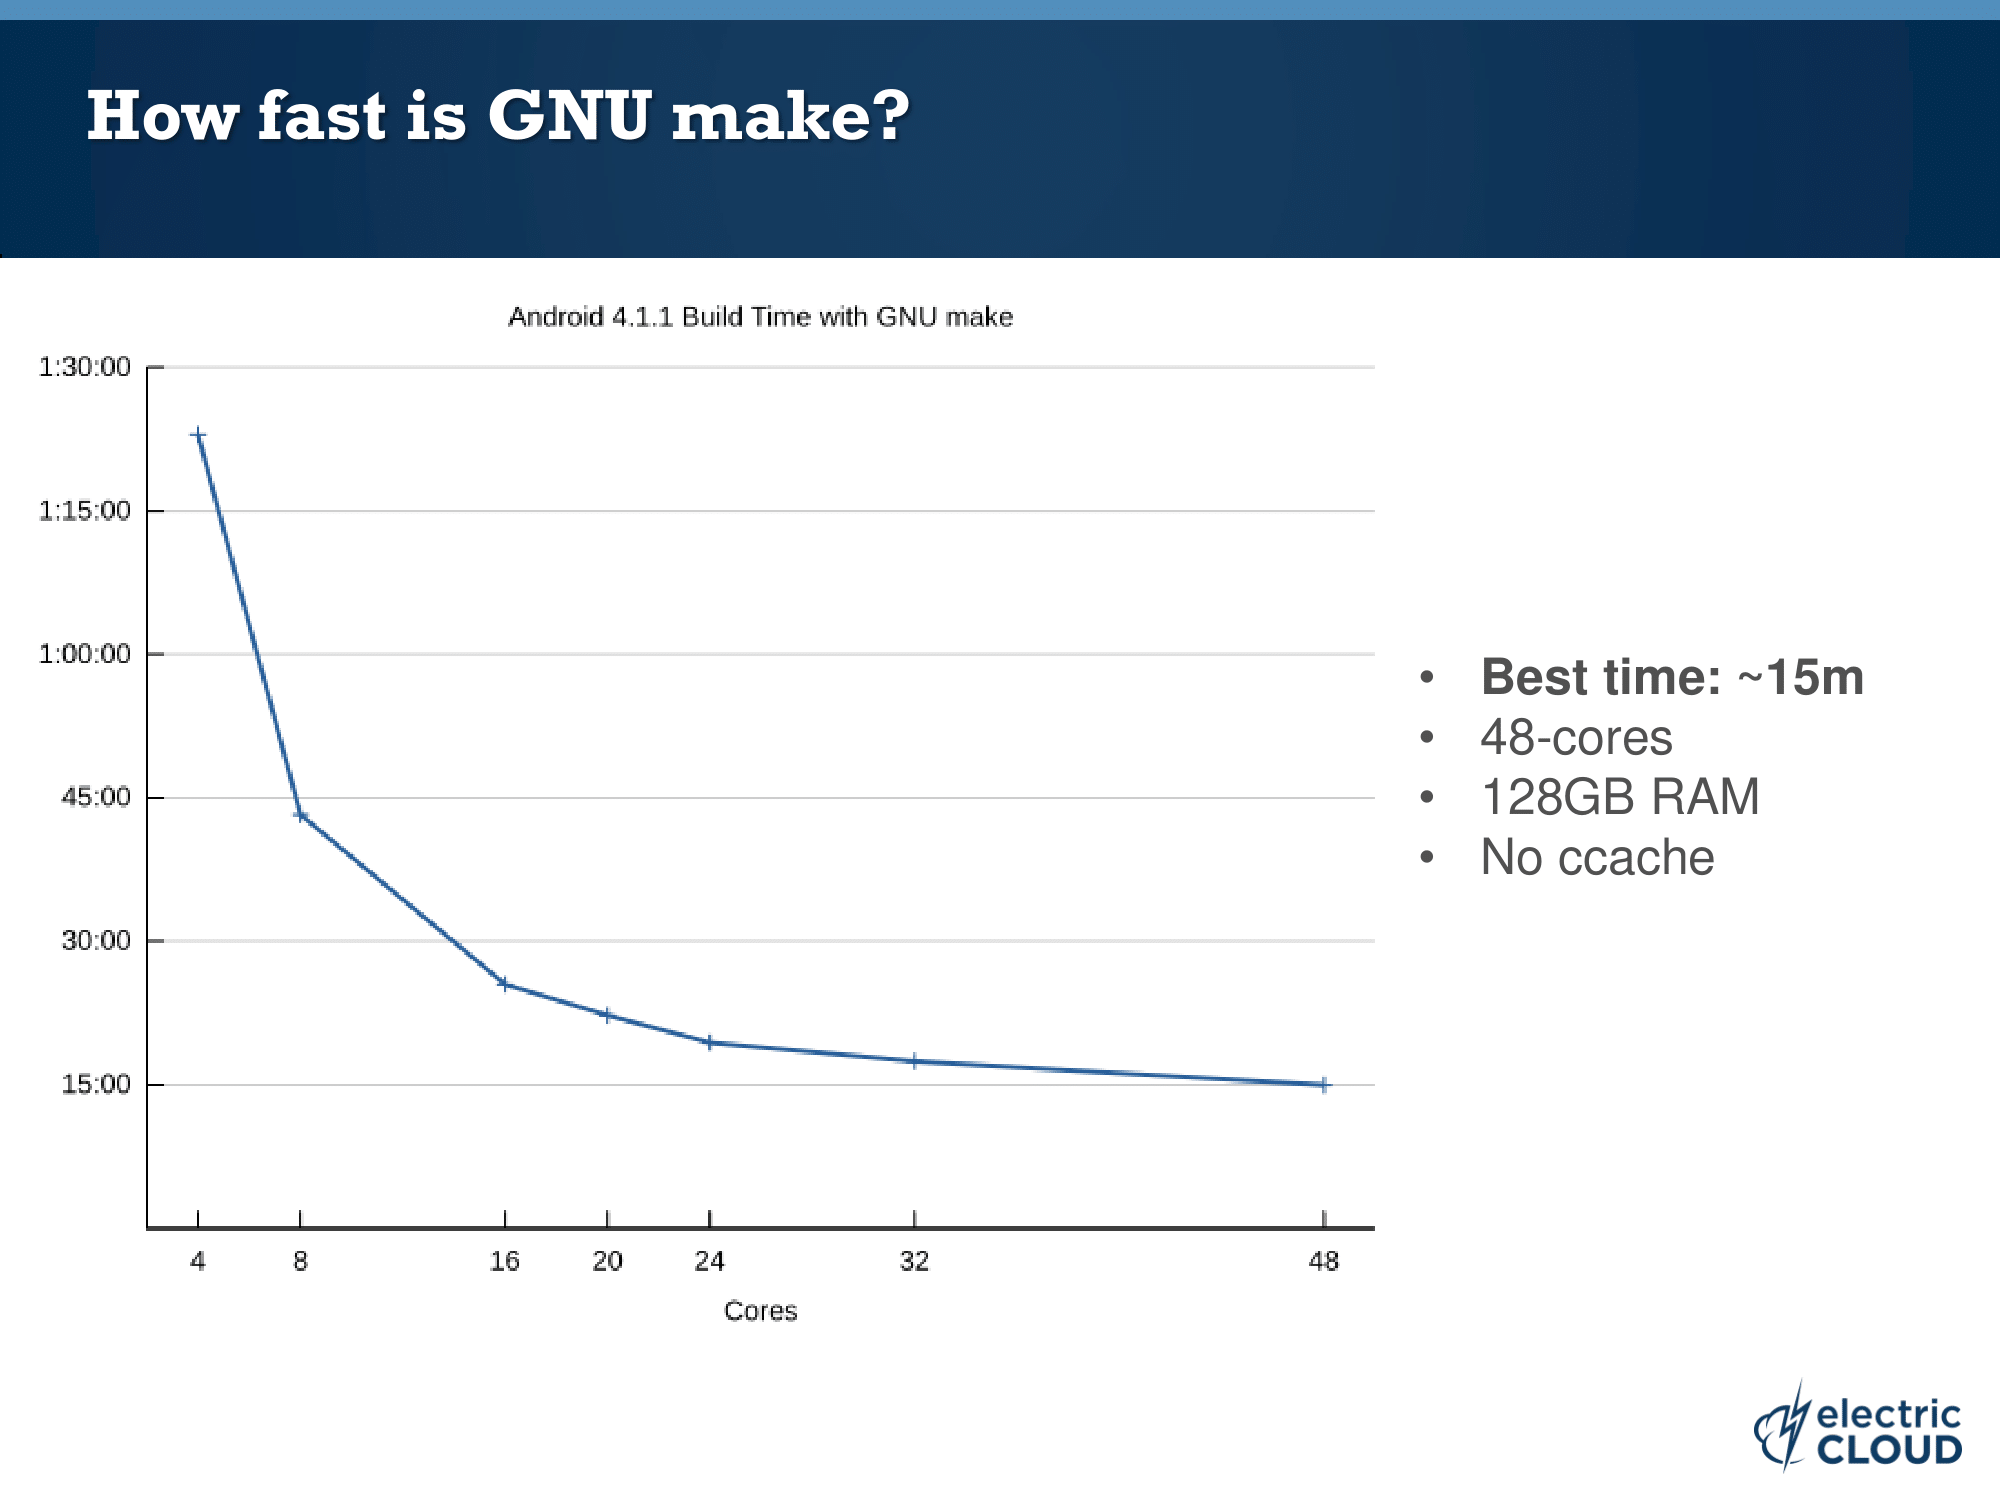
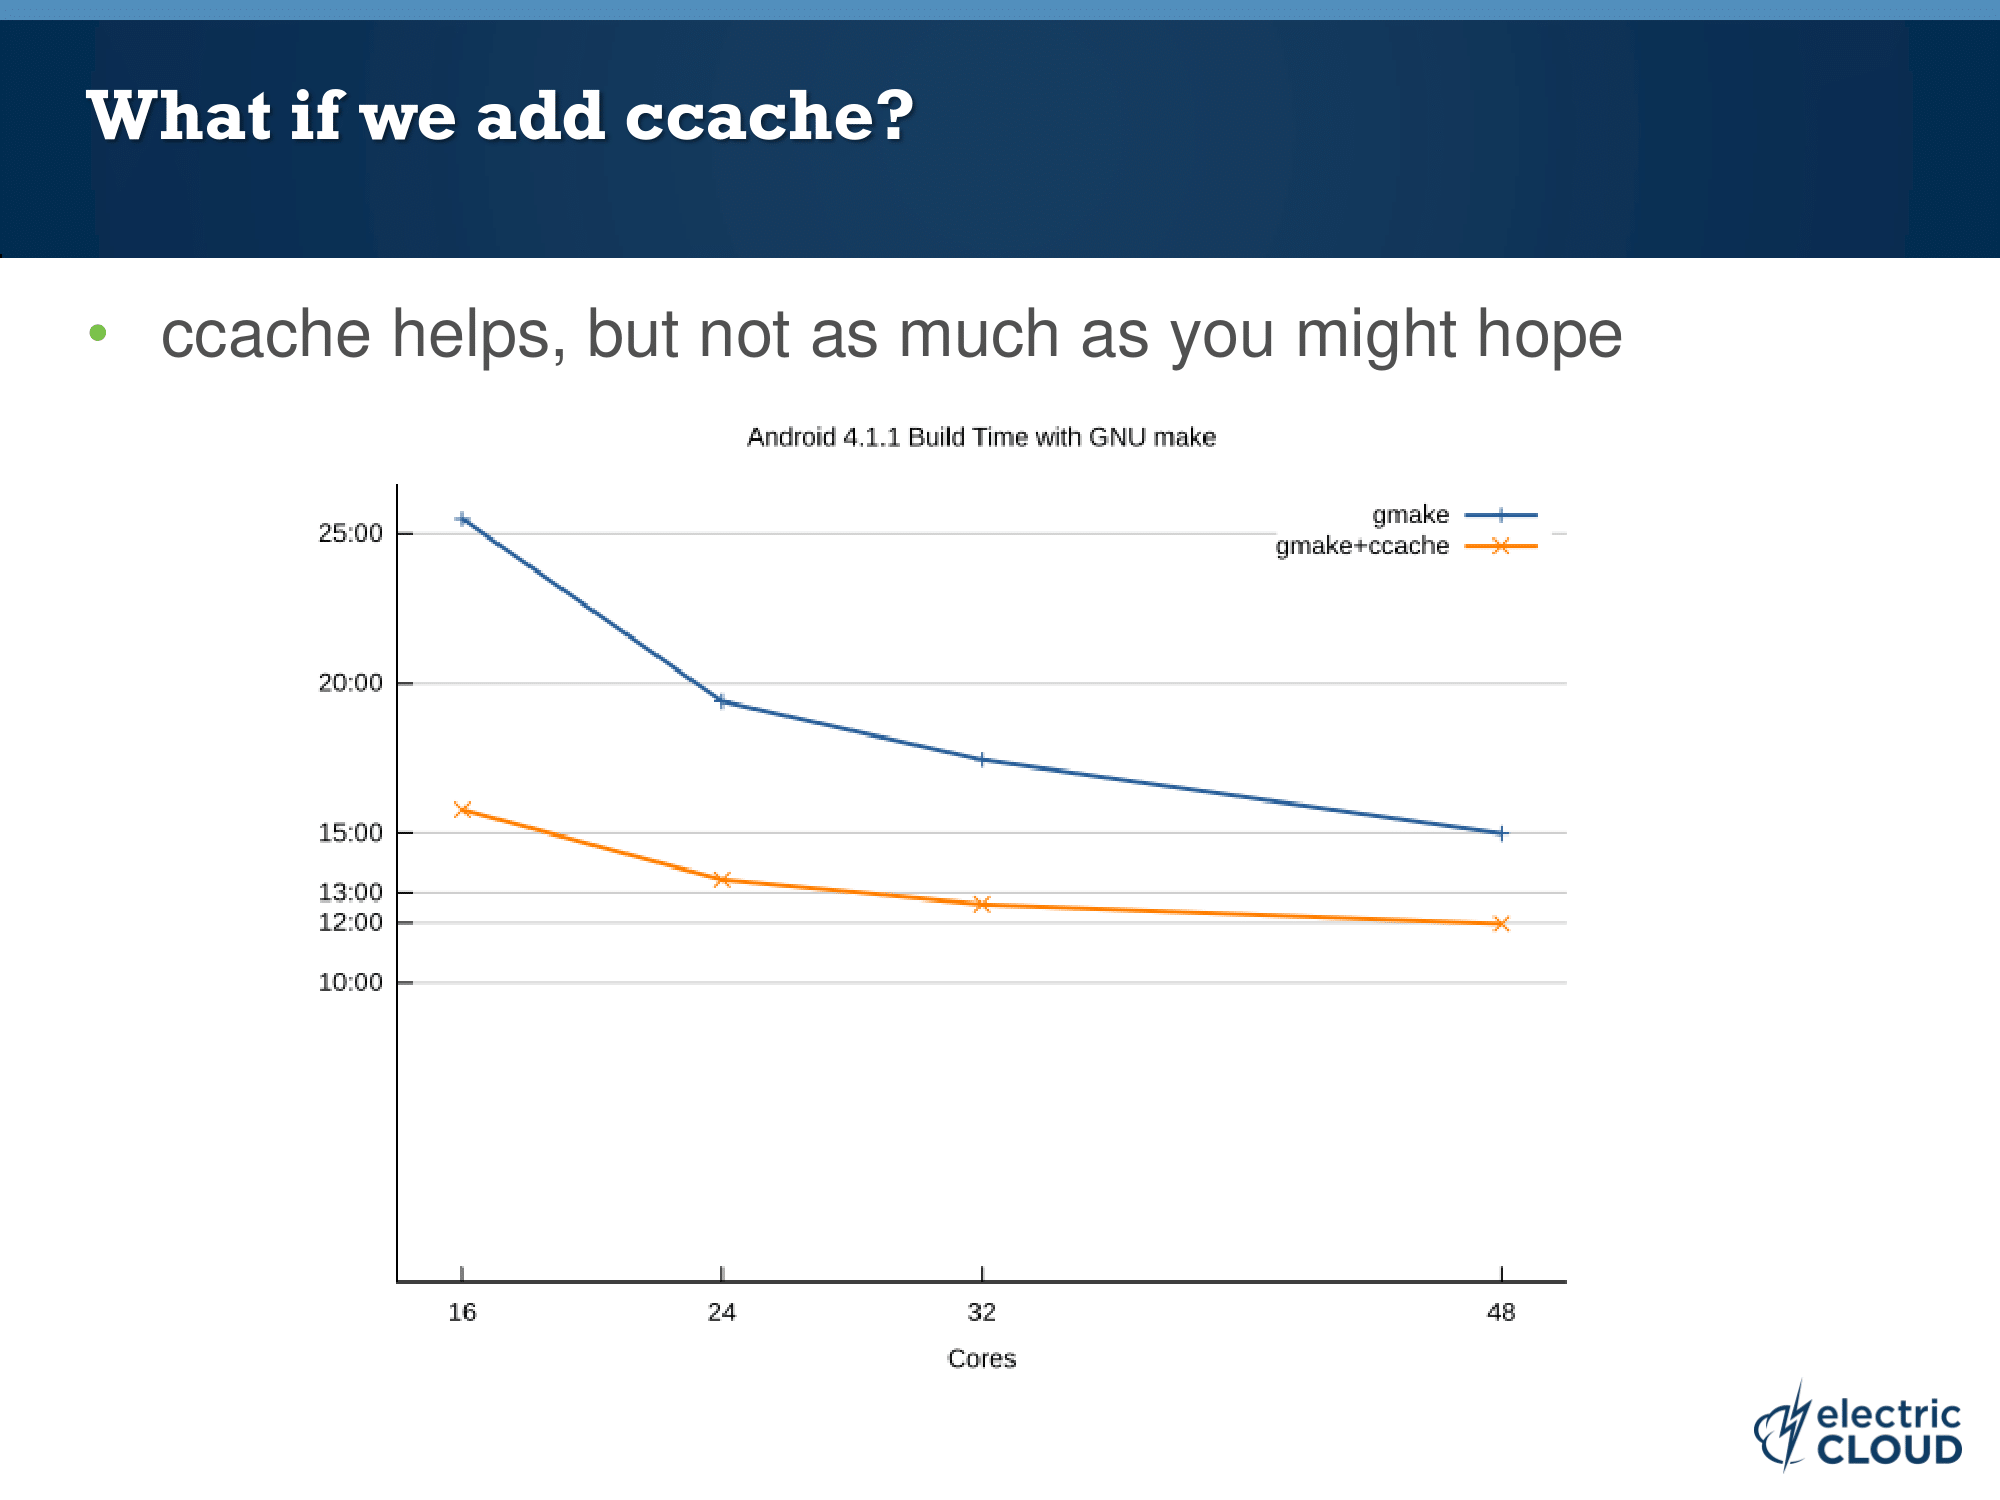
ベンチマークが Android 4.x なので少し古い資料になりますが、Core 数や ccache と Android のビルド時間の関係について調査しているので、こちらも参考になると思います。
Accelerating Android Builds

