はじめに
本記事では、StepZen を用いて PostgreSQL のデータを GraphQL API に変換し、React および Next を用いて Web アプリを作成する方法について説明します。
StepZen は RDB や REST API を簡単に連携、統合できる GraphQL API 構築サービスです。
また、ご存知の方も多いと思いますが、React は、シングルページアプリケーション(SPA)の開発に多く用いられるライブラリで、Next はプリレンダリングやサーバーサイドレンダリング(SSR)の機能を手軽に利用できる React のフレームワークです。
今回のコードは下記リポジトリにおいています。
optimisuke/purchase-history
想定読者
- Web アプリについて、基本的なことを理解している方を想定しています。
- また、Node.js (v18.17.0) がインストールされていることを前提としています。
- コマンドライン環境についても実行できることを想定していますので、Windowsであれば、WSL (Windows Subsystem for Linux) 等をご準備ください。
作成するもの
StepZen で提供されている PostgreSQL サーバー上にある購入履歴テーブルから、以下のような購入履歴画面を作成します。

次章から、3つのステップに分けて説明していきます。
- React/Next による表示画面作成
- StepZenによるGraphQL API作成
- GraphQL API呼び出し
1. React/Next による表示画面作成
作業フォルダに移動し、下記コマンドを実行することで、Next の環境を構築します。
本記事では、purchase-historyを作業フォルダとします。
npx create-next-app app -ts
app フォルダに移動し、不要なファイルを削除します。
cd app
rm -rf app public
今回、React の UI コンポーネントライブラリであるMUIを用いるため、関連するライブラリをインストールします。
npm install @mui/material @mui/icons-material @emotion/react @emotion/styled
準備が整ったので、必要なファイルを作成していきます。
今回、シンプルな画面を想定しているので、以下のpages/index.tsxのみで画面を構築します。
実際は必要に応じて、コンポーネントごとにファイルを分ける必要があります。
mkdir pages
以下のファイルでは、ヘッダー部分とオーダーのテーブル部分を表示しています。
テーブル部分は、配列であるオーダーごとにテーブルを作成し、オーダーに含まれるプロダクトをテーブルの行として表示しています。
配列を展開する際に配列のメソッドである.map()を活用しています。
// pages/index.tsx

import {
  AppBar,
  Avatar,
  Paper,
  Table,
  TableBody,
  TableCell,
  TableContainer,
  TableHead,
  TableRow,
  Toolbar,
  Typography,
} from "@mui/material";
import type { NextPage } from "next";

type Order = {
  id: number;
  createdat: string;
  lineitem: Lineitem[];
};

type Lineitem = {
  product: Product;
};

type Product = {
  id: number;
  title: string;
  image: string;
};

const Home: NextPage = () => {
  const orders: Order[] = [
    {
      id: 1,
      createdat: "2023-09-25",
      lineitem: [
        {
          product: {
            id: 1,
            title: "Apple",
            image: "apple-image-url",
          },
        },
        {
          product: {
            id: 2,
            title: "Banana",
            image: "banana-image-url",
          },
        },
      ],
    },
    {
      id: 2,
      createdat: "2023-09-25",
      lineitem: [
        {
          product: {
            id: 1,
            title: "Tomato",
            image: "tomato-image-url",
          },
        },
      ],
    },
  ];

  return (
    <div>
      <AppBar position="static">
        <Toolbar>
          <Typography variant="h6" component="div" sx={{ flexGrow: 1 }}>
            Purchase History
          </Typography>
        </Toolbar>
      </AppBar>
      <div>
        {orders.map((order: Order) => (
          <Paper key={order.id} style={{ marginBottom: "16px" }}>
            <Typography variant="h6" style={{ padding: "16px" }}>
              Order ID: {order.id}
            </Typography>
            <TableContainer>
              <Table>
                <TableHead>
                  <TableRow>
                    <TableCell style={{ width: 20 }}>Image</TableCell>
                    <TableCell style={{ width: 1000 }}>Name</TableCell>
                  </TableRow>
                </TableHead>
                <TableBody>
                  {order.lineitem.map((lineitem) => (
                    <TableRow key={lineitem.product.id}>
                      <TableCell>
                        <Avatar
                          variant="square"
                          src={lineitem.product.image}
                          sx={{ width: 100, height: 100 }}
                        />
                      </TableCell>
                      <TableCell>{lineitem.product.title}</TableCell>
                    </TableRow>
                  ))}
                </TableBody>
              </Table>
            </TableContainer>
          </Paper>
        ))}
      </div>
    </div>
  );
};

export default Home;
フォルダ構成は以下のようになります。
.
├── README.md
├── next-env.d.ts
├── next.config.js
├── node_modules
├── package-lock.json
├── package.json
├── pages
│   └── index.tsx
├── postcss.config.js
├── tailwind.config.ts
└── tsconfig.json
上記コードを保存したのち、下記コマンドを実行します。
npm run dev
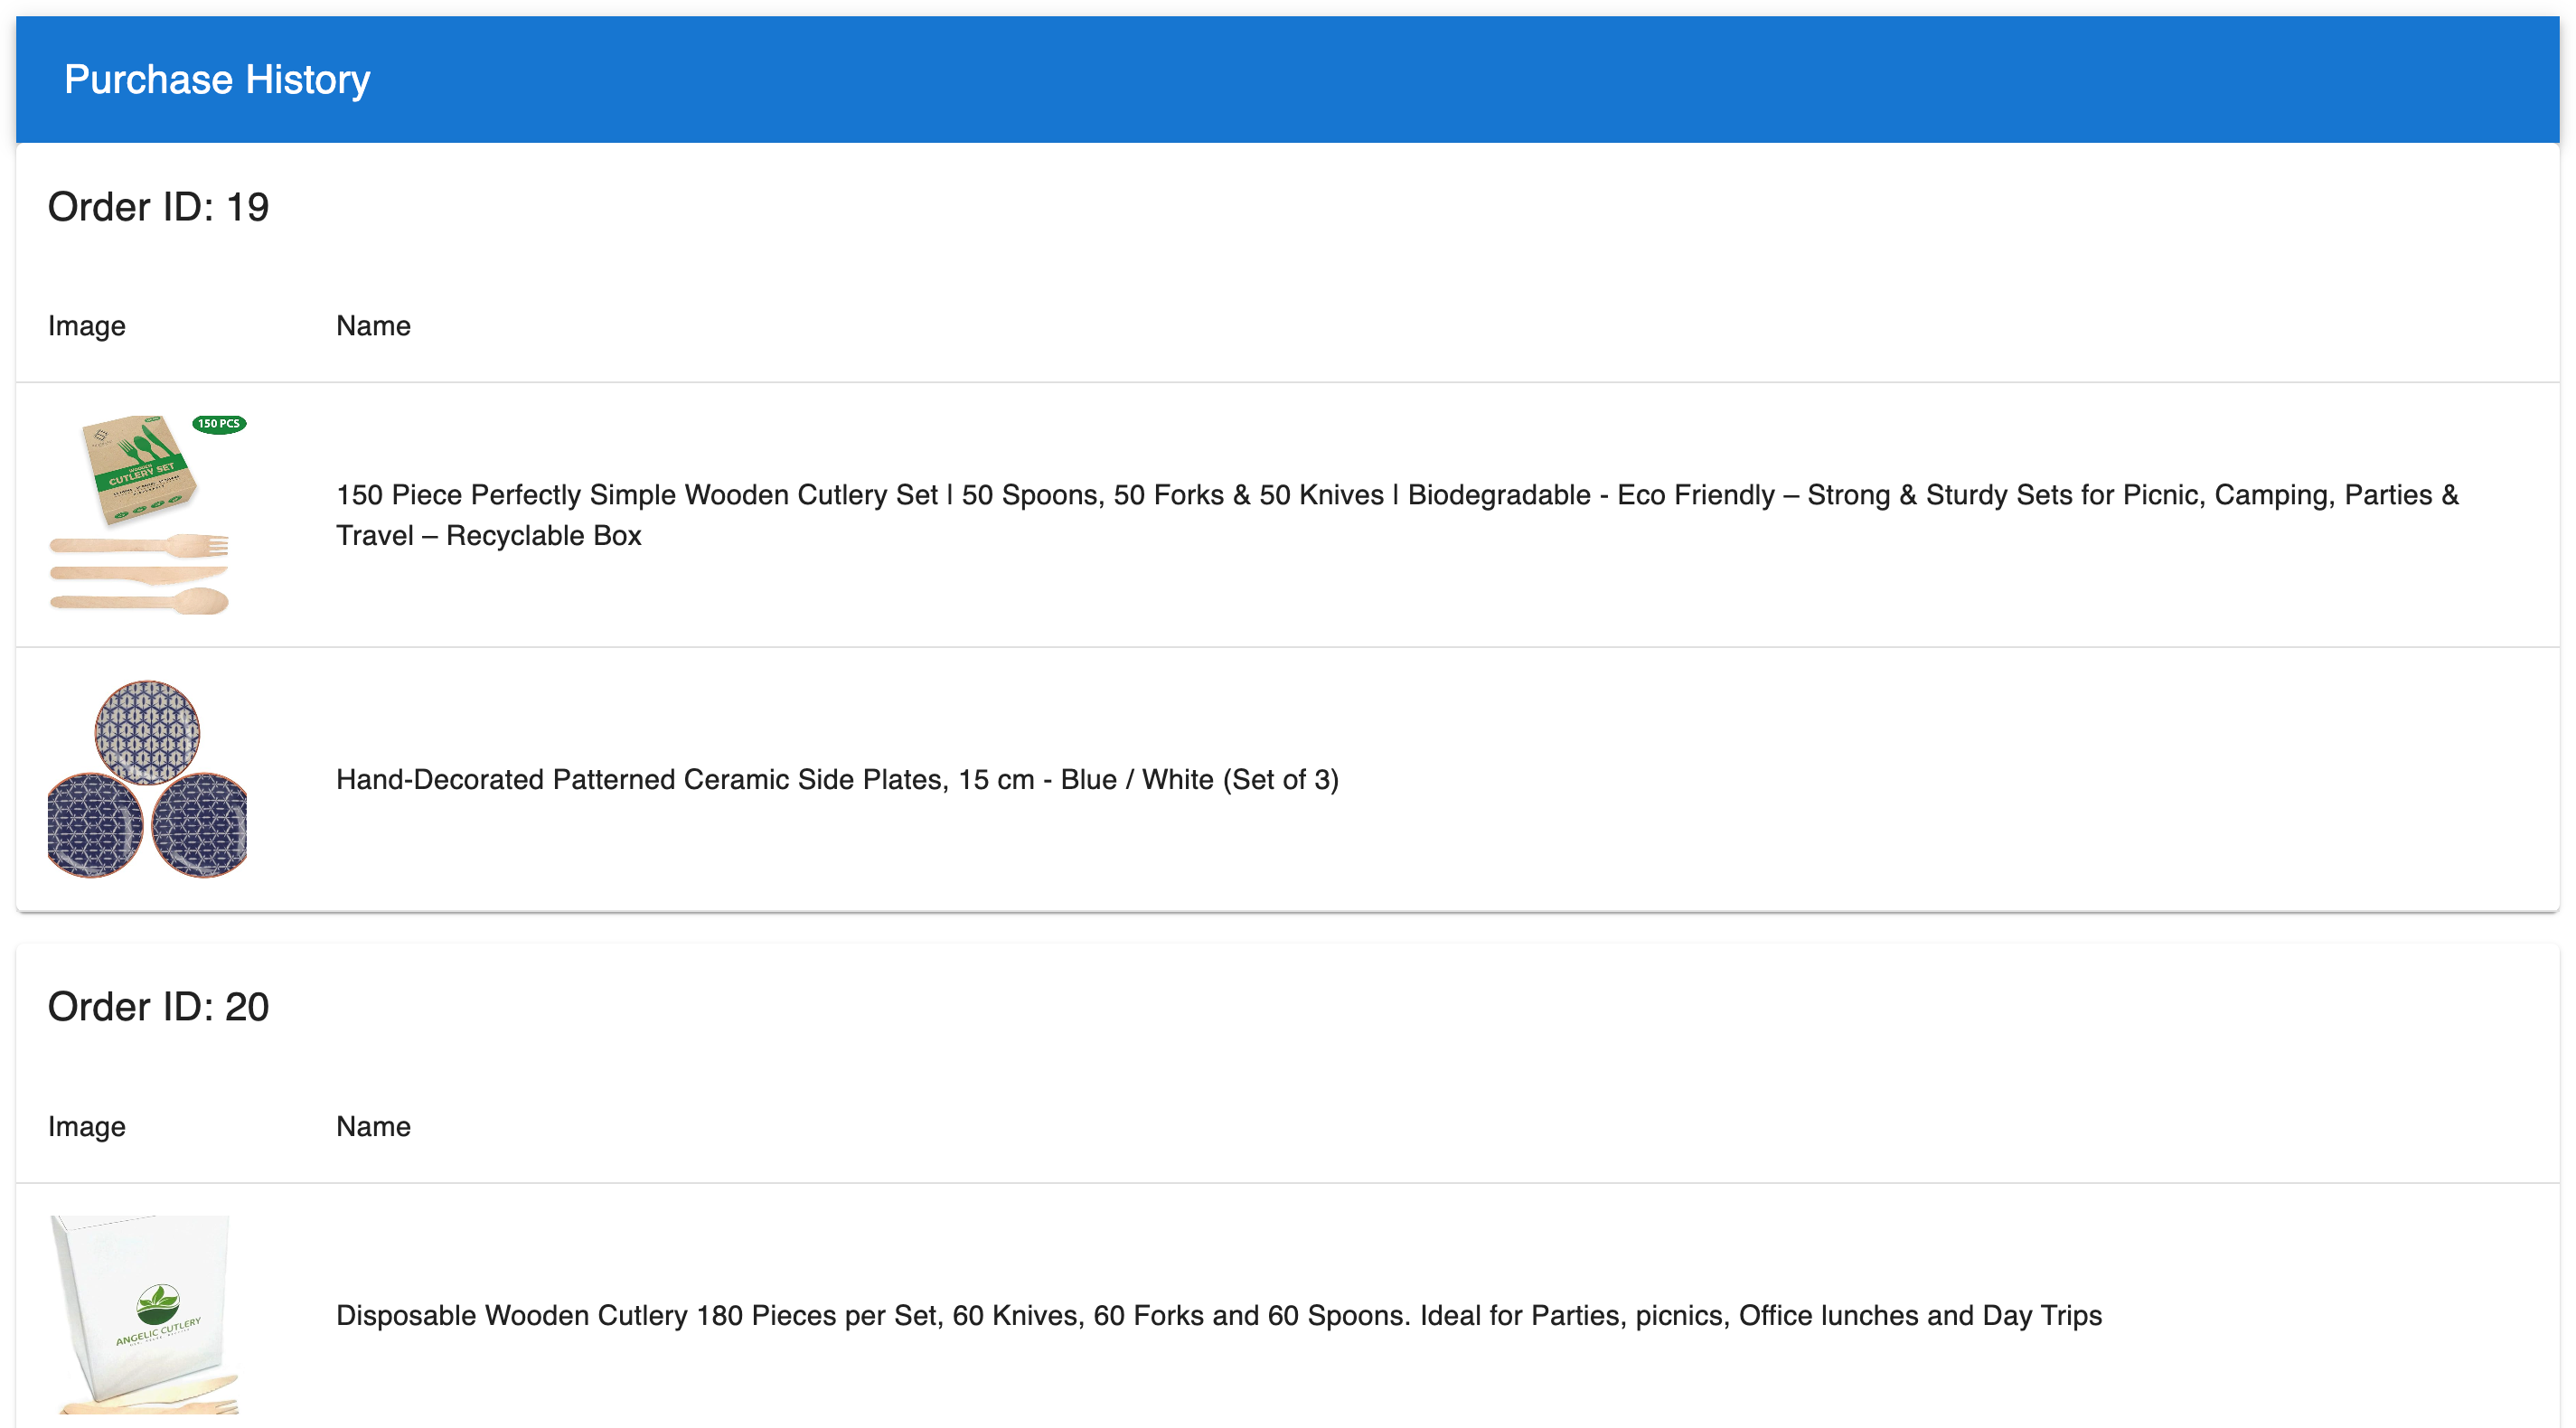
ブラウザからlocalhost:3000にアクセスすることで、以下のような画面が表示されます。

次に、StepZenを用いて、GraphQL APIを作成し、その後、GraphQL APIを呼び出す実装を追加していきます。
2. StepZen による GraphQL API 作成
使用するデータベースの構成
今回、StepZenのチュートリアル実施ように準備されているPostgreSQLデータベースを使用します。
使用するデータベースは、下記接続情報で接続できます。
host: postgresql.introspection.stepzen.net
username: testUserIntrospection
password: HurricaneStartingSample1934
database name: introspection
使用するデータベースは、顧客(customer)、住所(address)、注文(order)、商品(products)、顧客と住所の関連を管理する中間テーブル(customeraddress)、注文と商品の間の関連を管理する中間テーブル(lineitem)の 6 つのテーブルから構成されています。各テーブルは以下のリレーションで関連しています。
顧客(customer)と住所(address)は多対多のリレーションで、中間テーブル(customeraddress)を通じて結びついています。
顧客(customer)と注文(oder)は 1 対多のリレーション。
注文(order)と商品(product)は多対多のリレーションで、中間テーブル(lineitem)を通じて結びついています。
以下の図に、ER 図を示します。

StepZen CLI のインストールとセットアップ
StepZen の公式ドキュメント(StepZen Install and Set Up)に沿って、まずは StepZen CLI をインストールします。Node.js がインストールされていれば、npm install -g stepzenでインストールできます。次に、StepZen のアカウントを作成し、ダッシュボードから Admin Key を取得し、stepzen loginコマンドでログインします。
StepZen を用いた GraphQL API の作成
StepZen の公式ドキュメント(Getting started with a PostgreSQL database using @dbquery custom directive)に沿って、まずは、データベースのスキーマ情報から GraphQL の構成ファイルを生成していきます。
Nextのプロジェクトと同様に、作業フォルダpurchase-historyで、下記コマンドを実行します。
mkdir api
cd api
stepzen import postgresql
最後のコマンドを実行すると、下記のような質問が表示され、対話的にデータベースの接続情報等を回答します。
? What would you like your endpoint to be called? api/opining-condor
? What is your host? postgresql.introspection.stepzen.net
? What is the username? testUserIntrospection
? What is the password? [hidden]
? What is your database name? introspection
? What is your database schema (leave blank to use defaults)?
? Automatically link types based on foreign key relationships using @materializer
 (https://stepzen.com/docs/features/linking-types) Yes
Starting... done
ここで、最後の質問である? Automatically link types based on foreign key relationships using @materializer (https://stepzen.com/docs/features/linking-types)に Yes で答えることにより、外部キー制約によるリレーションを階層化された GraphQL 定義に反映させることができます。
上記コマンド実行後、下記ファイルが生成されます。
purchase-history/api
├── config.yaml
├── index.graphql
├── postgresql
│   └── index.graphql
└── stepzen.config.json
StepZen の設定ファイルとして、stepzen.config.jsonがあり、エンドポイント名等が記載されます。
{
  "endpoint": "api/willing-dingo"
}
PostgreSQL 接続用にconfig.yamlファイルが生成されています。これは、後述するpostgresql/index.graphqlから参照されます。
configurationset:
  - configuration:
      name: postgresql_config
      uri: postgresql://postgresql.introspection.stepzen.net/introspection?user=testUserIntrospection&password=HurricaneStartingSample1934
トップの GraphQL スキーマとしてindex.graphqlが生成されています。@sdlディレクティブを用いて他のスキーマファイルを指定することができます。StepZen が提供しているディレクティブについては、公式ドキュメント(GraphQL Directives Reference @rest @dbquery @graphql @materializer)に記載があります。
schema @sdl(files: ["postgresql/index.graphql"]) {
  query: Query
}
PostgreSQL のテーブルに対応する GraphQL スキーマpostgresql/index.graphqlが生成されています。本ファイルには、@materializerや@dbquery等のディレクティブが使われています。
StepZen を使用して作成された GraphQL API では、以下のようなクエリとミューテーションが生成されます。
- Query
- id による個別の取得
- List 全体の取得
- PaginatedList 範囲指定による取得
- ViaXXX 多対多リレーションのフィルタリング
- UsingXXXfkey 外部キーによるフィルタリング
- UsingXXXidx インデックス付きカラムによるフィルタリング
- Mutation
- insert
- delete
- update
ただし、多対多のリレーションのテーブル(customeraddress や lineitem)を CRUD するエンドポイントはデフォルトでは生成されません。
api/postgresql/index.graphq (長いので折りたたみ)
type Address {
  city: String
  countryregion: String
  customer: [Customer] @materializer(query: "customerViaCustomeraddress")
  id: Int!
  postalcode: String
  stateprovince: String
  street: String
}

type Customer {
  address: [Address] @materializer(query: "addressViaCustomeraddress")
  email: String!
  id: Int!
  name: String!
  order: [Order] @materializer(query: "orderUsingOrder_customerid_fkey")
}

type Lineitem {
  order: Order @materializer(query: "orderUsingLineitem_orderid_fkey")
  orderid: Int!
  product: Product @materializer(query: "productUsingLineitem_productid_fkey")
  productid: Int!
  quantity: Int
}

type Order {
  carrier: String
  createdat: Date!
  customer: Customer @materializer(query: "customerUsingOrder_customerid_fkey")
  customerid: Int!
  id: Int!
  lineitem: [Lineitem]
    @materializer(query: "lineitemUsingLineitem_orderid_fkey")
  shippingcost: Float
  trackingid: String
}

type Product {
  description: String
  id: Int!
  image: String
  lineitem: [Lineitem] @materializer(query: "lineitem")
  title: String
}

"""
The following queries are just a set of examples of how to access your schema.
Feel free to modify them or aggregate more.
"""
type Query {
  " Queries for type 'Address' "
  address(id: Int!): Address
    @dbquery(
      type: "postgresql"
      schema: "public"
      table: "address"
      configuration: "postgresql_config"
    )
  addressList: [Address]
    @dbquery(
      type: "postgresql"
      schema: "public"
      table: "address"
      configuration: "postgresql_config"
    )
  addressPaginatedList(first: Int, after: Int): [Address]
    @dbquery(
      type: "postgresql"
      schema: "public"
      query: """
      SELECT "city", "countryregion", "id", "postalcode", "stateprovince", "street" FROM "address" ORDER BY "id" LIMIT $1 OFFSET $2
      """
      configuration: "postgresql_config"
    )
  customerViaCustomeraddress(id: Int!): [Customer]
    @dbquery(
      type: "postgresql"
      schema: "public"
      query: """
      SELECT T."email", T."id", T."name"
        FROM "customer" T, "customeraddress" V
        WHERE
          V."addressid" = $1 AND
          V."customerid" = T."id"
      """
      configuration: "postgresql_config"
    )
  " Queries for type 'Customer' "
  addressViaCustomeraddress(id: Int!): [Address]
    @dbquery(
      type: "postgresql"
      schema: "public"
      query: """
      SELECT T."city", T."countryregion", T."id", T."postalcode", T."stateprovince", T."street"
        FROM "address" T, "customeraddress" V
        WHERE
          V."customerid" = $1 AND
          V."addressid" = T."id"
      """
      configuration: "postgresql_config"
    )
  customer(id: Int!): Customer
    @dbquery(
      type: "postgresql"
      schema: "public"
      table: "customer"
      configuration: "postgresql_config"
    )
  customerList: [Customer]
    @dbquery(
      type: "postgresql"
      schema: "public"
      table: "customer"
      configuration: "postgresql_config"
    )
  customerPaginatedList(first: Int, after: Int): [Customer]
    @dbquery(
      type: "postgresql"
      schema: "public"
      query: """
      SELECT "email", "id", "name" FROM "customer" ORDER BY "id" LIMIT $1 OFFSET $2
      """
      configuration: "postgresql_config"
    )
  customerUsingOrder_customerid_fkey(customerid: Int!): Customer
    @dbquery(
      type: "postgresql"
      schema: "public"
      query: """
      SELECT "email", "id", "name" FROM "customer" WHERE "id" = $1
      """
      configuration: "postgresql_config"
    )
  customerUsingcustomer_email_key(email: String!): Customer
    @dbquery(
      type: "postgresql"
      schema: "public"
      query: """
      SELECT "email", "id", "name" FROM "customer" WHERE "email" = $1
      """
      configuration: "postgresql_config"
    )
  " Queries for type 'Lineitem' "
  lineitem(id: Int!): [Lineitem]
    @dbquery(
      type: "postgresql"
      schema: "public"
      query: """
      SELECT "orderid", "productid", "quantity" FROM "lineitem" WHERE "productid" = $1
      """
      configuration: "postgresql_config"
    )
  lineitemList: [Lineitem]
    @dbquery(
      type: "postgresql"
      schema: "public"
      table: "lineitem"
      configuration: "postgresql_config"
    )
  lineitemPaginatedList(first: Int, after: Int): [Lineitem]
    @dbquery(
      type: "postgresql"
      schema: "public"
      query: """
      SELECT "orderid", "productid", "quantity" FROM "lineitem" LIMIT $1 OFFSET $2
      """
      configuration: "postgresql_config"
    )
  lineitemUsingLineitem_orderid_fkey(id: Int!): [Lineitem]
    @dbquery(
      type: "postgresql"
      schema: "public"
      query: """
      SELECT "orderid", "productid", "quantity" FROM "lineitem" WHERE "orderid" = $1
      """
      configuration: "postgresql_config"
    )
  " Queries for type 'Order' "
  order(id: Int!): Order
    @dbquery(
      type: "postgresql"
      schema: "public"
      table: "order"
      configuration: "postgresql_config"
    )
  orderList: [Order]
    @dbquery(
      type: "postgresql"
      schema: "public"
      table: "order"
      configuration: "postgresql_config"
    )
  orderPaginatedList(first: Int, after: Int): [Order]
    @dbquery(
      type: "postgresql"
      schema: "public"
      query: """
      SELECT "carrier", "createdat", "customerid", "id", "shippingcost", "trackingid" FROM "order" ORDER BY "id" LIMIT $1 OFFSET $2
      """
      configuration: "postgresql_config"
    )
  orderUsingLineitem_orderid_fkey(orderid: Int!): Order
    @dbquery(
      type: "postgresql"
      schema: "public"
      query: """
      SELECT "carrier", "createdat", "customerid", "id", "shippingcost", "trackingid" FROM "order" WHERE "id" = $1
      """
      configuration: "postgresql_config"
    )
  orderUsingOrder_customerid_fkey(id: Int!): [Order]
    @dbquery(
      type: "postgresql"
      schema: "public"
      query: """
      SELECT "carrier", "createdat", "customerid", "id", "shippingcost", "trackingid" FROM "order" WHERE "customerid" = $1
      """
      configuration: "postgresql_config"
    )
  " Queries for type 'Product' "
  product(id: Int!): Product
    @dbquery(
      type: "postgresql"
      schema: "public"
      table: "product"
      configuration: "postgresql_config"
    )
  productList: [Product]
    @dbquery(
      type: "postgresql"
      schema: "public"
      table: "product"
      configuration: "postgresql_config"
    )
  productPaginatedList(first: Int, after: Int): [Product]
    @dbquery(
      type: "postgresql"
      schema: "public"
      query: """
      SELECT "description", "id", "image", "title" FROM "product" ORDER BY "id" LIMIT $1 OFFSET $2
      """
      configuration: "postgresql_config"
    )
  productUsingLineitem_productid_fkey(productid: Int!): Product
    @dbquery(
      type: "postgresql"
      schema: "public"
      query: """
      SELECT "description", "id", "image", "title" FROM "product" WHERE "id" = $1
      """
      configuration: "postgresql_config"
    )
  productUsingtitle_idx(title: String!): [Product]
    @dbquery(
      type: "postgresql"
      schema: "public"
      query: """
      SELECT "description", "id", "image", "title" FROM "product" WHERE "title" = $1
      """
      configuration: "postgresql_config"
    )
}

"""
The following mutations are just a set of examples of how to access your schema.
Feel free to modify them or aggregate more.
"""
type Mutation {
  " Mutations for type 'Address' "
  deleteAddress(id: Int!): Address
    @dbquery(
      type: "postgresql"
      schema: "public"
      table: "address"
      dml: DELETE
      configuration: "postgresql_config"
    )
  insertAddress(
    city: String
    id: Int!
    stateprovince: String
    postalcode: String
    street: String
    countryregion: String
  ): Address
    @dbquery(
      type: "postgresql"
      schema: "public"
      table: "address"
      dml: INSERT
      configuration: "postgresql_config"
    )
  updateAddress(
    id: Int!
    city: String
    countryregion: String
    postalcode: String
    stateprovince: String
    street: String
  ): Address
    @dbquery(
      type: "postgresql"
      schema: "public"
      query: """
      UPDATE "address" SET
        "city" = COALESCE($2, "city"),
        "countryregion" = COALESCE($3, "countryregion"),
        "postalcode" = COALESCE($4, "postalcode"),
        "stateprovince" = COALESCE($5, "stateprovince"),
        "street" = COALESCE($6, "street")
      WHERE
        "id" = $1
      RETURNING *
      """
      configuration: "postgresql_config"
    )
  " Mutations for type 'Customer' "
  deleteCustomer(id: Int!): Customer
    @dbquery(
      type: "postgresql"
      schema: "public"
      table: "customer"
      dml: DELETE
      configuration: "postgresql_config"
    )
  insertCustomer(name: String!, email: String!): Customer
    @dbquery(
      type: "postgresql"
      schema: "public"
      table: "customer"
      dml: INSERT
      configuration: "postgresql_config"
    )
  updateCustomer(id: Int!, email: String, name: String): Customer
    @dbquery(
      type: "postgresql"
      schema: "public"
      query: """
      UPDATE "customer" SET
        "email" = COALESCE($2, "email"),
        "name" = COALESCE($3, "name")
      WHERE
        "id" = $1
      RETURNING *
      """
      configuration: "postgresql_config"
    )
  " Mutations for type 'Lineitem' "
  deleteLineitem(quantity: Int!, productid: Int!, orderid: Int!): Lineitem
    @dbquery(
      type: "postgresql"
      schema: "public"
      table: "lineitem"
      dml: DELETE
      configuration: "postgresql_config"
    )
  insertLineitem(quantity: Int, productid: Int!, orderid: Int!): Lineitem
    @dbquery(
      type: "postgresql"
      schema: "public"
      table: "lineitem"
      dml: INSERT
      configuration: "postgresql_config"
    )
  " Mutations for type 'Order' "
  deleteOrder(id: Int!): Order
    @dbquery(
      type: "postgresql"
      schema: "public"
      table: "order"
      dml: DELETE
      configuration: "postgresql_config"
    )
  insertOrder(
    carrier: String
    customerid: Int!
    id: Int!
    shippingcost: Float
    trackingid: String
    createdat: Date!
  ): Order
    @dbquery(
      type: "postgresql"
      schema: "public"
      table: "order"
      dml: INSERT
      configuration: "postgresql_config"
    )
  updateOrder(
    id: Int!
    carrier: String
    createdat: Date
    customerid: Int
    shippingcost: Float
    trackingid: String
  ): Order
    @dbquery(
      type: "postgresql"
      schema: "public"
      query: """
      UPDATE "order" SET
        "carrier" = COALESCE($2, "carrier"),
        "createdat" = COALESCE($3, "createdat"),
        "customerid" = COALESCE($4, "customerid"),
        "shippingcost" = COALESCE($5, "shippingcost"),
        "trackingid" = COALESCE($6, "trackingid")
      WHERE
        "id" = $1
      RETURNING *
      """
      configuration: "postgresql_config"
    )
  " Mutations for type 'Product' "
  deleteProduct(id: Int!): Product
    @dbquery(
      type: "postgresql"
      schema: "public"
      table: "product"
      dml: DELETE
      configuration: "postgresql_config"
    )
  insertProduct(
    image: String
    description: String
    title: String
    id: Int!
  ): Product
    @dbquery(
      type: "postgresql"
      schema: "public"
      table: "product"
      dml: INSERT
      configuration: "postgresql_config"
    )
  updateProduct(
    id: Int!
    description: String
    image: String
    title: String
  ): Product
    @dbquery(
      type: "postgresql"
      schema: "public"
      query: """
      UPDATE "product" SET
        "description" = COALESCE($2, "description"),
        "image" = COALESCE($3, "image"),
        "title" = COALESCE($4, "title")
      WHERE
        "id" = $1
      RETURNING *
      """
      configuration: "postgresql_config"
    )
}
api/postgresql/index.graphqlの修正
以下は、stepzen 0.33.0以降では不要になったようです。
デフォルトでは、多対多のリレーションテーブルであるlineitemが配列になっていなかったので、以下のように修正します
- lineitem: Lineitem @materializer(query: "lineitemUsingLineitem_orderid_fkey")
+ lineitem: [Lineitem] @materializer(query: "lineitemUsingLineitem_orderid_fkey")
- lineitemUsingLineitem_orderid_fkey(id: Int!): Lineitem
+ lineitemUsingLineitem_orderid_fkey(id: Int!): [Lineitem]
デプロイ
以下のコマンドでデプロイします。
stepzen start
StepZen Dashboardにアクセスすると下記のような画面が表示され、クエリを試すことができます。

以上で、StepZenを用いて、既存のデータベースからGraphQL APIを構築することができました。
3. GraphQL API 呼び出し
次に、先ほど作成したReactアプリからGraphQL APIを呼び出す修正を加えていきます。
GraphQLクエリの作成
まず、StepZen Dashboardから、GraphQLクエリを作成していきます。
ダッシュボードの上部Builderボタンをクリックし右側に出てくるスキーマ情報から必要なデータを選ぶことで、自動でGraphQLクエリを作成することができます。

今回、引数となるカスタマーIDを変数にするために、ダッシュボード左側のクエリを以下のように修正します。
query GetOrders($id: Int!) {
  customer(id: $id) {
    order {
      lineitem {
        product {
          id
          image
          title
        }
      }
      id
      createdat
    }
    id
    name
  }
}
ダッシュボードの画面左下のVariablesに変数の値をjson形式で入力することで、ダッシュボードから実行できます。
{
  "id": 4
}
入力後、以下のような画面となります。
また、上部のConnectボタンを押すことで、GraphQL APIを呼び出すためのクライアントコードを取得できます。今回は、React Apolloのコードを活用し呼び出しがわを実装していきます。
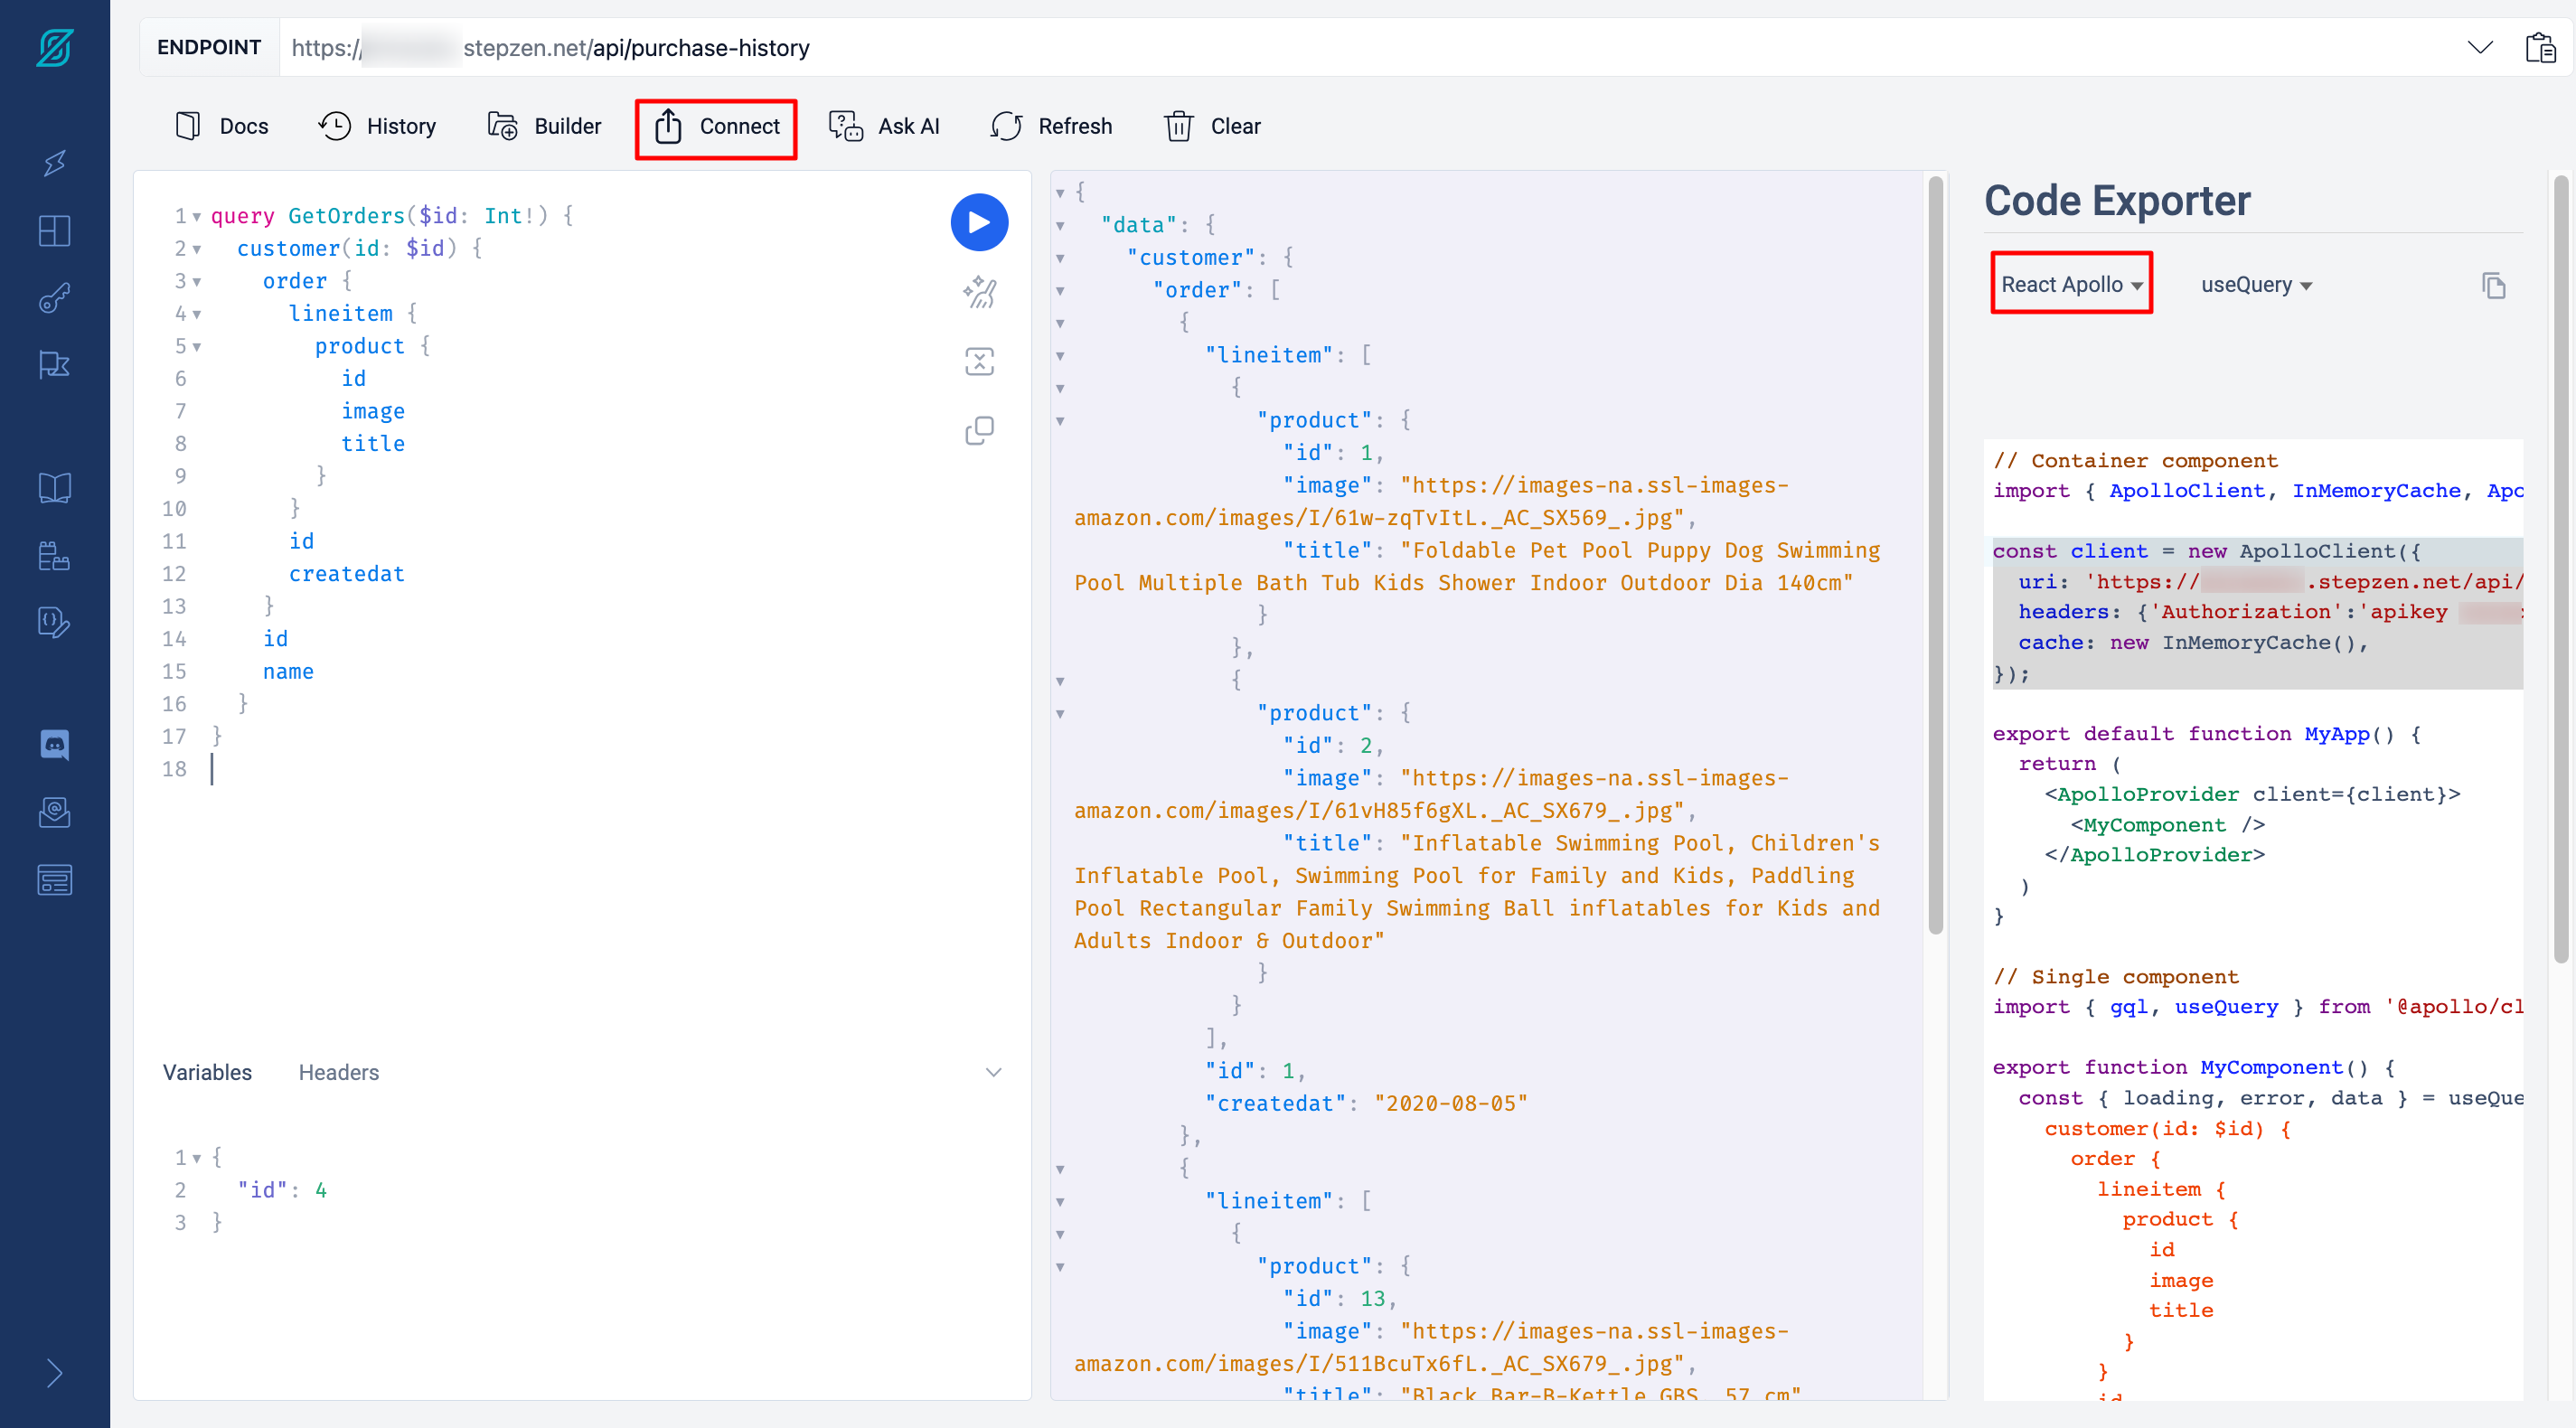
GraphQL API 呼び出し
GraphQLクエリを作成できたので、次にReact/NextコードにGraphQL API呼び出し部分を実装していきます。
今回、Apollo クライアントを用いるため、npmコマンドを用いてインストールします。
npm install @apollo/client
Apollo クライアントから GraphQL API にアクセスするために、下記ファイルを作成します。接続情報は環境変数から読み出しています。
// pages/_app.tsx

import { AppProps } from "next/app"; // AppProps をインポート
import { ApolloProvider } from "@apollo/client";
import { ApolloClient, InMemoryCache } from "@apollo/client";

const apiKey = process.env.NEXT_PUBLIC_API_KEY || "invalid-api-key";
const uri = process.env.NEXT_PUBLIC_API_URI || "invalid-api-uri";

const client = new ApolloClient({
  uri: uri,
  headers: { Authorization: `apikey ${apiKey}` },
  cache: new InMemoryCache(),
});

function MyApp({ Component, pageProps }: AppProps) {
  return (
    <ApolloProvider client={client}>
      <Component {...pageProps} />
    </ApolloProvider>
  );
}

export default MyApp;
環境変数は.envファイルに記載します。
NEXT_PUBLIC_API_URI=https://xxx.stepzen.net/api/todos/__graphql
NEXT_PUBLIC_API_KEY=xxx::stepzen.net+1000::yyy
API Key は StepZen の下記画面から取得できます。
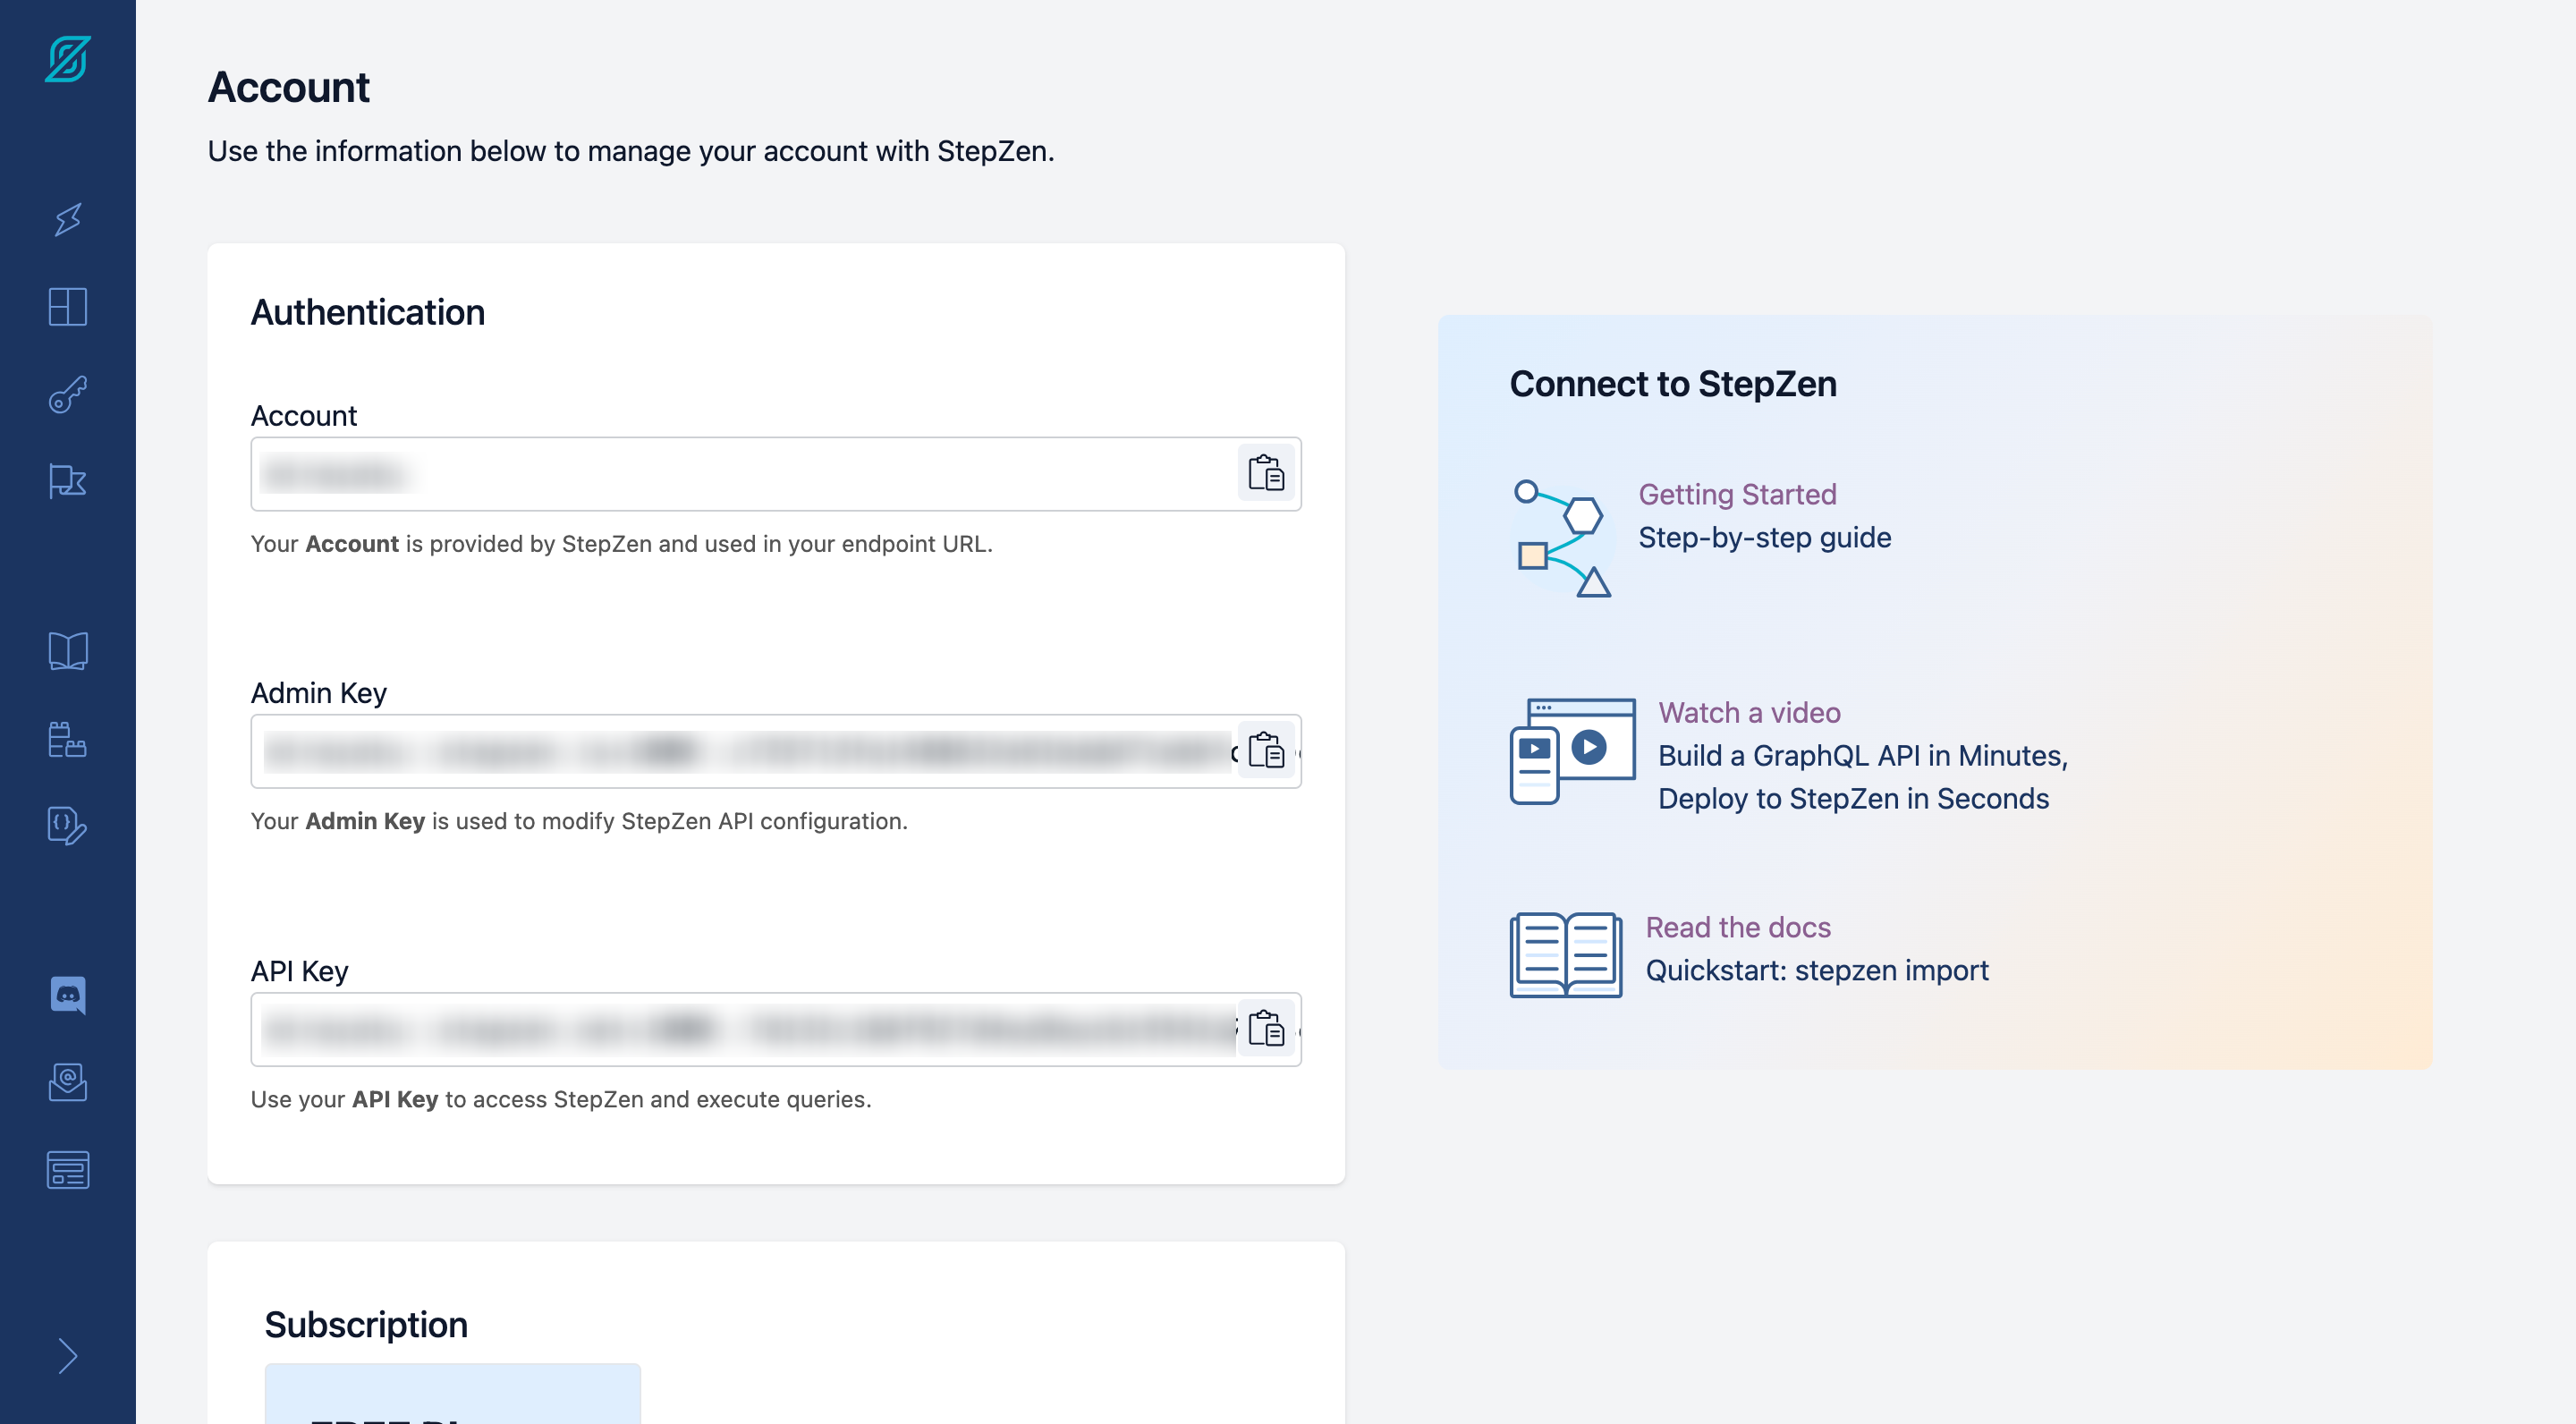
また、URL は StepZen の下記画面から取得できます。

次に、GraphQL API にアクセスし購入履歴情報を取得するために、以下の通り修正します。gqlを用いて GraphQL のクエリを定義し、useQueryを用いて GraphQL API を呼び出します。最後に、表示するデータを取得したデータに変更することで、GraphQL API を呼び出すことができます。
// pages/index.tsx

import {
  AppBar,
  Avatar,
  Paper,
  Table,
  TableBody,
  TableCell,
  TableContainer,
  TableHead,
  TableRow,
  Toolbar,
  Typography,
} from "@mui/material";
import type { NextPage } from "next";
+ import { useQuery, gql } from "@apollo/client";

type Order = {
  id: number;
  createdat: string;
  lineitem: Lineitem[];
};

type Lineitem = {
  product: Product;
};

type Product = {
  id: number;
  title: string;
  image: string;
};

const Home: NextPage = () => {
-   const orders: Order[] = [
-     {
-       id: 1,
-       createdat: "2023-09-25",
-       lineitem: [
-         {
-           product: {
-             id: 1,
-             title: "Apple",
-             image: "apple-image-url",
-           },
-         },
-         {
-           product: {
-             id: 2,
-             title: "Banana",
-             image: "banana-image-url",
-           },
-         },
-       ],
-     },
-     {
-       id: 2,
-       createdat: "2023-09-25",
-       lineitem: [
-         {
-           product: {
-             id: 1,
-             title: "Tomato",
-             image: "tomato-image-url",
-           },
-         },
-       ],
-     },
-   ];
+   const { loading, error, data } = useQuery(
+     gql`
+       query GetOrders($id: Int!) {
+         customer(id: $id) {
+           order {
+             lineitem {
+               product {
+                 id
+                 image
+                 title
+               }
+             }
+             id
+             createdat
+           }
+           id
+           name
+         }
+       }
+     `,
+     {
+       variables: { id: 4 },
+     }
+   );
+
+   if (loading) return <p>Loading...</p>;
+   if (error) return <p>Something went wrong...</p>;
+
+   const orders: Order[] = data.customer.order;

  return (
    <div>
      <AppBar position="static">
        <Toolbar>
          <Typography variant="h6" component="div" sx={{ flexGrow: 1 }}>
            Purchase History
          </Typography>
        </Toolbar>
      </AppBar>
      <div>
        {orders.map((order: Order) => (
          <Paper key={order.id} style={{ marginBottom: "16px" }}>
            <Typography variant="h6" style={{ padding: "16px" }}>
              Order ID: {order.id}
            </Typography>
            <TableContainer>
              <Table>
                <TableHead>
                  <TableRow>
                    <TableCell style={{ width: 20 }}>Image</TableCell>
                    <TableCell style={{ width: 1000 }}>Name</TableCell>
                  </TableRow>
                </TableHead>
                <TableBody>
                  {order.lineitem.map((lineitem) => (
                    <TableRow key={lineitem.product.id}>
                      <TableCell>
                        <Avatar
                          variant="square"
                          src={lineitem.product.image}
                          sx={{ width: 100, height: 100 }}
                        />
                      </TableCell>
                      <TableCell>{lineitem.product.title}</TableCell>
                    </TableRow>
                  ))}
                </TableBody>
              </Table>
            </TableContainer>
          </Paper>
        ))}
      </div>
    </div>
  );
};

export default Home;
実際のコードも以下に示します。
// pages/index.tsx

import {
  AppBar,
  Avatar,
  Paper,
  Table,
  TableBody,
  TableCell,
  TableContainer,
  TableHead,
  TableRow,
  Toolbar,
  Typography,
} from "@mui/material";
import type { NextPage } from "next";
import { useQuery, gql } from "@apollo/client";

type Order = {
  id: number;
  createdat: string;
  lineitem: Lineitem[];
};

type Lineitem = {
  product: Product;
};

type Product = {
  id: number;
  title: string;
  image: string;
};

const Home: NextPage = () => {
  const { loading, error, data } = useQuery(
    gql`
      query GetOrders($id: Int!) {
        customer(id: $id) {
          order {
            lineitem {
              product {
                id
                image
                title
              }
            }
            id
            createdat
          }
          id
          name
        }
      }
    `,
    {
      variables: { id: 4 },
    }
  );

  if (loading) return <p>Loading...</p>;
  if (error) return <p>Something went wrong...</p>;

  const orders: Order[] = data.customer.order;

  return (
    <div>
      <AppBar position="static">
        <Toolbar>
          <Typography variant="h6" component="div" sx={{ flexGrow: 1 }}>
            Purchase History
          </Typography>
        </Toolbar>
      </AppBar>
      <div>
        {orders.map((order: Order) => (
          <Paper key={order.id} style={{ marginBottom: "16px" }}>
            <Typography variant="h6" style={{ padding: "16px" }}>
              Order ID: {order.id}
            </Typography>
            <TableContainer>
              <Table>
                <TableHead>
                  <TableRow>
                    <TableCell style={{ width: 20 }}>Image</TableCell>
                    <TableCell style={{ width: 1000 }}>Name</TableCell>
                  </TableRow>
                </TableHead>
                <TableBody>
                  {order.lineitem.map((lineitem) => (
                    <TableRow key={lineitem.product.id}>
                      <TableCell>
                        <Avatar
                          variant="square"
                          src={lineitem.product.image}
                          sx={{ width: 100, height: 100 }}
                        />
                      </TableCell>
                      <TableCell>{lineitem.product.title}</TableCell>
                    </TableRow>
                  ))}
                </TableBody>
              </Table>
            </TableContainer>
          </Paper>
        ))}
      </div>
    </div>
  );
};

export default Home;
以上で、GraphQL APIを呼び出し実装が完了しました。
最後に、下記コマンドを実行しブラウザからlocalhost:3000にアクセスすることで、画面が表示されます。
npm run dev
おわりに
本記事では、StepZen を用いて PostgreSQL のデータを GraphQL API に変換し、React および Next を用いて Web アプリを作成する方法について説明しました。GraphQL を用いることで簡単にデータを取得できること、StepZen を用いることで簡単に GraphQL API を作成できることを感じてもらえたら幸いです。