※全てのオプションは網羅していません。
全てのオプションを確認したい場合は、 公式ドキュメント を参照。
カラムオプション
基本
var grid = document.getElementById('grid');

new Handsontable(grid, {
    columns: [
        {
            type: 'text'
        }
    ]
});
- カラムのオプション指定は、
columnsに配列を渡し、列番号に対応する要素にオブジェクトを渡すことで設定する。
type:カラムの型を指定する
text:テキスト
var grid = document.getElementById('grid');

new Handsontable(grid, {
    columns: [
        {
            type: 'text'
        }
    ]
});
- デフォルトは
text。 - 文字列入力になる。
- 基本、何でも入力可能。
- 文字は自動で左寄せになる。
numeric:数値
var grid = document.getElementById('grid');

var table = new Handsontable(grid, {
    columns: [
        {
            type: 'numeric'
        }
    ]
});
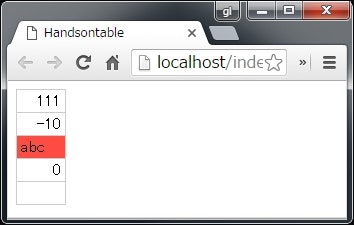
- 数値の入力のみ可になる。
- 数値以外を入力するとセルが赤くなる。
- 文字は自動で右寄せになる。
フォーマットする
var grid = document.getElementById('grid');

var table = new Handsontable(grid, {
    columns: [
        {
            type: 'numeric',
            format: '0,000.99'
        }
    ]
});
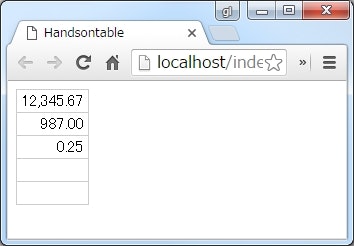
-
formatでフォーマットを指定できる。 - 全部は確かめてないけど、 Numeral.js にあるフォーマットが使えるっぽい。
checkbox:チェックボックス
var grid = document.getElementById('grid');

new Handsontable(grid, {
    data: [
        [true],
        [false],
        [true]
    ],
    columns: [
        {
            type: 'checkbox'
        }
    ]
});
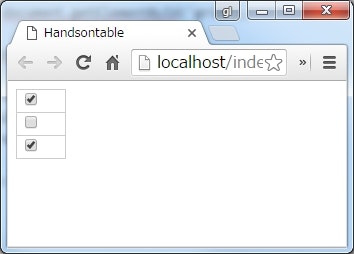
-
checkboxでチェックボックスになる。 -
trueでチェックがオンになり、falseでオフになる。
checkedTemplate, uncheckedTemplate:オン・オフの値を変更する
var grid = document.getElementById('grid');

new Handsontable(grid, {
    data: [
        ['no'],
        ['yes'],
        ['no']
    ],
    columns: [
        {
            type: 'checkbox',
            checkedTemplate: 'yes',
            uncheckedTemplate: 'no'
        }
    ]
});
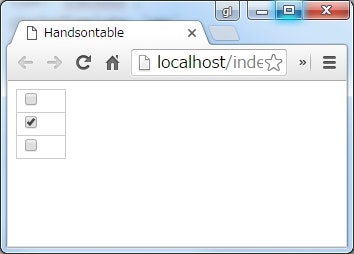
-
checkedTemplateでオンとなる値を、 -
uncheckedTemplateでオフとなる値を指定できる。
label:ラベルを表示する
var grid = document.getElementById('grid');

new Handsontable(grid, {
    data: [
        [false],
        [true],
        [false]
    ],
    columns: [
        {
            type: 'checkbox',
            label: {
                value: 'チェックボックスやで'
            }
        }
    ]
});

-
labelのvalueでチェックボックスの横に表示させる文字列(ラベル)を指定できる。 - デフォルトはチェックボックスの右側に表示される。
- 左に表示させたい場合は、
positionにbeforeを指定する。
var grid = document.getElementById('grid');

new Handsontable(grid, {
    data: [
        [false],
        [true],
        [false]
    ],
    columns: [
        {
            type: 'checkbox',
            label: {
                value: 'チェックボックスやで',
                position: 'before'
            }
        }
    ]
});

- デフォルトは
afterなので右側に出てる。
autocomplete:オートコンプリート
基本
var grid = document.getElementById('grid');

new Handsontable(grid, {
    columns: [
        {
            type: 'autocomplete',
            source: ['one', 'two', 'three', 'four', 'five']
        }
    ]
});
-
typeをautocompleteにしてsourceを指定すると、オートコンプリートが表示されるようになる。 - 候補の検索は、部分一致で行われる。
- デフォルトは
sourceで定義した値以外も入力できる。
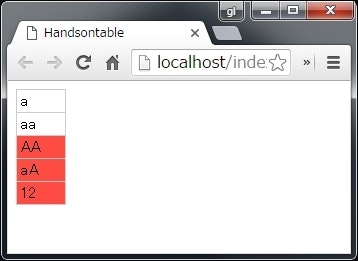
strict:入力できる値を制限する
var grid = document.getElementById('grid');

new Handsontable(grid, {
    columns: [
        {
            type: 'autocomplete',
            source: ['one', 'two', 'three', 'four', 'five'],
            strict: true
        }
    ]
});
-
strictをtrueにすると、sourceで挙げた値しか入力が許可されなくなる。 - オートコンプリートの補完途中で
Enterなどで入力を終了させると、そのとき選択されていた項目で自動的に入力値が埋め込まれる。 -
sourceにない値を無理やり入力すると、セルの背景色が赤くなる。
入力できる値を完全に制限する
var grid = document.getElementById('grid');

new Handsontable(grid, {
    columns: [
        {
            type: 'autocomplete',
            source: ['one', 'two', 'three', 'four', 'five'],
            strict: true,
            allowInvalid: false
        }
    ]
});
-
allowInvalidにfalseを設定すると、sourceで指定した値以外は全く入力できなくなる。-
allowInvalid自体は他のtypeでも使用可能。
-
-
Enterなどで入力を終了させようとしても、終了させられなくなる。 -
Escで入力を終了させられる。
source に関数を指定する
var grid = document.getElementById('grid');

new Handsontable(grid, {
    columns: [
        {
            type: 'autocomplete',
            source: function(query, process) {
                console.log('query=' + query);
                process(['hoge', 'fuga', 'piyo']);
            }
        }
    ]
});

コンソール
query=o
-
sourceに関数を指定できる。 - 第一引数に入力された文字列が渡される。
- 第二引数には関数が渡される。
- この関数の引数に入力候補となる配列を渡して実行すると、オートコンプリートが表示される。
- Ajax を利用して入力候補を動的生成したいときなどに利用する。
filter:候補を絞りこまないようにする
var grid = document.getElementById('grid');

new Handsontable(grid, {
    columns: [
        {
            type: 'autocomplete',
            source: ['hoge', 'fuga', 'piyo'],
            filter: false
        }
    ]
});
- デフォルトでは、入力された値に合わせて候補が絞りこまれていく。
-
filterにfalseを指定すると、絞り込みがされなくなる。
password:パスワード
var grid = document.getElementById('grid');

new Handsontable(grid, {
    columns: [
        {
            type: 'password'
        }
    ]
});
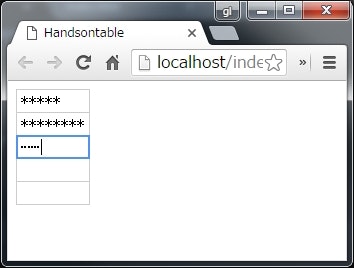
- 入力中の値、入力された値、が全てマスキングされる。
hashLength:表示を固定長にする
var grid = document.getElementById('grid');

new Handsontable(grid, {
    columns: [
        {
            type: 'password',
            hashLength: 10
        }
    ]
});
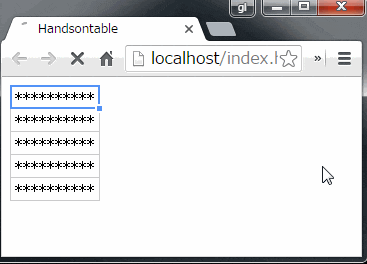
- 表示がマスクされていても桁数が分かると内容を推測される危険性がある。
-
hashLengthに桁数を指定すれば、入力の内容に関わらず常に指定したサイズのマスキングされた文字列が表示されるようになる。
hashSymbol:マスク文字を指定する
var grid = document.getElementById('grid');

new Handsontable(grid, {
    columns: [
        {
            type: 'password',
            hashSymbol: '@'
        }
    ]
});
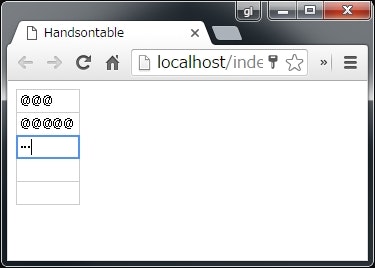
-
hashSymbolでマスクに任意の文字を指定できる。
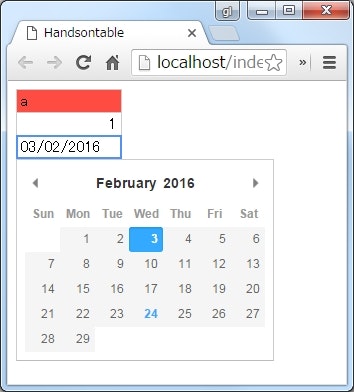
date:日付
var grid = document.getElementById('grid');

new Handsontable(grid, {
    columns: [
        {
            type: 'date'
        }
    ]
});
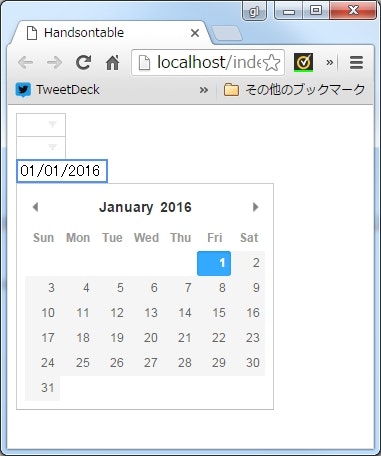
-
dateにすると日付入力になる。 - セルの編集を開始すると、カレンダーが表示される。
- デフォルトで不正な日付をチェックしてくれる。
dateFormat:日付書式を指定する
var grid = document.getElementById('grid');

new Handsontable(grid, {
    columns: [
        {
            type: 'date',
            dateFormat: 'YYYY-MM-DD'
        }
    ]
});

-
dateFormatで日付書式を指定できる。 - 書式の指定方法は Moment.js | Docs を参照。
defaultDate:初期値を指定する
var grid = document.getElementById('grid');

new Handsontable(grid, {
    columns: [
        {
            type: 'date',
            defaultDate: '01/01/2016'
        }
    ]
});
-
defaultDateで編集を開始したときの初期日付を指定できる。
datePickerConfig:細かい動作を調整する
var grid = document.getElementById('grid');

new Handsontable(grid, {
    columns: [
        {
            type: 'date',
            datePickerConfig: {
                minDate: new Date()
            }
        }
    ]
});
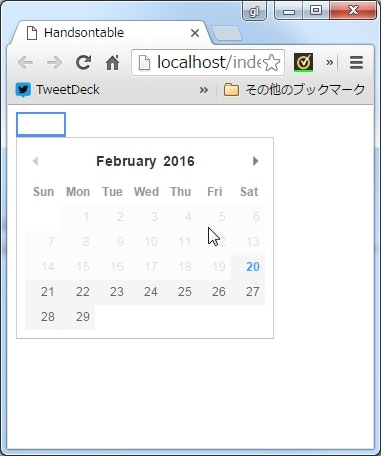
- カレンダーの表示には、 Pikaday というライブラリが使用されている。
-
datePickerConfigで、この Pikaday の設定 を指定できる。 - 細かい調整は、この設定で行う。
- 例では、
minDateを使って選択できる最小の日付を指定している。
renderer:セルの出力を制御する
html をそのまま出力する
var grid = document.getElementById('grid');

new Handsontable(grid, {
    data: [
        ['<u>underline</u>'],
        ['<a href="http://google.co.jp/">google</a>'],
        ['<button onclick="alert(\'hello\')">click</button>']
    ],
    columns: [
        {
            renderer: 'html'
        }
    ]
});
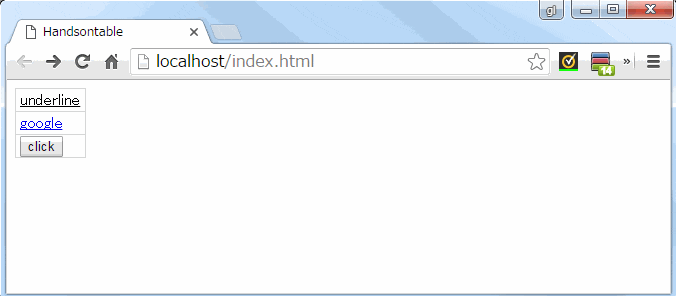
-
rendererにhtmlを指定すると、 HTML のタグがそのまま表示される。 - スクリプトも動くので、ユーザーが任意に入力できる場合はサニタイズが必要。
サニタイズする
var grid = document.getElementById('grid');

new Handsontable(grid, {
    data: [
        ['<u>underline</u>'],
        ['<a href="http://google.co.jp/">google</a>'],
        ['<button onclick="alert(\'hello\')">click</button>']
    ],
    columns: [
        {
            renderer: function(instance, td, row, col, prop, value, cellProperties) {
                var escaped = Handsontable.helper.stringify(value);
                escaped = strip_tags(escaped, '<u><a>');
                td.innerHTML = escaped;
            }
        }
    ]
});

// original by: Kevin van Zonneveld (http://kevin.vanzonneveld.net)
function strip_tags(input, allowed) {
    var tags = /<\/?([a-z][a-z0-9]*)\b[^>]*>/gi,
        commentsAndPhpTags = /<!--[\s\S]*?-->|<\?(?:php)?[\s\S]*?\?>/gi;

    // making sure the allowed arg is a string containing only tags in lowercase (<a><b><c>)
    allowed = (((allowed || "") + "").toLowerCase().match(/<[a-z][a-z0-9]*>/g) || []).join('');

    return input.replace(commentsAndPhpTags, '').replace(tags, function ($0, $1) {
        return allowed.indexOf('<' + $1.toLowerCase() + '>') > -1 ? $0 : '';
    });
}
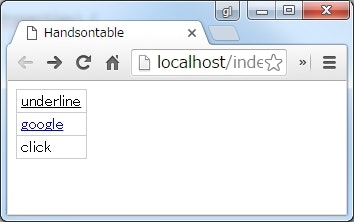
- 公式のユーザーガイド に載ってた、頑張ってサニタイズする方法。
allowEmpty:空入力を許可する
var grid = document.getElementById('grid');

new Handsontable(grid, {
    data: [
        [
            'text', 'text', 'text',
            1, 2, 3,
            '2015/01/01', '2015/01/01', '2015/01/01',
            'foo', 'bar', 'foo'
        ]
    ],
    allowEmpty: false,
    columns: [
        {type: 'text'},
        {allowEmpty: true, type: 'text'},
        {allowEmpty: false, type: 'text'},
        {type: 'numeric'},
        {allowEmpty: true, type: 'numeric'},
        {allowEmpty: false, type: 'numeric'},
        {type: 'date'},
        {allowEmpty: true, type: 'date'},
        {allowEmpty: false, type: 'date'},
        {type: 'autocomplete', source: ['foo', 'bar']},
        {allowEmpty: true, type: 'autocomplete', source: ['foo', 'bar']},
        {allowEmpty: false, type: 'autocomplete', source: ['foo', 'bar']},
    ]
});

-
trueを設定すると、空入力を許可する。 -
falseだと空入力するとエラーに(背景が赤く)なる。 - デフォルトは
trueなので、空入力可能。 - ただし、カラムの型によっては効かないっぽい。
- グリッド全体への指定と、個々のカラムへの指定の両方ができる。
readonly:読み取り専用
var grid = document.getElementById('grid');

new Handsontable(grid, {
    data: [
        ['hoge', 'fuga']
    ],
    columns: [
        {
            readOnly: true
        },
        {
        }
    ]
});
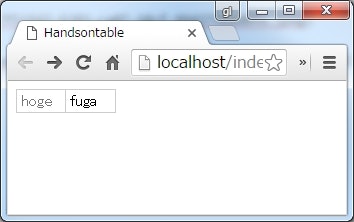
-
readOnlyをtrueにすると、そのカラムは読み取り専用になる。 -
Oは大文字。
allowInvalid:不正な値の入力可否を制御する
var grid = document.getElementById('grid');

new Handsontable(grid, {
    columns: [
        {
            type: 'numeric',
            allowInvalid: false
        }
    ]
});
-
allowInvalidにfalseを指定すると、不正な値は入力を確定できなくなる。-
typeにnumericを指定しているので、数値以外の文字を入力しようとしても、Enterを押しても入力が確定できない。
-
- デフォルトは
trueなので、入力を確定することはできる。- しかし、不正な値が入力されている場合は、セルが赤色に着色される。
validator:入力値を制限する
正規表現で指定する
var grid = document.getElementById('grid');

new Handsontable(grid, {
    columns: [
        {
            validator: /^[a-z]+$/
        }
    ]
});
-
validatorに正規表現(RegExpオブジェクト)を渡すと、その正規表現にマッチする値だけが入力OKになる。
関数で指定する
var grid = document.getElementById('grid');

new Handsontable(grid, {
    columns: [
        {
            validator: function(value, callback) {
                console.log(value);
                callback(value === 'hoge');
            }
        }
    ]
});
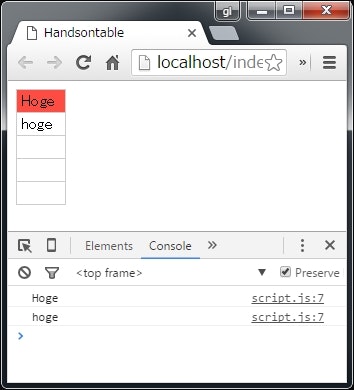
-
validatorに関数を指定することもできる。 - 第一引数に、セルの値が渡される。
- 第二引数には関数が渡される。
- この関数に
trueを渡せば検証OK、falseを渡せば検証NG扱いになる。
- この関数に
className:CSSクラスを設定する
var grid = document.getElementById('grid');

new Handsontable(grid, {
    columns: [
        {className: 'foo'},
        {}
    ],
    cell: [
        {col: 1, row: 0, className: 'bar'}
    ]
});
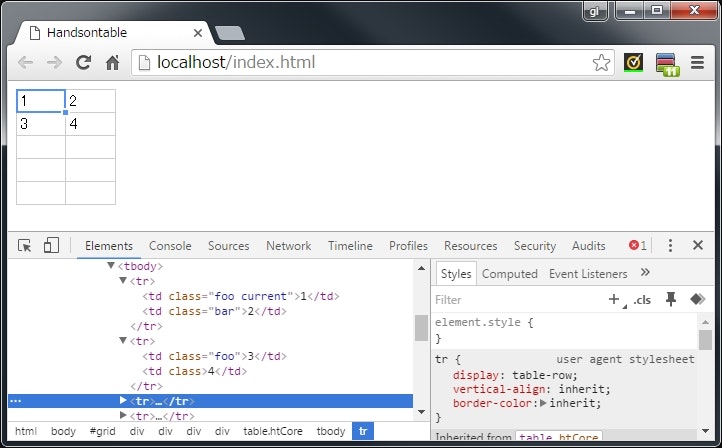
-
<td>タグに任意の CSS クラスを設定できる。 -
columnsで指定すれば、その列の全ての<td>タグに CSS クラスが設定される。
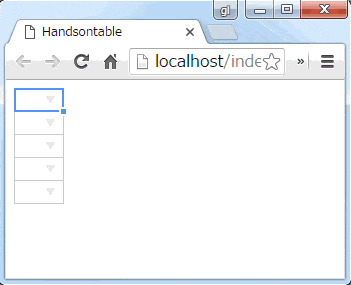
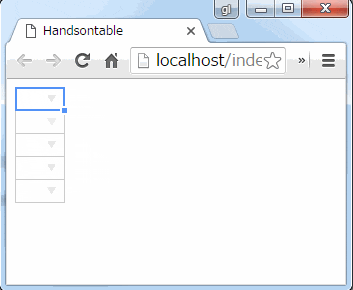
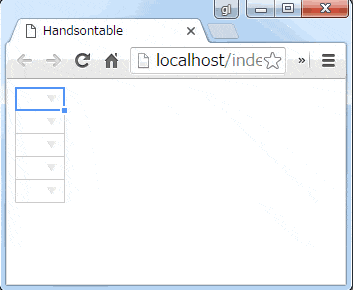
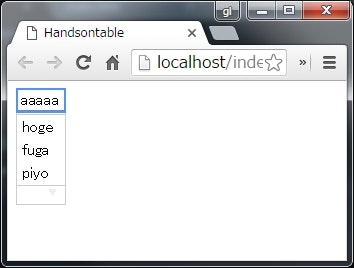
セルの編集をドロップダウンにする
var grid = document.getElementById('grid');

new Handsontable(grid, {
    columns: [
        {
            editor: 'select',
            selectOptions: ['hoge', 'fuga', 'piyo']
        }
    ]
});
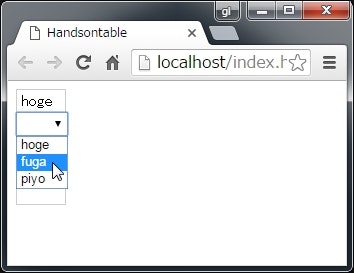
-
editorにselectを指定して、selectOptionsに選択肢を配列で渡す。
セルを指定してオプションを設定する
var grid = document.getElementById('grid');

new Handsontable(grid, {
    columns: [
        {type: 'numeric'}
    ],
    cell: [
        {col: 0, row: 2, type: 'date'}
    ]
});
-
cellオプションを使うと、任意のセルを指定してオプションの上書きができる。
関数でセルのオプションを設定する
var grid = document.getElementById('grid');

new Handsontable(grid, {
    cells: function(row, cols, prop) {
        return row % 2 === 0 ? {type: 'date'} : {type: 'numeric'};
    }
});
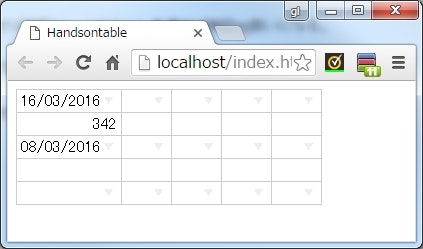
-
cellsオプションに関数を渡すと、セルごとの関数がコールバックされる。 - 関数が返したオブジェクトが、セルのオプションになる。