頭部方向推定?
頭部方向推定、英語ではHead Pose Estimationです。入力された画像情報と顔の特徴量データから顔が向いている方向や頭部の傾きなどを推定するアルゴリズムです。最近ではVtuberの開発などに大いに利用されています。
頭部方向推定手法
頭部方向推定方法はすでにQiitaでもいくつか方法が紹介されています。Qiitaの記事ではこちらがとてもよくまとめられています。
顔向き推定について調査中
PythonとOpenCV+dlibを用いた頭部推定方法については多分みなさんが参考にしている記事はこちらだと思います。
Head Pose Estimation using OpenCV and Dlib
顔方向推定のアルゴリズムについてはこのページのHow do pose estimation algorithms work ?の項に超詳しく書いてあります。
プログラムの一例
とりあえず記事で紹介されているプログラムを書いてみます。
顔認識用のdatファイルはこちらからダウンロードできます。
[dlib.net]顔認識用68点学習済みデータ[DL]
モジュールの読み込み
# !/usr/bin/env python3
# -*- coding: utf-8 -*-

import cv2 #OpenCV:画像処理系ライブラリ
import dlib #機械学習系ライブラリ
import imutils #OpenCVの補助
from imutils import face_utils
import numpy as np
画像処理にOpenCV、画像認識にdlib、そして画面に表示する補助としてimutilsをインポートしています。
カメラと顔検出器の設定
DEVICE_ID = 0 # 使用するカメラのID 0は標準webカメラ
capture = cv2.VideoCapture(DEVICE_ID)#dlibの学習済みデータの読み込み
predictor_path = ",,,/shape_predictor_68_face_landmarks.dat"
# 学習済みdatファイルのパスをコピペ

detector = dlib.get_frontal_face_detector() #顔検出器の呼び出し。ただ顔だけを検出する。
predictor = dlib.shape_predictor(predictor_path) #顔から目鼻などランドマークを出力する
詳しいdlibの関数についてはこちらを参考してください。
dlib documentation
頭部方向推定の中身
カメラから一コマずつ取得し処理を行います。
while(True): #カメラから連続で画像を取得する
    ret, frame = capture.read() #カメラからキャプチャしてframeに1コマ分の画像データを入れる

    frame = imutils.resize(frame, width=1000) #frameの画像の表示サイズを整える
    gray = cv2.cvtColor(frame, cv2.COLOR_BGR2GRAY) #gray scaleに変換する
    rects = detector(gray, 0) #grayから顔を検出
    image_points = None

    for rect in rects:
        shape = predictor(gray, rect)
        shape = face_utils.shape_to_np(shape)

        for (x, y) in shape: #顔全体の68箇所のランドマークをプロット
            cv2.circle(frame, (x, y), 1, (255, 255, 255), -1)

        image_points = np.array([
                tuple(shape[30]),#鼻頭
                tuple(shape[21]),
                tuple(shape[22]),
                tuple(shape[39]),
                tuple(shape[42]),
                tuple(shape[31]),
                tuple(shape[35]),
                tuple(shape[48]),
                tuple(shape[54]),
                tuple(shape[57]),
                tuple(shape[8]),
                ],dtype='double')

    if len(rects) > 0:
        cv2.FONT_HERSHEY_PLAIN, 0.7, (0, 0, 255), 2)
        model_points = np.array([
                (0.0,0.0,0.0), # 30
                (-30.0,-125.0,-30.0), # 21
                (30.0,-125.0,-30.0), # 22
                (-60.0,-70.0,-60.0), # 39
                (60.0,-70.0,-60.0), # 42
                (-40.0,40.0,-50.0), # 31
                (40.0,40.0,-50.0), # 35
                (-70.0,130.0,-100.0), # 48
                (70.0,130.0,-100.0), # 54
                (0.0,158.0,-10.0), # 57
                (0.0,250.0,-50.0) # 8
                ])

        size = frame.shape

        focal_length = size[1]
        center = (size[1] // 2, size[0] // 2) #顔の中心座標

        camera_matrix = np.array([
            [focal_length, 0, center[0]],
            [0, focal_length, center[1]],
            [0, 0, 1]
        ], dtype='double')

        dist_coeffs = np.zeros((4, 1))

        (success, rotation_vector, translation_vector) = cv2.solvePnP(model_points, image_points, camera_matrix,
                                                                      dist_coeffs, flags=cv2.SOLVEPNP_ITERATIVE)
        #回転行列とヤコビアン
        (rotation_matrix, jacobian) = cv2.Rodrigues(rotation_vector)
        mat = np.hstack((rotation_matrix, translation_vector))

        #yaw,pitch,rollの取り出し
        (_, _, _, _, _, _, eulerAngles) = cv2.decomposeProjectionMatrix(mat)
        yaw = eulerAngles[1]
        pitch = eulerAngles[0]
        roll = eulerAngles[2]

        print("yaw",int(yaw),"pitch",int(pitch),"roll",int(roll))#頭部姿勢データの取り出し

        cv2.putText(frame, 'yaw : ' + str(int(yaw)), (20, 10), cv2.FONT_HERSHEY_PLAIN, 1, (0, 0, 255), 2)
        cv2.putText(frame, 'pitch : ' + str(int(pitch)), (20, 25), cv2.FONT_HERSHEY_PLAIN, 1, (0, 0, 255), 2)
        cv2.putText(frame, 'roll : ' + str(int(roll)), (20, 40), cv2.FONT_HERSHEY_PLAIN, 1, (0, 0, 255), 2)

        (nose_end_point2D, _) = cv2.projectPoints(np.array([(0.0, 0.0, 500.0)]), rotation_vector,
                                                         translation_vector, camera_matrix, dist_coeffs)
        #計算に使用した点のプロット/顔方向のベクトルの表示
        for p in image_points:
            cv2.drawMarker(frame, (int(p[0]), int(p[1])),  (0.0, 1.409845, 255),markerType=cv2.MARKER_CROSS, thickness=1)

        p1 = (int(image_points[0][0]), int(image_points[0][1]))
        p2 = (int(nose_end_point2D[0][0][0]), int(nose_end_point2D[0][0][1]))

        cv2.arrowedLine(frame, p1, p2, (255, 0, 0), 2)

    cv2.imshow('frame',frame) # 画像を表示する
    if cv2.waitKey(1) & 0xFF == ord('q'): #qを押すとbreakしてwhileから抜ける
        break


capture.release() #video captureを終了する
cv2.destroyAllWindows() #windowを閉じる
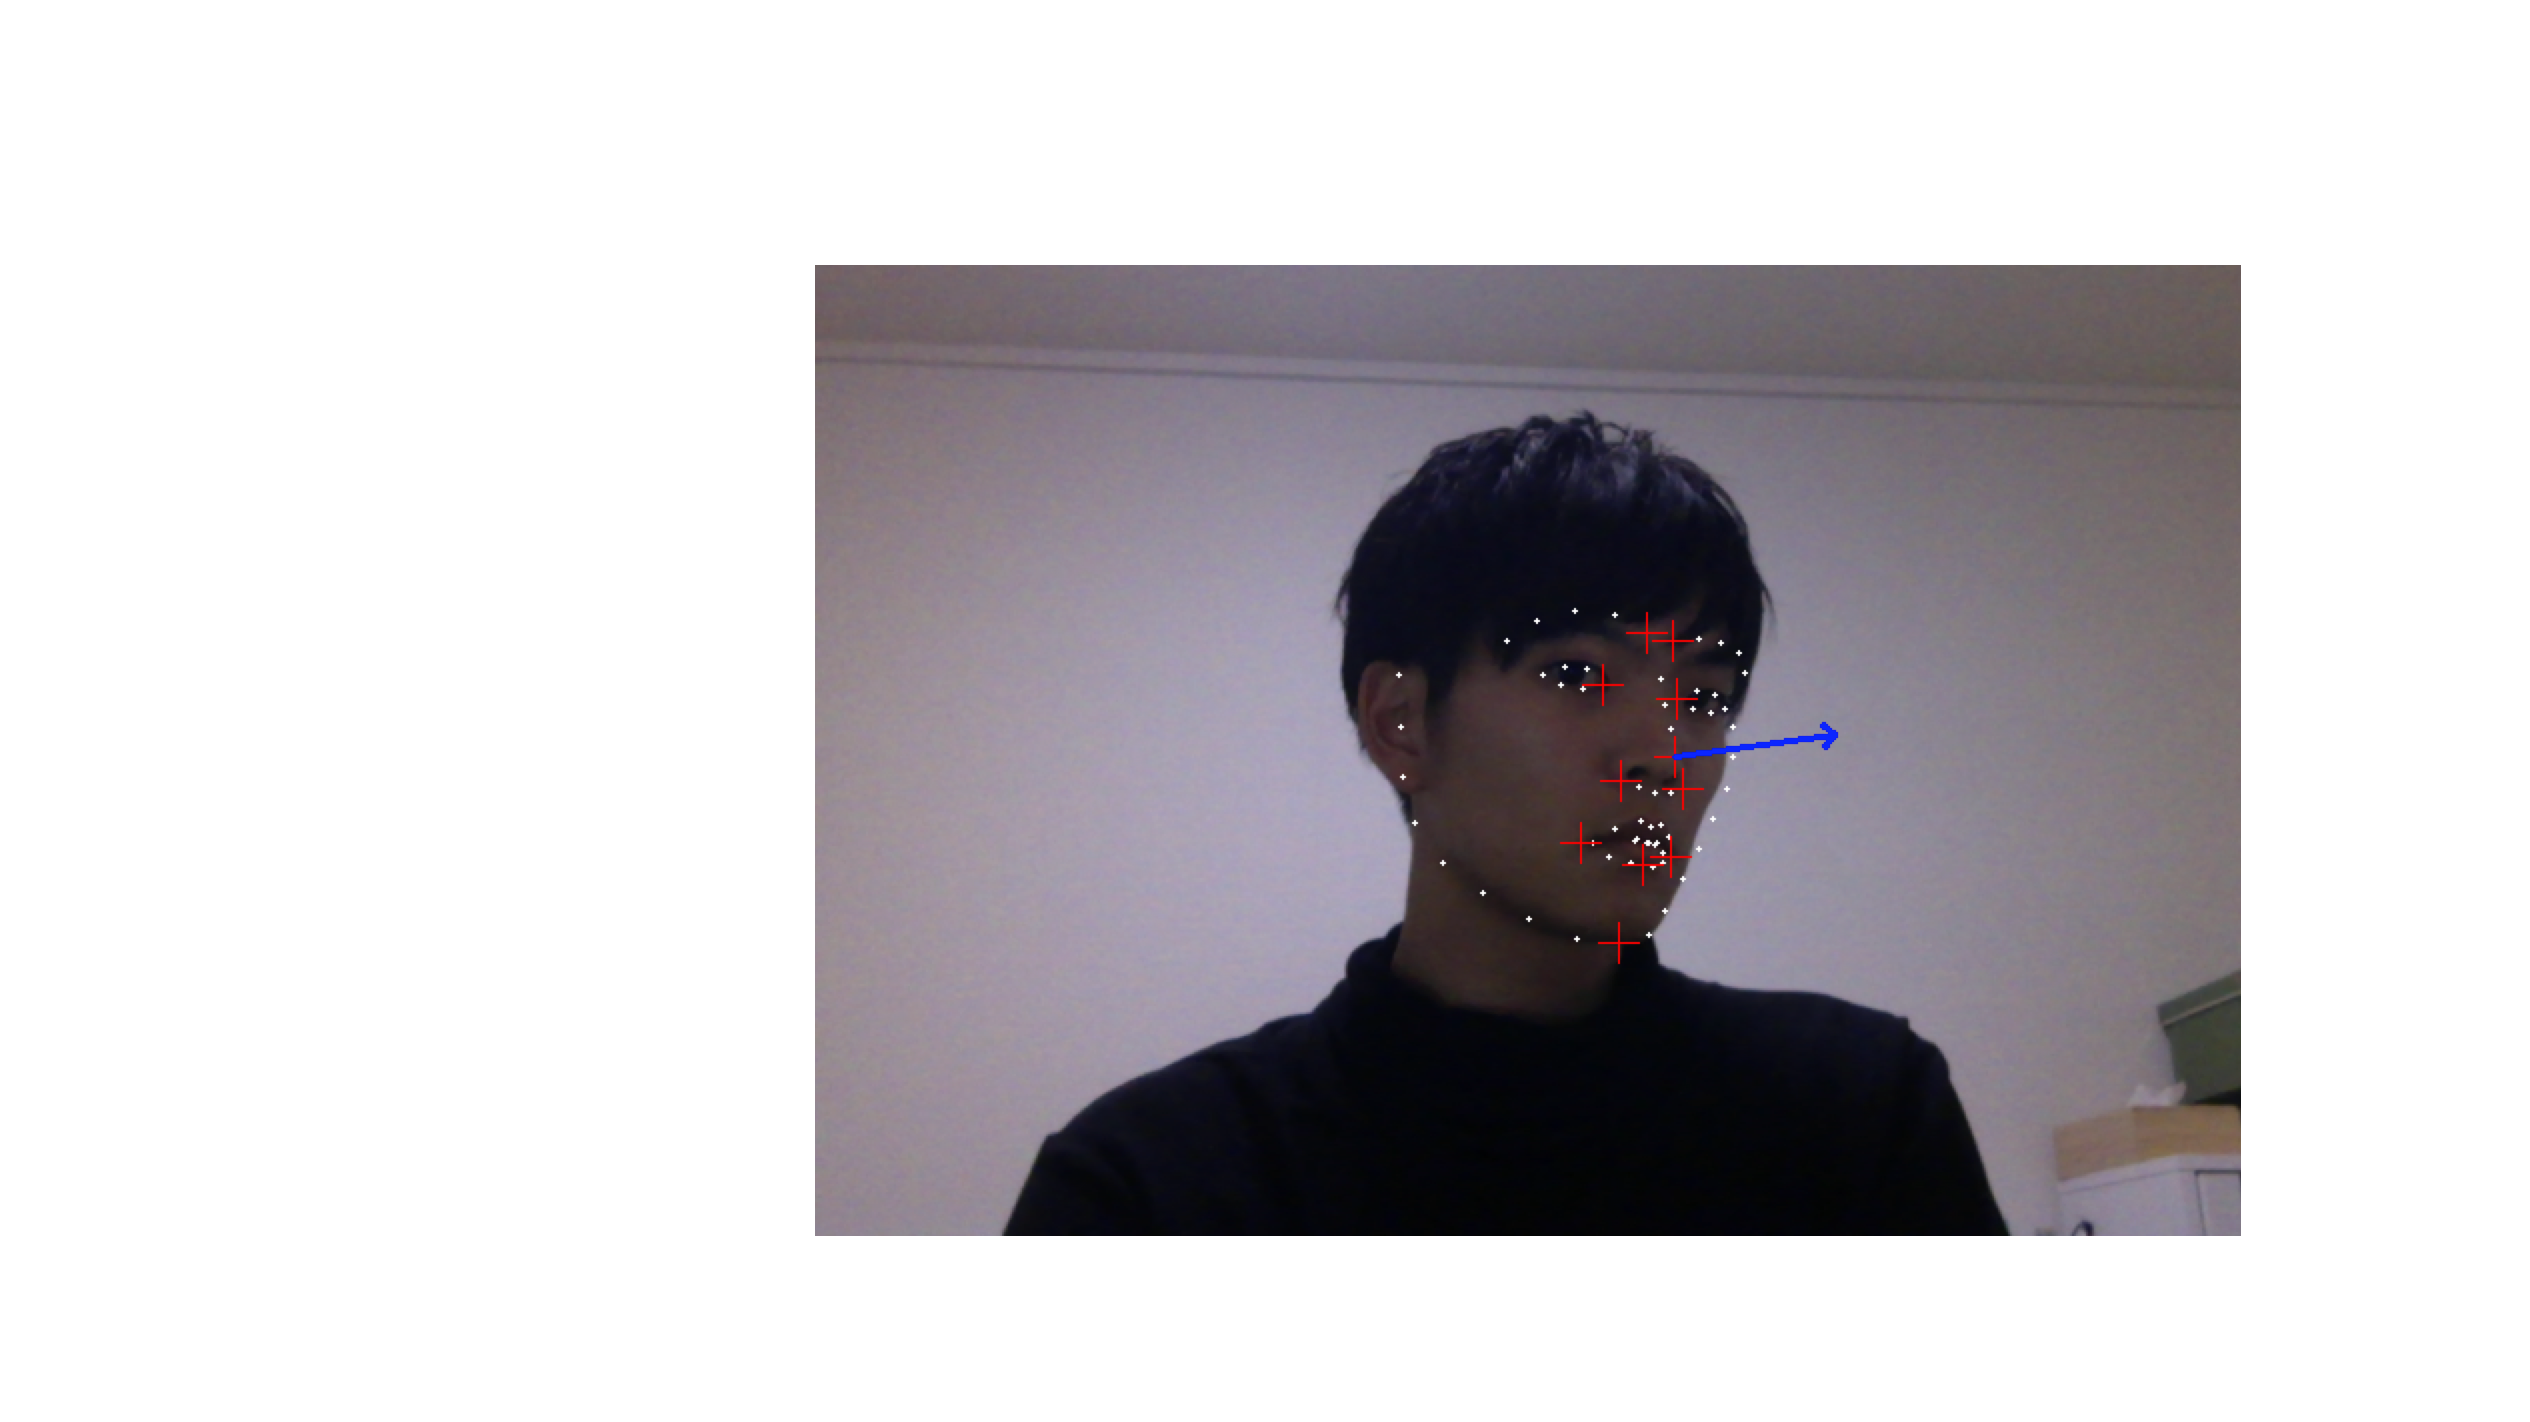
ちゃんと動けばこうなります。
パラメーターの説明や注意点
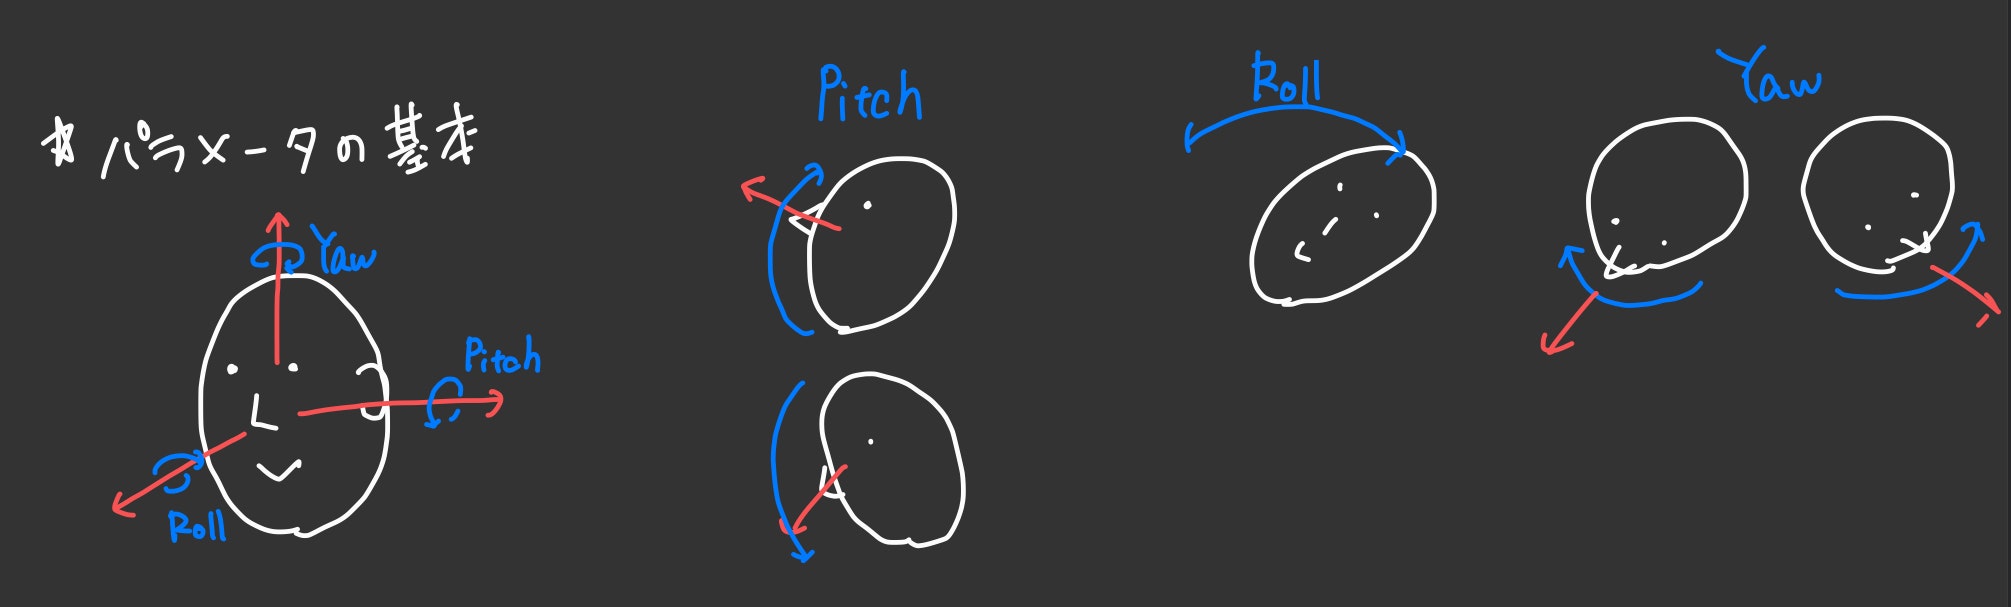
yaw,roll,pitch
頭部姿勢パラメータである yaw,roll,pitchはこんな感じです。(飛行機と一緒ですね)
使用する顔の特徴量
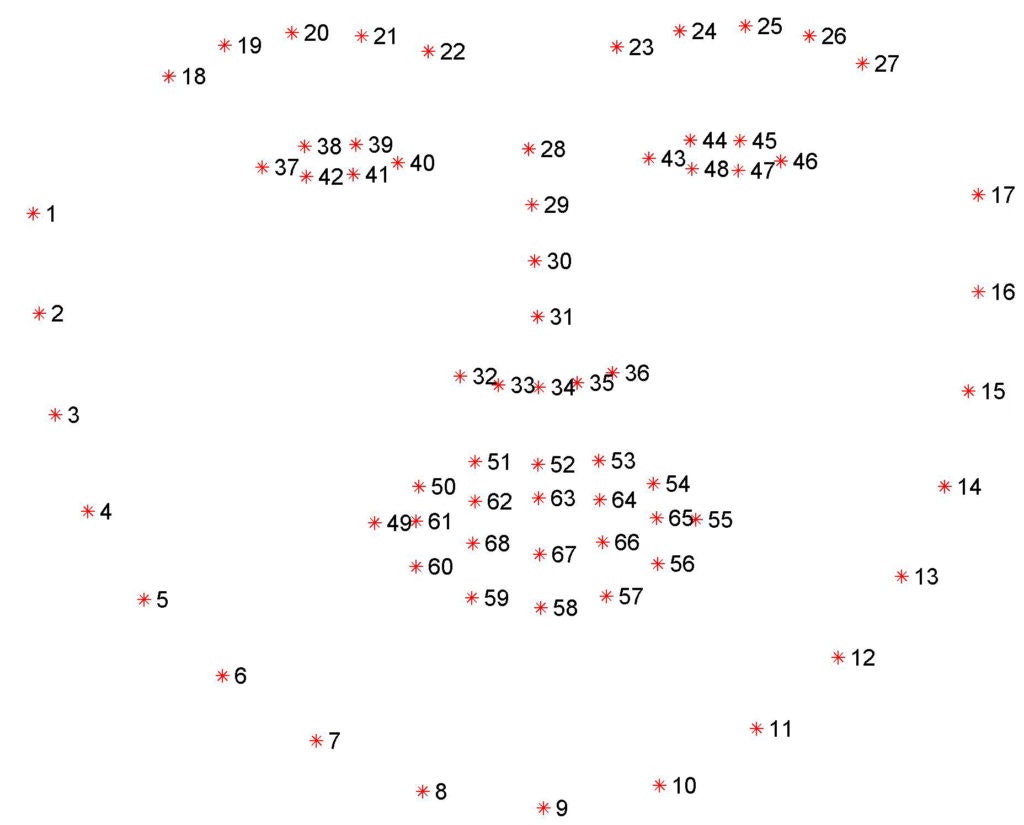
今回定義しているimage_pointsの位置はこちらを参照してください。
今回使用した点は
・眉の内側(22,23)
・目の内側(40,43)
・鼻の頭(31)
・鼻の両側(32,36)
・口の両外側(49,55)
・唇の下(58)
・あご(9)
の11点です。アルゴリズム的には5点で頭部方向は推定できますが、私が試してみたところ点数が少ない場合鼻先のベクトルの向きがあっちこっち向いてしまったので点数を増やしています。(学習済みデータが西洋人ベースだからですかね...)
Facial landmarks with dlib, OpenCV, and Python
顔の外側の点を使うほど精度はよくなるのですが、横を向いた時に眉などが見切れてしまうと特徴量の誤判定を引き起こすので、出来るだけ顔面中心の点を使うようにしましょう。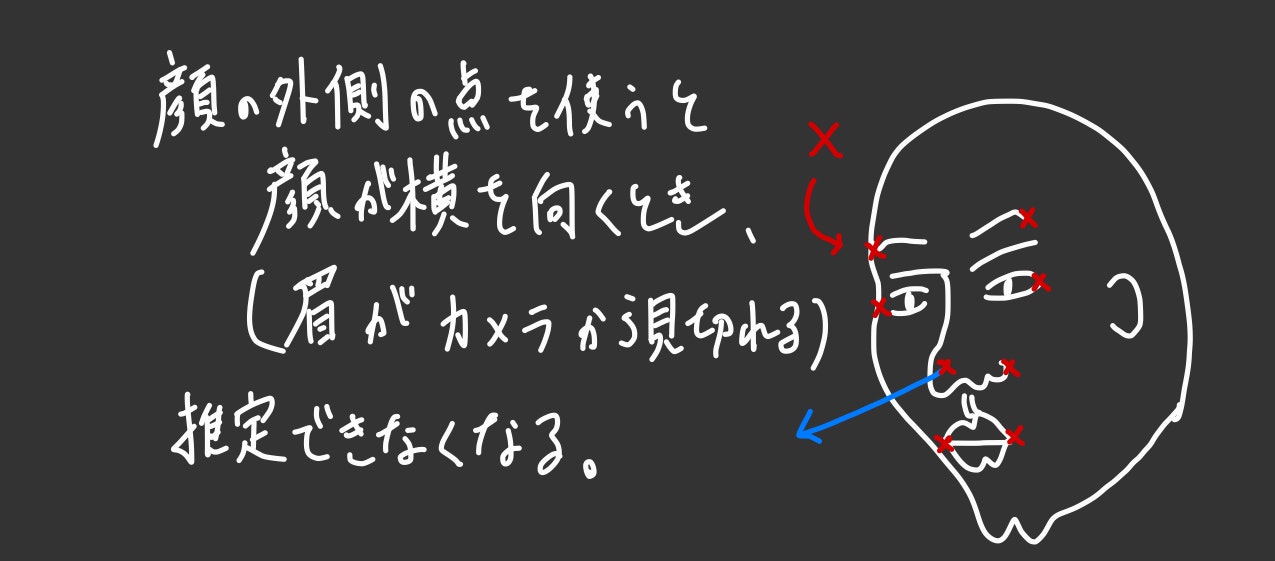
そして悩むのがmodel_points、つまり自分の顔のパーツの位置座標をこれはどうしたらいいのかというところなのですが、私は以下のプログラムから力ずくで定義しました。鼻の頭を原点とした顔の(x,y)座標データが画像で出てくるので、出来るだけカメラにまっすぐに向き姿勢を伸ばし、気合いで読み取ってください。z座標については勘です。鼻の頭から目の間あたりまでの距離を出して自分の鼻の高さとかに当てて数値を出してください。頑張れ!
# !/usr/bin/env python3
# -*- coding: utf-8 -*-

import cv2 #OpenCV:画像処理系ライブラリ
import dlib #機械学習系ライブラリ
import imutils #OpenCVの補助
from imutils import face_utils
import numpy as np


# VideoCapture オブジェクトを取得します
DEVICE_ID = 0 #ID 0は標準web cam
capture = cv2.VideoCapture(DEVICE_ID)#dlibの学習済みデータの読み込み
predictor_path = "/shape_predictor_68_face_landmarks.dat"

print("[INFO] loading facial landmark predictor...")
detector = dlib.get_frontal_face_detector() #顔検出器の呼び出し。ただ顔だけを検出する。
predictor = dlib.shape_predictor(predictor_path) #顔から目鼻などランドマークを出力する

while(True): #カメラから連続で画像を取得する
    ret, frame = capture.read() #カメラからキャプチャしてframeに1コマ分の画像データを入れる

    frame = imutils.resize(frame, width=2000) #frameの画像の表示サイズを整える
    gray = cv2.cvtColor(frame, cv2.COLOR_BGR2GRAY) #gray scaleに変換する
    rects = detector(gray, 0) #grayから顔を検出
    image_points = None

    for rect in rects:
        shape = predictor(gray, rect)
        shape = face_utils.shape_to_np(shape)
        #print(shape[30])#鼻の座標
        cal = shape-shape[30]
        print("######[X,Y]#######",
              "\n point18=",cal[17],
              "\n point22=",cal[21],
              "\n point37=",cal[36],
              "\n point40=",cal[39],
              "\n point28=",cal[27],
              "\n point31=",cal[30],
              "\n point32=",cal[31],
              "\n point49=",cal[48],
              "\n point58=",cal[57],
              "\n point9=",cal[8])

        for (x, y) in shape: #顔全体の68箇所のランドマークをプロット
            cv2.circle(frame, (x, y), 1, (255, 255, 255), -1)
            cv2.putText(frame,str((x, y)-shape[30]),(x,y), cv2.FONT_HERSHEY_PLAIN, 1.0, (0, 0, 255), 2)


    cv2.imshow('frame',frame) # 画像を表示する
    if cv2.waitKey(1) & 0xFF == ord('q'): #qを押すとbreakしてwhileから抜ける
        break

capture.release() #video captureを終了する
cv2.destroyAllWindows() #windowを閉じる
最後に
最後に全体のプログラムをぶん投げて終了にします。
お疲れ様でした。
プログラム
import cv2 #OpenCV:画像処理系ライブラリ
import dlib #機械学習系ライブラリ
import imutils #OpenCVの補助
from imutils import face_utils
import numpy as np


# VideoCapture オブジェクトを取得します
DEVICE_ID = 0 #ID 0は標準web cam
capture = cv2.VideoCapture(DEVICE_ID)#dlibの学習済みデータの読み込み
predictor_path = ".../shape_predictor_68_face_landmarks.dat"

detector = dlib.get_frontal_face_detector() #顔検出器の呼び出し。ただ顔だけを検出する。
predictor = dlib.shape_predictor(predictor_path) #顔から目鼻などランドマークを出力する

while(True): #カメラから連続で画像を取得する
    ret, frame = capture.read() #カメラからキャプチャしてframeに1コマ分の画像データを入れる

    frame = imutils.resize(frame, width=1000) #frameの画像の表示サイズを整える
    gray = cv2.cvtColor(frame, cv2.COLOR_BGR2GRAY) #gray scaleに変換する
    rects = detector(gray, 0) #grayから顔を検出
    image_points = None

    for rect in rects:
        shape = predictor(gray, rect)
        shape = face_utils.shape_to_np(shape)

        for (x, y) in shape: #顔全体の68箇所のランドマークをプロット
            cv2.circle(frame, (x, y), 1, (255, 255, 255), -1)

        image_points = np.array([
                tuple(shape[30]),#鼻頭
                tuple(shape[21]),
                tuple(shape[22]),
                tuple(shape[39]),
                tuple(shape[42]),
                tuple(shape[31]),
                tuple(shape[35]),
                tuple(shape[48]),
                tuple(shape[54]),
                tuple(shape[57]),
                tuple(shape[8]),
                ],dtype='double')

    if len(rects) > 0:
        model_points = np.array([
                (0.0,0.0,0.0), # 30
                (-30.0,-125.0,-30.0), # 21
                (30.0,-125.0,-30.0), # 22
                (-60.0,-70.0,-60.0), # 39
                (60.0,-70.0,-60.0), # 42
                (-40.0,40.0,-50.0), # 31
                (40.0,40.0,-50.0), # 35
                (-70.0,130.0,-100.0), # 48
                (70.0,130.0,-100.0), # 54
                (0.0,158.0,-10.0), # 57
                (0.0,250.0,-50.0) # 8
                ])

        size = frame.shape

        focal_length = size[1]
        center = (size[1] // 2, size[0] // 2) #顔の中心座標

        camera_matrix = np.array([
            [focal_length, 0, center[0]],
            [0, focal_length, center[1]],
            [0, 0, 1]
        ], dtype='double')

        dist_coeffs = np.zeros((4, 1))

        (success, rotation_vector, translation_vector) = cv2.solvePnP(model_points, image_points, camera_matrix,
                                                                      dist_coeffs, flags=cv2.SOLVEPNP_ITERATIVE)
        #回転行列とヤコビアン
        (rotation_matrix, jacobian) = cv2.Rodrigues(rotation_vector)
        mat = np.hstack((rotation_matrix, translation_vector))

        #yaw,pitch,rollの取り出し
        (_, _, _, _, _, _, eulerAngles) = cv2.decomposeProjectionMatrix(mat)
        yaw = eulerAngles[1]
        pitch = eulerAngles[0]
        roll = eulerAngles[2]

        print("yaw",int(yaw),"pitch",int(pitch),"roll",int(roll))#頭部姿勢データの取り出し

        cv2.putText(frame, 'yaw : ' + str(int(yaw)), (20, 10), cv2.FONT_HERSHEY_PLAIN, 1, (0, 0, 255), 2)
        cv2.putText(frame, 'pitch : ' + str(int(pitch)), (20, 25), cv2.FONT_HERSHEY_PLAIN, 1, (0, 0, 255), 2)
        cv2.putText(frame, 'roll : ' + str(int(roll)), (20, 40), cv2.FONT_HERSHEY_PLAIN, 1, (0, 0, 255), 2)

        (nose_end_point2D, _) = cv2.projectPoints(np.array([(0.0, 0.0, 500.0)]), rotation_vector,
                                                         translation_vector, camera_matrix, dist_coeffs)
        #計算に使用した点のプロット/顔方向のベクトルの表示
        for p in image_points:
            cv2.drawMarker(frame, (int(p[0]), int(p[1])),  (0.0, 1.409845, 255),markerType=cv2.MARKER_CROSS, thickness=1)

        p1 = (int(image_points[0][0]), int(image_points[0][1]))
        p2 = (int(nose_end_point2D[0][0][0]), int(nose_end_point2D[0][0][1]))

        cv2.arrowedLine(frame, p1, p2, (255, 0, 0), 2)

    cv2.imshow('frame',frame) # 画像を表示する
    if cv2.waitKey(1) & 0xFF == ord('q'): #qを押すとbreakしてwhileから抜ける
        break


capture.release() #video captureを終了する
cv2.destroyAllWindows() #windowを閉じる
2020/4/2追記
OpenCVがQt関連のエラーで動かない!
最近こんなエラーが出ました
qt.qpa.plugin: Could not find the Qt platform plugin "cocoa" in ""
This application failed to start because no Qt platform plugin could be initialized. Reinstalling the application may fix this problem.
どうも新しくopenCVをpipインストールするとこんなエラーが出るみたいです。
バージョンを下げると動きます。
pip3 install opencv-python==4.1.2.30
参考まとめ
Qiita
外部
Head Pose Estimation using OpenCV and Dlib
dlib documentation
Facial landmarks with dlib, OpenCV, and Python