ご挨拶
お久しぶりです。おおのんです。
SPA開発が盛んな昨今、フロントエンドからキャリアを始める人も増えていることでしょう。
そしてキャリアの次手に迷っているアナタ様に朗報です。
この記事ではTypeScriptを用いたバックエンドの開発方法をご紹介します。
できる限りシンプルにハンズオンでまとめました。
皆様の新しいキャリア開拓の一助になればと思います。
▼ゴール
・TypeScriptでバックエンド環境を作る
・シンプルなAPIの実装(GET, POST)と動作確認
▼対象
・フロントエンドからキャリアを始めた人(ジュニア、ミドル)
・TypeScriptでバックエンド書いてみたい人
前提
node.jsが必要です。この記事ではバージョン14.18.0で進めています。
フレームワークを使用します。今回は言わずと知れたExpressを使用します。
【参考サイト様】
・【公式】Express - Node.js Web アプリケーション・フレームワーク
・ExpressサーバをTypeScriptで作る。 - 自由自在
必要なパッケージのインストール
フォルダを作成し以下を行う。
npm init
npm install -D typescript @types/node
npm install -D express @types/express
npm install -D tsc-watch
準備
tsconfig.jsonを作成し以下のとおり記述。
{
  "include": ["src/**/*"],
  "compilerOptions": {
    "target": "es6",
    "module": "commonjs",
    "outDir": "./dist",
    "rootDir": "./src",
    "strict": true,
    "esModuleInterop": true,
    "skipLibCheck": true,
    "forceConsistentCasingInFileNames": true
  }
}
package.jsonのscriptsに追記。
...
"scripts": {
  ...
  "dev:watch": "tsc-watch --onSuccess \"node dist/index.js\"",
  ...
シンプルなGETとPOST
ルートにsrcフォルダを作成。
srcフォルダ直下にindex.tsを作成し以下の通り記述。
import express from 'express';
import greetingController from './controllers/greetings';

const app: express.Express = express();

app.use(express.json());
app.use(express.urlencoded({ extended: true }));

app.use('/greetings', greetingController);

app.listen(5000, () => {
  console.log('Start on PORT:5000!');
});
srcフォルダ直下にcontrollerフォルダを作成。
controllerフォルダ直下にgreetings.tsを作成。
import express, { Router } from 'express';

const router: Router = express.Router();

const greetings = [
  { id: 0, greeting: 'Hello!' },
  { id: 1, greeting: 'Nice to meet you!' },
];

router.get('/', (req, res) => {
  res.send(greetings);
});

router.post('/', (req, res) => {
  greetings.push(req.body);
  res.send(greetings);
});

export default router;
GETする
ローカルサーバを起動し、ブラウザで"localhost:5000/greetings"開く。
npm run dev:watch

Hello と Nice to meet you の2つが確認できました。
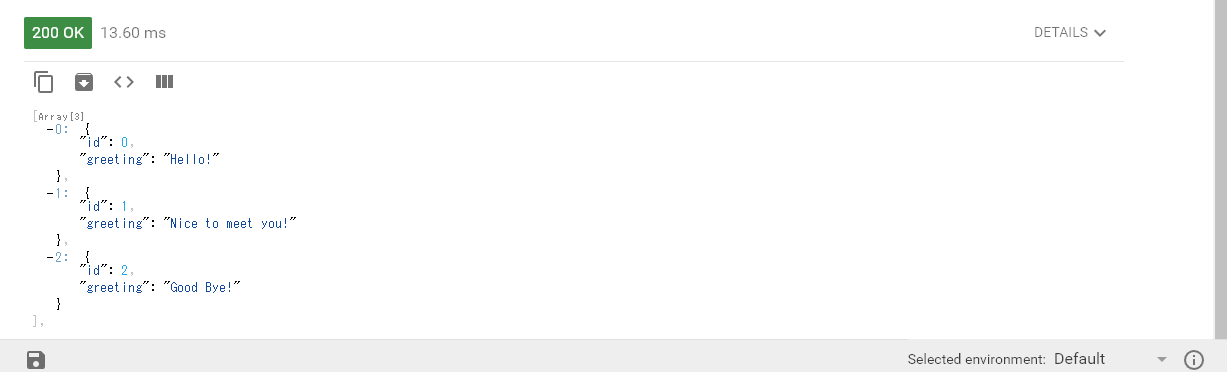
POSTする
Chromeの拡張機能でAdvanced REST client(ARC)をインストールし、起動
https://chrome.google.com/webstore/detail/advanced-rest-client/hgmloofddffdnphfgcellkdfbfbjeloo
下記のように入力しSENDボタンを押下。

Good bye! が追加されていることが確認できました。
おわりに
いかがだったでしょうか。
シンプルなものではありますが、簡単なAPIを実装できました。
細かく解説していませんが、一つずつコードを辿りそれぞれの意味・役割について理解を深めてください。
そもそもフロントエンドしか触っておらずWeb技術の基礎が欠けている自覚があるならば、
これを機に基本から勉強することを強くオススメします。入口としては↓など
・Webのしくみ - Web開発を学ぶ | MDN Web Docs
また、今回は紹介していませんが実際のWebアプリにはDB接続も欠かせませんね。
それらは次回以降ご紹介します。
▼続き
Express × TypeScriptでバックエンド開発②(MySQLの導入、ExpressでDB接続・操作)