WHAT
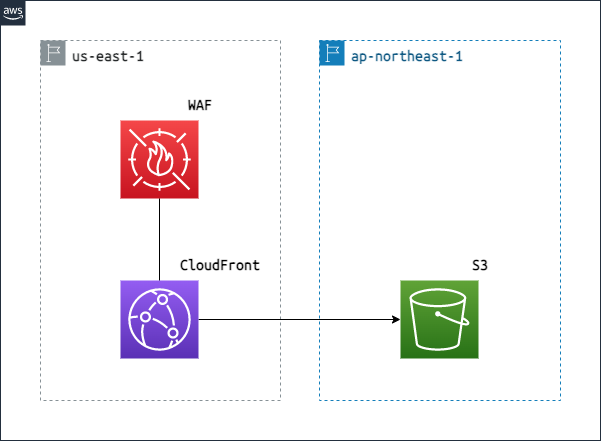
S3 Bucket を ap-northeast-1 に 作成し、CloudFront の Origin に指定し、その CloudFront に WAFv2 の WebACL を assosiate します
WHY
CDKで構成する場合、下記のような構成をとることがあると思います
- WAF を先に us-east-1 で作成する
- ap-northeast-1 に S3 Bucket を作成し、CloudFront の Origin に指定し、さらに WAF を設定する
このときに手順の 2 では ap-northeast-1 に S3 Bucket を作成する関係上、CloudFront に渡す WAF の WebACL を us-east-1 から引っ張ってこようとすると cross-region error に引っかかってしまうことがあると思います
これを回避するには カスタムリソースを使うパターン や cdk-remote-stack を使うパターン が考えられると思います
ただ今回、S3 はリージョンサービスなので CloudFront を us-east-1 からデプロイしてしまえば、この構成に限ってはこれらのパターンを使わずに作れるんじゃないかと思ったのでチャレンジしてみました
HOW
- 説明はかなり省略していきます、あしからず
- コード上もかなり省略していきます、あしからず
まずは index.ts は下記のような感じで
bin/index.ts
import * as cdk from "aws-cdk-lib";
import { WafStack } from "../lib/waf-stack";
import { S3Stack } from "../lib/s3-stack";
import { WafCloudfrontS3Stack } from "../lib/waf-cloudfront-s3-stack";

const app = new cdk.App();
const bucketName = "xxxxxxxxxxxxxx"

const bucket = new S3Stack(app, "S3Bucket", {
  env: { region: "ap-northeast-1" },
  bucketName
});

const cloudFrontWebACL = new WafStack(app, "CloudFrontWebACL", {
  env: { region: "us-east-1" },
});

new WafCloudfrontS3Stack(app, "WAFCloudFrontS3", {
  env: { region: "us-east-1" },
  bucketName,
  webAclArn: cloudFrontWebACL.webACL.attrArn,
});
次に WafCloudfrontS3Stack だけ示すと
lib/waf-cloudfront-s3-stack.ts
import { aws_cloudfront, aws_iam, aws_s3, Stack, StackProps } from 'aws-cdk-lib';
import { Construct } from 'constructs';

export type Props = StackProps & {
  bucketName: string;
  webAclArn: string;
};

export class WafCloudfrontS3Stack extends Stack {
  constructor(scope: Construct, id: string, props: Props) {
    super(scope, id, props);

    const { bucketName, webAclArn } = props;

    const originAccessIdentity = new aws_cloudfront.OriginAccessIdentity(this, "OriginAccessIdentity",{
      comment: `OIA for ${bucketName}`,
    });

    const bucket = aws_s3.Bucket.fromBucketAttributes(this, "bucket", {
      bucketName,
      region: "ap-northeast-1",
    });

    const policyStatement = new aws_iam.PolicyStatement({
      actions: ["s3:GetObject"],
      effect: aws_iam.Effect.ALLOW,
      principals: [
        new aws_iam.CanonicalUserPrincipal(
          originAccessIdentity.cloudFrontOriginAccessIdentityS3CanonicalUserId
        ),
      ],
      resources: [`${bucket.bucketArn}/*`],
    });

    const bucketPolicy = new aws_s3.CfnBucketPolicy(this, "cloudfrontAccessBucketPolicy",{
      bucket: bucket.bucketName,
      policyDocument: new aws_iam.PolicyDocument({
        statements: [policyStatement],
      }),
    });

    const distribution = new aws_cloudfront.CloudFrontWebDistribution(this, "Distribution", {
      webACLId: webAclArn,
      originConfigs: [{
        s3OriginSource: {
          s3BucketSource: bucket,
          originAccessIdentity,
        },
        behaviors: [{
          isDefaultBehavior: true
        }],
      }, ],
    });
でいけます
Point
注意点のようなポイントがいくつかあります
- aws_s3.Bucket.fromBucketAttributes を使うのがよい
これはregion: "ap-northeast-1"と region を指定できるからです
もし指定しなかった場合 CloudFront に設定される origin はxxxxxxxxxxxxxx.s3-us-east-1.amazonaws.comとなります
us-east-1ではダメのかはわかっていませんがコンソールから作成したときに合わせるようにしています -
IBucket の
grantReadは使えない
当初、下記のようなコードでラクをしたかったんですが残念ながら使えず、しかも理由がわからずしばらくハマっておりましたですが https://github.com/aws/aws-cdk/issues/6548 にたどりつき、IBucket では無理なことがわかり、また途中のコメントにあるconst originAccessIdentity = new aws_cloudfront.OriginAccessIdentity(this, "OriginAccessIdentity",{ comment: `OIA for ${bucketName}`, }); const bucket = aws_s3.Bucket.fromBucketAttributes(this, "bucket", { bucketName, region: "ap-northeast-1", }); bucket.grantRead(originAccessIdentity)aws_s3.CfnBucketPolicyを使うことで BucketPolicy を適用することができました
以上となります
他に Route53 や Certificate Manager との組み合わせも試さなければ、のちほど