ReactとSocket.IOのチュートリアル
こちらのReactとSocket.IOのチュートリアルがかなり素晴らしいと思いましたので、こちらを個人的にTypeScriptでやってみようと思い、投稿させていただきました
【Live Chat App with React Tutorial | React Hooks, Material UI, Socket.io, Node】
私は趣味でjavascriptを勉強しているものです。この投稿もググりながら書きました。間違いなどあれば指摘お願いします![]()
作成できたもの
簡易チャットです。Material-UIを使っているので見た目が綺麗です。

1 インストール
参考にした動画ではcreate-react-appで行なっていますが、私はwebpackで行いました
bash
yarn init -y
yarn add react react-dom @material-ui/core socket.io express
yarn add -D webpack webpack-cli ts-loader webpack-node-externals nodemon-webpack-plugin typescript @types/react @types/react-dom @types/socket.io @types/socket.io-client @types/express @types/node
reactreact-dom@material-ui/core-
socket.io- socket.io本体、Nodeサーバーで動く機能とブラウザで動く機能の両方がインストールされる
expresswebpackwebpack-clits-loader-
webpack-node-externals- webpackで生成したファイルを、
node bundle.jsと実行する場合にnode_modulesのファイルを一緒にバンドルしている必要はないので、node_modulesを無視して外部関数として扱うようにバンドルしてくれる
- webpackで生成したファイルを、
-
nodemon-webpack-plugin- webpackから
nodemonを使うためのプラグイン
- webpackから
typescript@types/react@types/react-dom-
@types/socket.io- socket.io のNodeサーバーで動く機能の型定義
-
@types/socket.io-client- socket.io のブラウザで動く機能の型定義
@types/express@types/node
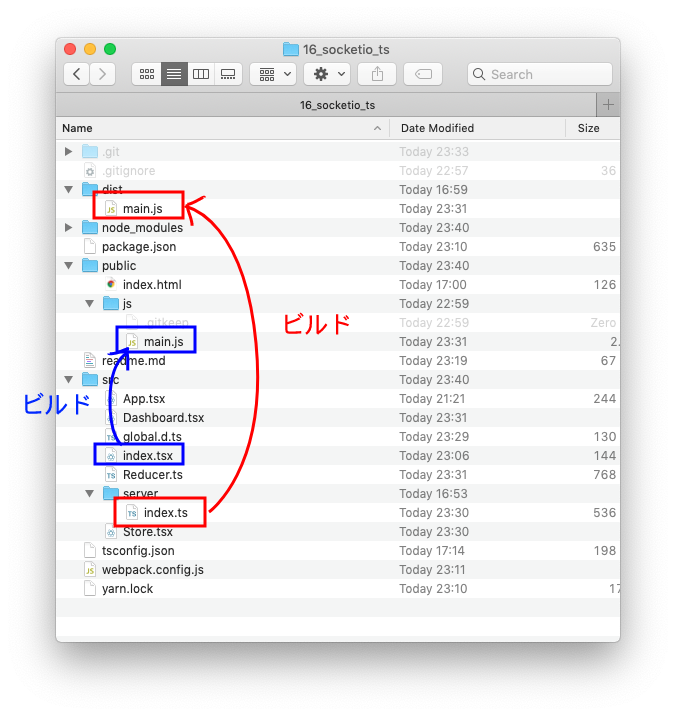
2 フォルダ構成
.
├── dist/ # webpackでバンドルしたファイルを出力(nodeサーバー用)
│   └── main.js
├── node_modules/
├── package.json
├── public/ # 静的ファイルを置く
│   ├── index.html
│   └── js/ # webpackでバンドルしたファイルを出力(ブラウザ用)
│       └── main.js
├── readme.md
├── src/ # 実際に作業するディレクトリ
│   ├── App.tsx
│   ├── Dashboard.tsx
│   ├── Reducer.ts
│   ├── Store.tsx
│   ├── global.d.ts
│   ├── index.tsx # ブラウザ用のjsの起点
│   └── server/
│       └── index.ts # サーバー用のjsの起点
├── tsconfig.json
├── webpack.config.js
└── yarn.lock
3 webpack.config.js
webpack.config.js
const nodeExternals = require("webpack-node-externals");
const NodemonPlugin = require("nodemon-webpack-plugin");

const clientConfig = {
    mode: "development",
    output: {
        filename: "[name].js",
        // expressでpublicフォルダ配下を静的に読む込むように設定するので、そこに出力する
        path: `${__dirname}/public/js`,
    },
    module: {
        rules: [{
            test: /\.tsx?$/,
            use: "ts-loader",
            exclude: /node_modules/,
        }]
    },
    resolve: {
        extensions: [".ts", ".tsx", ".js", ".jsx"]
    },
};

const serverConfig = {
    mode: "development",
    entry: "./src/server/index.ts",
    target: "node",
    node: {
        // expressを使うときにはこの設定をしないと失敗します
        // 参考:https://medium.com/@binyamin/creating-a-node-express-webpack-app-with-dev-and-prod-builds-a4962ce51334
        __dirname: false,
        __filename: false,
    },
    externals: [nodeExternals()],
    module: {
        rules: [{
            test: /\.ts$/,
            use: "ts-loader",
            exclude: /node_modules/,
        }]
    },
    plugins: [
        new NodemonPlugin(),
    ],
    resolve: {
        extensions: [".ts", ".js"]
    },
}

module.exports = [clientConfig, serverConfig];
4 tsconfig.json
tsconfig.json
{
    "compilerOptions": {
        "outDir": "./dist/",
        "noImplicitAny": true,
        "module": "es6",
        "target": "es5",
        "jsx": "react",
        "allowJs": true
    }
}
5 チャット作成
5-1 サーバ作成
publicフォルダで静的ファイルを見れるようにします
src/server/index.ts
import * as express from "express";
import * as http from "http";
import * as socketio from "socket.io";

import { ISendMsg } from "../global";

const app: express.Express = express();
const server: http.Server = http.createServer(app);
const io: socketio.Server = socketio(server);

app.use(express.static("public"));

io.on("connection", (socket: socketio.Socket) => {
    socket.on('chat message', (msg: ISendMsg) => {
        io.emit('chat message', msg);
    });
});

server.listen(3000, () => console.log("listening on *:3000"));
サーバーとクライアントで共通の型定義はglobal.d.tsというファイルを作ってそこに定義してみました
src/global.d.ts
export type TTopics = "general" | "randam";

export interface ISendMsg {
    from: string;
    msg: string;
    topic: TTopics;
}
5-2 ブラウザ側を作成
publicフォルダにhtmlを起きます
public/index.html
<!DOCTYPE html>
<meta charset="UTF-8">
<title>Document</title>
<script src="js/main.js" defer></script>
<div id="root"></div>
ブラウザ側の起点のファイル
src/index.tsx
import * as React from "react";
import { render } from "react-dom";
import App from "./App";

render(<App />, document.getElementById("root"));
チャットアプリのDashboardとStoreをつなげる
src/App.tsx
import * as React from "react";

import Dashboard from "./Dashboard";
import Store from "./Store";

const App: React.FC = (): JSX.Element => {
    return (
        <Store>
            <Dashboard />
        </Store>
    )
}

export default App;
画面レイアウトと、イベント実行を行う
src/Dashboard.tsx
import * as React from "react";

import { makeStyles, Theme, StyleRules } from "@material-ui/core/styles";
import Paper from "@material-ui/core/Paper";
import Typography from "@material-ui/core/Typography";
import List from "@material-ui/core/List";
import ListItem from "@material-ui/core/ListItem";
import ListItemText from "@material-ui/core/ListItemText";
import Chip from "@material-ui/core/Chip";
import Button from "@material-ui/core/Button";
import TextField from "@material-ui/core/TextField";
import Select from "@material-ui/core/Select";
import MenuItem from "@material-ui/core/MenuItem";

import { TTopics } from "./global";
import { CTX, IState, TChatIitemState } from "./Store"

const useStyles = makeStyles((theme: Theme) => ({
    root: {
        margin: "50px",
        padding: theme.spacing(3, 2),
        textAlign: "center",
    },
    flex: {
        display: "flex",
        alignItems: "center",
    },
    topicsWindow: {
        width: "30%",
        height: "300px",
        borderRight: "1px solid grey",
    },
    chatWindow: {
        width: "70%",
        height: "300px",
        padding: "20px",
    },
    chatBox: {
        width: "85%",
    },
    button: {
        width: "15%",
    },
}))

const Dashboard: React.FC = (): JSX.Element => {

    const classes: Record<string, string> = useStyles({})

    const { allChats, sendChatAction, users } = React.useContext<IState>(CTX)
    const topics = Object.keys(allChats);

    const [activeTopics, changeActiveTopics] = React.useState<TTopics>(topics[0] as TTopics)
    const [selectValue, changeSelectValue] = React.useState<string>(users[0])
    const [textValue, changeTextValue] = React.useState<string>("")

    return (
        <>
            <Paper className={classes.root}>
                <Typography variant="h4" component="h4">
                    Chat App
                </Typography>
                <Typography variant="h5" component="h5">
                    {activeTopics}
                </Typography>
                <div className={classes.flex}>
                    <div className={classes.topicsWindow}>
                        <List>
                            {
                                topics.map(topic => (
                                    <ListItem
                                        button
                                        key={topic}
                                        onClick={(e: React.MouseEvent<{}>) => {
                                            changeActiveTopics((e.target as HTMLElement).textContent as TTopics)
                                        }}
                                    >
                                        <ListItemText primary={topic} />
                                    </ListItem>
                                ))
                            }
                        </List>
                    </div>
                    <div className={classes.chatWindow}>
                        {
                            allChats[activeTopics].map((chat: TChatIitemState, i: number) => (
                                <div className={classes.flex} key={i}>
                                    <Chip label={chat.from} />
                                    <Typography variant="body1" gutterBottom>{chat.msg}</Typography>
                                </div>
                            ))
                        }
                    </div>
                </div>
                <div className={classes.flex}>
                    <Select
                        value={selectValue}
                        onChange={(e: React.ChangeEvent<HTMLSelectElement>) => {
                            changeSelectValue(e.target.value)
                        }}
                    >
                        {users.map((user: string) => (<MenuItem value={user} key={user}>{user}</MenuItem>))}
                    </Select>
                </div>
                <div className={classes.flex}>
                    <TextField
                        label="Send a chat"
                        className={classes.chatBox}
                        value={textValue}
                        onChange={(e: React.ChangeEvent<HTMLInputElement>) => {
                            changeTextValue(e.target.value);
                        }}
                    />
                    <Button
                        variant="contained"
                        color="primary"
                        className={classes.button}
                        onClick={() => {
                            sendChatAction({from: selectValue, msg: textValue, topic: activeTopics})
                            changeTextValue("")
                        }}
                    >
                        Send
                    </Button>
                </div>
            </Paper>
        </>
    )
}

export default Dashboard;
チャットデータを管理するStore.tsxを作成、参考動画では、ここにreducerの機能も書いてましたが、型定義も一緒にこのファイルに書くと結構な量になってしまったので、reducerは別ファイルにしました
src/Store.tsx
import * as React from "react";
import * as io from "socket.io-client"

import { TTopics, ISendMsg } from "./global";
import { reducer, IActions } from "./Reducer";

const initState = {
    general: [
        {from: "alice", msg: "hi!"},
        {from: "alice", msg: "hi!"},
        {from: "alice", msg: "hi!"},
    ],
    randam: [
        {from: "bob", msg: "hello!"},
        {from: "bob", msg: "hello!"},
        {from: "bob", msg: "hello!"},
    ],
}

export type TChatIitemState = {
    from: string,
    msg: string,
}

export type TChatState = {
    [key in TTopics]: TChatIitemState[];
}

export interface IState {
    allChats?: TChatState;
    sendChatAction?: (value: ISendMsg) => void;
    users?: string[];
}

export const CTX = React.createContext<IState>({});

let socket: SocketIOClient.Socket;

const sendChatAction = (data: ISendMsg) => {
    socket.emit("chat message", data);
}

const Store: React.FC = ({ children }): JSX.Element => {

    if (!socket) {
        socket = io(":3000");
        socket.on("chat message", (data: ISendMsg) => {
            dispatch({ type: "RECEIVE_MESSAGE", payload: data });
        });
    }

    const [allChats, dispatch] = React.useReducer<React.Reducer<TChatState, IActions>>(reducer, initState)

    const users = ["alice", "bob"]; // サンプルなのでユーザー固定

    return (
        <CTX.Provider value={{ allChats, sendChatAction, users }}>
            {children}
        </CTX.Provider>
    )
}

export default Store;
reducerの機能を作成
src/Reducer.ts
import { TTopics } from "./global";
import { TChatState } from "./Store";

interface IAddChat {
    type: "RECEIVE_MESSAGE";
    payload: {
        from: string;
        msg: string;
        topic: TTopics;
    };
}
export type IActions = IAddChat;
// ↑アクションが増えたら↓こうする予定
//  type IActions = IAddChat | IUpdateAction | IDeleteAction

export const reducer = (state: TChatState, action: IActions) => {
    const {from, msg, topic} = action.payload
    switch(action.type) {
        case "RECEIVE_MESSAGE":
            return {
                ...state,
                [topic]: [
                    ...state[topic],
                    {from, msg}
                ]
            }
        default:
            return state
    }
}
reactのHooksをあまり使ったことがなかったので勉強になりました(^_^;)
最後まで読んでいただいてありがとうございましたm(_ _)m