この記事は私がsocket.ioのドキュメントを読んで基本を勉強したという内容ですので、間違いなどありましたらご指摘お願いします![]()
またドキュメントでjQueryが使われている部分はネイティブJavaScriptに書き換えています
Get started
The web framework 【expressフレームワークを使う】
1. Socket.IOを試すためのhtmlをexpressを使って表示
※expressではなく、普通にnodeのhttpモジュールでもOKです。
yarn init -y
yarn add express@4.15.2

# または、

npm init -y
npm i -S express@4.15.2
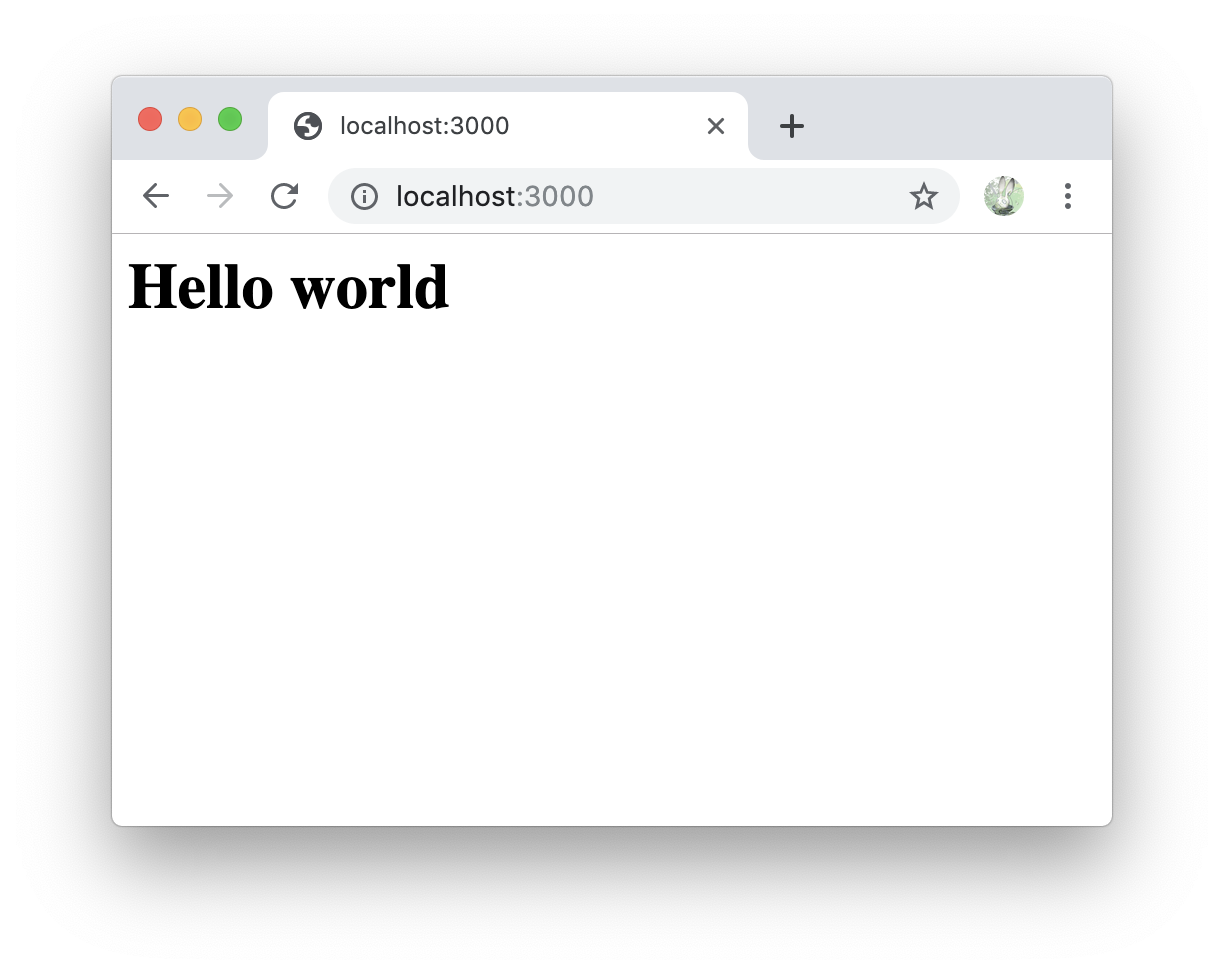
2. index.jsファイルを作成し、ブラウザで確認
const app = require("express")();
const http = require("http").createServer(app);

app.get("/", (req, res) => {
  res.send("<h1>Hello world</h1>");
});

http.listen(3000, () => {
  console.log("listening on *:3000");
});
node index.js
http://localhost:3000/ をブラウザで開く
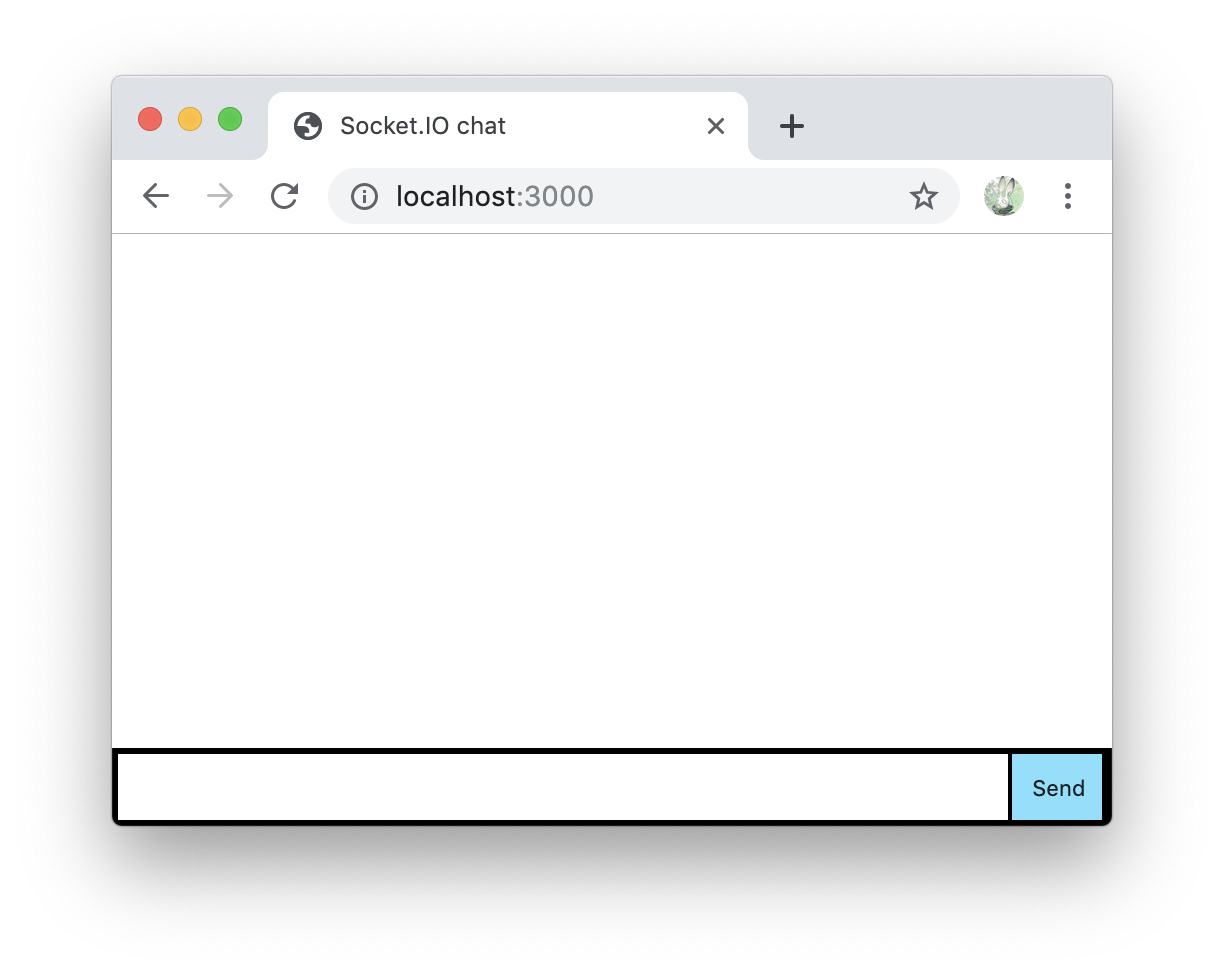
Serving HTML 【htmlファイルを作成】
1. index.htmlを作成し、その内容を表示するようにする
const app = require("express")();
const http = require("http").createServer(app);

app.get("/", (req, res) => {
  res.sendFile(__dirname + "/index.html");
});

http.listen(3000, () => {
  console.log("listening on *:3000");
});
<!DOCTYPE html>
<html>
  <head>
    <title>Socket.IO chat</title>
    <style>
      * { margin: 0; padding: 0; box-sizing: border-box; }
      body { font: 13px Helvetica, Arial; }
      form { background: #000; padding: 3px; position: fixed; bottom: 0; width: 100%; }
      form input { border: 0; padding: 10px; width: 90%; margin-right: .5%; }
      form button { width: 9%; background: rgb(130, 224, 255); border: none; padding: 10px; }
      #messages { list-style-type: none; margin: 0; padding: 0; }
      #messages li { padding: 5px 10px; }
      #messages li:nth-child(odd) { background: #eee; }
    </style>
  </head>
  <body>
    <ul id="messages"></ul>
    <form action="">
      <input id="m" autocomplete="off" /><button>Send</button>
    </form>
  </body>
</html>
nodeから実行しているindex.jsファイルを変更した場合はCtrl+Cで一度サーバを切り、もう一度、node index.jsで起動します。
Integrating Socket.IO 【Nodeサーバにsocket.ioを統合】
socket.ioは2つの部分から構成されている
- Nodeのサーバで動く機能
- ブラウザで動く機能
# socket.ioをインストールすると、↑の2つの機能はどちらも使えるようになります

yarn add socket.io
# または、
npm i -S socket.io
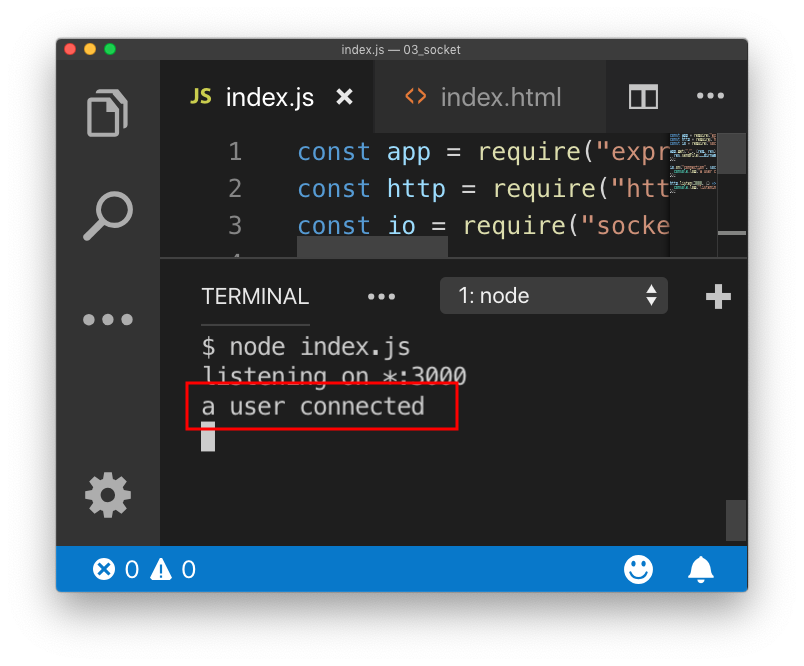
1. index.jsでsocket.ioの接続イベントを設定
const app = require("express")();
const http = require("http").Server(app);
const io = require("socket.io")(http); // Nodeのサーバで動く機能

app.get("/", (req, res) => {
  res.sendFile(__dirname + "/index.html");
});

io.on("connection", socket => {
  console.log("a user connected");
});

http.listen(3000, () => {
  console.log("listening on *:3000");
});
2. index.htmlを変更
<body>
<ul id="messages"></ul>
<form action="">
    <input id="m" autocomplete="off" /><button>Send</button>
</form>

<!-- ブラウザで動く機能 -->
<script src="/socket.io/socket.io.js"></script>
<script>
const socket = io();
</script>
</body>
この状態で、nodeサーバ再起動、ブラウザリロードすると、接続されたことが確認できます
3. 切断イベントを設定
io.on("connection", socket => {
  console.log("a user connected");
  socket.on("disconnect", () => {
    console.log("user disconnected");
  });
});
ブラウザのタブを閉じるなどすると、切断されて、user disconnectedとログに表示されます
Emitting events 【イベント発行】
<body>
<ul id="messages"></ul>
<form action="">
    <input id="m" autocomplete="off" /><button>Send</button>
</form>

<script src="/socket.io/socket.io.js"></script>
<script>
{
    const socket = io();
    document.querySelector("form").addEventListener("submit", e => {
        e.preventDefault();
        socket.emit('chat message', document.querySelector("#m").value);
        document.querySelector("#m").value = "";
    });
}
</script>
</body>
io.on("connection", socket => {
  socket.on("chat message", msg => {
    console.log("message: " + msg);
  });
});

イベントを設定して入力値を送信することができました
Broadcasting 【他のユーザーにイベント送信】
io.emit('some event', { for: 'everyone' });
io.on("connection", socket => {
  socket.on("chat message", msg => {
    io.emit("chat message", msg); // ブラウザに送信
  });
});
<body>
<ul id="messages"></ul>
<form action="">
    <input id="m" autocomplete="off" /><button>Send</button>
</form>

<script src="/socket.io/socket.io.js"></script>
<script>
{
    const socket = io();
    document.querySelector("form").addEventListener("submit", e => {
        e.preventDefault();
        socket.emit('chat message', document.querySelector("#m").value);
        document.querySelector("#m").value = "";
    });
    socket.on('chat message', msg => {
        // イベントを受信してhtmlに表示
        document.querySelector("#messages").insertAdjacentHTML("beforeend", `
            <li>${msg}</li>
        `);
    });
}
</script>
</body>

接続しているユーザーに送信することができました。
Overview
What Socket.IO is
google翻訳↓
Socket.IOは、ブラウザとサーバー間で双方向の双方向のリアルタイム通信を可能にするライブラリです。
ブラウザ->サーバー、サーバー->ブラウザでデータ送信できます。
Using with Node http server 【Nodeのhttpモジュールで使う】
Server (index.js)
const app = require("http").createServer(handler);
const io = require("socket.io")(app);
const fs = require("fs");

app.listen(3000);

function handler(req, res) {
  fs.readFile(__dirname + "/index.html", (err, data) => {
    if (err) {
      res.writeHead(500);
      return res.end("Error loading index.html");
    }

    res.writeHead(200);
    res.end(data);
  });
}

io.on("connection", socket => {
  socket.emit("news", { hello: "world" }); // 接続してすぐに`news`というイベント名でブラウザにデータ送信
  socket.on("my other event", data => { // `my other event`でイベントを受け取る
    console.log(data);
  });
});
Client (index.html)
<script src="/socket.io/socket.io.js"></script>
<script>
{
    const socket = io();
    socket.on("news", msg => { // newsイベントのデータを受け取る
        console.log("news")
    });
    socket.emit("my other event", { my: 'data' }); // `my other event`というイベント名でサーバにデータ送信
}
</script>

Using with Express 【Expressで使う】
Server (index.js)
const app = require("express")();
const server = require("http").Server(app);
const io = require("socket.io")(server);

server.listen(3000);

app.get("/", (req, res) => {
  res.sendFile(__dirname + "/index.html");
});

io.on("connection", socket => {
  socket.emit("news", { hello: "world" }); // 接続してすぐに`news`というイベント名でブラウザにデータ送信
  socket.on("my other event", data => { // `my other event`でイベントを受け取る
    console.log(data);
  });
});
Client (index.html)
<script src="/socket.io/socket.io.js"></script>
<script>
{
    const socket = io();
    socket.on("news", msg => { // newsイベントのデータを受け取る
        console.log(msg)
    });
    socket.emit("my other event", { my: 'data' }); // `my other event`というイベント名でサーバにデータ送信
}
</script>
Restricting yourself to a namespace 【名前空間を設定できる】
Server (index.js)
server.of('/hoge')
イベント名が同じでも、名前空間で設定したイベントを実行してくれます。
const app = require("express")();
const server = require("http").Server(app);
const io = require("socket.io")(server);

server.listen(3000);

app.get("/", (req, res) => {
  res.sendFile(__dirname + "/index.html");
});

// http:localhost:3000/chatで名前空間を設定
const chat = io.of("/chat").on("connection", socket => {
  socket.emit("a message", {
    that: "only",
    "/chat": "will get"
  });
  chat.emit("a message", {
    everyone: "in",
    "/chat": "will get"
  });
});

// http:localhost:3000/newsで名前空間を設定
const news = io.of("/news").on("connection", socket => {
  socket.emit("item", { news: "item" });
  news.emit("a message", {
    everyone: "in",
    "/news": "will get"
  });
});
Client (index.html)
<script src="/socket.io/socket.io.js"></script>
<script>
    const chat = io.connect('http://localhost:3000/chat')
        , news = io.connect('http://localhost:3000/news');

    chat.on('a message', data => {
        console.log(data);
    });
    news.on('item', data => {
        console.log(data);
    });
    news.on('a message', data => {
        console.log(data);
    });
</script>

Sending and getting data (acknowledgements) 【データ送信】
Server (index.js)
const app = require("express")();
const server = require("http").Server(app);
const io = require("socket.io")(server);

server.listen(3000);

app.get("/", (req, res) => {
  res.sendFile(__dirname + "/index.html");
});

io.on("connection", socket => {
  socket.on("ferret", (name, word, fn) => {
    fn(`${name} says ${word}`);
  });
});
Client (index.html)
<script src="/socket.io/socket.io.js"></script>
<script>
    const socket = io();

    socket.on("connect", () => {
        socket.emit("ferret", "tobi", "woot", data => {
            console.log(data);
        });
    });
</script>

Broadcasting messages 【自分以外にデータ送信】
Server
broadcast
先ほどから使っていたemitの前にbroadcastとつけると自分以外にデータ送信してくれます
const app = require("express")();
const server = require("http").Server(app);
const io = require("socket.io")(server);

server.listen(3000);

app.get("/", (req, res) => {
  res.sendFile(__dirname + "/index.html");
});

io.on("connection", socket => {
  socket.broadcast.emit("user connected");
});
<script src="/socket.io/socket.io.js"></script>
<script>
    const socket = io();

    socket.on("connect", () => {
        socket.on("user connected", () => {
            console.log("connected");
        });
    });
</script>

Rooms and Namespaces
Namespaces
google翻訳↓
Socket.IOを使用すると、ソケットに「名前を付ける」ことができます。これは基本的に、異なるエンドポイントまたはパスを割り当てることを意味します。
Custom namespaces
const app = require("express")();
const server = require("http").Server(app);
const io = require("socket.io")(server);

server.listen(3000);

app.get("/", (req, res) => {
  res.sendFile(__dirname + "/index.html");
});

const nsp = io.of("/my-namespace");
nsp.on("connection", function(socket) {
  console.log("someone connected");
});
<script src="/socket.io/socket.io.js"></script>
<script>
    const myNamespace = io("/my-namespace");
</script>

Rooms
google翻訳↓
各名前空間内で、ソケットが参加および脱退できる任意のチャネルを定義することもできます。
Joining and leaving
join
joinで特定のチャンネルに登録する
const app = require("express")();
const server = require("http").Server(app);
const io = require("socket.io")(server);

server.listen(3000);

app.get("/", (req, res) => {
  res.sendFile(__dirname + "/index.html");
});

io.on("connection", socket => {
  socket.on("chat message", ({ msg, room }) => {
    socket.join(room); // 指定のチャンネルに追加
    io.to(room).emit("chat message", msg);
  });
});
<body>
<ul id="messages"></ul>
<form action="">
    <input type="radio" name="room" value="1" checked>room1
    <input type="radio" name="room" value="2">room2
    <br>
    <input id="m" autocomplete="off" /><button>Send</button>
</form>

<script src="/socket.io/socket.io.js"></script>
<script>
    const socket = io();
    document.querySelector("form").addEventListener("submit", e => {
        e.preventDefault();
        socket.emit('chat message', {
            msg: document.querySelector("#m").value,
            room: `room-${e.target.room.value}`,
        });
    });
    socket.on('chat message', msg => {
        document.querySelector("#messages").insertAdjacentHTML("beforeend", `
            <li>${msg}</li>
        `);
    });
</script>
</body>

特定のルームの人にだけデータ送信できました。
※チャンネルを離れるには、joinと同じ方法でleaveを呼び出せば良いということでした。
最後まで読んでいただいてありがとうございましたm(_ _)m