この記事について
Djangoでbootstrap-datetimepickerを使うためのライブラリ、「django-bootstrap-datepicker-plus」を紹介します。
bootstrap-datetimepicker について
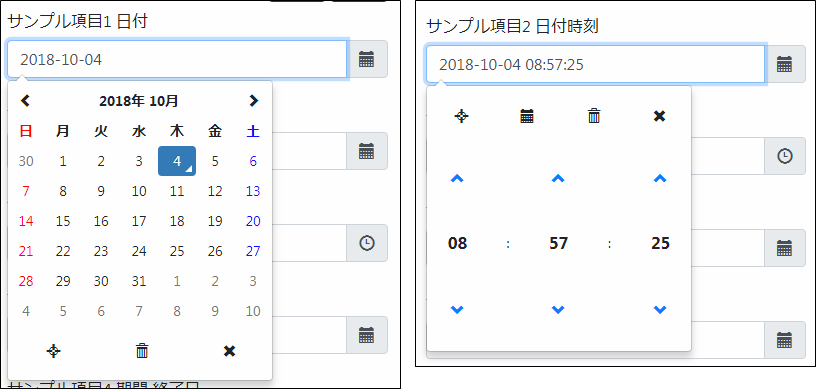
「bootstrap-datetimepicker」は日付入力欄をカレンダー形式で入力するためのjQueryプラグインです。日付だけでなく日付時刻・時刻のみの入力にも対応しています。2つの入力欄に開始・終了の役割を設定して、矛盾のない状態になるよう制御をする機能もあります。
※ 日付と時刻の切り替えはカレンダーと時計のアイコンをクリックします。
一見簡単に使えそうですが、導入に当たって元の入力欄のHTMLをinput-group,form-groupクラスで装飾する必要があり、Djangoのフォームクラスから生成したフォームにそのまま適用することができません。
そこで、もとの入力欄をbootstrap-datetimepicker用のHTMLに装飾してくれるdjango-bootstrap-datepicker-plusというライブラリが公開されています。
このライブラリはbootstrap3/bootstrap4の両方で使えます。
使い方
使い方は、django-bootstrap-datepicker-plusをインストールし、フォームクラス上のwidgetにライブラリのクラスを指定します。
モデルフォームでの実装例を残します。それ以外の使い方は公式サイトをみてください。
0.インストール
pip install django-bootstrap-datepicker-plus
1.settings.py
INSTALLED_APPS = [
    # Add the following
    'bootstrap_datepicker_plus',
]
2.models.py
日付、日付時刻、時刻のフィールドに加え、開始終了日の制御機能も試してみます。
    # サンプル項目1 日付

class Item(models.Model):

    sample_1 = models.DateField(
        verbose_name='サンプル項目1 日付',
        blank=True,
        null=True,
    )

    # サンプル項目2 日付時刻
    sample_2 = models.DateTimeField(
        verbose_name='サンプル項目2 日付時刻',
        blank=True,
        null=True,
    )

    # サンプル項目3 時刻
    sample_3 = models.TimeField(
        verbose_name='サンプル項目3 日時',
        blank=True,
        null=True,
    )

    # サンプル項目4 期間 開始日
    sample_4_start = models.DateField(
        verbose_name='サンプル項目4 期間 開始日',
        blank=True,
        null=True,
    )

    # サンプル項目4 期間 終了日
    sample_4_end = models.DateField(
        verbose_name='サンプル項目4 期間 終了日',
        blank=True,
        null=True,
    )
3.forms.py
optionsオプションでbootstrap-datetimepickerのオプションが、attrオプションでinputタグの属性の指定が可能です。
デフォルトだとカレンダーの上の表記が「10月 2018」となってしまうので、dayViewHeaderFormatオプションで一般的な表現に修正しています。
import bootstrap_datepicker_plus as datetimepicker
from django import forms

from .models import Item


class ItemForm(forms.ModelForm):

    class Meta:
        model = Item
        fields = ('sample_1', 'sample_2', 'sample_3', 'sample_4_start', 'sample_4_end')
        widgets = {
            'sample_1': datetimepicker.DatePickerInput(
                format='%Y-%m-%d',
                options={
                    'locale': 'ja',
                    'dayViewHeaderFormat': 'YYYY年 MMMM',
                }
            ),

            'sample_2': datetimepicker.DateTimePickerInput(
                format='%Y-%m-%d %H:%M:%S',
                options={
                    'locale': 'ja',
                    'dayViewHeaderFormat': 'YYYY年 MMMM',
                }
            ),

            'sample_3': datetimepicker.TimePickerInput(
                format='%H:%M:%S',
                options={
                    'locale': 'ja',
                }

            ),

            'sample_4_start': datetimepicker.DatePickerInput(
                format='%Y-%m-%d',
                options={
                    'locale': 'ja',
                    'dayViewHeaderFormat': 'YYYY年 MMMM',
                }
            ).start_of('期間'),

            'sample_4_end': datetimepicker.DatePickerInput(
                format='%Y-%m-%d',
                options={
                    'locale': 'ja',
                    'dayViewHeaderFormat': 'YYYY年 MMMM',
                }
            ).end_of('期間'),
        }
4.templates.html
- テンプレートにjQuery及びBootstrapの読み込みが必要です。テンプレート内にテンプレートタグ
{% load bootstrap4 %},{% bootstrap_css %},{% bootstrap_javascript jquery='full' %}を記述するか、直接linkタグ・scriptタグを記述します。
<link href="https://maxcdn.bootstrapcdn.com/bootstrap/4.0.0/css/bootstrap.min.css" rel="stylesheet">
<script src="https://code.jquery.com/jquery-3.3.1.min.js"></script>
<script src="https://maxcdn.bootstrapcdn.com/bootstrap/4.0.0/js/bootstrap.min.js"></script>
- テンプレートタグ
{{ form.media }}で必要なライブラリ(datetimepickerとmoment.js)の読み込みが挿入されます。出力されるのは以下のコードです。
<link href="/static/bootstrap_datepicker_plus/css/datepicker-widget.css" type="text/css" media="all" rel="stylesheet">
<script type="text/javascript" src="https://cdnjs.cloudflare.com/ajax/libs/moment.js/2.9.0/moment-with-locales.min.js"></script>
<script type="text/javascript" src="https://cdnjs.cloudflare.com/ajax/libs/bootstrap-datetimepicker/4.17.47/js/bootstrap-datetimepicker.min.js"></script>
<script type="text/javascript" src="/static/bootstrap_datepicker_plus/js/datepicker-widget.js"></script>
django_crispy_formsの利用時はフォームの先頭に自動的に{{ form.media }}が挿入されるので、これより前方でjQueryを読み込む必要があります。
5.CSS
以下のコードで土曜日と日曜日に色が付きます。
参考: Qiita: Bootstrap 4でDatetimePickerを使いたい
    .datepicker-days th.dow:first-child,
    .datepicker-days td:first-child {
        color: #f00;
    }
    .datepicker-days th.dow:last-child,
    .datepicker-days td:last-child {
        color: #00f;
    }
[スマホ対応] キーボードを非表示にする
この手のウィジェットをスマホで使ったときにありがちな問題なんですが、入力欄にタッチすると仮想キーボードも起動してしまい、画面を占領してウィジェットが使いずらくなります。
参考:Qiita:bootstrap-datepicker の UI がスマホ表示だと微妙
この問題は、入力欄を編集不可にしてウィジェットの入力だけ受け付けるという設定で解決できます。
参考:How to prevent mobile keyboard to show when opening the picker?
以下、設定例です。
        widgets = {
            # スマホ対応版 キーボード入力不可
            'sample_1': datetimepicker.DatePickerInput(
                format='%Y-%m-%d',
                attrs={'readonly': 'true'},
                options={
                    'locale': 'ja',
                    'dayViewHeaderFormat': 'YYYY年 MMMM',
                    'ignoreReadonly': True,
                    'allowInputToggle': True,
                }
            ),
css で編集不可時のグレーアウトを無効にします。
.form-control[disabled],
.form-control[readonly],
.form-control fieldset[disabled] {
    background-color: #fff !important;
    opacity: 1;
}
注意点
bootstrap-datetimepickerのAPIは本家のbootstrap-datepickerほど充実していません。例えば「祝祭日を赤くする」「入力を受け付ける日は休日と特定の日を除いた2営業日後」などの要件ならばbootstrap-datepicker(+ WebAPIとか)を使いましょう。
ちなみにbootstrap-datepickerの導入方法は、入力フィールドにクラスを追加して、あとはJavaScriptを頑張って書くという方法になります。
参考:how to show datepicker calendar on datefield
class HolidayTimeForm(forms.ModelForm):

    class Meta:
        model = Holiday
        widgets = {
            'holiday_date': forms.DateInput(attrs={'class':'datepicker'}),
        }
