この記事はOpenCV Advent Calendar 2022の16日目の記事です。
15日目はOpenCV-pythonをdispatchから読み解くを寄稿頂きました。
本記事は異形かつ上下非対称の形状を持ったサンプルの回転角取得についてまとめたものです。
はじめに
OpenCVではキャプチャー画像から対象物の角度を測定することができますが、丸や四角など基本図形の回転角を測定するのは容易でも実際に測定したいサンプルの多くは異形だったりします。
これが上下(または左右)対象であればよいのですが、非対称の場合困ったことが起きます。
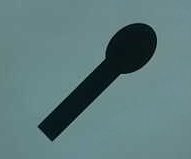
例として下図のスプーンのような図形の場合を考えます。
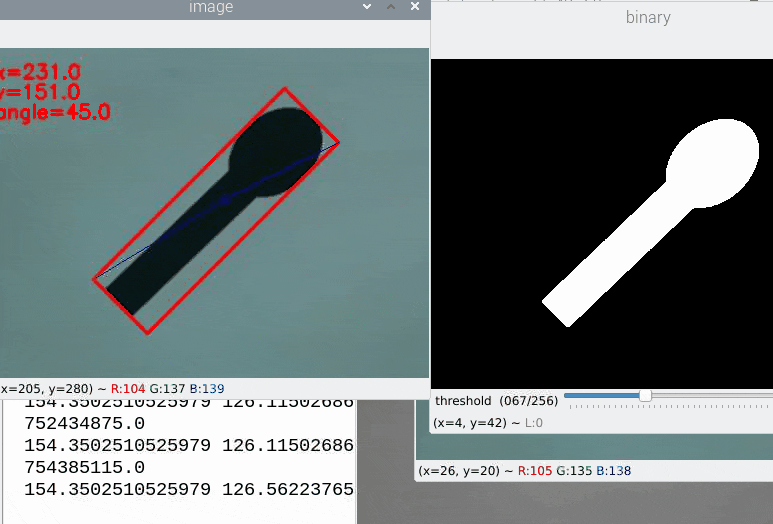
スプーンの掬う側(「つぼ」と言うらしいです)が真上の時を0°とした場合下図は45°となります。
これをcv.minAreaRectで角度を取得すると
45°となりました。
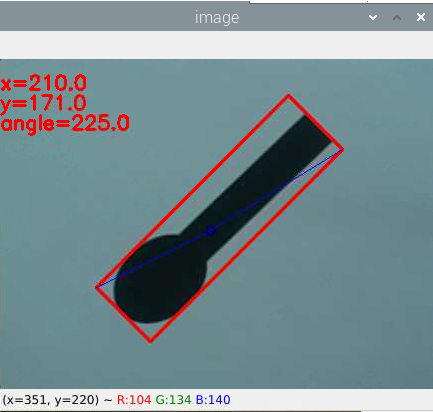
これを上下にひっくり返します。45°+180°で225°になるはずですが…

…45°ですね。
上下の認識が無いため、cv.minAreaRectのみでは0~180°の範囲でしか測定できません。
結果、製品の角度を取得したのち設定した角度に製品を揃える。という処理をしたい場合、上下がバラバラになったものが流れてくることになります。
この問題について解決します。
結論
画像モーメント(cv2.moments)を使います。
mu = cv2.moments("検査対象", False) #画像モーメントの取得
x,y= int(mu["m10"]/mu["m00"]) , int(mu["m01"]/mu["m00"]) #重心座標
dist1 = np.linalg.norm(box[0]-(x,y)) #外接矩形の左上~重心までの距離
dist2 = np.linalg.norm(box[2]-(x,y)) #外接矩形の右下~重心までの距離
#dist2が大きい場合、スプーンのつぼは下にあるので角度を+180°する
if dist2 > dist1:
    angle = angle +180
これをラズパイに組み込んでリアルタイム測定してみます。
環境
- raspberry pi4 64bit bullseye
- opencv-contrib-python:4.1.2.30
- カメラ:Raspberry Pi カメラモジュール
測定方法
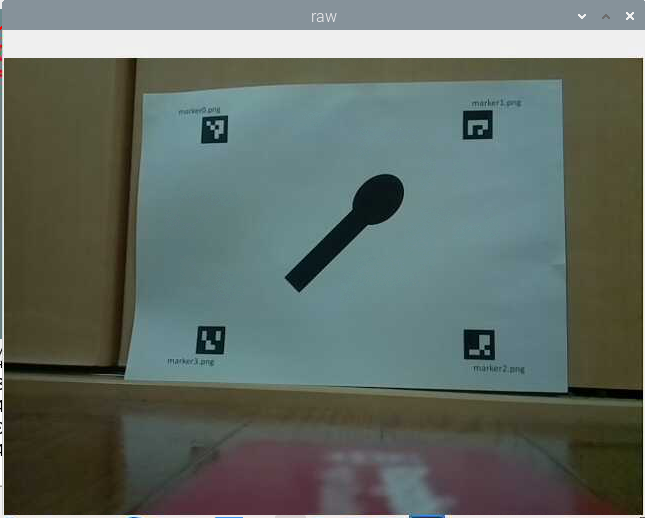
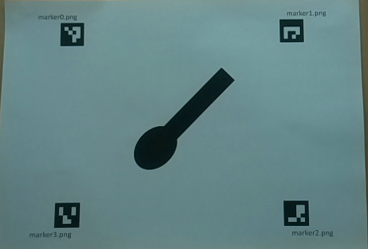
45°に傾けたスプーンのような画像とArucoマーカーを紙に印刷したものを測定対象としました。
Arucoマーカーを使った検査面の作成については過去の記事を参照してください。
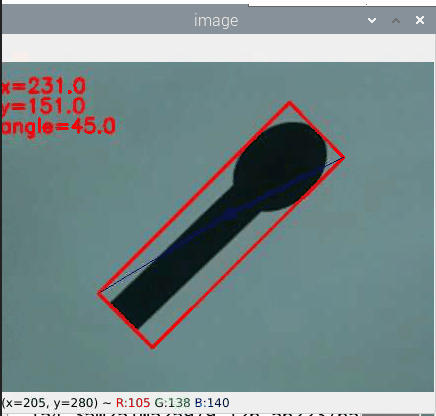
カメラを固定していなかったり紙が歪んで貼られたりしていますが、検出角度は精度良く取れているのが確認できます。
次に冒頭で失敗した225°のサンプルですが
きちんと認識されました。
もちろん、スプーンが下の場合を0°としたい場合も対応できます。
その場合、
if dist1 > dist2:
    angle = angle +180
とすればOKです。
プログラム全文
おまけで載せておきます。
import cv2
import numpy as np
import tkinter as tk

def open_file():
    pass
def close_disp():
    pass
def btn_click():
    # テキスト取得
    x_dis= int(txt_1.get())
    y_dis= int(txt_2.get())
    cap_num= int(txt_3.get())
    root.destroy()

    # パラメータ
    size= 3 # 表示画像サイズ=ARマーカー間の実寸×size
    th = 90 # 閾値の初期値
    cap = cv2.VideoCapture(cap_num) # カメラ番号取得
    aruco = cv2.aruco

    def nothing(x):
        pass

    cv2.namedWindow('binary')
    cv2.createTrackbar('threshold','binary', th , 256, nothing)

    while True:
        try:
            ret, img = cap.read() # 戻り値 = ,カメラ画像
            cv2.imshow('raw',img)
            p_dict = aruco.getPredefinedDictionary(aruco.DICT_4X4_50) # ArUcoマーカーのdict取得(50ピクセル)
            corners, ids, rejectedImgPoints = aruco.detectMarkers(img, p_dict) # カメラ画像からArUcoマーカー検出
            # 時計回りで左上から順に表示画像の座標をmに格納
            m = np.empty((4,2)) # [x,y]の配列を4点分
            corners2 = [np.empty((1,4,2))]*4
            for i,c in zip(ids.ravel(), corners):
              corners2[i] = c.copy()
            m[0] = corners2[0][0][2] # マーカー0の右下
            m[1] = corners2[1][0][3] # マーカー1の左下
            m[2] = corners2[2][0][0] # マーカー2の左上
            m[3] = corners2[3][0][1] # マーカー3の右上
            width, height = (x_dis*size,y_dis*size) # 変形後画像サイズ
            marker_coordinates = np.float32(m)
            true_coordinates   = np.float32([[0,0],[width,0],[width,height],[0,height]])
            trans_mat = cv2.getPerspectiveTransform(marker_coordinates,true_coordinates) # 画像サイズを任意の大きさに合わせる
            img_trans = cv2.warpPerspective(img,trans_mat,(width, height))
            tmp = img_trans.copy()
            img_trans = cv2.cvtColor(img_trans, cv2.COLOR_BGR2GRAY)
            # 二値化
            gamma = cv2.getTrackbarPos('threshold','binary')
            th = cv2.getTrackbarPos('threshold','binary')
            _,img_trans = cv2.threshold(img_trans,th,255,cv2.THRESH_BINARY_INV)
            cv2.imshow('binary',img_trans)
            contours, hierarchy = cv2.findContours(img_trans, cv2.RETR_EXTERNAL, cv2.CHAIN_APPROX_SIMPLE)
            rect = cv2.minAreaRect(contours[0])
            angle = rect[2]
            box = cv2.boxPoints(rect)
            box = np.int0(box)
            tmp = cv2.drawContours(tmp,[box],0,(0,0,255),2)
            mu = cv2.moments(img_trans, False)
            x,y= int(mu["m10"]/mu["m00"]) , int(mu["m01"]/mu["m00"])
            print(mu["m10"])
            dist1 = np.linalg.norm(box[0]-(x,y))
            dist2 = np.linalg.norm(box[2]-(x,y))
            print(dist1,dist2)
            if dist2 > dist1:
                angle = angle +180
            cv2.line(tmp,box[0], (x, y), (255, 0, 0))
            cv2.line(tmp,box[2], (x, y), (255, 0, 0))
            cv2.circle(tmp, (x,y), 4, 100, 2, 4)
            cv2.putText(tmp, "x={:.1f}".format(x),(int(0), int(30)), cv2.FONT_HERSHEY_SIMPLEX,0.65, (0, 0, 255), 2)
            cv2.putText(tmp, "y={:.1f}".format(y),(int(0), int(50)), cv2.FONT_HERSHEY_SIMPLEX,0.65, (0, 0, 255), 2)
            cv2.putText(tmp, "angle={:.1f}".format(angle),(int(0), int(70)), cv2.FONT_HERSHEY_SIMPLEX,0.65, (0, 0, 255), 2)

            cv2.imshow('image',tmp)
            key = cv2.waitKey(1)
            if key == ord("q"):
                    break
        except ValueError:
            print("ValueError")
        except IndexError:
            print("IndexError")
        except AttributeError:
            print("AttributeError")

    cv2.destroyAllWindows()

# 画面作成
root = tk.Tk() # Window
root.title('回転角の取得')
root.geometry('300x200')

# ラベル
lbl_1 = tk.Label(text='幅')
lbl_1.place(x=30, y=70)
lbl_2 = tk.Label(text='高さ')
lbl_2.place(x=30, y=100)
lbl_2 = tk.Label(text='カメラ')
lbl_2.place(x=30, y=150)

# テキストボックス
txt_1 = tk.Entry(width=20)
txt_1.insert(0, 145)
txt_1.place(x=90, y=70)
txt_2 = tk.Entry(width=20)
txt_2.insert(0, 110)
txt_2.place(x=90, y=100)
txt_3 = tk.Entry(width=20)
txt_3.insert(0, 0)
txt_3.place(x=90, y=150)

# ボタン
btn = tk.Button(root, text='OK', command=btn_click)
btn.place(x=140, y=170)

root.mainloop()
おわりに
上下のあるサンプルの回転角が取れない問題を解決できました。
具体的にどのようなケースで役立つのかについてはまた(来年)まとめたいと思います。
明日、17日目の記事は小川メソッドでおなじみの@kaizen_nagoyaさんの記事です。