予め
- Heroku のアカウントがあって、heroku toolbelt が ローカルにインストールされている
- nodejs が インストールされている
- Facebook の Page が作られている(https://www.facebook.com/pages/create/)
- Facebook アプリが作成されている(https://developers.facebook.com/quickstarts/?platform=web)
開発環境作り
Hubot のインストール
$ npm install -g yo generator-hubot
Hubot application の Generate
yeomen generator を 使ってアプリケーションのベースを作ります
Messenger Bot 用の Adapter には messenger-bot を使います
かりに アプリケーション名を botapp とします
$ mkdir botapp
$ cd botapp
$ yo hubot
git に Commit しておく
$ git init
$ git add .
$ git commit -m 'Initial commit'
adapter を聞かれたら、 messenger-bot と入力する
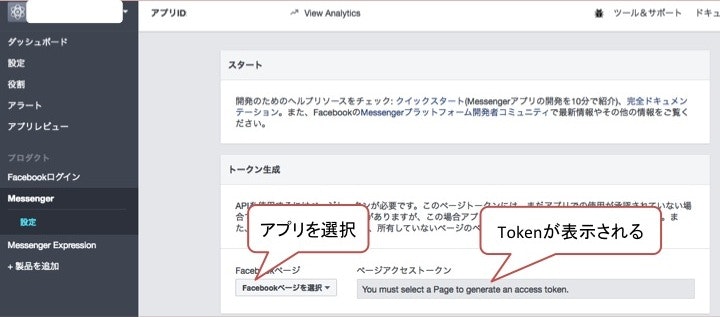
Facebook access token を作る
- アプリケーションの管理ページから Messenger を選択する
- 登録した Messenger Bot 用の アプリケーションを選択
- Token が表示される
Heroku に Push
Heroku の git に Push する
$ heroku apps:create botapp
$ git push heroku master
Token とか 登録する
$ heroku config:set MESSENGER_ACCESS_TOKEN=(先ほど取得した Token)
$ heroku config:set MESSENGER_VERIFY_TOKEN=botapp (何か適当な文字列 Webhooks 登録時に使用します)
$ heroku config:set HUBOT_HEROKU_KEEPALIVE_URL=$(heroku apps:info -s  | grep web-url | cut -d= -f2)
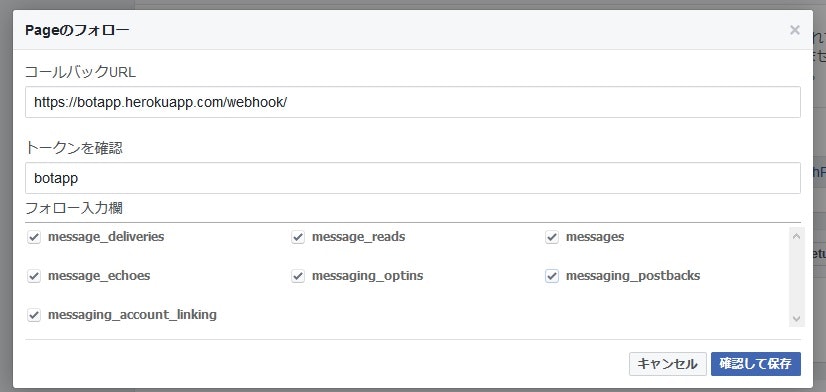
Webfook を登録
- Tokenを取得した Facebook のアプリケーション管理ページで Webhooks の欄の Edit Events ボタンをくりく
- 下のダイアログが表示されるので、コールバックURLへ (herokunourl)/webhook/、トークン確認へ MESSENGER_VERIFY_TOKEN へ設定した文字列を入力する
- チェックボックスを全部チェックして 確認して保存 する
これで準備完了です
簡単な Coll and Response
Hubot の応答Scriptを書く
1.script フォルダ内に以下のファイルを設定
botapp.coffee
# commands:
# hubot こんちは return the message ちはこん
#
module.exports = (robot) ->
  robot.hear /こんちは/i, (res) ->
    res.send 'ちはこん'
2.heroku に Push する
3.facebook の Page から メッセンジャーを起動してメッセージを入力する
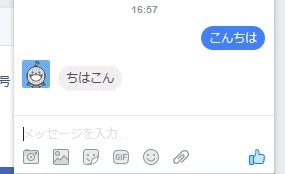
これで、返事が帰ってくるはずです