前回のお話
こちらで軽量Whisperのお話を書いています。今回はその続きです。
やりたかったこと
会議の音声をリアルタイムで認識して文字起こしをするだけであればTeamsなどでもできますが、リアルタイムな翻訳はPro機能なので使えず手元で同時通訳を実現したいなと思い今回の記事作成に至りました。
必要なライブラリ
このプログラムを動かすためには以下のライブラリが必要です。
pip install flask
ファイルとフォルダ構造
├── webApp.py
├── uploads        # 前回記事のDistil-whisperの文字起こしテキスト出力先
└── templates
    └── index.html
実装コード
以下が実装コードです。
webApp.py
from flask import Flask, render_template, request, jsonify
import os
import shutil
import threading
import time

app = Flask(__name__)

# 監視中のファイルパス
watched_file_path = None
# ファイル内容のキャッシュ
file_content_cache = []

def get_last_10_lines(file_path):
    try:
        with open(file_path, 'r', encoding='utf-8') as file:
            lines = file.readlines()
            return lines[-15:]
    except:
        return []

def watch_file():
    global file_content_cache
    while True:
        if watched_file_path and os.path.exists(watched_file_path):
            file_content_cache = get_last_10_lines(watched_file_path)
        time.sleep(1)

@app.route('/')
def index():
    return render_template('index.html')

@app.route('/upload', methods=['POST'])
def upload_file():
    global watched_file_path
    file = request.files['file']
    upload_folder = 'uploads'
    os.makedirs(upload_folder, exist_ok=True)
    watched_file_path = os.path.join(upload_folder, file.filename)
    file.save(watched_file_path)
    return jsonify(success=True)

@app.route('/update', methods=['GET'])
def update_file():
    return jsonify(file_content_cache)

if __name__ == '__main__':
    threading.Thread(target=watch_file, daemon=True).start()
    app.run(debug=True)
templates/index.html
<!DOCTYPE html>
<html lang="ja">
<head>
    <meta charset="UTF-8">
    <title>File Upload</title>
    <script src="https://ajax.googleapis.com/ajax/libs/jquery/3.5.1/jquery.min.js"></script>
    <style>
        #drop_area {
            width: 400px;
            height: 50px;
            border: 2px dashed #000;
            margin: 20px;
            display: flex;
            justify-content: center;
            align-items: center;
        }
        .new-line {
            color: blue; /* 新しい行は青色で表示 */
        }
        .old-line {
            color: black; /* 既存の行は黒色で表示 */
        }
    </style>
</head>
<body>
    <div id="drop_area">ここにファイルをドロップ</div>
    <div id="file_content"></div>

    <script>
        let lastContent = [];

        $(function() {
            $('#drop_area').on('dragover', function(e) {
                e.stopPropagation();
                e.preventDefault();
                e.originalEvent.dataTransfer.dropEffect = 'copy';
            });

            $('#drop_area').on('drop', function(e) {
                e.stopPropagation();
                e.preventDefault();
                let files = e.originalEvent.dataTransfer.files;
                uploadFile(files[0]);
            });

            setInterval(updateFileContent, 1000); // 1秒ごとにファイル内容を更新
        });

        function uploadFile(file) {
            let formData = new FormData();
            formData.append('file', file);

            $.ajax({
                url: '/upload',
                type: 'POST',
                data: formData,
                processData: false,
                contentType: false,
                success: function(response) {
                    if (response.success) {
                        updateFileContent(); // 即座にファイル内容を更新
                    }
                }
            });
        }

        function updateFileContent() {
            $.ajax({
                url: '/update',
                type: 'GET',
                success: function(data) {
                    displayFileContent(data);
                }
            });
        }

        function displayFileContent(data) {
            const contentDiv = $('#file_content');
            contentDiv.empty(); // 既存の内容をクリア

            // 新しく追加された行を青色で、それ以外の行を黒色で表示
            data.forEach((line, index) => {
                let lineClass = (index === data.length - 1) ? 'new-line' : 'old-line';
                contentDiv.append($('<div>').addClass(lineClass).text(line));
            });

            // 現在の内容を保存
            lastContent = data.slice();
        }

    </script>
</body>
</html>
コードの解説
このFlaskアプリケーションは、ユーザーがドラッグ&ドロップでファイルをアップロードすると、そのファイルの内容をリアルタイムに監視し、結果をブラウザに表示します。アップロードされるファイルは、前述の「distil-whisper」を用いたリアルタイム音声認識アプリケーションによって生成されるものとします。
Flaskアプリケーションの主要部分(webApp.py)
Flaskアプリケーションの主要部分では、以下の3つのエンドポイントが提供されています。
-
/: ホームページ。index.htmlが表示されます。 -
/upload: ファイルのアップロードを受け付けるエンドポイント。アップロードされたファイルはuploadsフォルダに保存され、その内容がリアルタイムに監視されます。 -
/update: ファイルの内容の更新をクライアントに通知するエンドポイント。最新のファイル内容がJSON形式で返されます。
フロントエンド部分(index.html)
フロントエンド部分では、jQueryを使って以下の操作を行います。
- ファイルのドラッグ&ドロップによるアップロード機能
- 1秒ごとに
/updateエンドポイントから最新のファイル内容を取得し、ブラウザに表示
使い方
1.webApp.pyを起動します。
前回記事の「Distil-Whisper」が起動している前提です。
「Uploads」フォルダに現在の日付時刻のテキストファイルが生成されているので、それをドラッグアンドドロップします。

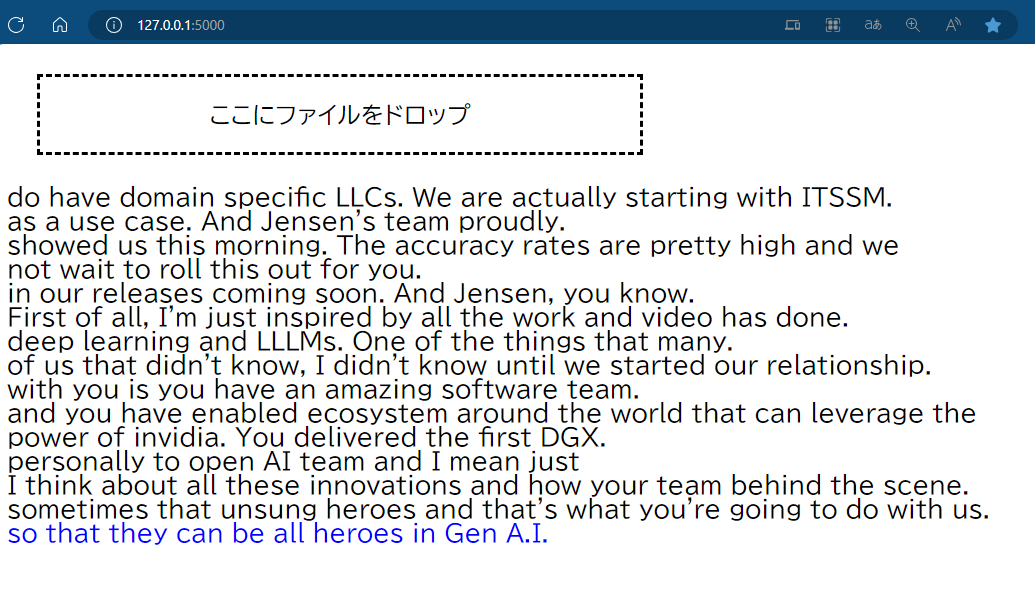
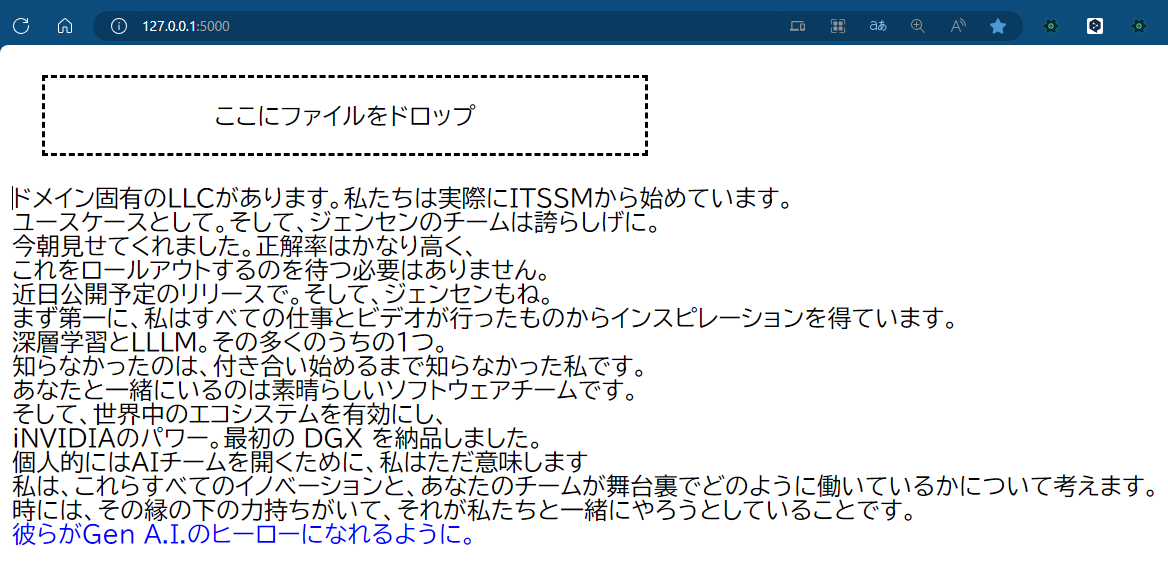
2.文字起こしのラスト15行が常に表示されます。
3.Edgeのブラウザ翻訳で日本語に翻訳します。
ブラウザのリロードをするときに画面が全クリアされないので目がチカチカすることは無いと思います。
あと、ブラウザのウィンドウを2つ並べておいて片方を英語、片方をブラウザ翻訳の日本語のようすると元の文章もちゃんと見られるのでいいと思います。
実際に動いている様子
こちらに動いている様子を掲載しています。
併せてフォローもいただけると嬉しいです。
終わりに
前回の「Distil-Whisper」の記事と併せて2日程度でこの仕組みが完成しました。
ChatGPTの活躍に感謝しています。今後も仕事に生かせそうなコードを書いていこうと思います。

