これの続きです。
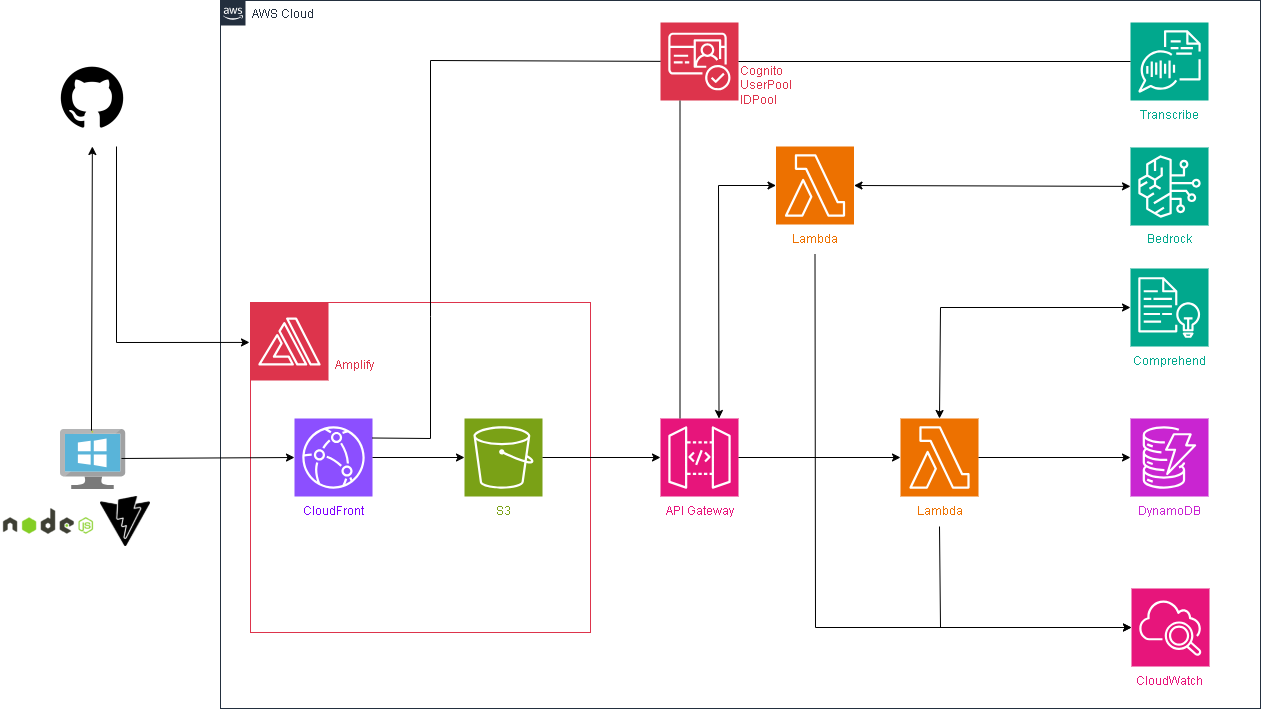
環境イメージ
今まで構築してきた環境にLambdaを1つ追加して、そこからAWS Bedrockに接続します。
BedrockでAWSのAIであるNovaを呼び出してユーザへのコメントを生成してもらいます。
Lambdaを呼び出すために既存のAPI Gatewayに設定を追加します。
ハンズオン
Lambda
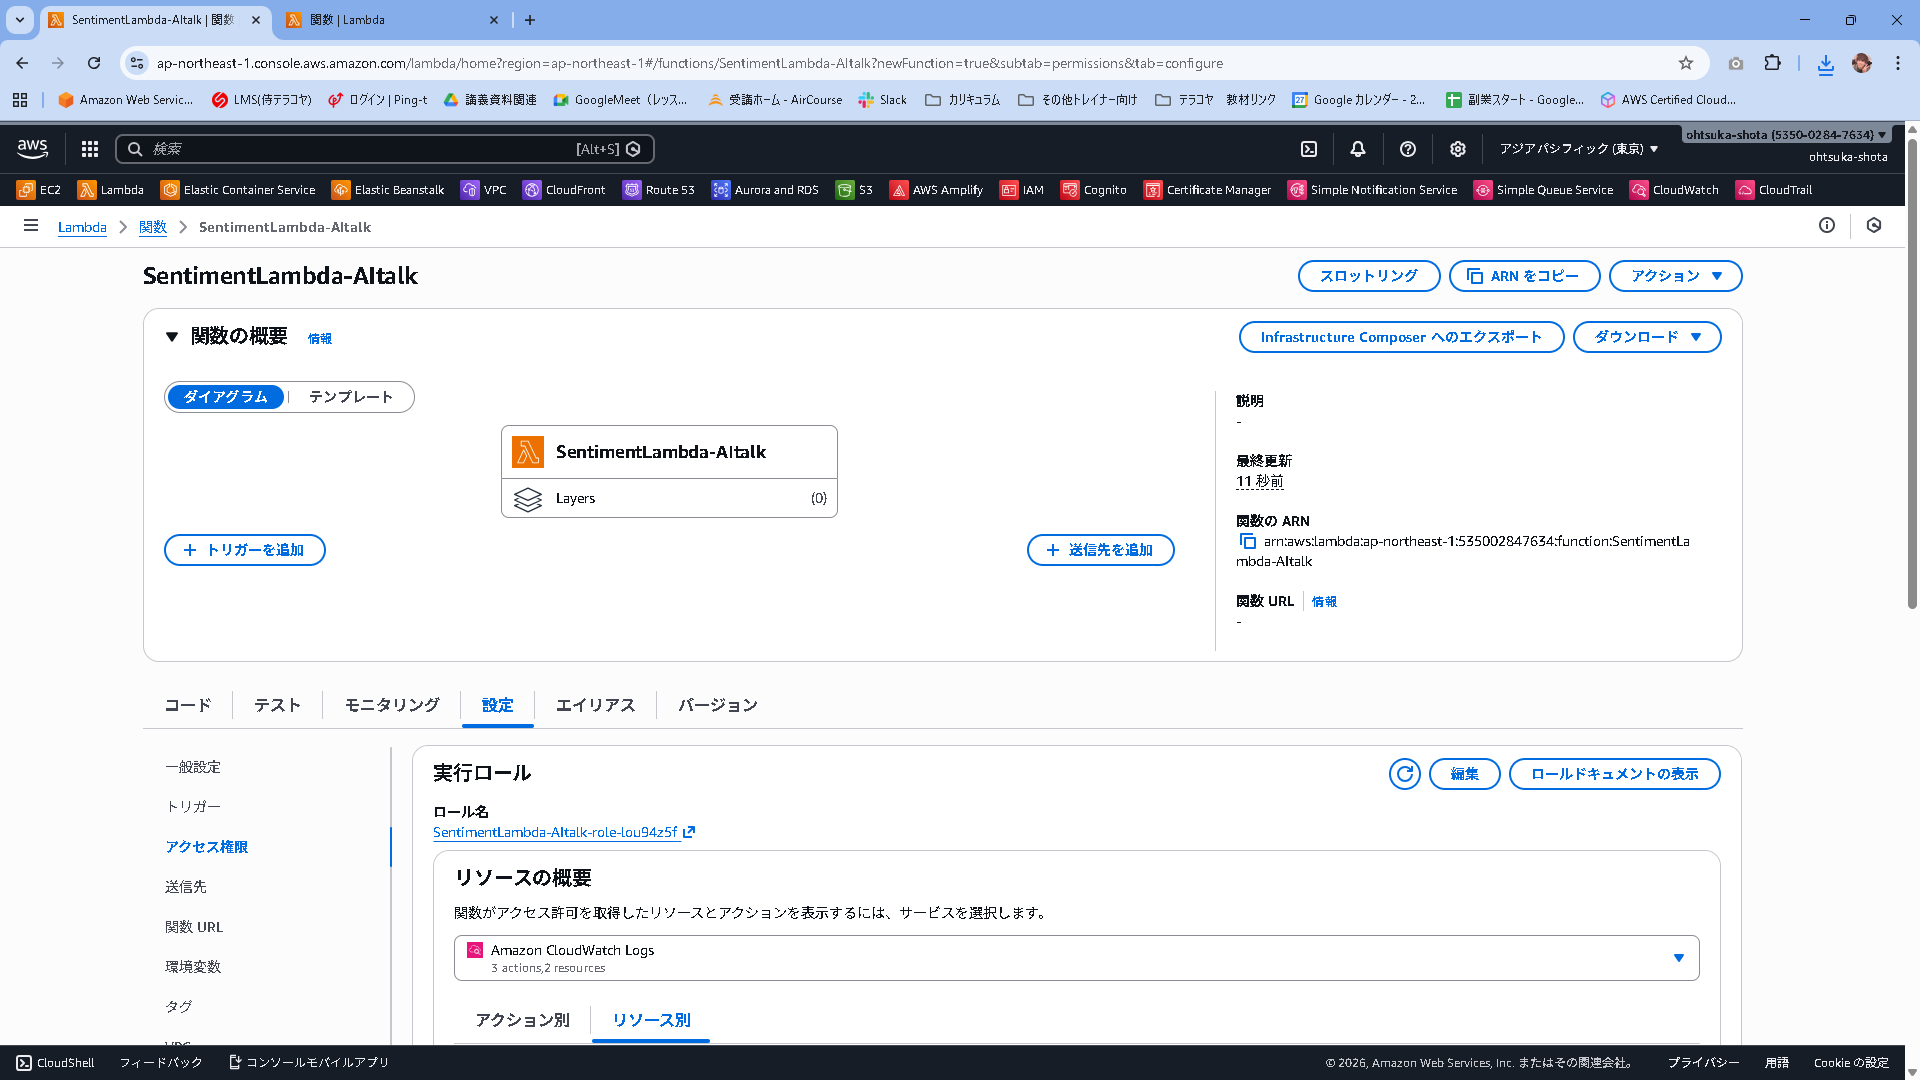
SentimentLambda-AItalkという名前でLambdaを作成します。
ランタイムはPython3.13とします。

作成出来たことを確認します。
このLambdaはAWS Bedrockと連携しますので、Roleの中身を変える必要があります。
変えていきましょう。
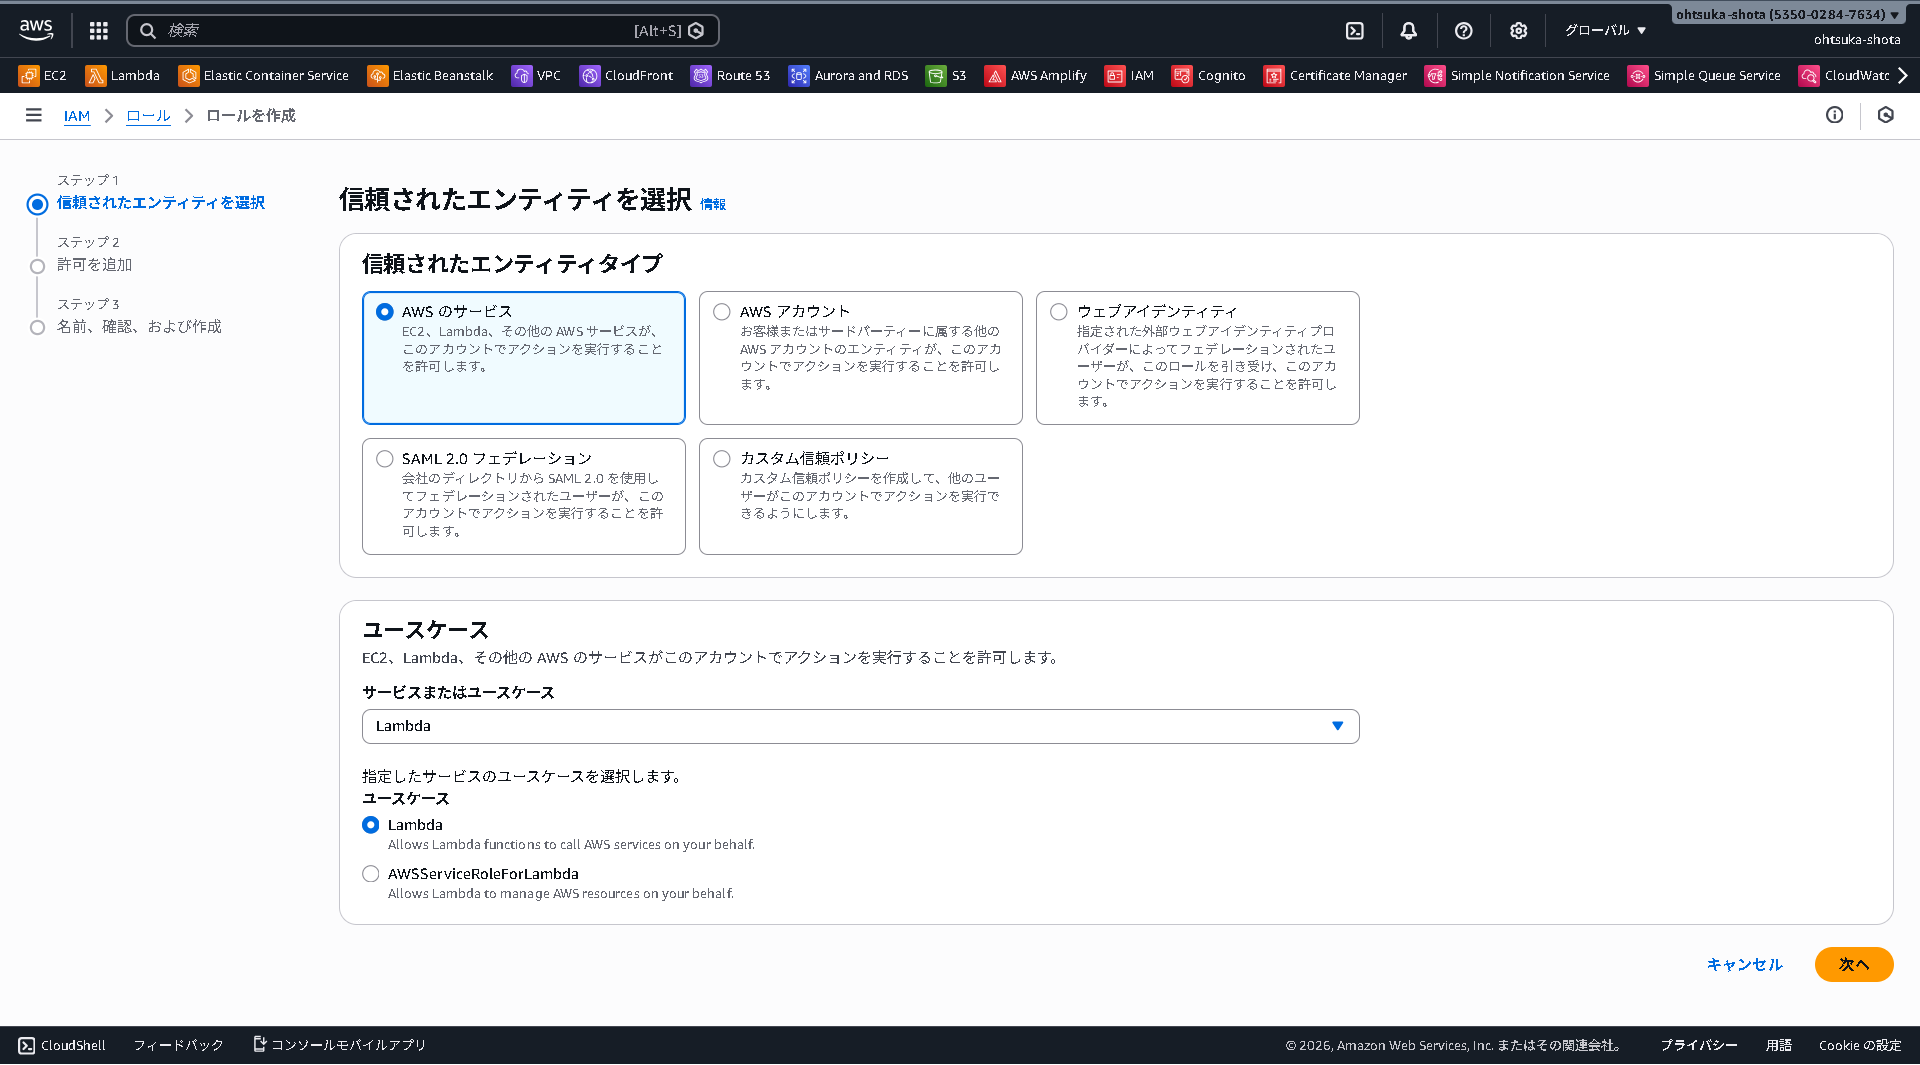
IAMRoleの管理画面に移動して、Roleの新規作成を行います。
AWSのサービスで、ユースケースはLambdaを選択します。
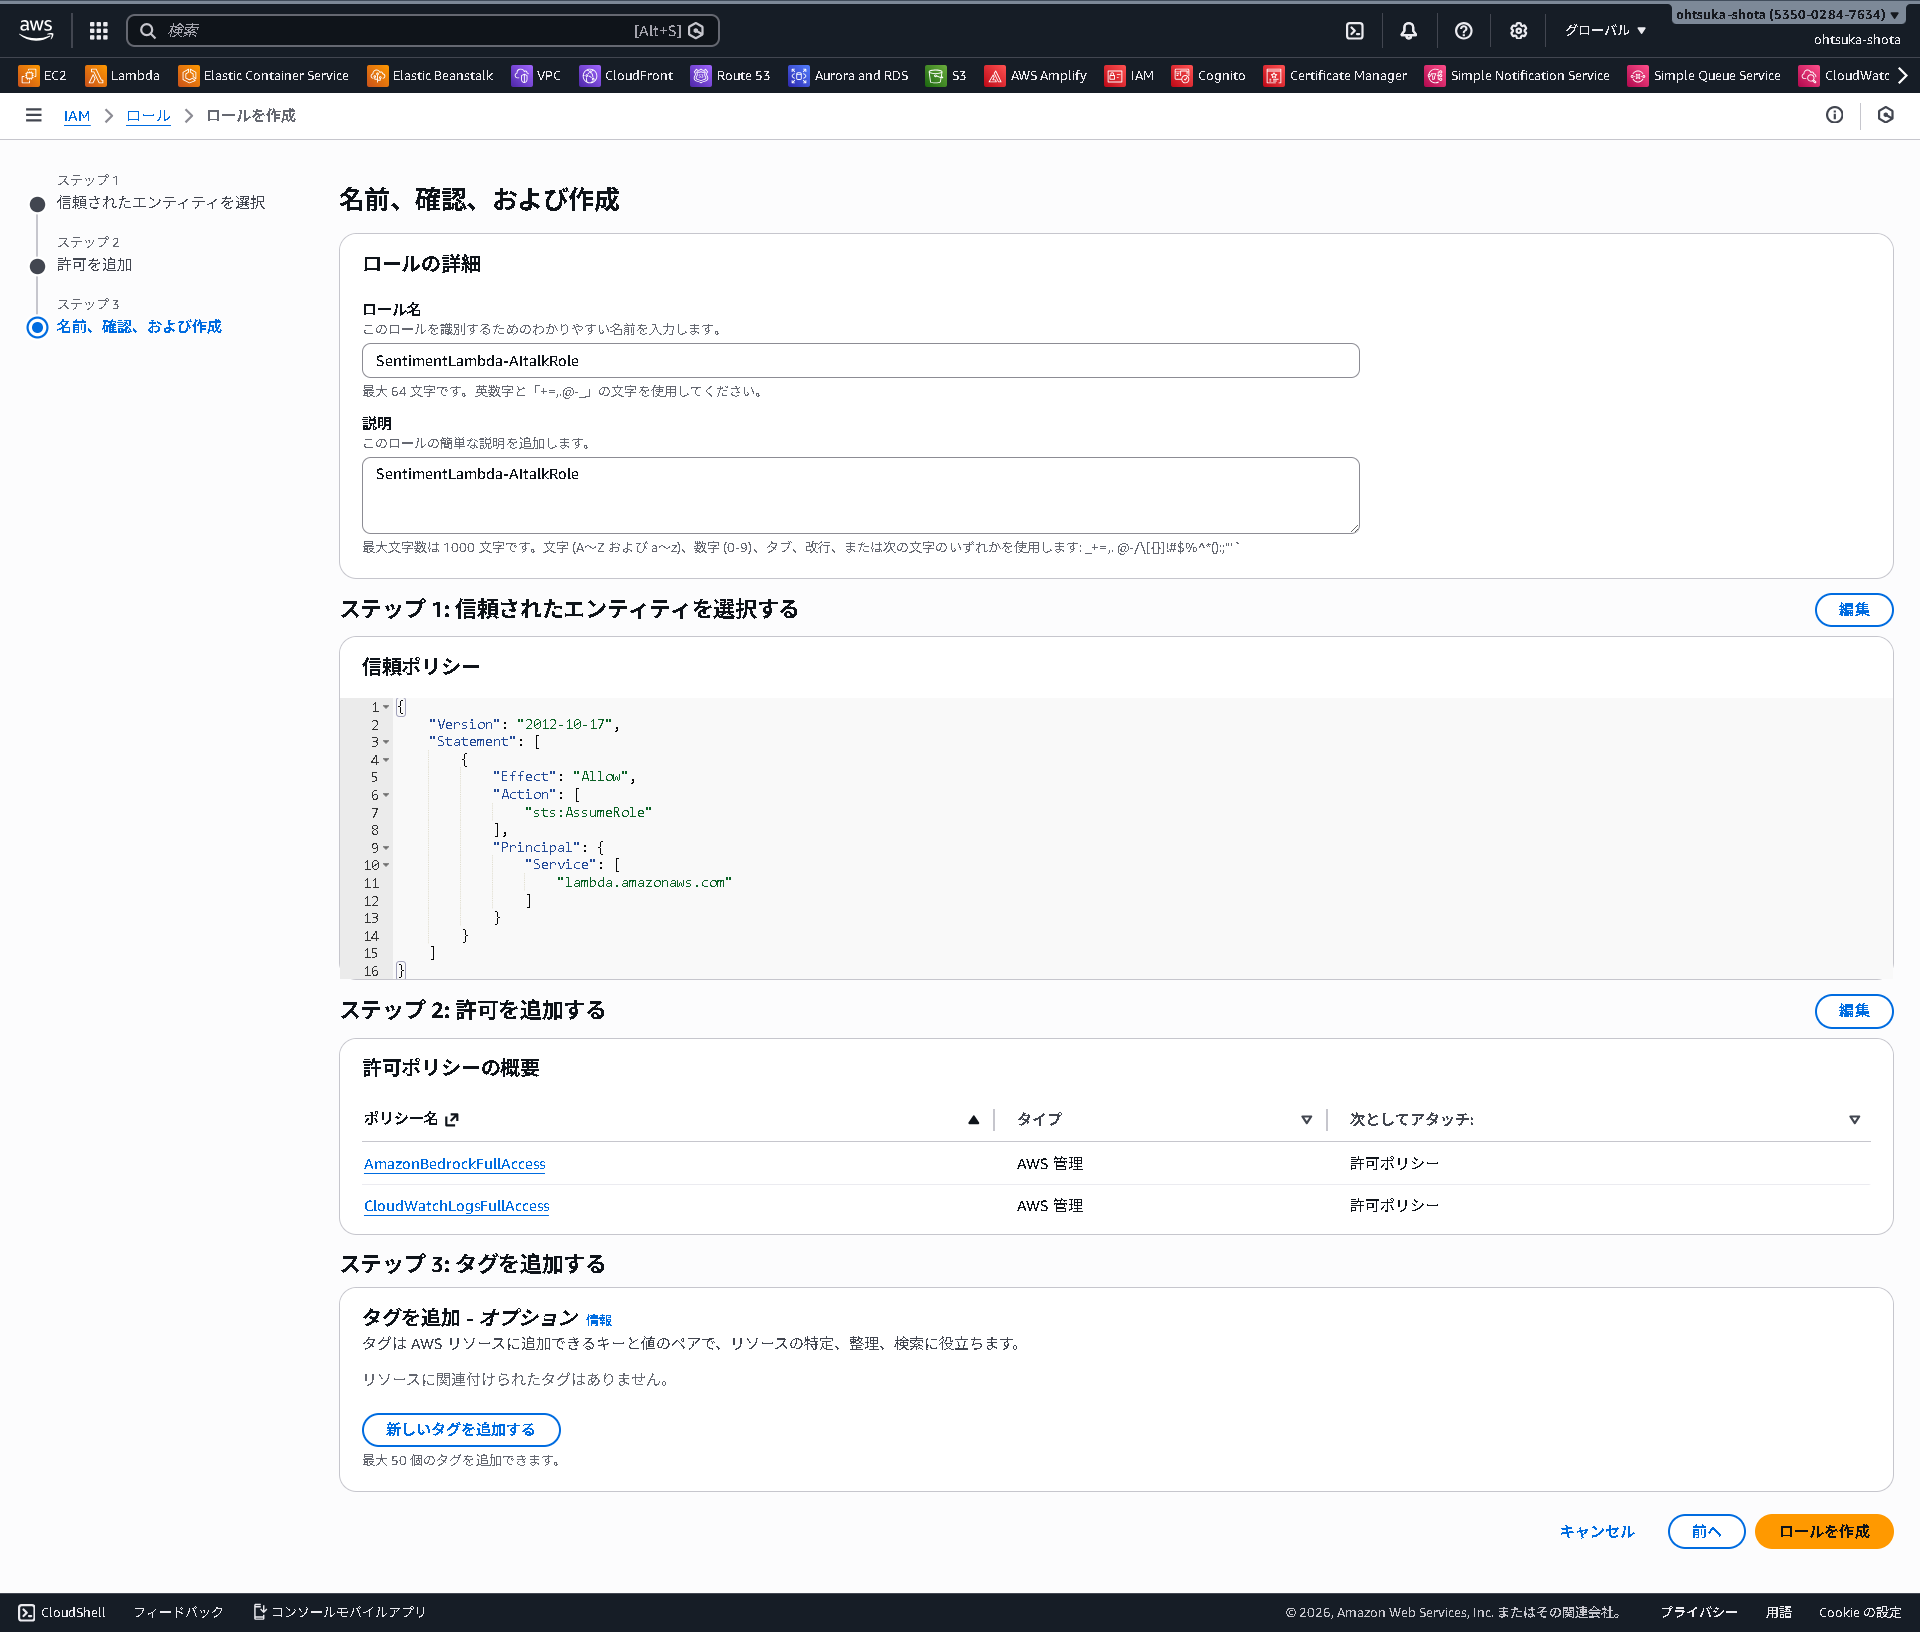
PolicyはAmazonBedrockFullAccessとCloudWatchLogsFullAccessを付与します。

SentimentLambda-AItalkRoleという名前でRoleを作成します。
作成したRoleをLambdaに紐づけておきましょう。

また、同じく設定タブでタイムアウトを1分にしておきましょう。
Bedrockから回答を待つので、タイムアウトが3秒だとそこまでに回答が間に合わずエラーになる可能性があります。

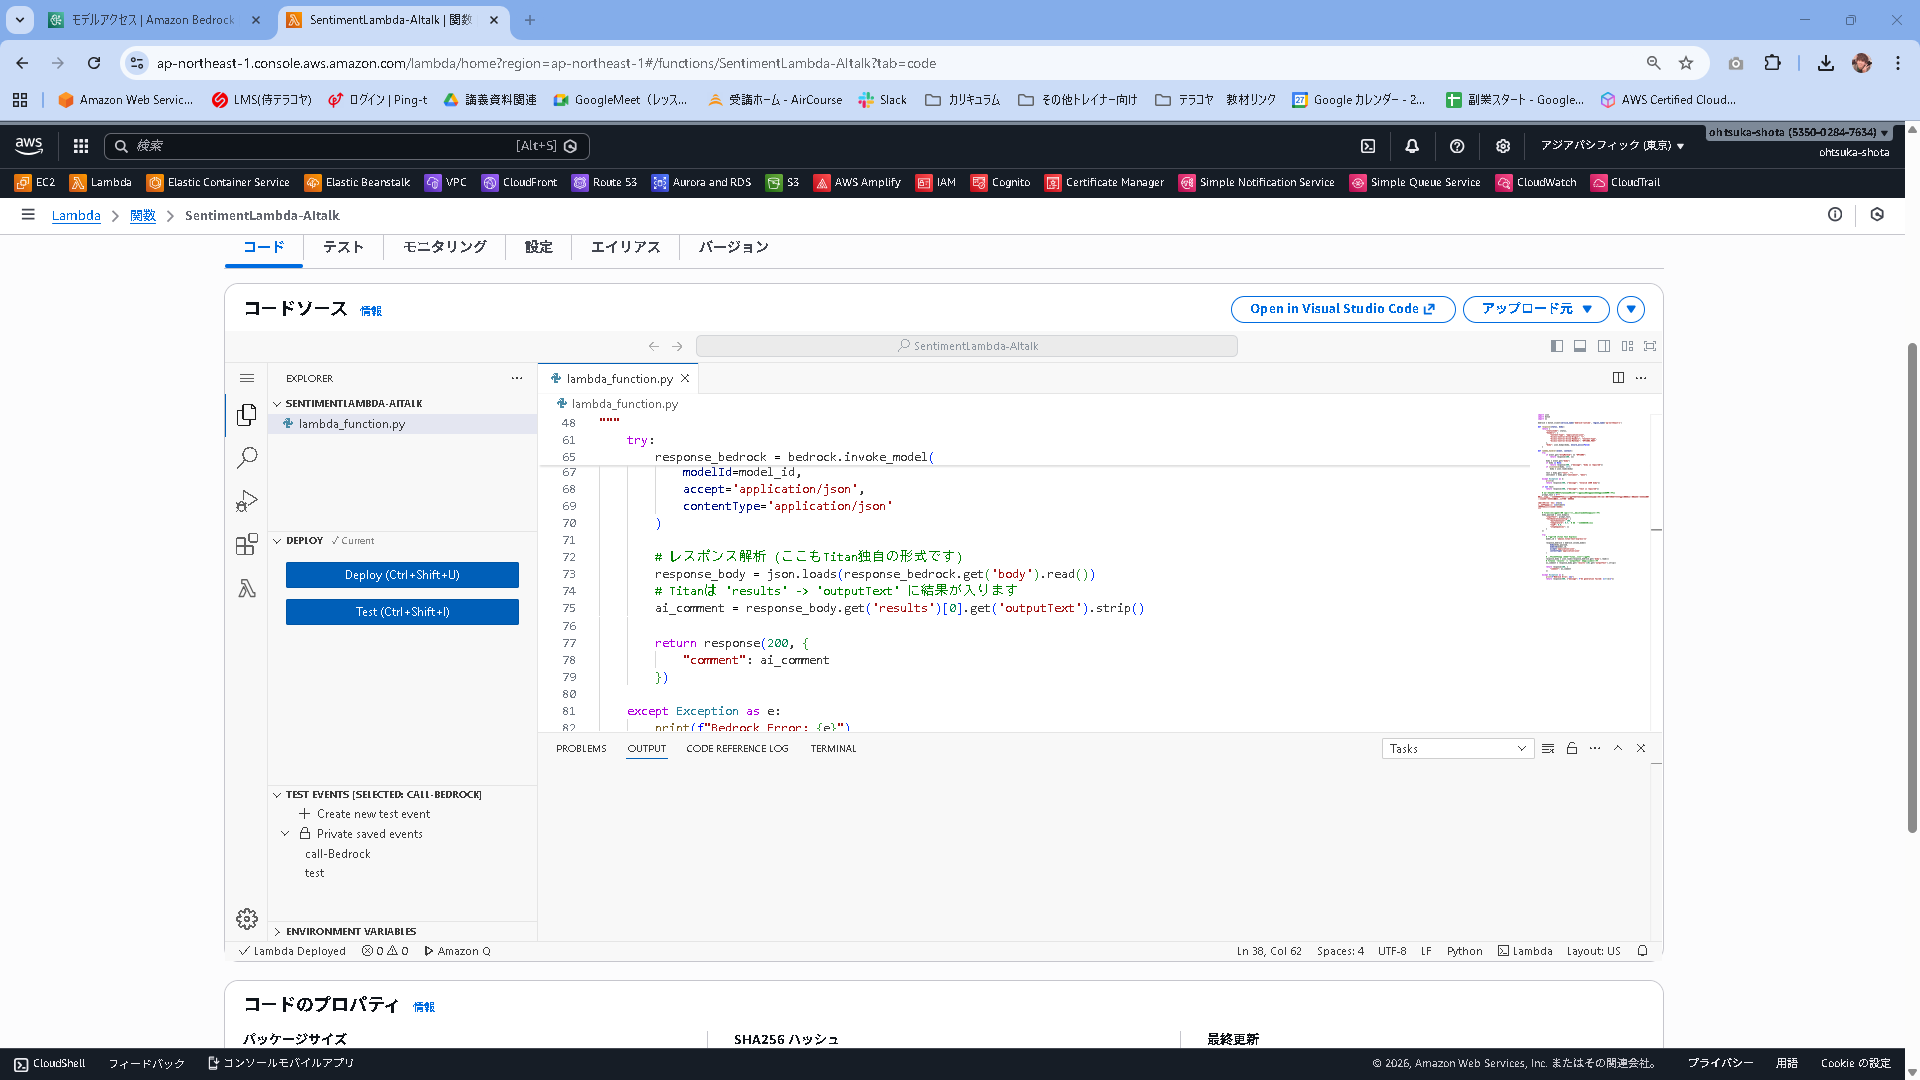
Lambdaのコードは以下とします。
コードを更新したらDeployをしておきましょう。今回はAmazon Nova Microを呼び出します。
import json
import boto3
import os

# ★重要点★
# 東京(ap-northeast-1)ではなく、本家(us-east-1)を指定して確実に呼び出します
bedrock = boto3.client(service_name='bedrock-runtime', region_name='us-east-1')

def response(status, body):
    return {
        "statusCode": status,
        "headers": {
            "Content-Type": "application/json",
            "Access-Control-Allow-Origin": "*",
            "Access-Control-Allow-Headers": "Content-Type",
            "Access-Control-Allow-Methods": "OPTIONS,POST"
        },
        "body": json.dumps(body, ensure_ascii=False)
    }

def lambda_handler(event, context):
    if event.get("httpMethod") == "OPTIONS": return response(200, {})

    try:
        body = json.loads(event.get("body")) if isinstance(event.get("body"), str) else event.get("body")
        text = body.get("text", "")
        sentiment = body.get("sentiment", "不明")
    except:
        return response(400, {"message": "Invalid JSON"})

    if not text: return response(400, {"message": "text is required"})

    # --- Amazon Nova Micro 用の設定 ---

    # システムプロンプト
    system_list = [
        { "text": "あなたは親切なAIカウンセラーです。ユーザーの言葉と感情分析結果を元に、50文字以内で優しく励ましやコメントをしてください。" }
    ]

    # ユーザーメッセージ
    user_message = f"ユーザー: {text}\n感情: {sentiment}"

    messages_list = [
        {
            "role": "user",
            "content": [
                {"text": user_message}
            ]
        }
    ]

    # リクエストボディ
    body_payload = json.dumps({
        "system": system_list,
        "messages": messages_list,
        "inferenceConfig": {
            "max_new_tokens": 300,
            "temperature": 0.7,
            "top_p": 0.9
        }
    })

    try:
        # モデルID: Amazon Nova Micro
        # USリージョン指定なので、そのままのIDで動きます
        model_id = 'amazon.nova-micro-v1:0'

        res = bedrock.invoke_model(
            body=body_payload,
            modelId=model_id,
            accept='application/json',
            contentType='application/json'
        )

        response_body = json.loads(res.get('body').read())
        # 結果の取り出し
        ai_comment = response_body.get('output').get('message').get('content')[0].get('text').strip()

        return response(200, {"comment": ai_comment})

    except Exception as e:
        print(f"Error: {e}")
        return response(500, {"message": str(e)})
Bedrockは少し前まで、AIを使う時はそのモデルアクセスを有効化する必要がありましたが、今はそれが必要ありません。
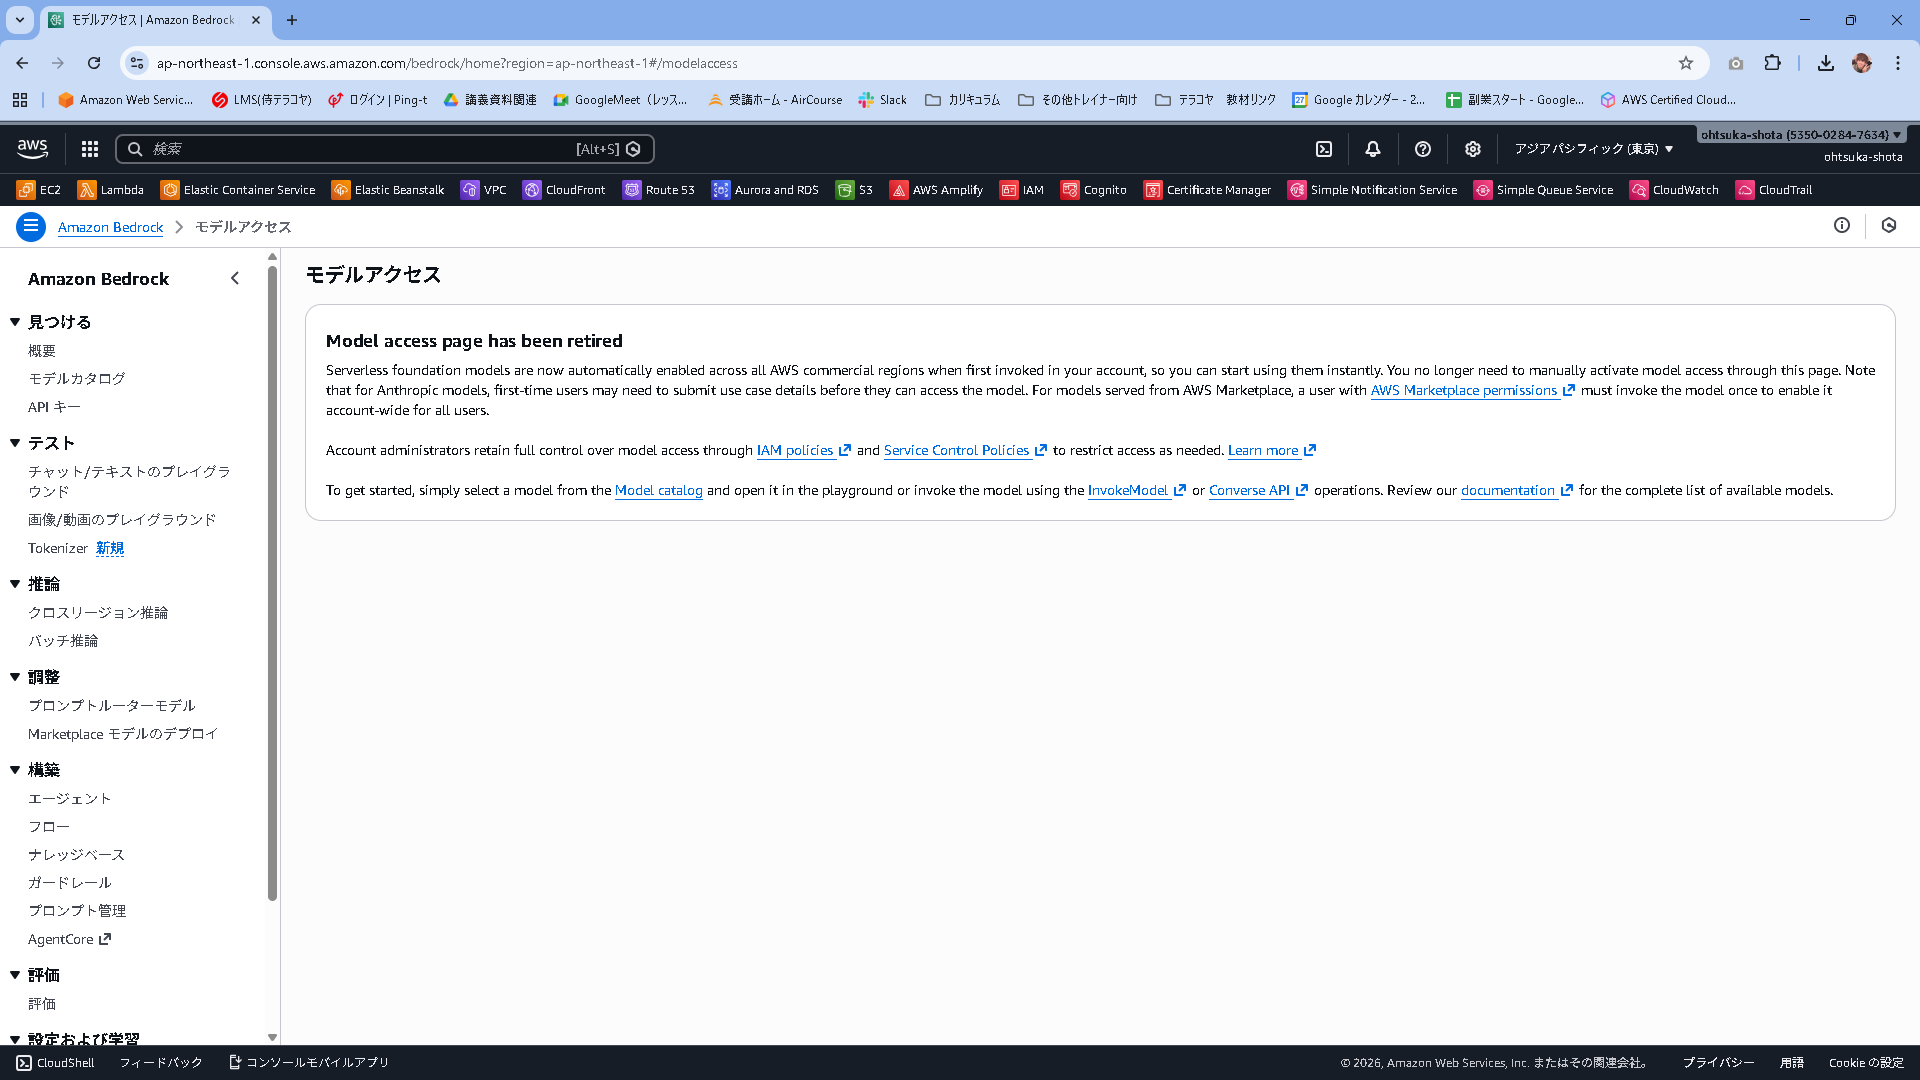
Model access page has been retired
Serverless foundation models are now automatically enabled across all AWS commercial regions when first invoked in your account, so you can start using them instantly. You no longer need to manually activate model access through this page. Note that for Anthropic models, first-time users may need to submit use case details before they can access the model. For models served from AWS Marketplace, a user with AWS Marketplace permissions must invoke the model once to enable it account-wide for all users.
Account administrators retain full control over model access through IAM policies and Service Control Policies to restrict access as needed. Learn more
To get started, simply select a model from the Model catalog and open it in the playground or invoke the model using the InvokeModel or Converse API operations. Review our documentation for the complete list of available models.
Lambdaのテストを実施してみます。
以下の内容を使って、Lambdaのテストを作成します。
{
  "body": {
    "text": "今日は仕事で大きなミスをしてしまって、本当に落ち込んでいます...もう立ち直れないかもしれません。",
    "sentiment": "NEGATIVE"
  }
}
作成出来たら保存ボタンを押下します。

Testボタンを押下します。
結果が返ってきたことがわかります。
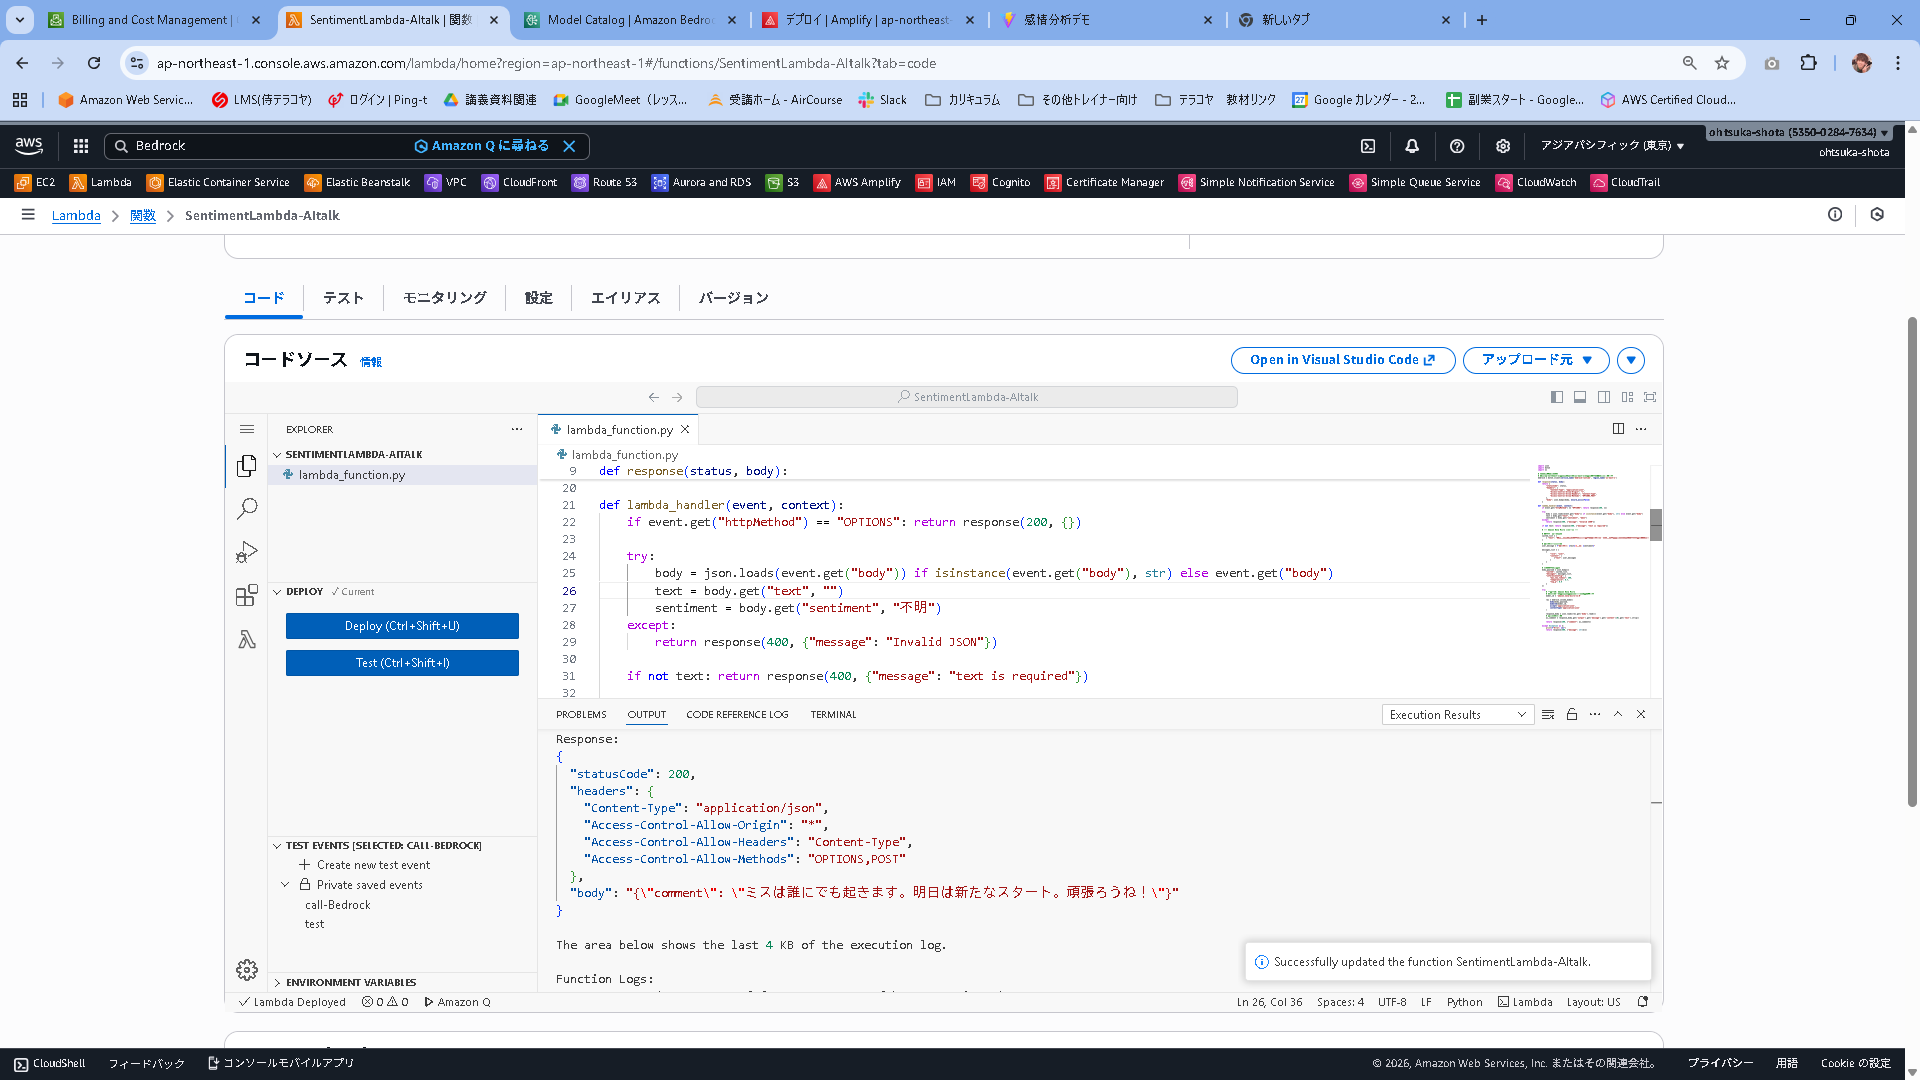
Status: Succeeded
Test Event Name: call-Bedrock

Response:
{
  "statusCode": 200,
  "headers": {
    "Content-Type": "application/json",
    "Access-Control-Allow-Origin": "*",
    "Access-Control-Allow-Headers": "Content-Type",
    "Access-Control-Allow-Methods": "OPTIONS,POST"
  },
  "body": "{\"comment\": \"ミスは誰にでも起きます。明日は新たなスタート。頑張ろうね!\"}"
}

The area below shows the last 4 KB of the execution log.

Function Logs:
START RequestId: 30a24990-af8f-4517-84a7-422aef0b0c93 Version: $LATEST
END RequestId: 30a24990-af8f-4517-84a7-422aef0b0c93
REPORT RequestId: 30a24990-af8f-4517-84a7-422aef0b0c93	Duration: 998.75 ms	Billed Duration: 1462 ms	Memory Size: 128 MB	Max Memory Used: 86 MB	Init Duration: 462.52 ms

Request ID: 30a24990-af8f-4517-84a7-422aef0b0c93
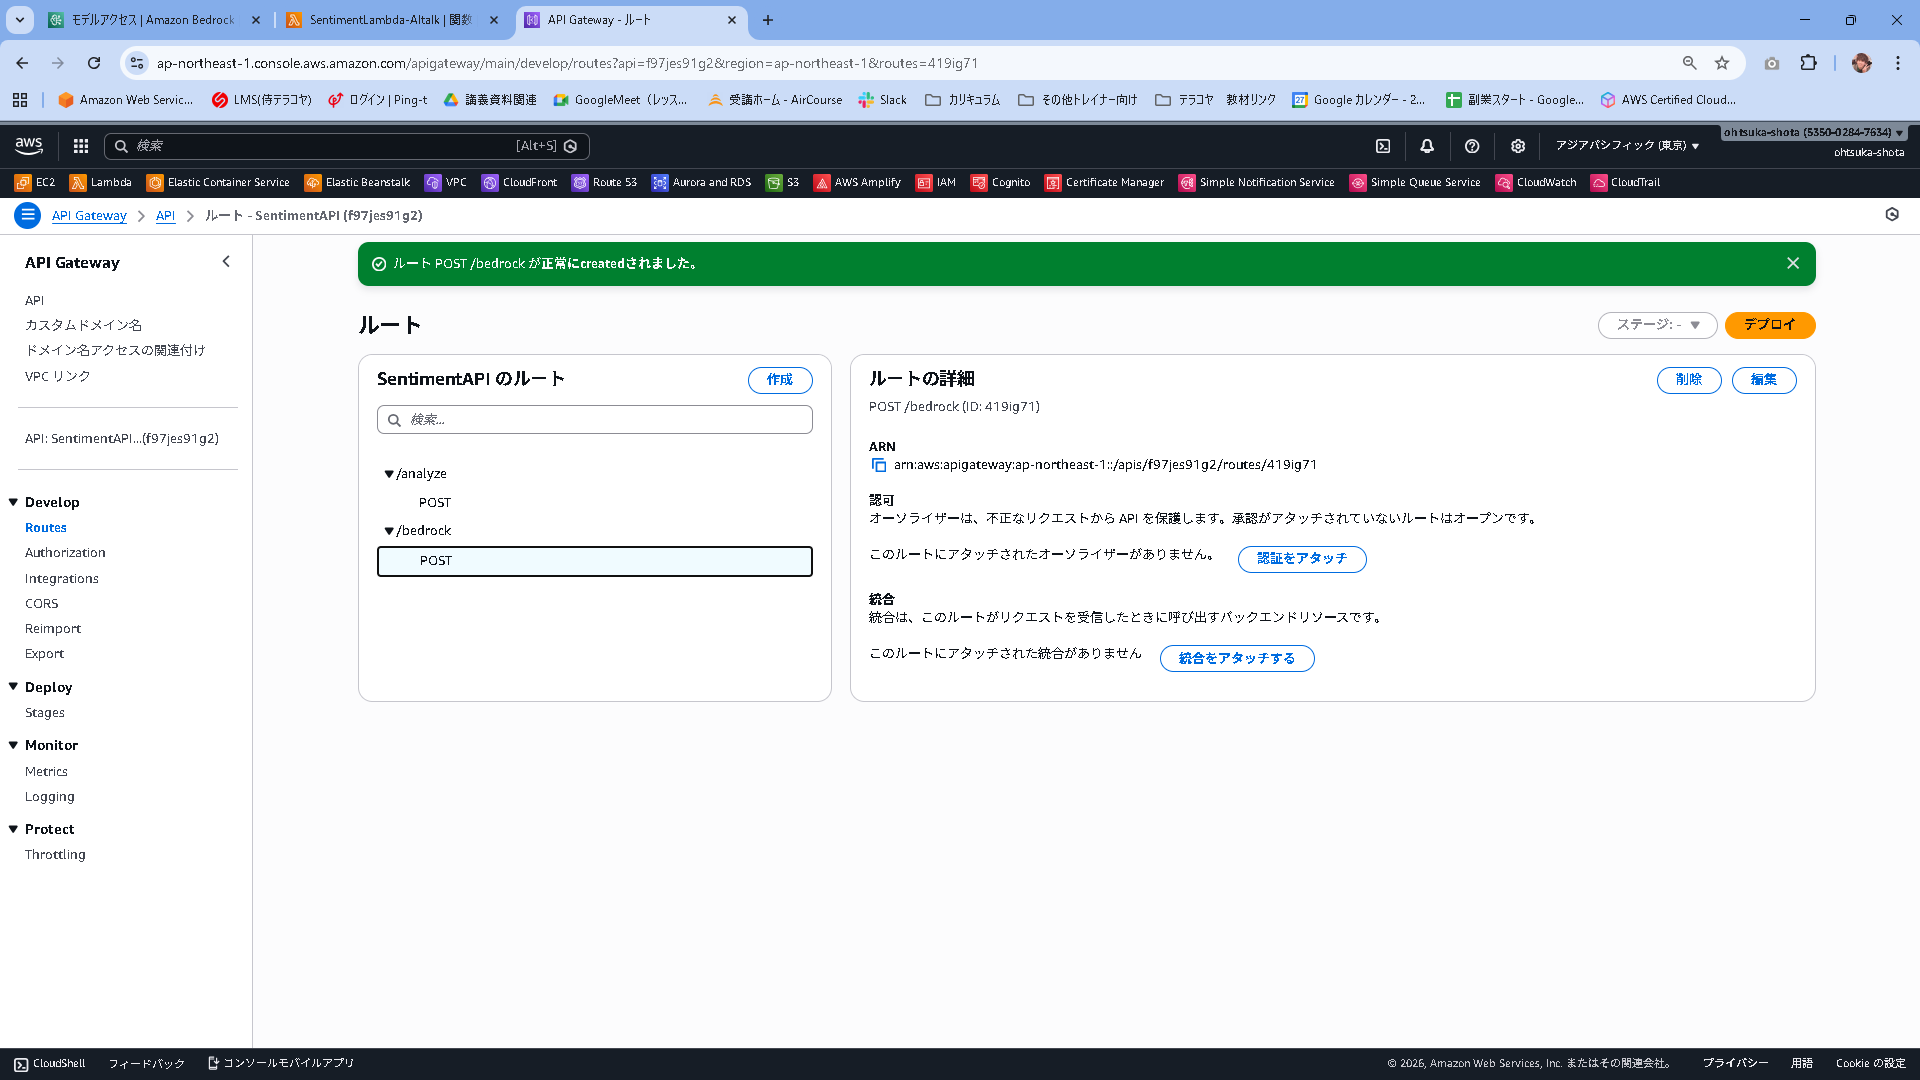
API Gateway
既存で使っているAPI Gatewayを流用します。
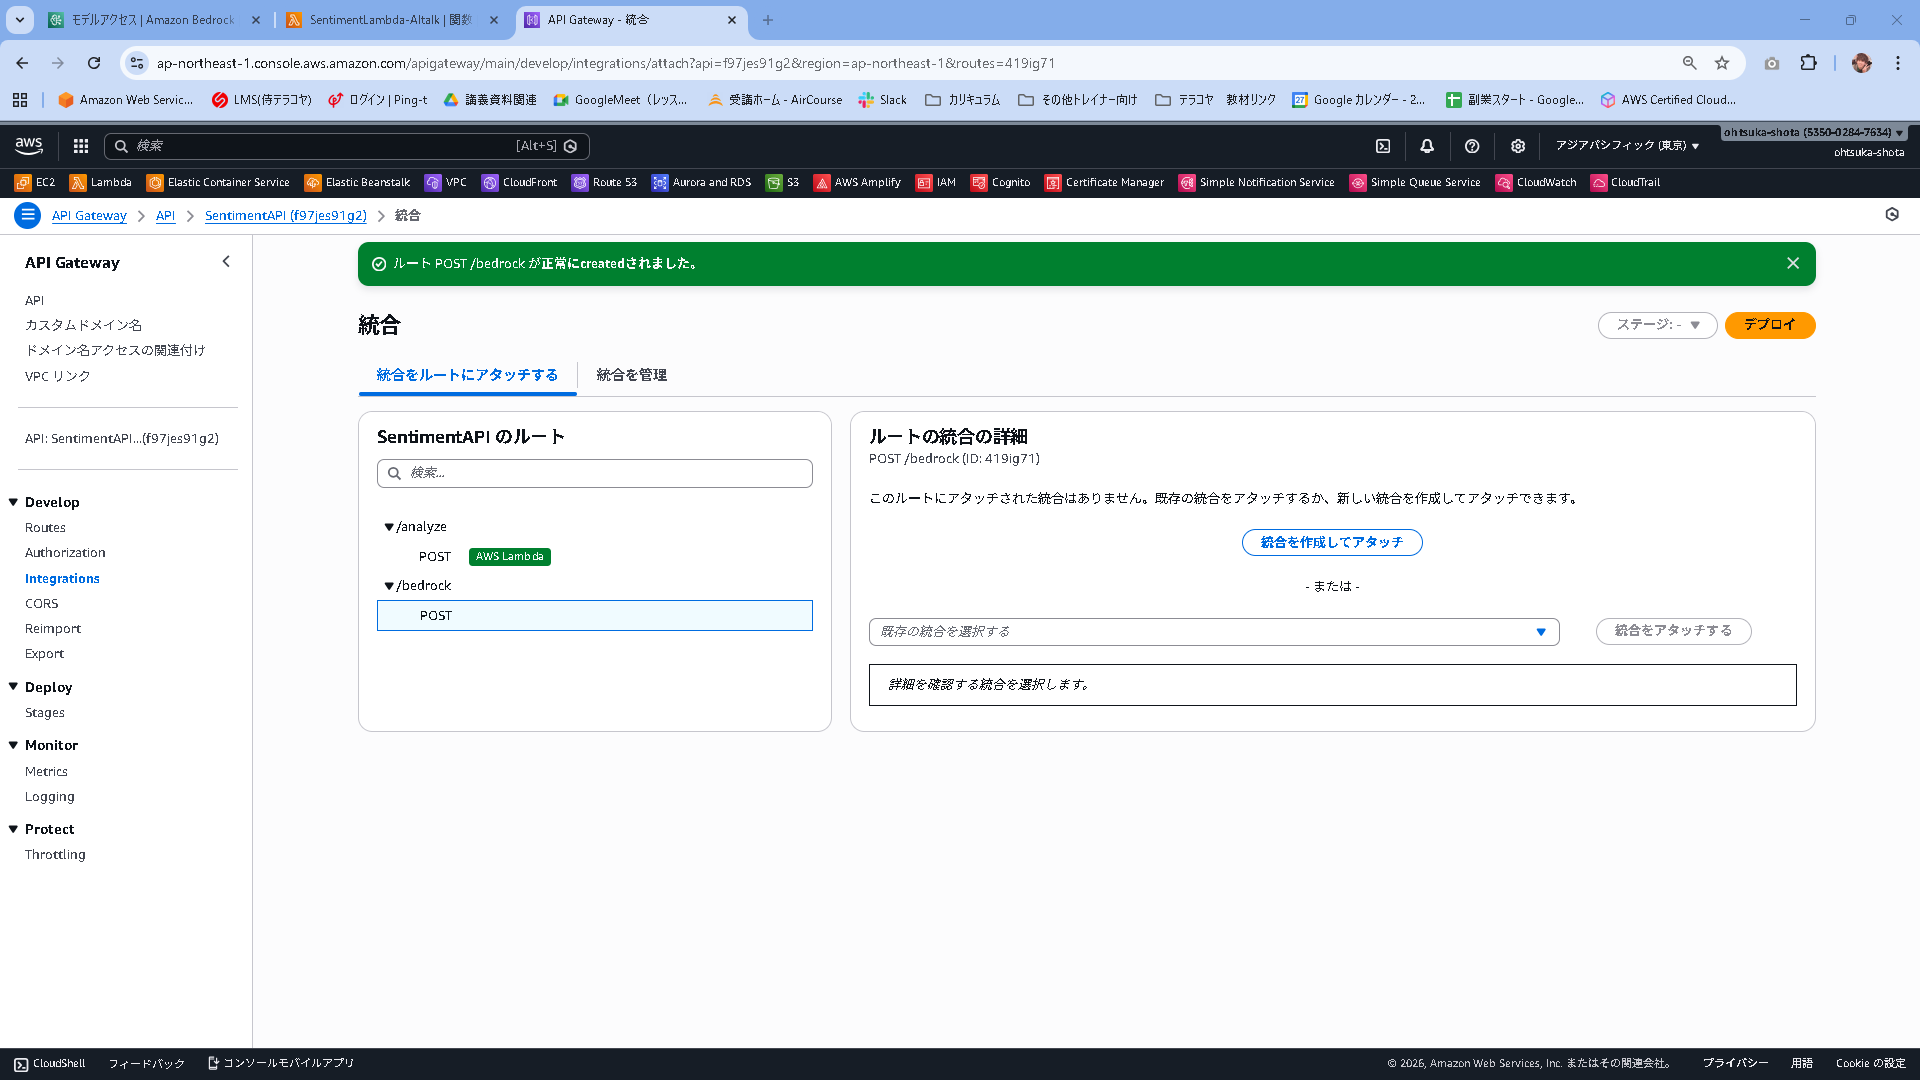
SentimentAPIのルートの右側の作成を押下。

Post/bedrockとします。
この状態で作成を押下します。

作成出来たことを確認します。
統合をアタッチするを押下します。
統合を作成してアタッチを押下します。
統合タイプをLambda関数として、Lambdaは先ほど作成したSentimentLambda-AItalkを指定します。
アクセス許可を呼び出すは有効化します。この状態で作成します。
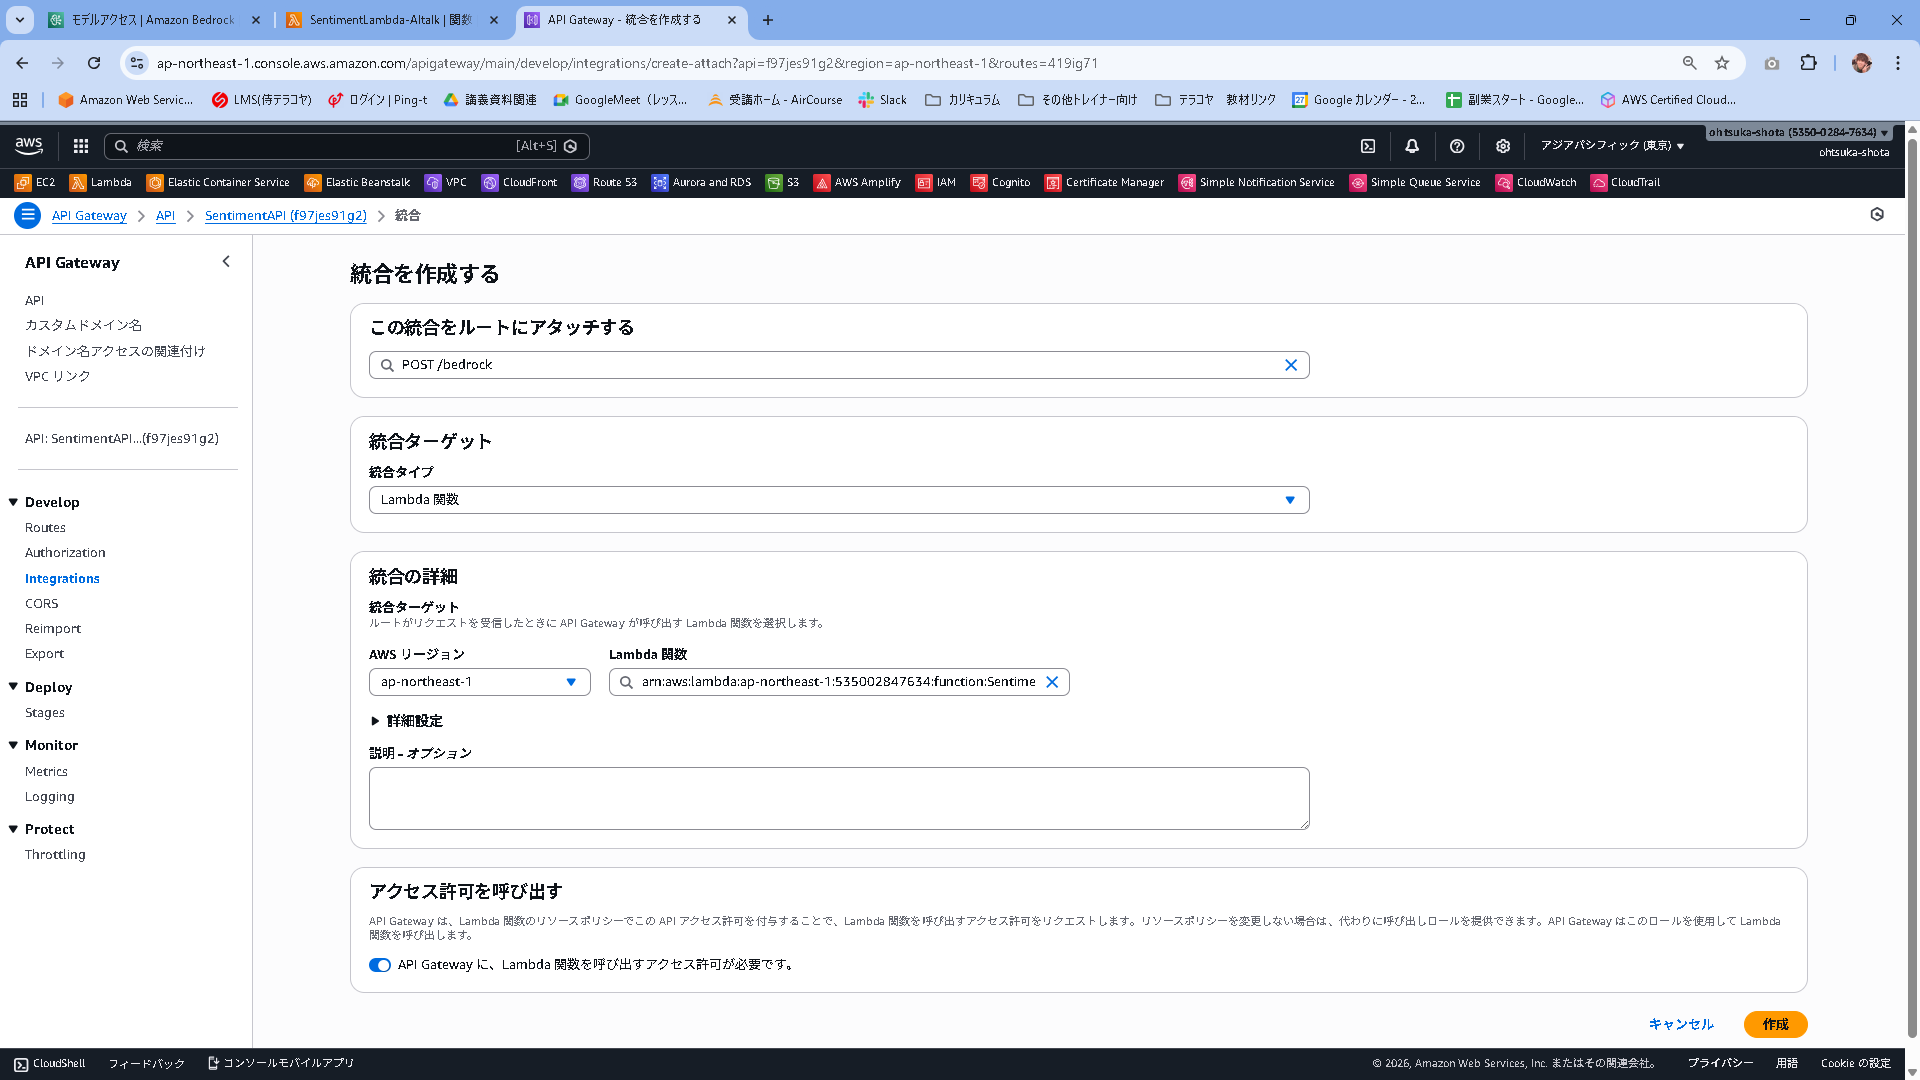
統合が作成されたことを確認します。
続いて認可を設定していきます。認証をアタッチを押下します。

オーソライザを作成してアタッチを押下します。
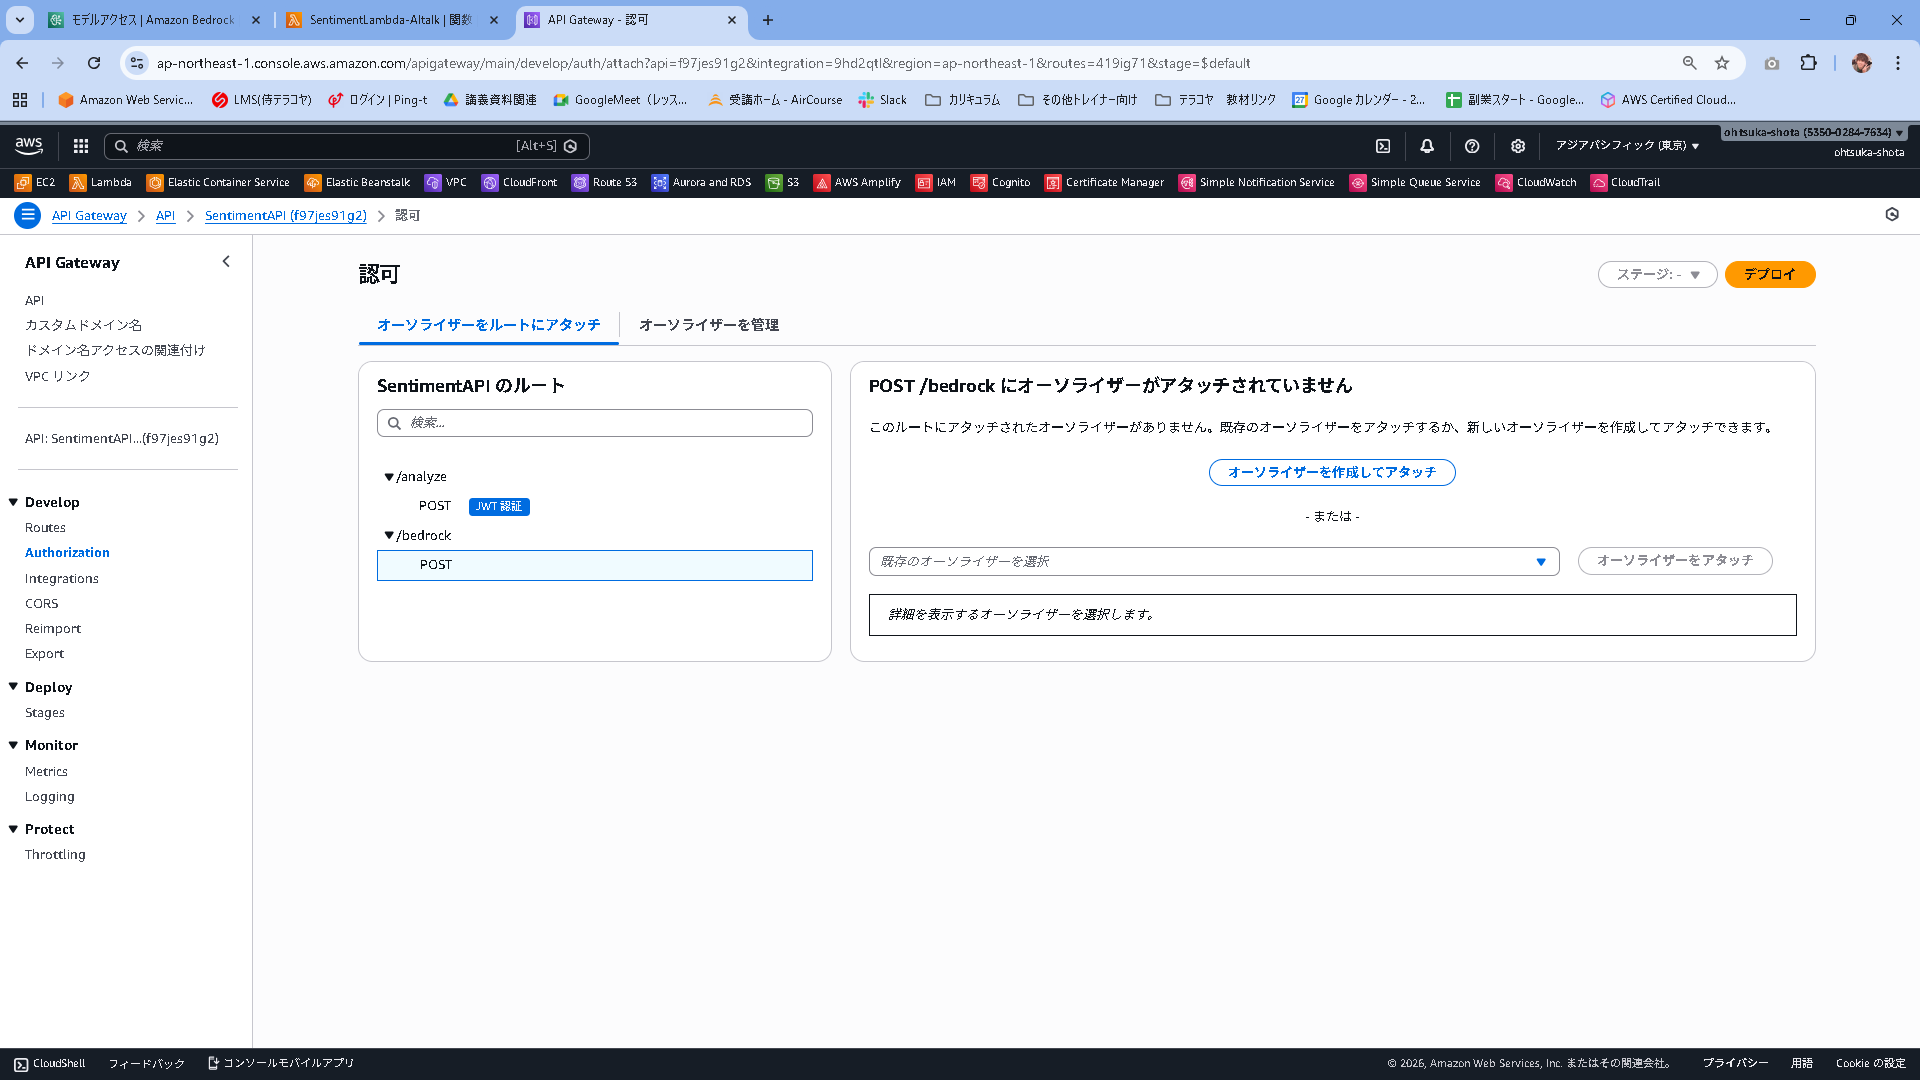
タイプ:JWT
名前:CognitoAuth-AITalk
IDソース:$request.header.Authorization(デフォルト)
URL:https://cognito-idp.ap-northeast-1.amazonaws.com/CognitoのユーザプールID
対象者:CognitoのアプリケーションクライアントID
これで作成します。設定内容は前作ったものと同様です。

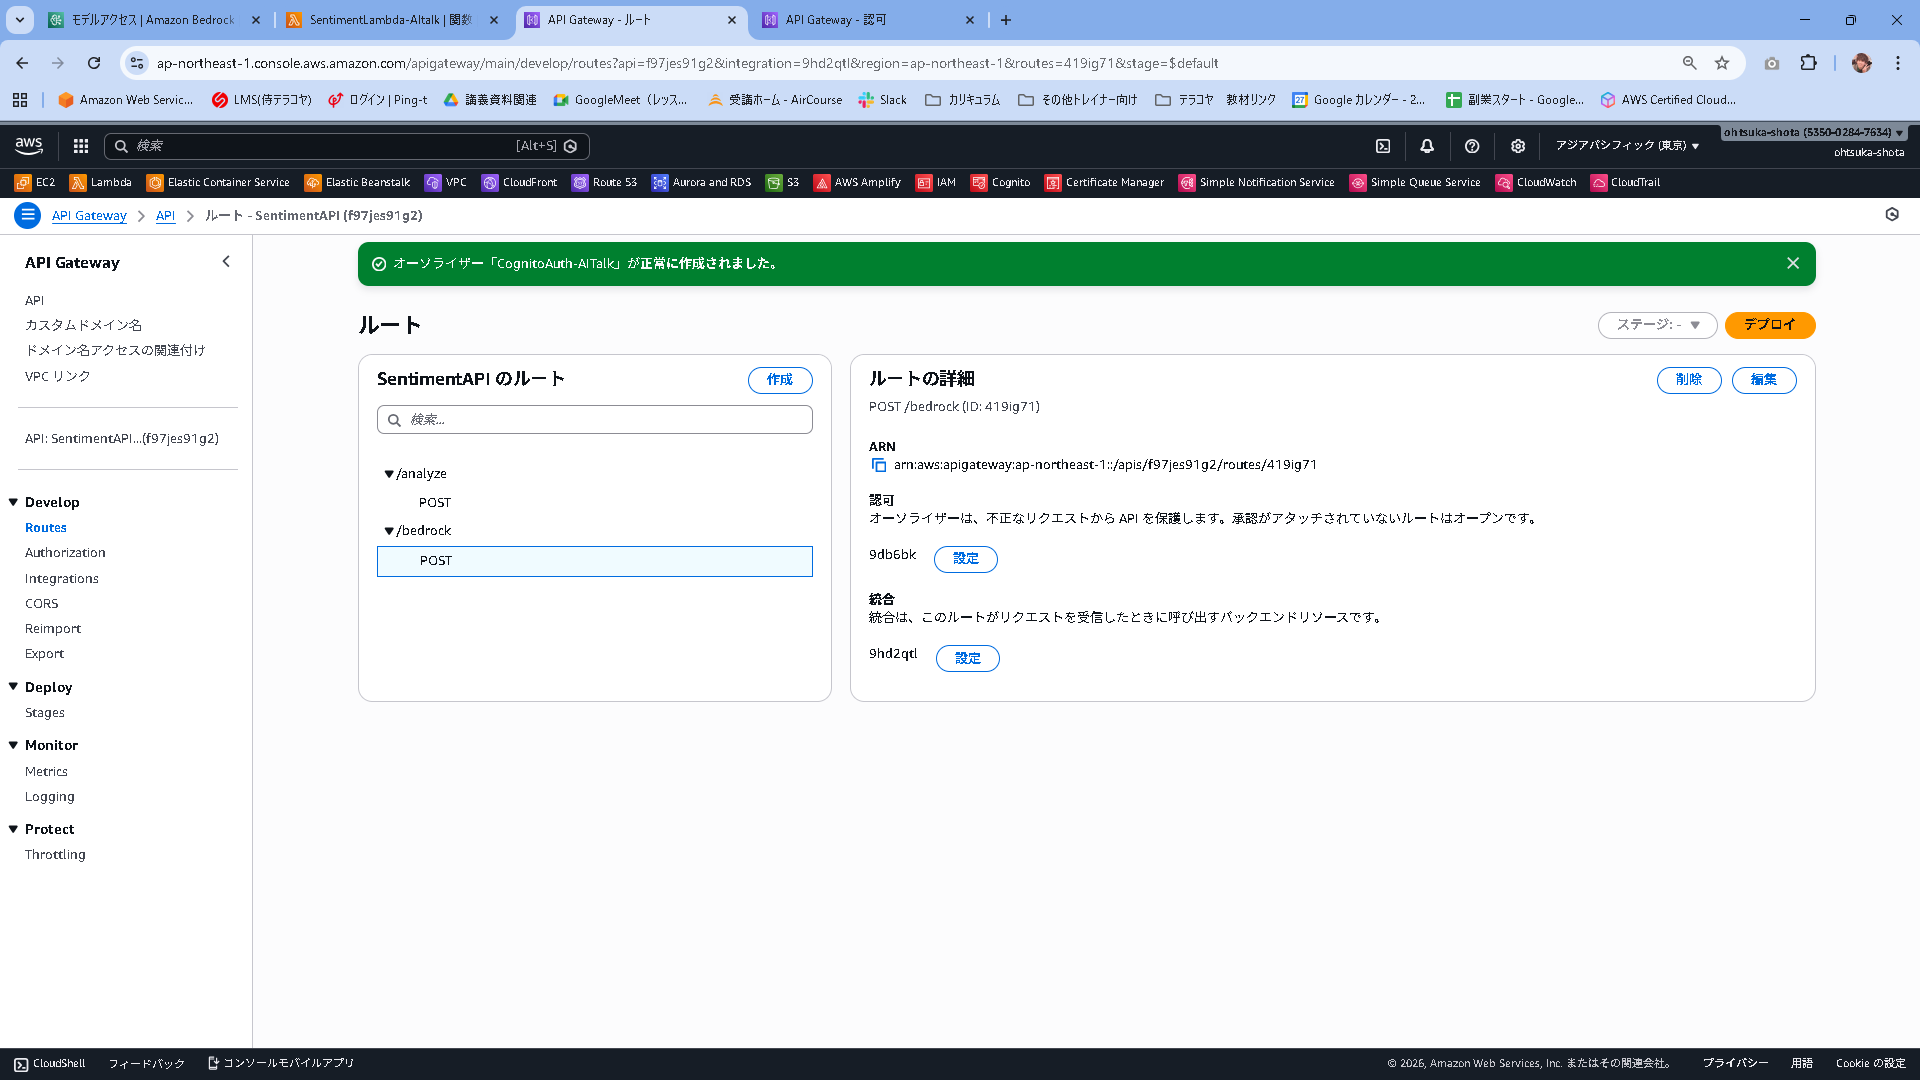
認可に設定が入ったことを確認します。こうすることによりAPI Gateway経由でLambdaを実行する際にCognitoで認証を受けたユーザ(ログインに成功したユーザ)のみがLambdaをキックできるようになりました。
Reactコードの修正
src/components/AiFeedback.jsx
import React from 'react';

export function AiFeedback({ comment, loading, isVisible }) {
  // 表示条件を満たさない場合は何も描画しない
  if (!isVisible && !loading) return null;

  return (
    <div style={{
      marginTop: "24px",
      padding: "20px",
      backgroundColor: "#f0fdf4",  /* 背景色: 薄いミントグリーン */
      borderRadius: "12px",        /* 角丸を大きく */
      border: "1px solid #bbf7d0", /* 枠線: 薄い緑 */
      borderLeft: "6px solid #10b981", /* 左側のアクセント線: 濃い緑 */
      boxShadow: "0 4px 6px -1px rgba(0, 0, 0, 0.1)", /* 影をつけて浮き上がらせる */
      color: "#1f2937" /* ★重要: 文字色を濃いグレーに強制指定 */
    }}>
      {/* ヘッダー部分 */}
      <h3 style={{
        margin: "0 0 12px 0",
        fontSize: "1.1rem",
        fontWeight: "bold",
        display: "flex",
        alignItems: "center",
        gap: "10px",
        color: "#065f46" /* タイトル文字色: 深い緑 */
      }}>
        <span style={{ fontSize: "1.5rem" }}>🤖</span>
        <span>AIカウンセラー</span>

        {loading && (
          <span style={{
            fontSize: "0.85rem",
            fontWeight: "normal",
            color: "#6b7280",
            marginLeft: "auto"
          }}>
            メッセージ生成中...
          </span>
        )}
      </h3>

      {/* メッセージ本文 */}
      {!loading && comment && (
        <div style={{
          fontSize: "1rem",
          lineHeight: "1.8",       /* 行間を広げて読みやすく */
          whiteSpace: "pre-wrap",  /* 改行を反映 */
          color: "#374151",        /* 本文文字色: 読みやすいグレー */
          backgroundColor: "rgba(255, 255, 255, 0.6)", /* 文字背景にうっすら白を敷く */
          padding: "12px",
          borderRadius: "8px"
        }}>
          {comment}
        </div>
      )}

      {/* コメントがない場合 */}
      {!loading && !comment && isVisible && (
          <p style={{ margin: 0, color: "#6b7280", fontSize: "0.9rem" }}>
            (コメントはありません)
          </p>
      )}
    </div>
  );
}
src/components/MainApp.jsx
import { useMemo, useState } from "react";
import { fetchAuthSession } from "aws-amplify/auth";
import { useTranscribe } from "../hooks/useTranscribe";
import { ResultCard } from "./ResultCard";
import { AiFeedback } from "./AiFeedback"; // ★追加: 作成したコンポーネントを読み込み

// 環境設定
const API_BASE = (import.meta.env.VITE_API_BASE_URL ?? "").replace(/\/$/, "");

async function safeReadText(res) {
  try { return await res.text(); } catch { return ""; }
}

export default function MainApp({ signOut, user }) {
  const [text, setText] = useState("");
  const [loading, setLoading] = useState(false);
  const [error, setError] = useState("");
  const [result, setResult] = useState(null);
  const [apiStatus, setApiStatus] = useState("unchecked");

  // AI用ステート
  const [aiComment, setAiComment] = useState("");
  const [aiLoading, setAiLoading] = useState(false);

  const { isRecording, startRecording, stopRecording } = useTranscribe(setText);

  const canSubmit = useMemo(() => {
    const len = text.trim().length;
    return !loading && !aiLoading && len > 0 && len <= 1000;
  }, [text, loading, aiLoading]);

  const apiStatusLabel = !API_BASE ? "未設定" : apiStatus === "ok" ? "接続OK" : apiStatus === "ng" ? "接続NG" : "未確認";

  // --- ロジック部分 ---
  async function onSubmit(e) {
    e.preventDefault();
    setError("");
    setResult(null);
    setAiComment("");

    if (!API_BASE) {
      setError("API の設定がありません。");
      return;
    }

    setLoading(true);
    try {
      const session = await fetchAuthSession();
      const token = session.tokens?.idToken?.toString();
      if (!token) throw new Error("認証トークンエラー");

      // 1. 感情分析
      const res = await fetch(`${API_BASE}/analyze`, {
        method: "POST",
        headers: { "Content-Type": "application/json", Authorization: token },
        body: JSON.stringify({ text: text.trim() }),
      });

      if (!res.ok) {
        const bodyText = await safeReadText(res);
        throw new Error(bodyText || `HTTP ${res.status}`);
      }

      const data = await res.json();
      setResult(data);
      setApiStatus("ok");

      // 2. AIコメント取得
      await fetchAiComment(text.trim(), data.sentiment, token);

    } catch (err) {
      setApiStatus("ng");
      setError(err instanceof Error ? err.message : String(err));
    } finally {
      setLoading(false);
    }
  }

  async function fetchAiComment(inputText, sentimentResult, token) {
    setAiLoading(true);
    try {
      const res = await fetch(`${API_BASE}/bedrock`, {
        method: "POST",
        headers: { "Content-Type": "application/json", Authorization: token },
        body: JSON.stringify({ text: inputText, sentiment: sentimentResult }),
      });
      if (!res.ok) throw new Error("AI Error");
      const data = await res.json();
      setAiComment(data.comment);
    } catch (err) {
      console.error(err);
      setAiComment(""); // エラー時は空にしておくか、エラーメッセージを入れる
    } finally {
      setAiLoading(false);
    }
  }

  // --- 表示部分 (JSX) ---
  return (
    <div className="page">
      <main className="card">
        <div className="header">
          <div>
            <h1 className="title">感情分析デモ</h1>
            <p className="subtitle">ユーザー: {user?.signInDetails?.loginId || user?.username}</p>
            <p className="subtitle" style={{ marginTop: "4px" }}>API接続: {apiStatusLabel}</p>
          </div>
          <div>
            <button onClick={signOut} className="btn" style={{ backgroundColor: "#4b5563", fontSize: "12px", padding: "8px 12px" }}>ログアウト</button>
          </div>
        </div>

        <form onSubmit={onSubmit} className="form">
          <textarea
                className="textarea"
            value={text}
            onChange={(e) => setText(e.target.value)}
            placeholder="ここに文章を入力してください(最大1000文字)"
          />
          <div className="row" style={{ alignItems: 'center' }}>
            <button
                type="button"
                className="btn"
                onClick={isRecording ? stopRecording : startRecording}
                style={{
                    backgroundColor: isRecording ? '#dc2626' : '#2563eb',
                    marginRight: 'auto', display: 'flex', alignItems: 'center', gap: '6px', cursor: 'pointer'
                }}
            >
                <span style={{ fontSize: '1.2em' }}>{isRecording ? "⏹" : "🎤"}</span>
                {isRecording ? "停止する" : "音声入力"}
            </button>
            <small className="counter" style={{ marginRight: '10px' }}>{text.length} / 1000</small>
            <button type="submit" className="btn" disabled={!canSubmit}>
              {loading ? "分析中..." : "分析する"}
            </button>
          </div>
        </form>

        {error && <div className="alert alert--error">{error}</div>}

        {/* 結果表示 */}
        <ResultCard result={result} />

        {/* AiFeedbackコンポ―ネントの配置 */}
        <AiFeedback
          comment={aiComment}
          loading={aiLoading}
          isVisible={!!result || aiLoading}
        />

      </main>
    </div>
  );
}
動作確認
npm run devを行いアプリを稼働させます。
適当に文章内容を入力します。

Comprehendを使って感情分析をすると共に、AIがコメントをくれるようになりました。
問題なさそうです。

本番環境にデプロイ
問題なさそうですので、今の状態でAmplifyに反映していきたいと思います。
C:\Users\ohtsu\Documents\AWS\SentimentRepo>git add .
warning: in the working copy of 'src/components/AiFeedback.jsx', LF will be replaced by CRLF the next time Git touches it

C:\Users\ohtsu\Documents\AWS\SentimentRepo>git commit -m "ver1.3"
[main cb8c32e] ver1.3
 2 files changed, 121 insertions(+), 58 deletions(-)
 create mode 100644 src/components/AiFeedback.jsx

C:\Users\ohtsu\Documents\AWS\SentimentRepo>git push origin main
Enumerating objects: 10, done.
Counting objects: 100% (10/10), done.
Delta compression using up to 20 threads
Compressing objects: 100% (6/6), done.
Writing objects: 100% (6/6), 2.57 KiB | 2.57 MiB/s, done.
Total 6 (delta 3), reused 0 (delta 0), pack-reused 0
remote: Resolving deltas: 100% (3/3), completed with 3 local objects.
To https://github.com/ohtsuka-shota/SentimentRepo.git
   90667ee..cb8c32e  main -> main
デプロイが開始されました。正常終了することを確認します。


本番環境でも動作に問題なさそうです。
