こんにちは。
株式会社クラスアクト インフラストラクチャ事業部の大塚です。
今回はタイトルの通り、Djangoで作成したWebアプリケーションをスマホアプリと連携するための方法を書いていきたいと思います。
以下のQiita記事と関連する記事となります。
参考サイト
以下のサイトがわかりやすかったです。
英語ですけど、難しい英語を使っているわけではなかったので普通に読めるかと思います。
環境
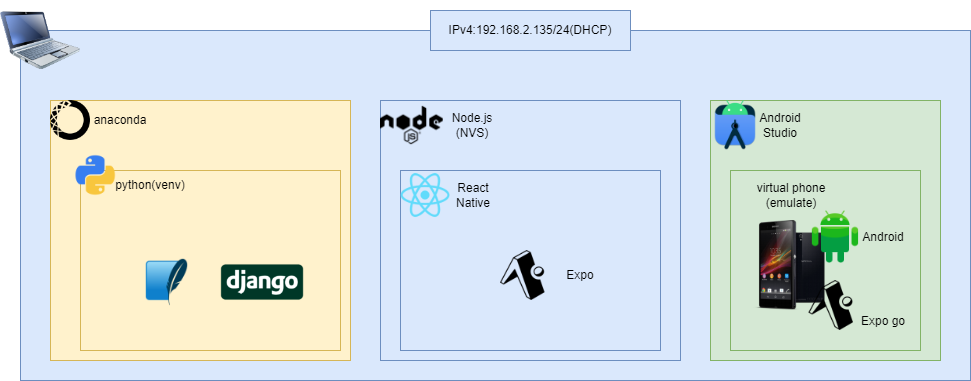
私の構築環境は以下となります。
※あくまでイメージであるという点と、React NativeやAndroid Studio回りは勉強し始めて数日レベルなので、諸々間違っているかもしれません。ご了承ください。
ホストOSはWin11 homeの一般的なものです。その上にanacondaを使用してDjango環境を構築しています。また、NVSを使ってNode.js/React Native/Expoを使用できるようにしています。ExpoからAndroid Studioを呼び出してAndroidスマホをエミュレートしています。
構築
Django環境の初期セットアップ
今回はmobilePJという名前のプロジェクトを新規作成しました。
作成した後、apiという名前のアプリを作成しています。
PS C:\Users\ohtsu\Documents\DjangoEnv\django-dev\mobilePJ> python manage.py startapp api
PS C:\Users\ohtsu\Documents\DjangoEnv\django-dev\mobilePJ> ls
    ディレクトリ: C:\Users\ohtsu\Documents\DjangoEnv\django-dev\mobilePJ
Mode                 LastWriteTime         Length Name
----                 -------------         ------ ----
d-----        2023/12/23      8:38                api
d-----        2023/12/23      8:38                mobilePJ
-a----        2023/12/23      8:32            686 manage.py
mobilePJ配下のsettings.pyの諸々を変更します。
- ALLOW_HOSTで全てのIPアドレスからのアクセスを許可。
- INSTALLED_APPにapiを記載。
- LANGUAGE_CODEとTIME_ZONEを日本のものに修正。
from pathlib import Path

# Build paths inside the project like this: BASE_DIR / 'subdir'.
BASE_DIR = Path(__file__).resolve().parent.parent


# Quick-start development settings - unsuitable for production
# See https://docs.djangoproject.com/en/4.1/howto/deployment/checklist/

# SECURITY WARNING: keep the secret key used in production secret!
SECRET_KEY = "django-insecure-1&=83$_@6p+cdl-!z29-yfmv0g@#2_b)uehmta_e9w=z7$%$4s"

# SECURITY WARNING: don't run with debug turned on in production!
DEBUG = True

ALLOWED_HOSTS = ["*"]


# Application definition

INSTALLED_APPS = [
    "api",
    "django.contrib.admin",
    "django.contrib.auth",
    "django.contrib.contenttypes",
    "django.contrib.sessions",
    "django.contrib.messages",
    "django.contrib.staticfiles",
]

MIDDLEWARE = [
    "django.middleware.security.SecurityMiddleware",
    "django.contrib.sessions.middleware.SessionMiddleware",
    "django.middleware.common.CommonMiddleware",
    "django.middleware.csrf.CsrfViewMiddleware",
    "django.contrib.auth.middleware.AuthenticationMiddleware",
    "django.contrib.messages.middleware.MessageMiddleware",
    "django.middleware.clickjacking.XFrameOptionsMiddleware",
]

ROOT_URLCONF = "mobilePJ.urls"

TEMPLATES = [
    {
        "BACKEND": "django.template.backends.django.DjangoTemplates",
        "DIRS": [],
        "APP_DIRS": True,
        "OPTIONS": {
            "context_processors": [
                "django.template.context_processors.debug",
                "django.template.context_processors.request",
                "django.contrib.auth.context_processors.auth",
                "django.contrib.messages.context_processors.messages",
            ],
        },
    },
]

WSGI_APPLICATION = "mobilePJ.wsgi.application"


# Database
# https://docs.djangoproject.com/en/4.1/ref/settings/#databases

DATABASES = {
    "default": {
        "ENGINE": "django.db.backends.sqlite3",
        "NAME": BASE_DIR / "db.sqlite3",
    }
}


# Password validation
# https://docs.djangoproject.com/en/4.1/ref/settings/#auth-password-validators

AUTH_PASSWORD_VALIDATORS = [
    {
        "NAME": "django.contrib.auth.password_validation.UserAttributeSimilarityValidator",
    },
    {
        "NAME": "django.contrib.auth.password_validation.MinimumLengthValidator",
    },
    {
        "NAME": "django.contrib.auth.password_validation.CommonPasswordValidator",
    },
    {
        "NAME": "django.contrib.auth.password_validation.NumericPasswordValidator",
    },
]


# Internationalization
# https://docs.djangoproject.com/en/4.1/topics/i18n/

LANGUAGE_CODE = "ja"

TIME_ZONE = "Asia/Tokyo"

USE_I18N = True

USE_TZ = True


# Static files (CSS, JavaScript, Images)
# https://docs.djangoproject.com/en/4.1/howto/static-files/

STATIC_URL = "static/"

# Default primary key field type
# https://docs.djangoproject.com/en/4.1/ref/settings/#default-auto-field

DEFAULT_AUTO_FIELD = "django.db.models.BigAutoField"
次にmobilePJのurls.pyを以下のようにしました。apiアプリのurls.pyに処理を引き渡しています。
# mobilePJ urls.py

from django.contrib import admin
from django.urls import path, include

urlpatterns = [
    path("admin/", admin.site.urls),
    path("api/", include("api.urls")),
]
次にapiアプリ配下にurls.pyを新規作成。中身を以下としました。
api/helloとアクセスしてきたらviewsのhelloに処理を引き継ぐということですね。処理の内容はこれから記載します。
# api urls.py

from django.urls import path, include
from . import views

urlpatterns = [
    path("hello/", views.hello),
]
apiアプリ配下のviews.pyを以下のように編集します。
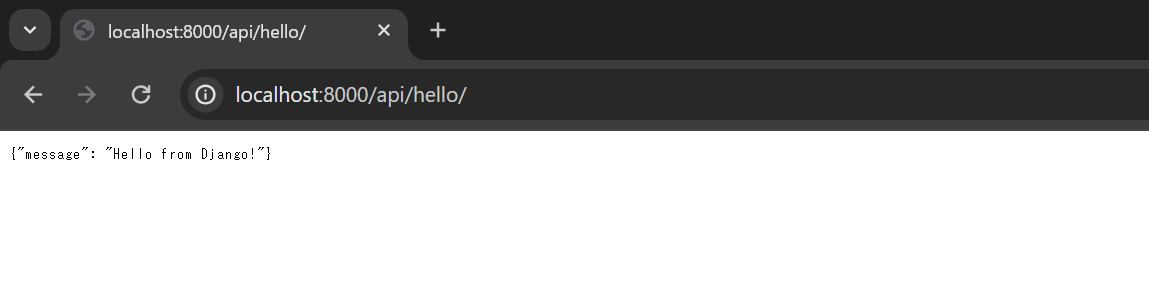
keyが"message"。valueが"Hello from Django!"というJSON形式の様です。
# api views.py

from django.shortcuts import render
from django.http import JsonResponse

def hello(request):
    return JsonResponse({'message': 'Hello from Django!'})
runserverを実施します。migration関連で警告が出ていますが、今回は関係ないのでスルーします。
また、0.0.0.0を設定してあげないとエミュレートされたスマホからアクセスすることが出来ません。(環境によってはこれを記載しなくてもスマホからアクセス可能です。)
PS C:\Users\ohtsu\Documents\DjangoEnv\django-dev\mobilePJ> python manage.py runserver 0.0.0.0:8000
Watching for file changes with StatReloader
Performing system checks...

System check identified no issues (0 silenced).

You have 18 unapplied migration(s). Your project may not work properly until you apply the migrations for app(s): admin, auth, contenttypes, sessions.
Run 'python manage.py migrate' to apply them.
December 23, 2023 - 17:03:16
Django version 4.1, using settings 'mobilePJ.settings'
Starting development server at http://0.0.0.0:8000/
Quit the server with CTRL-BREAK.
http://localhost:8000/api/helloにWebブラウザで接続すると以下のような画面が表示されます。
React Nativeの初期セットアップ
expo用に作成したディレクトリに移動します。
C:\Users\ohtsu\Documents\expo>dir
 ドライブ C のボリューム ラベルは Windows です
 ボリューム シリアル番号は F2DC-C792 です
 C:\Users\ohtsu\Documents\expo のディレクトリ
2023/12/09  00:11    <DIR>          .
2023/12/08  23:56    <DIR>          ..
2023/12/07  22:05    <DIR>          my-app
2023/12/09  00:21    <DIR>          react
               0 個のファイル                   0 バイト
               4 個のディレクトリ  720,628,412,416 バイトの空き領域
nvsコマンドを使ってNode.jsやReact Nativeが使用できるようします。また、DjangoにHttpRequestを投げるためにAxiosをインストールします。その後npx create-expo-appコマンドを使ってスマホアプリ作成に必要なデータセットを用意します。今回はmobileAppという名前にしました。
(DjangoEnv) C:\Users\ohtsu\Documents\expo>nvs use lts
PATH += %LOCALAPPDATA%\nvs\node\20.10.0\x64

(DjangoEnv) C:\Users\ohtsu\Documents\expo>node --version
v20.10.0

(DjangoEnv) C:\Users\ohtsu\Documents\expo\mobileApp>npm install axios

added 4 packages, and audited 1251 packages in 4s
85 packages are looking for funding
  run `npm fund` for details

5 moderate severity vulnerabilities
To address all issues (including breaking changes), run:
  npm audit fix --force

Run `npm audit` for details.

(DjangoEnv) C:\Users\ohtsu\Documents\expo>npx create-expo-app mobileApp --template
√ Choose a template: » Blank
√ Downloaded and extracted project files.
> npm install
npm WARN deprecated @npmcli/move-file@1.1.2: This functionality has been moved to @npmcli/fs
npm WARN deprecated @babel/plugin-proposal-numeric-separator@7.18.6: This proposal has been merged to the ECMAScript standard and thus this plugin is no longer maintained. Please use @babel/plugin-transform-numeric-separator instead.
npm WARN deprecated @babel/plugin-proposal-class-properties@7.18.6: This proposal has been merged to the ECMAScript standard and thus this plugin is no longer maintained. Please use @babel/plugin-transform-class-properties instead.
npm WARN deprecated @babel/plugin-proposal-optional-catch-binding@7.18.6: This proposal has been merged to the ECMAScript standard and thus this plugin is no longer maintained. Please use @babel/plugin-transform-optional-catch-binding instead.
npm WARN deprecated @babel/plugin-proposal-nullish-coalescing-operator@7.18.6: This proposal has been merged to the ECMAScript standard and thus this plugin is no longer maintained. Please use @babel/plugin-transform-nullish-coalescing-operator instead.
npm WARN deprecated @babel/plugin-proposal-export-namespace-from@7.18.9: This proposal has been merged to the ECMAScript standard and thus this plugin is no longer maintained. Please use @babel/plugin-transform-export-namespace-from instead.
npm WARN deprecated @babel/plugin-proposal-optional-chaining@7.21.0: This proposal has been merged to the ECMAScript standard and thus this plugin is no longer maintained. Please use @babel/plugin-transform-optional-chaining instead.
npm WARN deprecated @babel/plugin-proposal-object-rest-spread@7.20.7: This proposal has been merged to the ECMAScript standard and thus this plugin is no longer maintained. Please use @babel/plugin-transform-object-rest-spread instead.
npm WARN deprecated @babel/plugin-proposal-async-generator-functions@7.20.7: This proposal has been merged to the ECMAScript standard and thus this plugin is no longer maintained. Please use @babel/plugin-transform-async-generator-functions instead.
npm WARN deprecated uuid@3.4.0: Please upgrade  to version 7 or higher.  Older versions may use Math.random() in certain circumstances, which is known to be problematic.  See https://v8.dev/blog/math-random for details.
npm WARN deprecated uglify-es@3.3.9: support for ECMAScript is superseded by `uglify-js` as of v3.13.0

added 1246 packages, and audited 1247 packages in 43s

84 packages are looking for funding
  run `npm fund` for details

5 moderate severity vulnerabilities

To address all issues (including breaking changes), run:
  npm audit fix --force

Run `npm audit` for details.

✅ Your project is ready!

To run your project, navigate to the directory and run one of the following npm commands.

- cd mobileApp
- npm run android
- npm run ios # you need to use macOS to build the iOS project - use the Expo app if you need to do iOS development without a Mac
- npm run web
mobileApp配下のApp.jsを以下の様に修正します。
axios.getで指定しているURLは先ほどWebブラウザでDjangoにアクセスしたもののlocalhostをIPアドレスに変換すればOKです。この辺りの話はこの記事の上の方で記載している【詰まった事】をご覧ください。
import React, { useEffect, useState } from 'react';
import { StyleSheet, Text, View } from 'react-native';
import axios from 'axios';

export default function App() {
  const [message, setMessage] = useState('');

  useEffect(() => {
    axios.get('http://192.168.2.135:8000/api/hello')
      .then(response => {
        setMessage(response.data.message);
      })
      .catch(error => {
        console.log(error);
      });
  }, []);

  return (
    <View style={styles.container}>
      <Text>{message}</Text>
    </View>
  );
}

const styles = StyleSheet.create({
  container: {
    flex: 1,
    backgroundColor: '#fff',
    alignItems: 'center',
    justifyContent: 'center',
  },
});
Androidスマホをエミュレートして確認する
mobileAppに移動してnpx expo startを実行します。
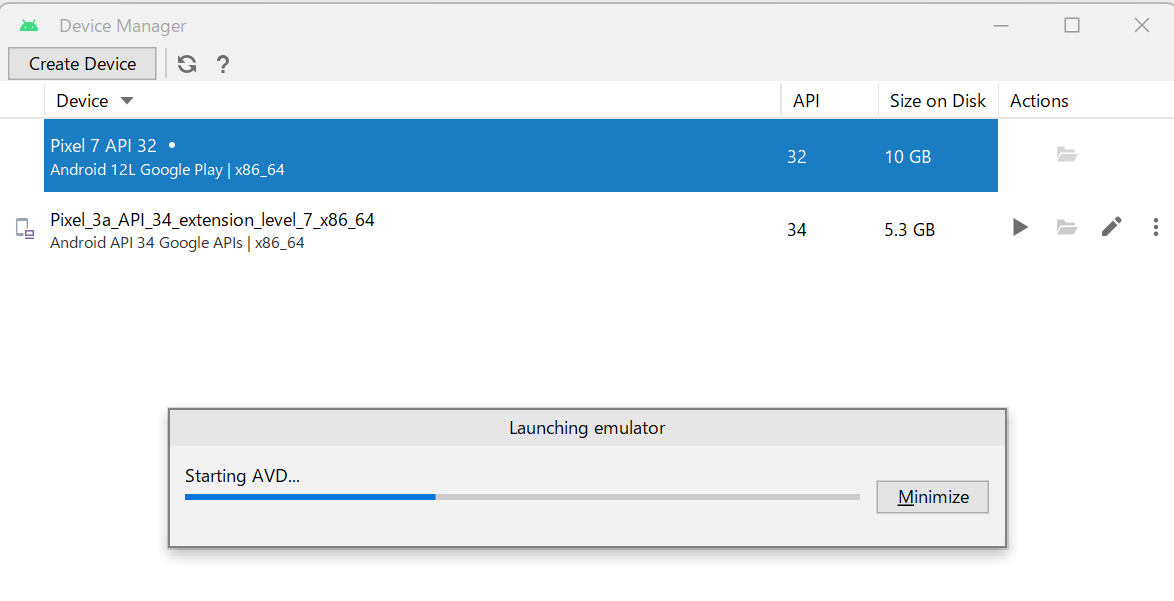
…と単純にいければいいのですが、よくわかりませんがAndroid Studioで最初からエミュレートとして用意されている"Pixel_3a_API_34_extension_level_7_x86_64"で原因不明のエラーが頻発するようになりました。そのため"Pixel_7_API_32"というエミュレータを用意してそちらでExpo goを立ち上げました。
やり方としては、Android Studioを立ち上げてDeviceManagerを開いてエラーを吐きまくる方じゃないエミュレータを手動で起動させます。
このエミュレータの用意の仕方ですが、左上にある"Create Device"から用意可能です。ここでは省きます。
そのあとに以下のコマンドを実行すると起動しているAndroidに対してExpo goをインストールしてくれます。
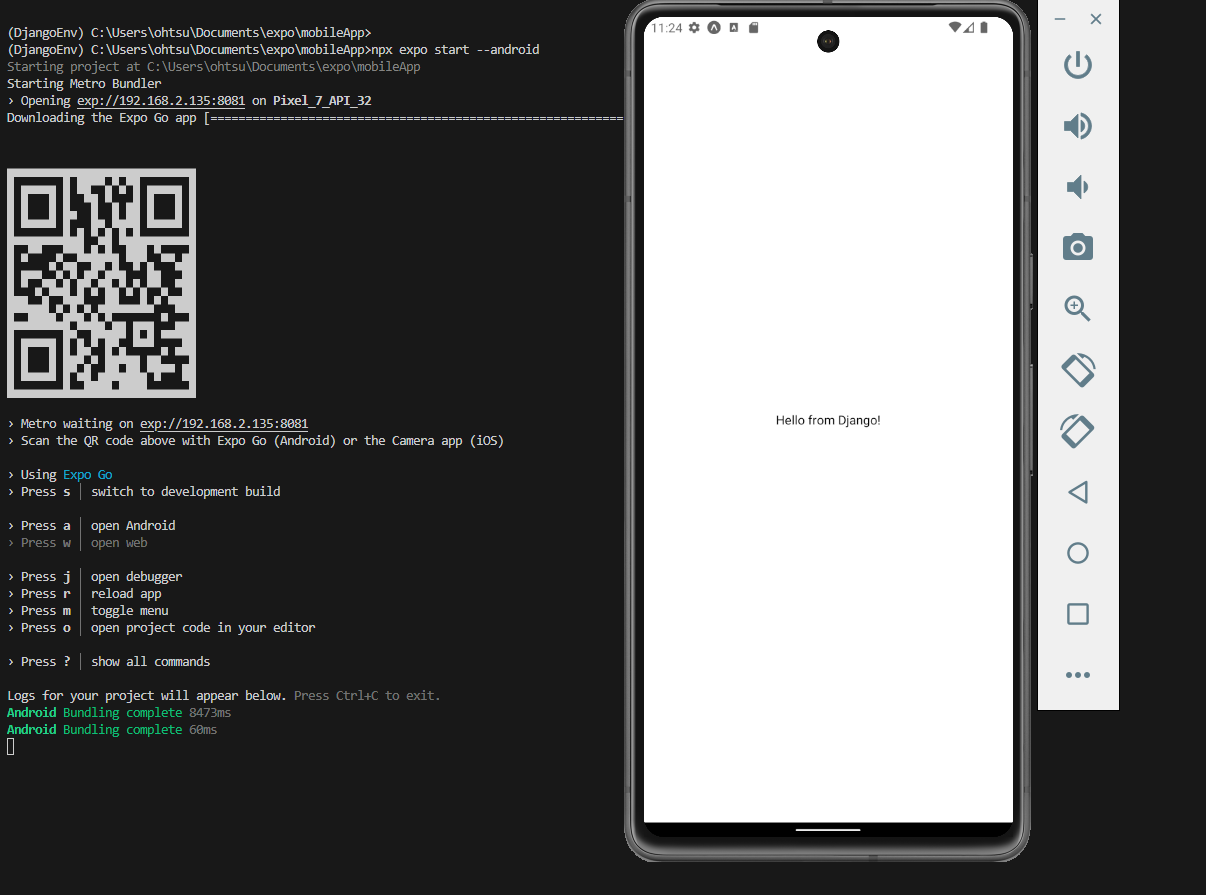
npx expo start --android
以下がReact Native(Expo)とDjangoが連携していることを示す図となります。
ExpoがApp.jsに記載されているURLにHttpRequestを投げて、DjangoがそのRequestに対してResponseを返した結果、出力されているメッセージが表示されている。ということになります。