用語
Postfix
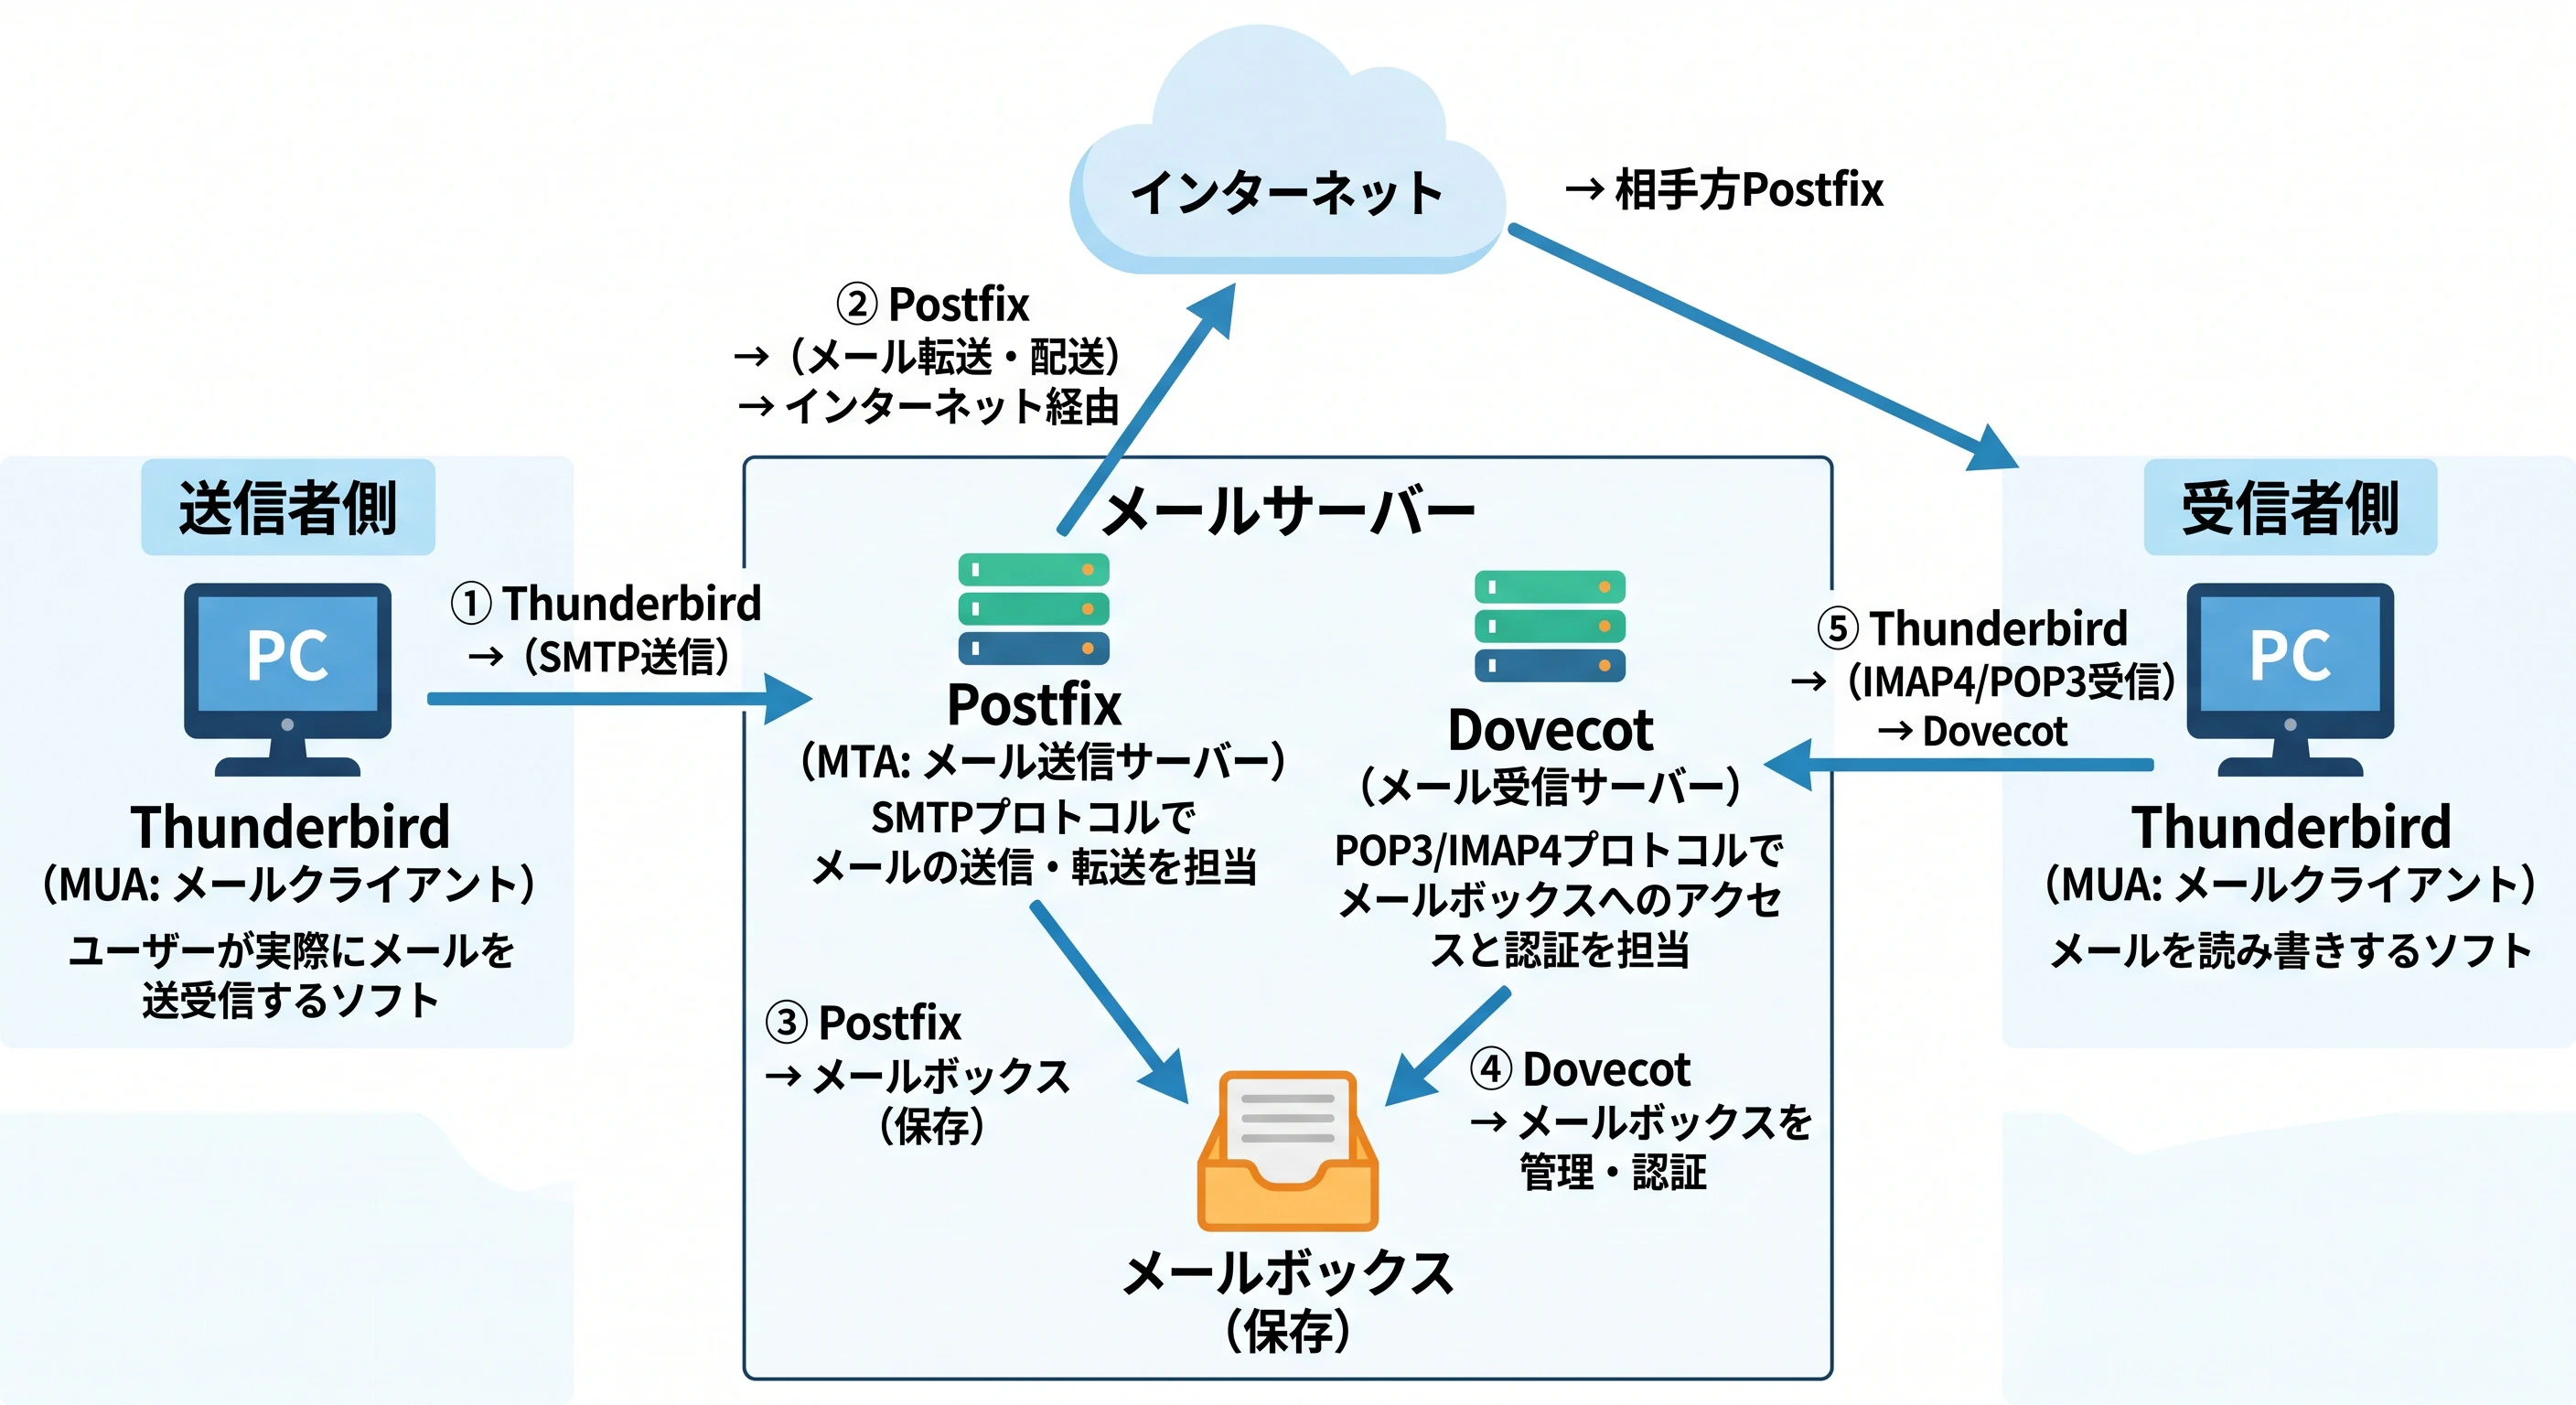
Postfixは、電子メールの送信・転送を担うMTA(Mail Transfer Agent)と呼ばれるフリーソフトウェアで、SMTPプロトコルを使用してメールの配送処理を行う。sendmailとの高い互換性を持ちながら、より高速で安全な設計が特徴であり、送信元・宛先の確認からメールの仕分け・転送までを担当する。単体では受信機能を持たないため、実際のメールサーバー構築ではDovecotなどの受信サーバーと組み合わせて利用されるのが一般的。
Dovecot
Dovecotは、LinuxなどのUnix系OS上で動作するオープンソースのメール受信サーバーソフトウェアで、POP3およびIMAP4プロトコルに対応している。Timo Sirainen氏によって2002年に開発が開始され、セキュアな設計方針とmbox・Maildir・独自形式のdboxなど複数のメールボックス形式のサポートで知られている。単体では送受信を完結できず、Postfixなどのメール送信サーバーと組み合わせてメールボックスへのアクセスやユーザー認証を提供する役割を担う
Thunderbird
Thunderbirdは、Mozillaが開発する無料のオープンソースメールクライアント(MUA:Mail User Agent)で、複数のメールアカウントを一つのソフトで一元管理できる。高速な全文検索やタブ表示、アーカイブ機能などを備え、設定やカスタマイズも自由に行える点が特徴である。PostfixやDovecotで構築したメールサーバーに接続し、実際にメールの送受信を行うクライアントソフトとして広く利用されている
環境構築
Postfixのインストールと設定
Linuxに最初から入っているパッケージなどを最新化しておきます。
/etc/hostsファイルを編集し、test01.localと、test01というホスト名は自分自身だということをPostfixが名前解決できるようにします。
root@multi-server:~# apt update && apt upgrade -y
root@multi-server:~# cp -p /etc/hosts /etc/hosts.origin
root@multi-server:~# nano /etc/hosts
root@multi-server:~# sdiff /etc/hosts /etc/hosts.origin
127.0.0.1 localhost                                             127.0.0.1 localhost
127.0.1.1 multi-server test01.local test01                    | 127.0.1.1 multi-server

# The following lines are desirable for IPv6 capable hosts      # The following lines are desirable for IPv6 capable hosts
::1     ip6-localhost ip6-loopback                              ::1     ip6-localhost ip6-loopback
fe00::0 ip6-localnet                                            fe00::0 ip6-localnet
ff00::0 ip6-mcastprefix                                         ff00::0 ip6-mcastprefix
ff02::1 ip6-allnodes                                            ff02::1 ip6-allnodes
ff02::2 ip6-allrouters                                          ff02::2 ip6-allrouters
Postfixをインストールします。
root@multi-server:~# apt install postfix mailutils -y
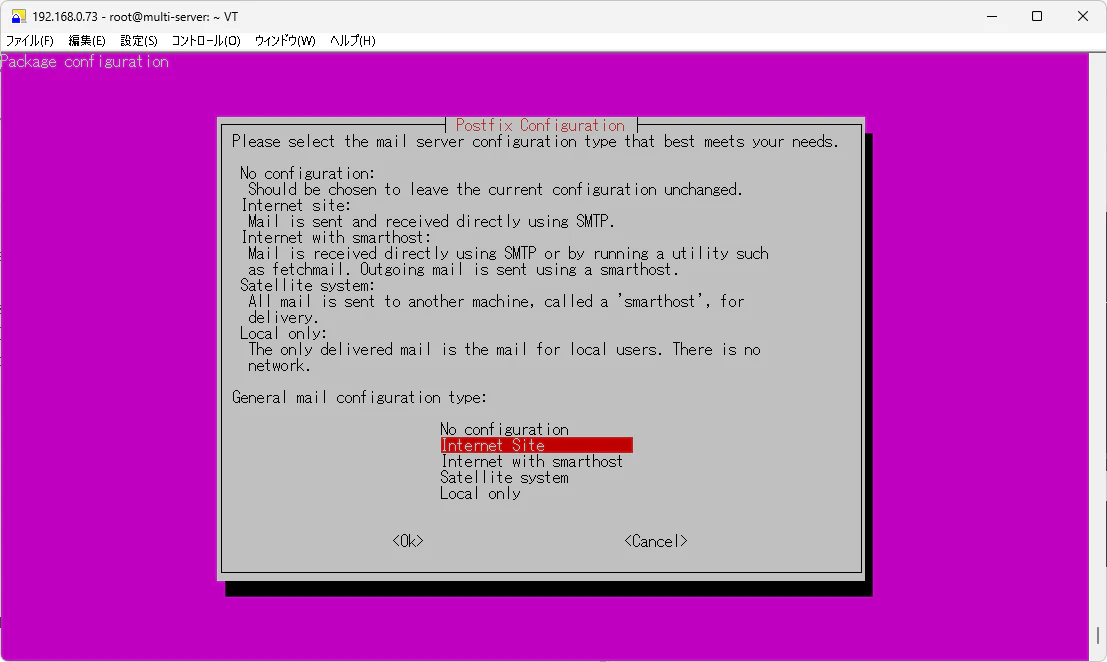
以下のような画面が表示されますが、Internet Siteを選択します。
-
No configuration (設定なし)
設定ファイルを一切生成せず、インストールのみを行います。後から手動で/etc/postfix/main.cfをゼロから作成・編集したい上級者向けの選択肢です。 -
Internet Site (インターネットサイト)
このサーバー自身が直接インターネット上の他のメールサーバーとSMTP通信を行い、メールの送受信を行います。一般的な独立したメールサーバーを構築する場合の標準的な選択肢です。 -
Internet with smarthost (スマートホスト付きインターネット)
メールの受信はこのサーバーで直接行いますが、外部へのメール送信は別のメールサーバー(スマートホスト/リレーサーバー。例:プロバイダのSMTPサーバーやSendGridなど)にすべて任せる構成です。 -
Satellite system (サテライトシステム)
このサーバーではメールの受信を一切行わず、送信するメールもすべてスマートホスト(リレーサーバー)に転送します。Webサーバーなどがシステム通知メールを送信するだけの用途によく使われます。 -
Local only (ローカルのみ)
外部ネットワークとのメールの送受信を行わず、サーバー内のローカルユーザー間(例:rootから一般ユーザーへ)でのみメールをやり取りする構成です。
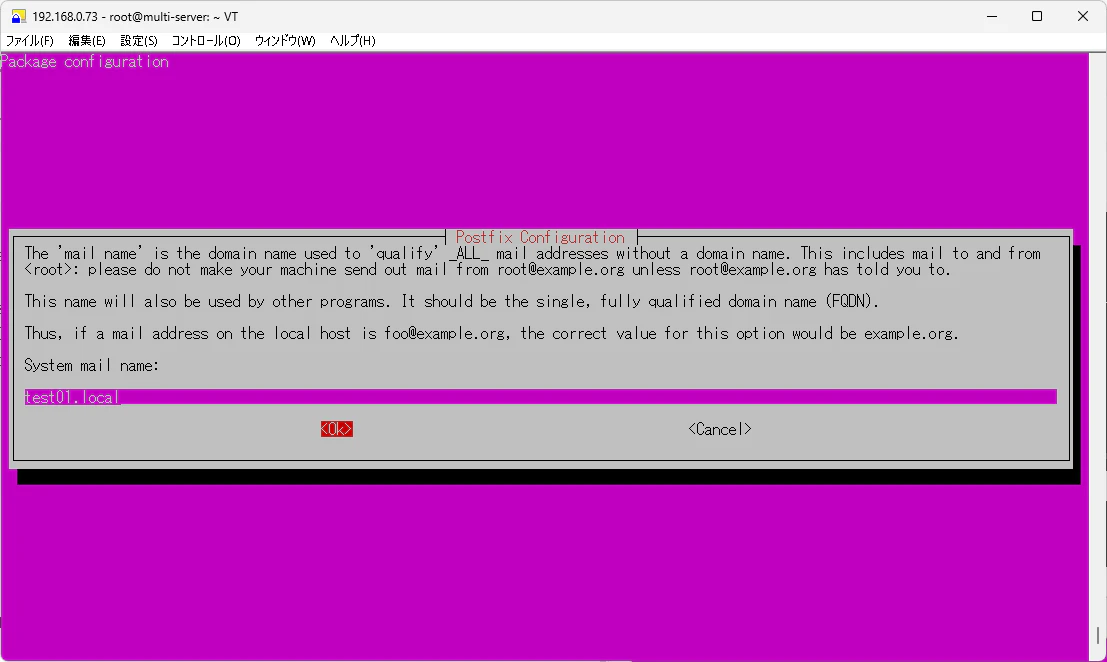
次に以下のような画面が表示されます。
ここでの設定はメールアドレスの@以降にどういうドメインを使うかという設定を入れる感じになります。
今回はtest01.localとしていきます。なのでメールアドレス的には***@test01.localになります。
Postfixをインストールした後、main.cfというコンフィグファイルを編集していきます。
以下の項目を編集しております。
-
myhostname = mail.test01.local(このサーバー自身のFQDN(完全なホスト名)。Postfixが自分自身を名乗るときや、メールヘッダーの
Received:行に使われる。) -
mydomain = test01.local(このサーバーが属するドメイン名。
myhostnameから自動推測も可能だが、明示的に指定することもできる。) -
myorigin = $mydomai(送信メールの「差出人アドレスのドメイン部分」に使われる値。ローカルユーザーが
userとだけ書いて送信しても、実際にはuser@test01.localとして送られるようにする設定) - mydestination = $myhostname, test01.local, multi-server,(「自分宛てのメールとして最終配送(ローカル配送)するドメイン」のリスト。ここに書かれた宛先宛てのメールは外部に転送せず、自ホスト内のメールボックスに配送する。)
- mynetworks = 127.0.0.0/8 192.168.0.0/16 (メールサーバが通信を受け付けるネットワークを指定。私の自宅の環境だと192.168.0.0/16だったので追加しています。)
root@multi-server:~# cp -p /etc/postfix/main.cf /etc/postfix/main.cf.origin
root@multi-server:~# nano /etc/postfix/main.cf
root@multi-server:~# sdiff /etc/postfix/main.cf /etc/postfix/main.cf.origin
# See /usr/share/postfix/main.cf.dist for a commented, more c   # See /usr/share/postfix/main.cf.dist for a commented, more c


# Debian specific:  Specifying a file name will cause the fir   # Debian specific:  Specifying a file name will cause the fir
# line of that file to be used as the name.  The Debian defau   # line of that file to be used as the name.  The Debian defau
# is /etc/mailname.                                             # is /etc/mailname.
#myorigin = /etc/mailname                                       #myorigin = /etc/mailname

smtpd_banner = $myhostname ESMTP $mail_name (Ubuntu)            smtpd_banner = $myhostname ESMTP $mail_name (Ubuntu)
biff = no                                                       biff = no

# appending .domain is the MUA's job.                           # appending .domain is the MUA's job.
append_dot_mydomain = no                                        append_dot_mydomain = no

# Uncomment the next line to generate "delayed mail" warnings   # Uncomment the next line to generate "delayed mail" warnings
#delay_warning_time = 4h                                        #delay_warning_time = 4h

readme_directory = no                                           readme_directory = no

# See http://www.postfix.org/COMPATIBILITY_README.html -- def   # See http://www.postfix.org/COMPATIBILITY_README.html -- def
# fresh installs.                                               # fresh installs.
compatibility_level = 3.6                                       compatibility_level = 3.6


# TLS parameters                                                # TLS parameters
smtpd_tls_cert_file=/etc/ssl/certs/ssl-cert-snakeoil.pem        smtpd_tls_cert_file=/etc/ssl/certs/ssl-cert-snakeoil.pem
smtpd_tls_key_file=/etc/ssl/private/ssl-cert-snakeoil.key       smtpd_tls_key_file=/etc/ssl/private/ssl-cert-snakeoil.key
smtpd_tls_security_level=may                                    smtpd_tls_security_level=may

smtp_tls_CApath=/etc/ssl/certs                                  smtp_tls_CApath=/etc/ssl/certs
smtp_tls_security_level=may                                     smtp_tls_security_level=may
smtp_tls_session_cache_database = btree:${data_directory}/smt   smtp_tls_session_cache_database = btree:${data_directory}/smt


smtpd_relay_restrictions = permit_mynetworks permit_sasl_auth   smtpd_relay_restrictions = permit_mynetworks permit_sasl_auth
myhostname = mail.test01.local                                | myhostname = multi-server
alias_maps = hash:/etc/aliases                                  alias_maps = hash:/etc/aliases
alias_database = hash:/etc/aliases                              alias_database = hash:/etc/aliases
mydomain = test01.local                                       | myorigin = /etc/mailname
myorigin = $mydomain                                          | mydestination = $myhostname, test01.local, multi-server, loca
mydestination = $myhostname, test01.local, multi-server, loca <
relayhost =                                                     relayhost =
mynetworks = 127.0.0.0/8 192.168.0.0/16   [::ffff:127.0.0.0]/ | mynetworks = 127.0.0.0/8 [::ffff:127.0.0.0]/104 [::1]/128
mailbox_size_limit = 0                                          mailbox_size_limit = 0
recipient_delimiter = +                                         recipient_delimiter = +
inet_interfaces = all                                           inet_interfaces = all
inet_protocols = all                                            inet_protocols = all
修正した内の構文チェックを行い、問題ないことを確認しましたら設定反映の為postfixを再起動していきます。
root@multi-server:~# postfix check
root@multi-server:~# systemctl restart postfix
root@multi-server:~# systemctl enable postfix
Synchronizing state of postfix.service with SysV service script with /usr/lib/systemd/systemd-sysv-install.
Executing: /usr/lib/systemd/systemd-sysv-install enable postfix
root@multi-server:~# systemctl status postfix
● postfix.service - Postfix Mail Transport Agent
     Loaded: loaded (/usr/lib/systemd/system/postfix.service; enabled; preset: enabled)
     Active: active (exited) since Sat 2026-07-25 14:05:03 UTC; 9s ago
       Docs: man:postfix(1)
   Main PID: 14989 (code=exited, status=0/SUCCESS)
        CPU: 540us

Jul 25 14:05:03 multi-server systemd[1]: Starting postfix.service - Postfix Mail Transport Agent...
Jul 25 14:05:03 multi-server systemd[1]: Finished postfix.service - Postfix Mail Transport Agent.
今回はtestユーザにメールを送信していきたいと思います。
postfixサーバにtestユーザがいることを確認します。OSユーザにいれば問題ありません。
root@multi-server:~# cat /etc/passwd | grep -i test
test:x:1000:1000:test:/home/test:/bin/bash
テストメール送信
Pythonのコードを動かすことでメールを送信してみます。
Pythonのコードは以下で確認したコードになります。
コードは以下となります。
import smtplib
from email.mime.text import MIMEText
from email.utils import formatdate

# --- 設定項目(ここだけ変更) ---
SMTP_HOST = "192.168.0.73"  # ★構築したLinuxサーバーのIPアドレスに変更
SMTP_PORT = 25              # ★Postfixのデフォルトポート(25)に変更

FROM_ADDR = "sender@test01.local"
TO_ADDR = "test@test01.local"   # ★Linux側で作成したユーザー宛てに変更推奨
SUBJECT = "Postfix 送信テスト"
BODY = "実サーバー(Postfix)への送信テストです。"

def send_test_mail():
    msg = MIMEText(BODY, "plain", "utf-8")
    msg["Subject"] = SUBJECT
    msg["From"] = FROM_ADDR
    msg["To"] = TO_ADDR
    msg["Date"] = formatdate(localtime=True)

    try:
        with smtplib.SMTP(SMTP_HOST, SMTP_PORT, timeout=10) as server:
            server.set_debuglevel(1)
            server.send_message(msg)
        print("✅ Postfixサーバーへの送信に成功しました。")

    except smtplib.SMTPException as e:
        print(f"❌ SMTPエラー: {e}")
    except (ConnectionRefusedError, TimeoutError) as e:
        print(f"❌ 接続エラー: {e}")

if __name__ == "__main__":
    send_test_mail()
コードを実行していきます。
送信成功と出力されております。data: (250, b'2.0.0 Ok: queued as 318AA8AF84')の318から始まるものはPostfixがそのメールをキューに登録した際に割り振るキューID(Queue ID)です。Postfix内部でメールを一意に識別するための管理番号の様です。
(.venv) PS C:\Users\ohtsu\Documents\python\mail> python .\sendmail.py
send: 'ehlo [100.90.13.60]\r\n'
reply: b'250-mail.test01.local\r\n'
reply: b'250-PIPELINING\r\n'
reply: b'250-SIZE 10240000\r\n'

中略

data: (250, b'2.0.0 Ok: queued as 318AA8AF84')
send: 'QUIT\r\n'
reply: b'221 2.0.0 Bye\r\n'
reply: retcode (221); Msg: b'2.0.0 Bye'
✅ Postfixサーバーへの送信に成功しました。
メールが届いていることをログから確認します。
root@multi-server:~# grep "318AA8AF84" /var/log/mail.log
2026-07-25T14:16:05.203005+00:00 multi-server postfix/smtpd[15391]: 318AA8AF84: client=unknown[192.168.0.10]
2026-07-25T14:16:05.209230+00:00 multi-server postfix/cleanup[15395]: 318AA8AF84: message-id=<>
2026-07-25T14:16:05.213181+00:00 multi-server postfix/qmgr[14988]: 318AA8AF84: from=<sender@test01.local>, size=496, nrcpt=1 (queue active)
2026-07-25T14:16:05.219480+00:00 multi-server postfix/local[15396]: 318AA8AF84: to=<test@test01.local>, relay=local, delay=0.02, delays=0.02/0/0/0, dsn=2.0.0, status=sent (delivered to mailbox)
2026-07-25T14:16:05.219526+00:00 multi-server postfix/qmgr[14988]: 318AA8AF84: removed

---------------------------

root@multi-server:~# mail -u test
"/var/mail/test": 1 message 1 new
>N   1 sender@test01.loca Sat Jul 25 14:16  18/647   Postfix 送信テスト
?
Return-Path: <sender@test01.local>
X-Original-To: test@test01.local
Delivered-To: test@test01.local
Received: from [100.90.13.60] (unknown [192.168.0.10])
        by mail.test01.local (Postfix) with ESMTP id 318AA8AF84
        for <test@test01.local>; Sat, 25 Jul 2026 14:16:05 +0000 (UTC)
Content-Type: text/plain; charset="utf-8"
MIME-Version: 1.0
Content-Transfer-Encoding: base64
Subject: Postfix 送信テスト
From: sender@test01.local
To: test@test01.local
Date: Sat, 25 Jul 2026 23:16:05 +0900
X-IMAPbase: 1784989115                    2
X-UID: 1
Status: R

5a6f44K144O844OQ44O8KFBvc3RmaXgp44G444Gu6YCB5L+h44OG44K544OI44Gn44GZ44CC
?
No applicable message
? exit
Dovecot
"ドベコット"ではなく"ダブコット"と呼ぶらしいです。これをインストールしていきます。
root@multi-server:~# apt install dovecot-core dovecot-imapd dovecot-pop3d -y
root@multi-server:~# dovecot --version
2.3.21 (47349e2482)
以下のファイルを編集していきます。
/etc/dovecot/conf.d/10-mail.conf
メール保存形式(mbox/Maildir)の指定
先程/var/mail/testと/var/mail/"ユーザ名"となっていることから
"mbox:~/mail:INBOX=/var/mail/%u"となっていればOKらしいです。
root@multi-server:~# cat /etc/dovecot/conf.d/10-mail.conf | grep -i mail_location
mail_location = mbox:~/mail:INBOX=/var/mail/%u
/etc/dovecot/conf.d/10-auth.conf
認証方式の指定
平文(暗号化なし)でのパスワード認証を許可するかどうかの設定です。デフォルトはyes(平文認証を禁止)ですが、これをnoに変更することで平文認証を許可しています。
plainはSMTP/IMAPで標準的に使われる認証方式、loginは主にOutlookなど一部のメールクライアントが要求する認証方式です。Thunderbirdなど幅広いクライアントに対応するため、両方を有効にしています。
root@multi-server:~# cp -p /etc/dovecot/conf.d/10-auth.conf /etc/dovecot/conf.d/10-auth.conf.origin
root@multi-server:~# nano /etc/dovecot/conf.d/10-auth.conf
root@multi-server:~# diff /etc/dovecot/conf.d/10-auth.conf /etc/dovecot/conf.d/10-auth.conf.origin
10c10
< disable_plaintext_auth = no
---
> #disable_plaintext_auth = yes
100c100
< auth_mechanisms = plain login
---
> auth_mechanisms = plain
/etc/dovecot/conf.d/10-ssl.conf
TLS/SSLの有無
DovecotがIMAP/POP3の通信でTLS/SSLによる暗号化を使うかどうかの設定です。デフォルトはyes(TLS必須、または利用可能な状態)ですが、今回はnoに変更して暗号化なしでの接続を許可しています。
root@multi-server:~# cp -p /etc/dovecot/conf.d/10-ssl.conf /etc/dovecot/conf.d/10-ssl.conf.origin
root@multi-server:~# nano /etc/dovecot/conf.d/10-ssl.conf
root@multi-server:~# diff /etc/dovecot/conf.d/10-ssl.conf /etc/dovecot/conf.d/10-ssl.conf.origin
6c6
< ssl = no
---
> ssl = yes
設定を反映していくために、Dovecotを再起動していきます。
root@multi-server:~# systemctl restart dovecot
root@multi-server:~# systemctl enable dovecot
Synchronizing state of dovecot.service with SysV service script with /usr/lib/systemd/systemd-sysv-install.
Executing: /usr/lib/systemd/systemd-sysv-install enable dovecot
root@multi-server:~# systemctl status dovecot
● dovecot.service - Dovecot IMAP/POP3 email server
     Loaded: loaded (/usr/lib/systemd/system/dovecot.service; enabled; preset: enabled)
     Active: active (running) since Sat 2026-07-25 14:30:59 UTC; 24s ago
       Docs: man:dovecot(1)
             https://doc.dovecot.org/
   Main PID: 18889 (dovecot)
     Status: "v2.3.21 (47349e2482) running"
      Tasks: 4 (limit: 4600)
     Memory: 3.4M (peak: 3.9M)
        CPU: 15ms
     CGroup: /system.slice/dovecot.service
             tq18889 /usr/sbin/dovecot -F
             tq18892 dovecot/anvil
             tq18893 dovecot/log
             mq18894 dovecot/config
dovecotの簡単な動作確認のテストを行います。
サーバで以下を実行します。
root@multi-server:~#telnet localhost 143
以下のようにOKという文言が出てきたら、処理が一時的に止まります。対話形式でログイン等をしていく感じになります。
Trying 127.0.0.1...
Connected to localhost.
Escape character is '^]'.
* OK [CAPABILITY IMAP4rev1 SASL-IR LOGIN-REFERRALS ID ENABLE IDLE LITERAL+ AUTH=PLAIN AUTH=LOGIN] Dovecot (Ubuntu) ready.
以下のようなコマンドを実行することでdovecot側で先ほどPythonで送信したメールが確認出来るかを確認していきます。
a1 login ユーザ名 パスワード
a2 list "" *
a3 select INBOX
a4 fetch 1 body[]
a5 logout
Thunderbirdの導入と動作確認
ThunderbirdというメールクライアントをWindowsにインストールしていきます。
インストーラを実行したら色々聞かれますが、デフォルトの設定でインストールすればOK。
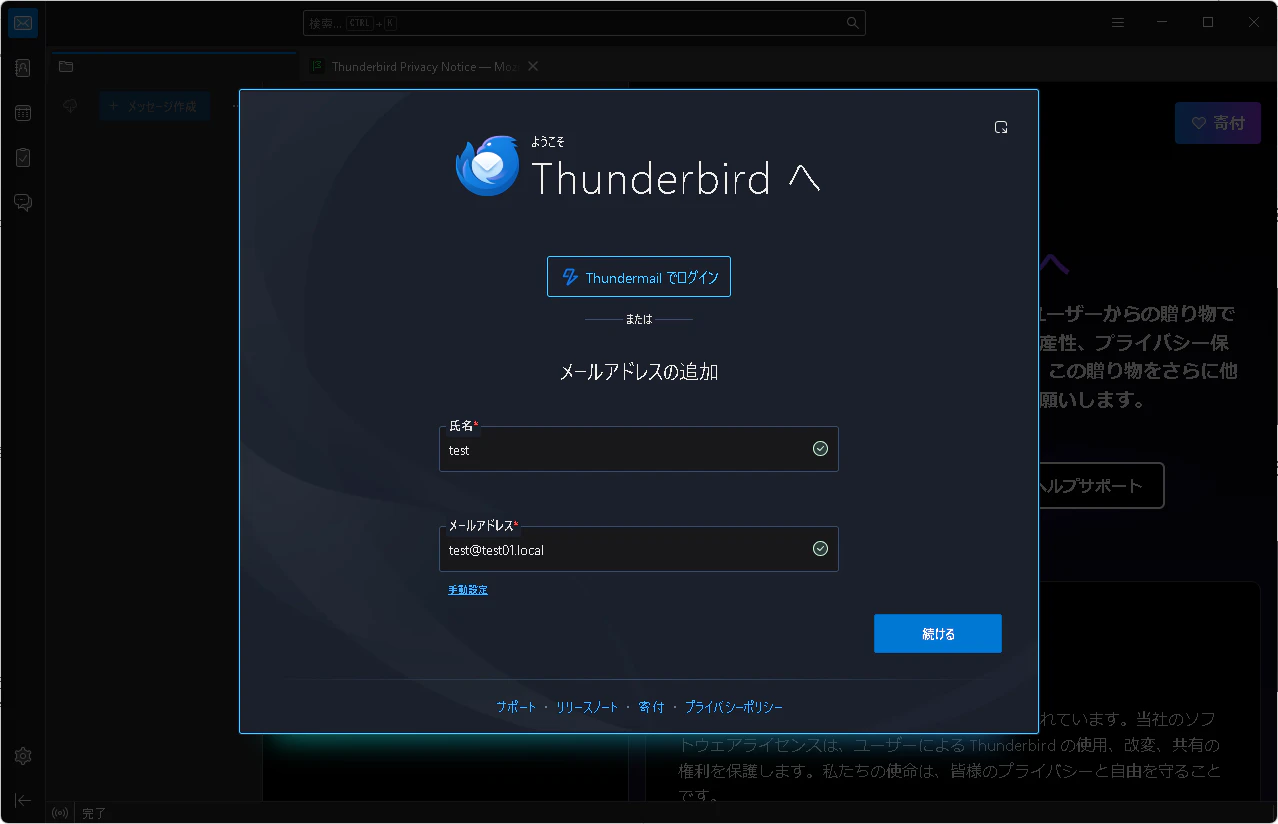
ユーザ名とパスワードを入力すると手動設定という文字列が表示されるのでこれを押下します。
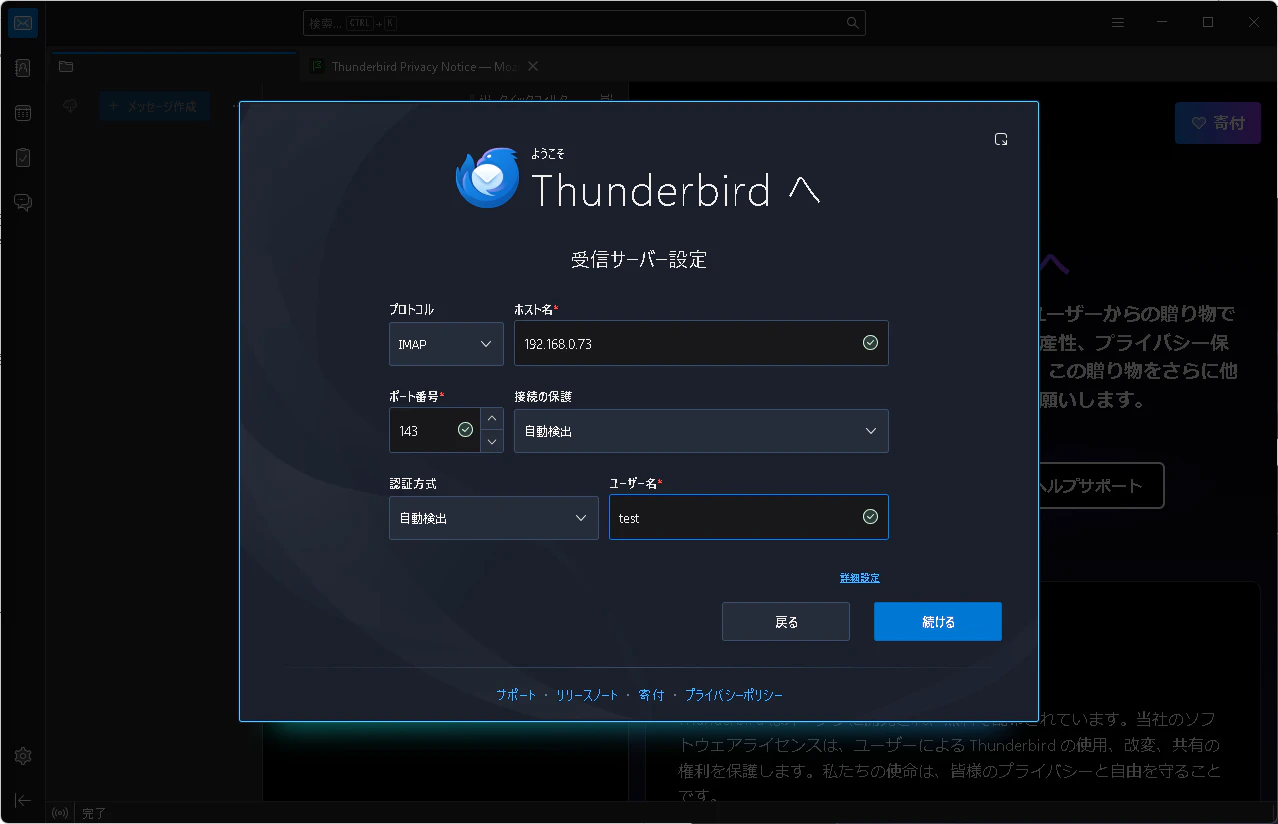
受信サーバ設定をしていきます。
ホスト名のところは、名前解決できるならホスト名を入れますが出来る状態ではなかったので、IPアドレスを入力していきます。
またユーザ名のところはユーザ名のみとしていきます。
※受信サーバ:
メールクライアント(Thunderbird)がメールボックスからメールを取得しに行く先のサーバーです。今回の構成ではDovecotがこの役割を担っています。
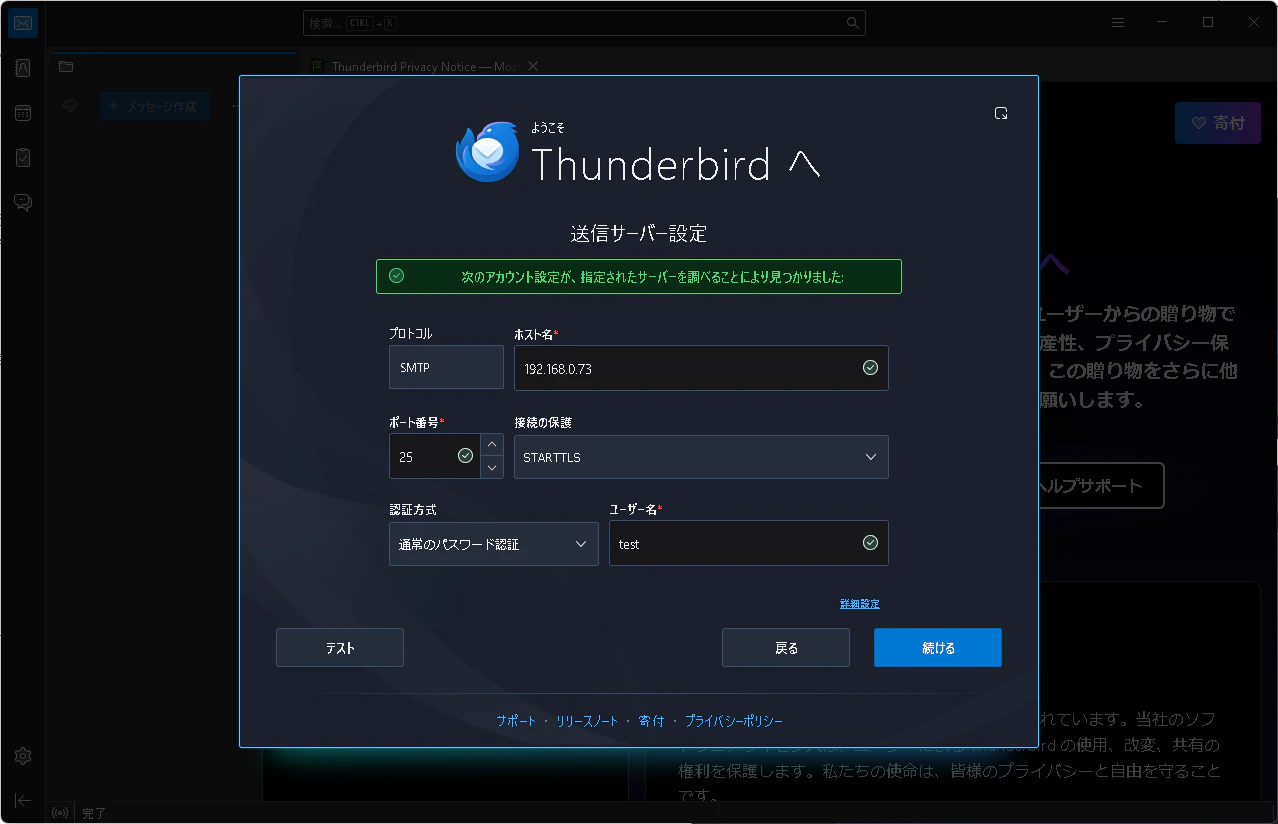
送信サーバ設定
基本的には受信サーバと同じように設定を入れていきます。
テストボタンを押下して、サーバが見つかることを確認します。
※送信サーバ:
Thunderbirdからメールを送信する際に、そのメールを受け取って配送処理をするサーバーです。今回の構成ではPostfixがこの役割で、SMTPプロトコルを使います。
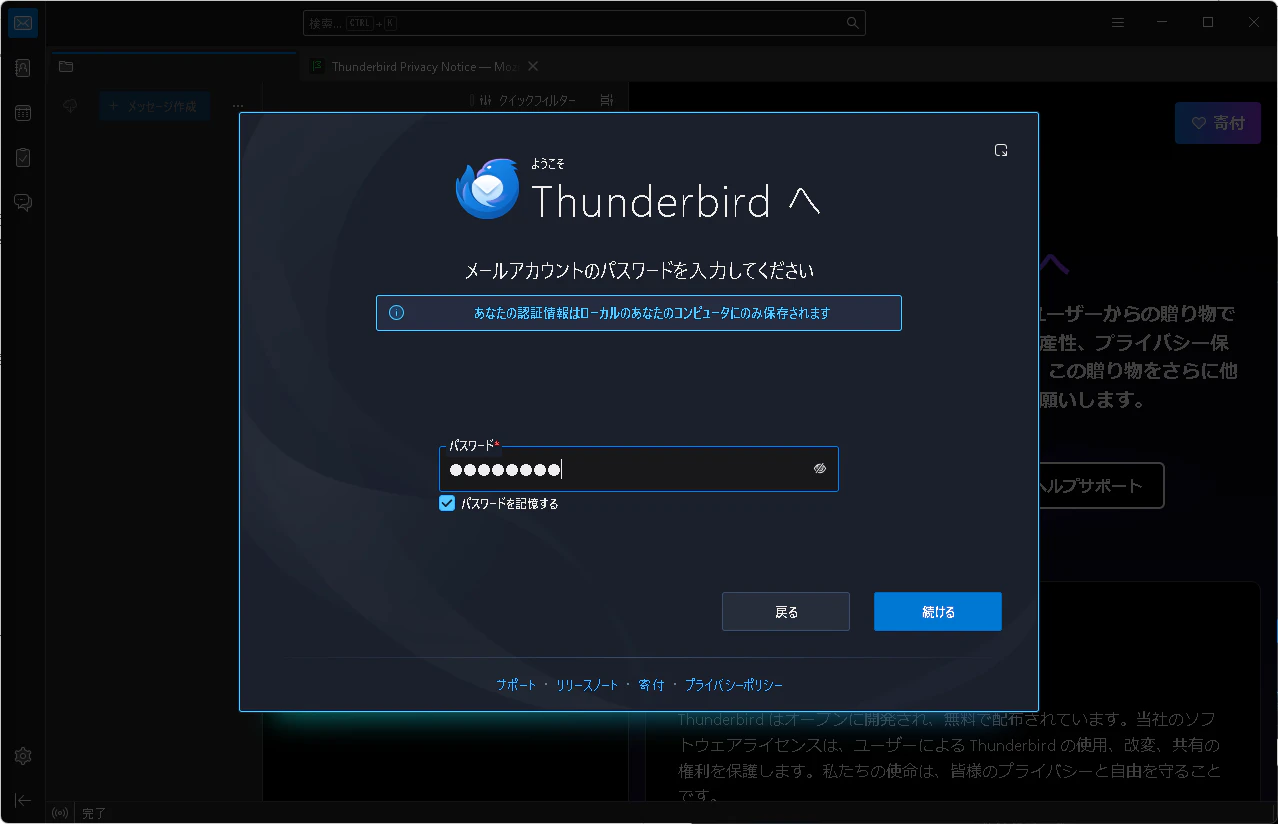
ユーザのパスワードを入力します。
今回の場合testユーザのパスワードを入力していきます。
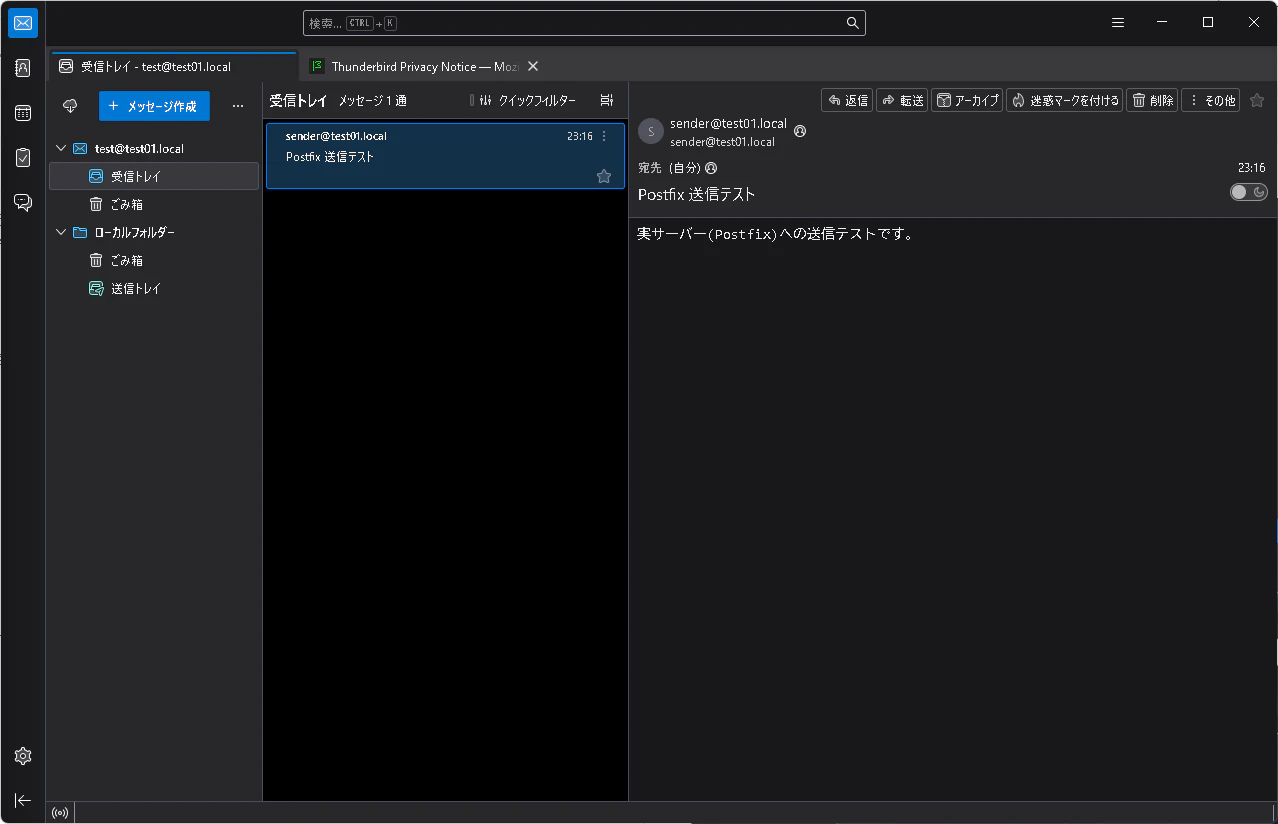
Pythonから送信されてきたメールがメールクライアントから確認できることがわかりますね。