こんにちは。
株式会社クラスアクト インフラストラクチャ事業部の大塚です。
今回は以下の記事で作成したkubeadmベースのk8s環境にkubernetes-dashboard,MetalLB,LoadBalancer環境をデプロイしたり、workerノードを追加する手順を書いておこうと思います。
kubernetes-dashboardのデプロイ
以下を参考にし、kubernetes-dashboardをデプロイしていきます。
root@k8s-master:~# kubectl apply -f https://raw.githubusercontent.com/kubernetes/dashboard/v2.7.0/aio/deploy/recommended.yaml
※kubernetesの公式サイトにもyamlベースのデプロイ手順があるのですが、私の環境だとうまくいかなかったです。
雑にログをとってしまい恐縮ですが、デプロイ後は以下のような状態になると思います。
kubernetes-dashboardというnamespaceが作成され、そこに諸々環境デプロイが走るようです。
Every 2.0s: kubectl get pod,svc,cm,secret -A -o wide                                                                                                                                                     k8s-master: Mon May 22 08:26:23 2023
NAMESPACE              NAME                                             READY   STATUS    RESTARTS   AGE     IP               NODE           NOMINATED NODE   READINESS GATES
kube-system            pod/calico-kube-controllers-6c99c8747f-z4gn9     1/1     Running   0          6m26s   172.16.235.194   k8s-master     <none>           <none>
kube-system            pod/calico-node-4mp6j                            1/1     Running   0          6m26s   192.168.2.31     k8s-worker01   <none>           <none>
kube-system            pod/calico-node-sprl5                            1/1     Running   0          6m26s   192.168.2.30     k8s-master     <none>           <none>
kube-system            pod/coredns-5d78c9869d-mt78k                     1/1     Running   0          7m57s   172.16.235.193   k8s-master     <none>           <none>
kube-system            pod/coredns-5d78c9869d-pqbz5                     1/1     Running   0          7m57s   172.16.235.195   k8s-master     <none>           <none>
kube-system            pod/etcd-k8s-master                              1/1     Running   0          8m8s    192.168.2.30     k8s-master     <none>           <none>
kube-system            pod/kube-apiserver-k8s-master                    1/1     Running   0          8m      192.168.2.30     k8s-master     <none>           <none>
kube-system            pod/kube-controller-manager-k8s-master           1/1     Running   0          8m4s    192.168.2.30     k8s-master     <none>           <none>
kube-system            pod/kube-proxy-s8frp                             1/1     Running   0          7m57s   192.168.2.30     k8s-master     <none>           <none>
kube-system            pod/kube-proxy-v5l4p                             1/1     Running   0          6m45s   192.168.2.31     k8s-worker01   <none>           <none>
kube-system            pod/kube-scheduler-k8s-master                    1/1     Running   0          8m      192.168.2.30     k8s-master     <none>           <none>
kubernetes-dashboard   pod/dashboard-metrics-scraper-5cb4f4bb9c-ps8vt   1/1     Running   0          3m29s   172.16.79.65     k8s-worker01   <none>           <none>
kubernetes-dashboard   pod/kubernetes-dashboard-6967859bff-p7w2c        1/1     Running   0          3m29s   172.16.79.66     k8s-worker01   <none>           <none>

NAMESPACE              NAME                                TYPE        CLUSTER-IP       EXTERNAL-IP   PORT(S)                  AGE     SELECTOR
default                service/kubernetes                  ClusterIP   10.96.0.1        <none>        443/TCP                  8m4s    <none>
kube-system            service/kube-dns                    ClusterIP   10.96.0.10       <none>        53/UDP,53/TCP,9153/TCP   8m1s    k8s-app=kube-dns
kubernetes-dashboard   service/dashboard-metrics-scraper   ClusterIP   10.101.192.126   <none>        8000/TCP                 3m29s   k8s-app=dashboard-metrics-scraper
kubernetes-dashboard   service/kubernetes-dashboard        ClusterIP   10.98.208.9      <none>        443/TCP                  3m30s   k8s-app=kubernetes-dashboard

NAMESPACE              NAME                                                             DATA   AGE
default                configmap/kube-root-ca.crt                                       1      7m58s
kube-node-lease        configmap/kube-root-ca.crt                                       1      7m58s
kube-public            configmap/cluster-info                                           2      8m2s
kube-public            configmap/kube-root-ca.crt                                       1      7m58s
kube-system            configmap/calico-config                                          4      6m28s
kube-system            configmap/coredns                                                1      8m1s
kube-system            configmap/extension-apiserver-authentication                     6      8m10s
kube-system            configmap/kube-apiserver-legacy-service-account-token-tracking   1      8m10s
kube-system            configmap/kube-proxy                                             2      8m1s
kube-system            configmap/kube-root-ca.crt                                       1      7m58s
kube-system            configmap/kubeadm-config                                         1      8m4s
kube-system            configmap/kubelet-config                                         1      8m3s
kubernetes-dashboard   configmap/kube-root-ca.crt                                       1      3m30s
kubernetes-dashboard   configmap/kubernetes-dashboard-settings                          0      3m29s

NAMESPACE              NAME                                     TYPE                            DATA   AGE
kube-system            secret/bootstrap-token-x847d2            bootstrap.kubernetes.io/token   7      8m2s
kubernetes-dashboard   secret/kubernetes-dashboard-certs        Opaque                          0      3m29s
kubernetes-dashboard   secret/kubernetes-dashboard-csrf         Opaque                          1      3m29s
kubernetes-dashboard   secret/kubernetes-dashboard-key-holder   Opaque                          2      3m29s
dashboardログインに必要なtokenを生成します。
以下を参考にしました。
今回用意したyamlファイルは以下2点。
apiVersion: v1
kind: ServiceAccount
metadata:
  name: admin-user
  namespace: kubernetes-dashboard
apiVersion: rbac.authorization.k8s.io/v1
kind: ClusterRoleBinding
metadata:
  name: admin-user
roleRef:
  apiGroup: rbac.authorization.k8s.io
  kind: ClusterRole
  name: cluster-admin
subjects:
- kind: ServiceAccount
  name: admin-user
  namespace: kubernetes-dashboard
デプロイしていきます。
root@k8s-master:~/yaml# kubectl apply -f admin-user.yaml
serviceaccount/admin-user created
root@k8s-master:~/yaml# kubectl apply -f ClusterRoleBinding.yaml
clusterrolebinding.rbac.authorization.k8s.io/admin-user created
デプロイ後create tokenを実行します。出力された文字列を控えます。
root@k8s-master:~/yaml# kubectl -n kubernetes-dashboard create token admin-user
eyJhbGciOiJSUzI1NiIsImtpZCI6IlljUlRNVEZQcGptbmYyRzQ4R0RybjBVeks4aFAtQ1YwcGVMenZpWE90ejQifQ.eyJhdWQiOlsiaHR0cHM6Ly9rdWJlcm5ldGVzLmRlZmF1bHQuc3ZjLmNsdXN0ZXIubG9jYWwiXSwiZXhwIjoxNjg0NzQ3NTYzLCJpYXQiOjE2ODQ3NDM5NjMsImlzcyI6Imh0dHBzOi8va3ViZXJuZXRlcy5kZWZhdWx0LnN2Yy5jbHVzdGVyLmxvY2FsIiwia3ViZXJuZXRlcy5pbyI6eyJuYW1lc3BhY2UiOiJrdWJlcm5ldGVzLWRhc2hib2FyZCIsInNlcnZpY2VhY2NvdW50Ijp7Im5hbWUiOiJhZG1pbi11c2VyIiwidWlkIjoiODhjYTJkNmYtNjA4OS00M2Y1LWEyZWMtMjNmYjg2YjY0NGY3In19LCJuYmYiOjE2ODQ3NDM5NjMsInN1YiI6InN5c3RlbTpzZXJ2aWNlYWNjb3VudDprdWJlcm5ldGVzLWRhc2hib2FyZDphZG1pbi11c2VyIn0.OC1CsdQhYmZAVnDX-E0Je2hhWGI11avIh1KE3odsx32moGRq8gHtXknzju3tKlyRppvfZ4KGVhH4qh2k4ea2tDM-bjLnbZiqmQyeA26izA_PAARbGO_Oh7ccx5yjFHOeAbY0mNOKp7fPJjwO6zoEPQRT6gK3prEBHh14uv3GeZ7KHJkdHxohLl5mHMZy3CSpLL4KSvg2R0l4Msg-kvKVKSNIpauhPz1-YZVRnUvYa3t_FwWVgNX6SrQDK--XlSbNVjLCi39qLZIYzIeGXyIVhBGcvDtU4y9NbXdakQRgMwtc_byS1AEVz8OC1IL1ysNvitdidzcn6efhpXGRuPt_Xw
NodePortを使いdashboardにWebブラウザでアクセスしたいと思います。
yamlファイルを用意するのが面倒だったので、今回はexposeを使います。--target-portは8443番です。dashboardはこのポートでlistenしているようです。
root@k8s-master:~/yaml# kubectl expose pod kubernetes-dashboard-6967859bff-p7w2c --type=NodePort --name=dashboard-nodeport --namespace=kubernetes-dashboard --target-port=8443
service/dashboard-nodeport exposed

root@k8s-master:~/yaml# kubectl get svc -o wide -n kubernetes-dashboard
NAME                        TYPE        CLUSTER-IP       EXTERNAL-IP   PORT(S)          AGE     SELECTOR
dashboard-metrics-scraper   ClusterIP   10.101.192.126   <none>        8000/TCP         6m30s   k8s-app=dashboard-metrics-scraper
dashboard-nodeport          NodePort    10.102.38.116    <none>        8443:30573/TCP   23s     k8s-app=kubernetes-dashboard,pod-template-hash=6967859bff
kubernetes-dashboard        ClusterIP   10.98.208.9      <none>        443/TCP          6m31s   k8s-app=kubernetes-dashboard
Webブラウザに"https://(masterノードのIP):(nodeportに払い出されたポート番号)"と入力し、アクセスを試みます。私の環境ですと今回はhttps://192.168.2.30:30573になります。
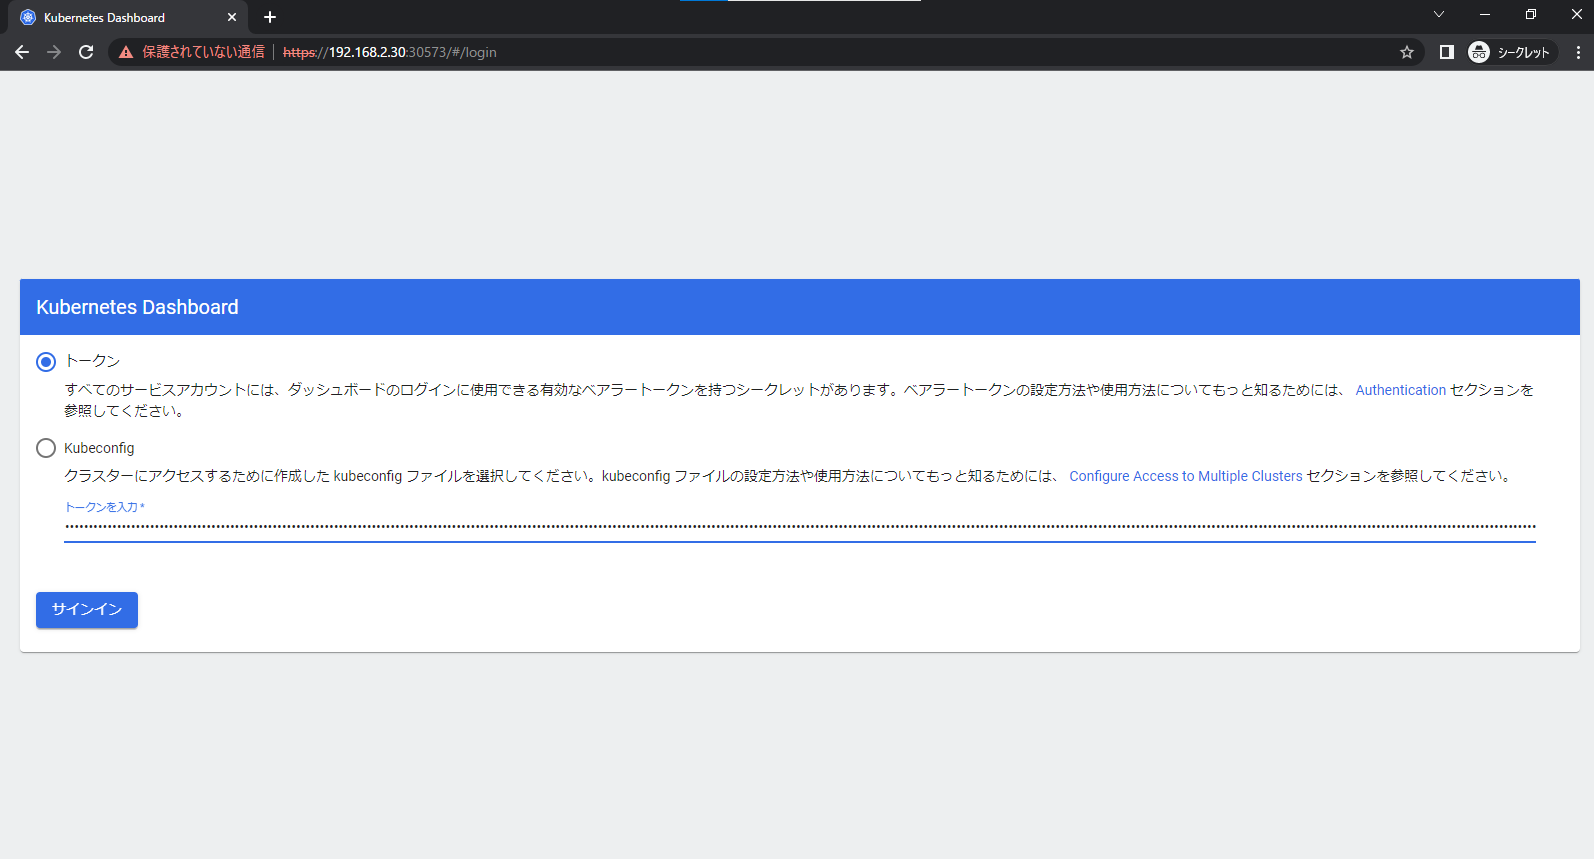
以下のような画面が表示されたら、先ほど控えたtokenの文字列をコピペして貼り付けます。
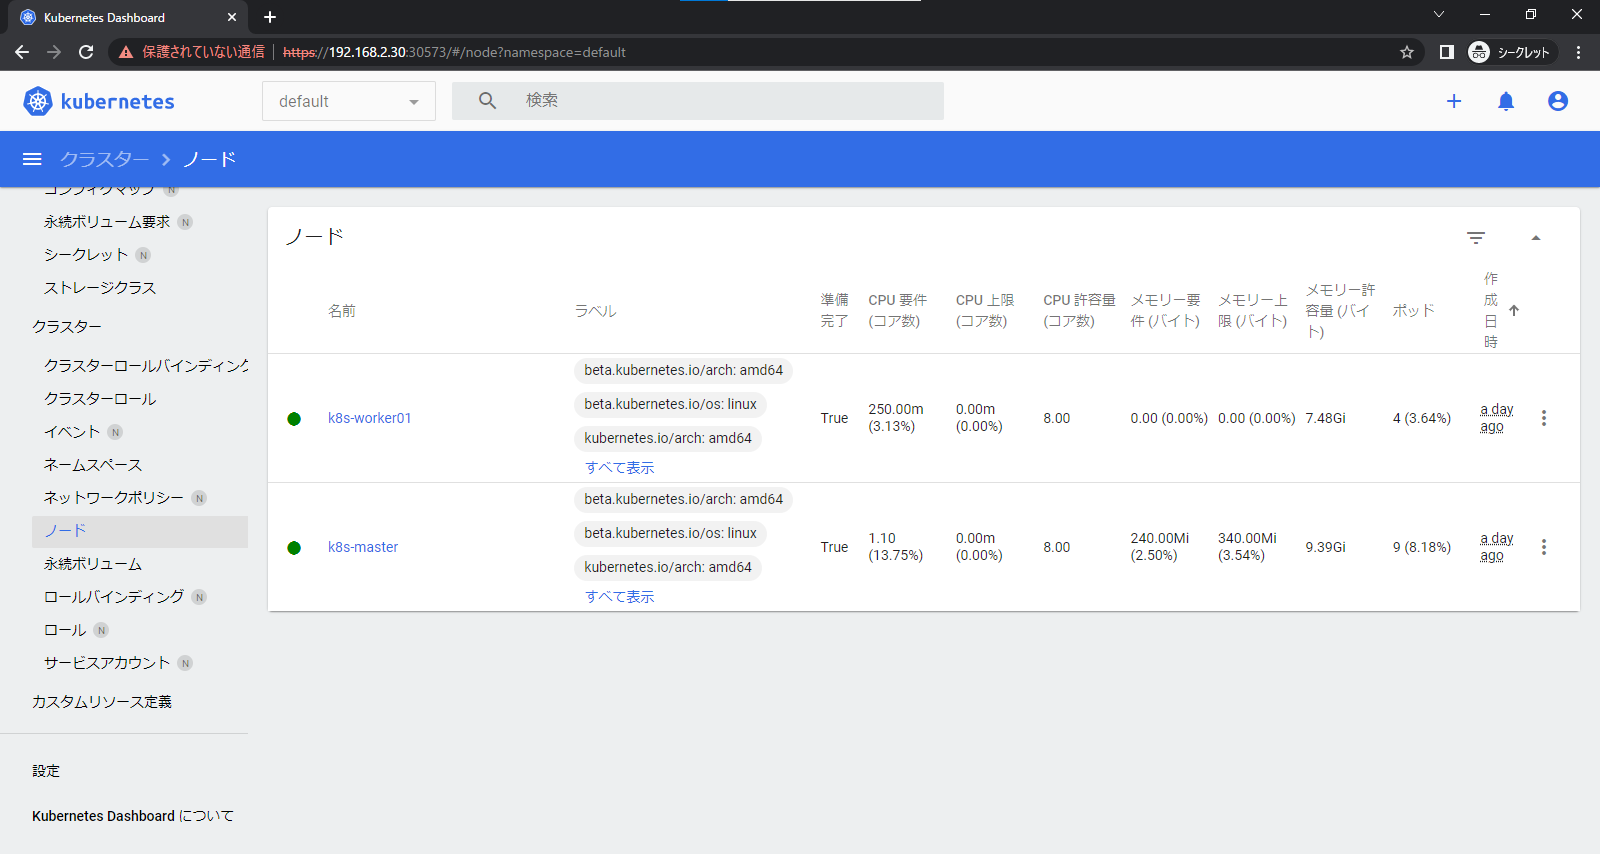
dashboardがデータをとれているか確認します。ノードの情報が取れているので問題なさそうに見えます。
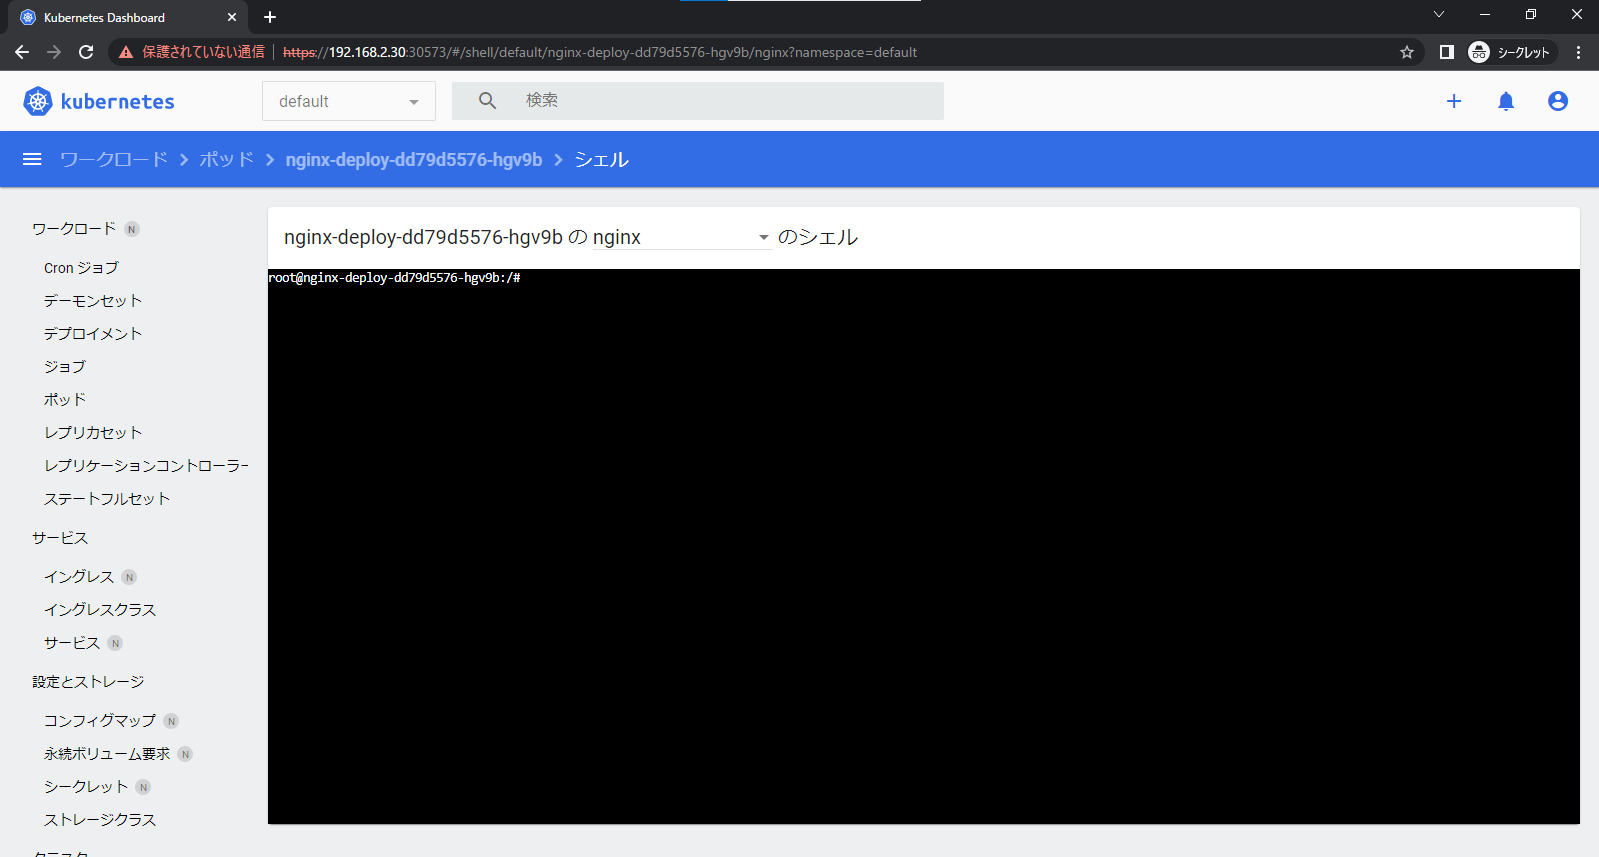
podなどをデプロイしていると、pod内のコンテナに対して以下のような画面で操作することも可能のようです。
kubectl execをわざわざしなくていいというのは便利かなと思いますね。
MetalLBとLoadBalancerのデプロイ
上記で作成したdashboardに対してLoadBalancerを割り当てていきたいと思います。個人的にnodeportでアクセスするのはあまり好きではなく。。。
LoadBalancerをデプロイするために、MetalLBを最初にデプロイしていきます。
上記サイトを参考にコマンドを実行しデプロイします。
これを実行するとmetallb-systemというnamespaceが作成され、その中にいろいろデプロイされます。
root@k8s-master:~/yaml# kubectl apply -f https://raw.githubusercontent.com/metallb/metallb/v0.13.9/config/manifests/metallb-native.yaml

root@k8s-master:~/yaml# kubectl get pod,svc,cm,secret -o wide -A
NAMESPACE              NAME                                             READY   STATUS    RESTARTS   AGE   IP               NODE           NOMINATED NODE   READINESS GATES
default                pod/nginx-deploy-dd79d5576-hgv9b                 1/1     Running   0          37h   172.16.79.70     k8s-worker01   <none>           <none>
default                pod/nginx-deploy-dd79d5576-wsccn                 1/1     Running   0          37h   172.16.79.69     k8s-worker01   <none>           <none>
kube-system            pod/calico-kube-controllers-6c99c8747f-z4gn9     1/1     Running   0          37h   172.16.235.194   k8s-master     <none>           <none>
kube-system            pod/calico-node-4mp6j                            1/1     Running   0          37h   192.168.2.31     k8s-worker01   <none>           <none>
kube-system            pod/calico-node-sprl5                            1/1     Running   0          37h   192.168.2.30     k8s-master     <none>           <none>
kube-system            pod/coredns-5d78c9869d-mt78k                     1/1     Running   0          37h   172.16.235.193   k8s-master     <none>           <none>
kube-system            pod/coredns-5d78c9869d-pqbz5                     1/1     Running   0          37h   172.16.235.195   k8s-master     <none>           <none>
kube-system            pod/etcd-k8s-master                              1/1     Running   0          37h   192.168.2.30     k8s-master     <none>           <none>
kube-system            pod/kube-apiserver-k8s-master                    1/1     Running   0          37h   192.168.2.30     k8s-master     <none>           <none>
kube-system            pod/kube-controller-manager-k8s-master           1/1     Running   0          37h   192.168.2.30     k8s-master     <none>           <none>
kube-system            pod/kube-proxy-s8frp                             1/1     Running   0          37h   192.168.2.30     k8s-master     <none>           <none>
kube-system            pod/kube-proxy-v5l4p                             1/1     Running   0          37h   192.168.2.31     k8s-worker01   <none>           <none>
kube-system            pod/kube-scheduler-k8s-master                    1/1     Running   0          37h   192.168.2.30     k8s-master     <none>           <none>
kubernetes-dashboard   pod/dashboard-metrics-scraper-5cb4f4bb9c-ps8vt   1/1     Running   0          37h   172.16.79.65     k8s-worker01   <none>           <none>
kubernetes-dashboard   pod/kubernetes-dashboard-6967859bff-p7w2c        1/1     Running   0          37h   172.16.79.66     k8s-worker01   <none>           <none>
metallb-system         pod/controller-7948676b95-zv58m                  1/1     Running   0          87s   172.16.79.71     k8s-worker01   <none>           <none>
metallb-system         pod/speaker-cz9fz                                1/1     Running   0          87s   192.168.2.30     k8s-master     <none>           <none>
metallb-system         pod/speaker-ppspq                                1/1     Running   0          87s   192.168.2.31     k8s-worker01   <none>           <none>

NAMESPACE              NAME                                TYPE        CLUSTER-IP       EXTERNAL-IP   PORT(S)                  AGE   SELECTOR
default                service/kubernetes                  ClusterIP   10.96.0.1        <none>        443/TCP                  37h   <none>
kube-system            service/kube-dns                    ClusterIP   10.96.0.10       <none>        53/UDP,53/TCP,9153/TCP   37h   k8s-app=kube-dns
kubernetes-dashboard   service/dashboard-metrics-scraper   ClusterIP   10.101.192.126   <none>        8000/TCP                 37h   k8s-app=dashboard-metrics-scraper
kubernetes-dashboard   service/dashboard-nodeport          NodePort    10.102.38.116    <none>        8443:30573/TCP           37h   k8s-app=kubernetes-dashboard,pod-template-hash=6967859bff
kubernetes-dashboard   service/kubernetes-dashboard        ClusterIP   10.98.208.9      <none>        443/TCP                  37h   k8s-app=kubernetes-dashboard
metallb-system         service/webhook-service             ClusterIP   10.107.255.246   <none>        443/TCP                  87s   component=controller

NAMESPACE              NAME                                                             DATA   AGE
default                configmap/kube-root-ca.crt                                       1      37h
kube-node-lease        configmap/kube-root-ca.crt                                       1      37h
kube-public            configmap/cluster-info                                           2      37h
kube-public            configmap/kube-root-ca.crt                                       1      37h
kube-system            configmap/calico-config                                          4      37h
kube-system            configmap/coredns                                                1      37h
kube-system            configmap/extension-apiserver-authentication                     6      37h
kube-system            configmap/kube-apiserver-legacy-service-account-token-tracking   1      37h
kube-system            configmap/kube-proxy                                             2      37h
kube-system            configmap/kube-root-ca.crt                                       1      37h
kube-system            configmap/kubeadm-config                                         1      37h
kube-system            configmap/kubelet-config                                         1      37h
kubernetes-dashboard   configmap/kube-root-ca.crt                                       1      37h
kubernetes-dashboard   configmap/kubernetes-dashboard-settings                          0      37h
metallb-system         configmap/kube-root-ca.crt                                       1      88s

NAMESPACE              NAME                                     TYPE                            DATA   AGE
kube-system            secret/bootstrap-token-x847d2            bootstrap.kubernetes.io/token   7      37h
kubernetes-dashboard   secret/kubernetes-dashboard-certs        Opaque                          0      37h
kubernetes-dashboard   secret/kubernetes-dashboard-csrf         Opaque                          1      37h
kubernetes-dashboard   secret/kubernetes-dashboard-key-holder   Opaque                          2      37h
metallb-system         secret/memberlist                        Opaque                          1      63s
metallb-system         secret/webhook-server-cert               Opaque                          4      87s
次にMetalLBからLoadBalancerに割り当てるIPアドレスプールの設定などを行っていきます。
以下のWebサイトを参考にします。
今回用意したyamlは以下2点
addressesという部分は、割り当ててほしいIPアドレスのレンジを指定します。
私は192.168.2.35~39を指定しています。
apiVersion: metallb.io/v1beta1
kind: IPAddressPool
metadata:
  name: first-pool
  namespace: metallb-system
spec:
  addresses:
  - 192.168.2.35-192.168.2.39
apiVersion: metallb.io/v1beta1
kind: L2Advertisement
metadata:
  name: example
  namespace: metallb-system
spec:
  ipAddressPools:
  - first-pool
デプロイしていきます。
root@k8s-master:~/yaml# kubectl apply -f IPAddressPoolMetalLB.yaml
ipaddresspool.metallb.io/first-pool created
root@k8s-master:~/yaml# kubectl apply -f L2Advertisement.yaml
l2advertisement.metallb.io/example created
LoadBalancerをデプロイしていきます。
yamlは以下とします。
apiVersion: v1
kind: Service
metadata:
  name: dashboard-loadbalancer
  namespace: kubernetes-dashboard
spec:
  type: LoadBalancer
  selector:
    k8s-app: kubernetes-dashboard
  ports:
  - protocol: TCP
    port: 60000
    targetPort: 8443
デプロイします。
EXTERNAL-IPに指定したIPが降られていることや、describeでendpointがdashboardのIPアドレスになっていることを確認します。
root@k8s-master:~/yaml# kubectl apply -f dashboard-loadbalancer.yaml
service/dashboard-loadbalancer created

root@k8s-master:~/yaml# kubectl get svc -o wide -n kubernetes-dashboard
NAME                        TYPE           CLUSTER-IP       EXTERNAL-IP    PORT(S)           AGE   SELECTOR
dashboard-loadbalancer      LoadBalancer   10.102.236.52    192.168.2.35   60000:32251/TCP   40s   k8s-app=kubernetes-dashboard
dashboard-metrics-scraper   ClusterIP      10.101.192.126   <none>         8000/TCP          37h   k8s-app=dashboard-metrics-scraper
dashboard-nodeport          NodePort       10.102.38.116    <none>         8443:30573/TCP    37h   k8s-app=kubernetes-dashboard,pod-template-hash=6967859bff
kubernetes-dashboard        ClusterIP      10.98.208.9      <none>         443/TCP           37h   k8s-app=kubernetes-dashboard

root@k8s-master:~/yaml# kubectl describe svc dashboard-loadbalancer -n kubernetes-dashboard
Name:                     dashboard-loadbalancer
Namespace:                kubernetes-dashboard
Labels:                   <none>
Annotations:              metallb.universe.tf/ip-allocated-from-pool: first-pool
Selector:                 k8s-app=kubernetes-dashboard
Type:                     LoadBalancer
IP Family Policy:         SingleStack
IP Families:              IPv4
IP:                       10.102.236.52
IPs:                      10.102.236.52
LoadBalancer Ingress:     192.168.2.35
Port:                     <unset>  60000/TCP
TargetPort:               8443/TCP
NodePort:                 <unset>  32251/TCP
Endpoints:                172.16.79.66:8443
Session Affinity:         None
External Traffic Policy:  Cluster
Events:
  Type    Reason       Age   From                Message
  ----    ------       ----  ----                -------
  Normal  IPAllocated  69s   metallb-controller  Assigned IP ["192.168.2.35"]
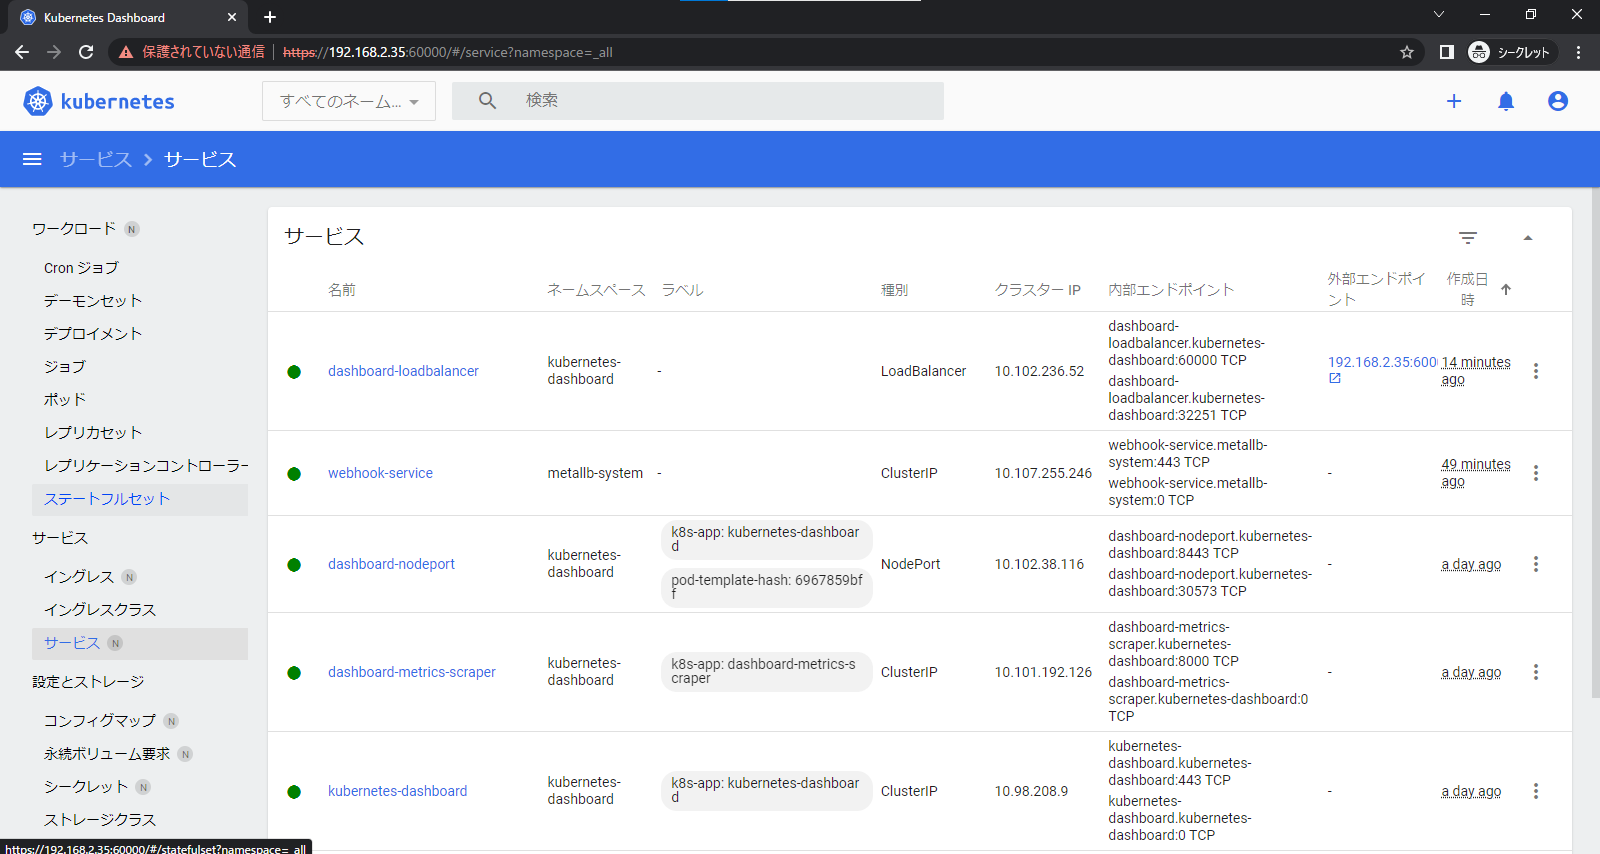
EXTERNAL-IPでdashboardにアクセスできるか確認します。
今回の場合、https://192.168.2.35:60000になります。
結果として以下のようにアクセスができるかと思います。
workerノードを追加する。
masterノードで以下のコマンドを実行します。
token createに--print-join-commandオプションを追加します。出力されたコマンドを控えます。
root@k8s-master:~# kubeadm token create --print-join-command
kubeadm join k8s-master:6443 --token skdrkk.wribyfy6emzacxhx --discovery-token-ca-cert-hash sha256:0d6486415dd39743f08afdf758be752f84476eb7bf9cba8935d6c7790f61ec00

root@k8s-master:~# kubeadm token list
TOKEN                     TTL         EXPIRES                USAGES                   DESCRIPTION                                                EXTRA GROUPS
skdrkk.wribyfy6emzacxhx   23h         2023-05-24T10:04:23Z   authentication,signing   <none>                                                     system:bootstrappers:kubeadm:default-node-token
上記で出力されたコマンドを追加したいwokerノードで実行します。
root@k8s-worker02:~# kubeadm join k8s-master:6443 --token skdrkk.wribyfy6emzacxhx --discovery-token-ca-cert-hash sha256:0d6486415dd39743f08afdf758be752f84476eb7bf9cba8935d6c7790f61ec00
[preflight] Running pre-flight checks
[preflight] Reading configuration from the cluster...
[preflight] FYI: You can look at this config file with 'kubectl -n kube-system get cm kubeadm-config -o yaml'
[kubelet-start] Writing kubelet configuration to file "/var/lib/kubelet/config.yaml"
[kubelet-start] Writing kubelet environment file with flags to file "/var/lib/kubelet/kubeadm-flags.env"
[kubelet-start] Starting the kubelet
[kubelet-start] Waiting for the kubelet to perform the TLS Bootstrap...
This node has joined the cluster:
* Certificate signing request was sent to apiserver and a response was received.
* The Kubelet was informed of the new secure connection details.
Run 'kubectl get nodes' on the control-plane to see this node join the cluster.
masterノードで認識しているかを確認します。
数分待つとReadyステートになるかと思います。
root@k8s-master:~# kubectl get node
NAME           STATUS   ROLES           AGE   VERSION
k8s-master     Ready    control-plane   25h   v1.27.2
k8s-worker01   Ready    <none>          25h   v1.27.2
k8s-worker02   Ready    <none>          60s   v1.27.2
その他
kubeadm環境を作るとき、コマンドが多くて面倒な場合以下を流し込んでください。
コピーしてteratermなどにベーっと張ってエンターを押せば勝手に処理をしてくれます。
ところどころenterを押下しないといけない場面があるかもしれませんがだいぶ楽だと思います。
swapoff -a
sed -i '/ swap / s/^\(.*\)$/#\1/g' /etc/fstab
tee /etc/modules-load.d/containerd.conf <<EOF
overlay
br_netfilter
EOF
modprobe overlay
modprobe br_netfilter
tee /etc/sysctl.d/kubernetes.conf <<EOF
net.bridge.bridge-nf-call-ip6tables = 1
net.bridge.bridge-nf-call-iptables = 1
net.ipv4.ip_forward = 1
EOF
sysctl --system
apt install -y curl gnupg2 software-properties-common apt-transport-https ca-certificates
curl -fsSL https://download.docker.com/linux/ubuntu/gpg | sudo gpg --dearmour -o /etc/apt/trusted.gpg.d/docker.gpg
add-apt-repository "deb [arch=amd64] https://download.docker.com/linux/ubuntu $(lsb_release -cs) stable"
apt update
apt install -y containerd.io
containerd config default | sudo tee /etc/containerd/config.toml >/dev/null 2>&1
sed -i 's/SystemdCgroup \= false/SystemdCgroup \= true/g' /etc/containerd/config.toml
systemctl restart containerd
systemctl enable containerd
curl -s https://packages.cloud.google.com/apt/doc/apt-key.gpg | sudo gpg --dearmour -o /etc/apt/trusted.gpg.d/kubernetes-xenial.gpg
apt-add-repository "deb http://apt.kubernetes.io/ kubernetes-xenial main"
apt update
apt install -y kubelet kubeadm kubectl
apt-mark hold kubelet kubeadm kubectl
masterノードでkubeadm initした後に実行するコマンドも用意してあります。
mkdir -p $HOME/.kube
cp -i /etc/kubernetes/admin.conf $HOME/.kube/config
chown $(id -u):$(id -g) $HOME/.kube/config
kubectl cluster-info
また、環境構築で何度もエラーをするときにsnapshotを使ってrollbackをすることがあるかと思いますが、あまりにも何度もやっていると、サーバの時間がくるってインストール時にエラーを吐くようなことがあります。
その時は以下のコマンドを実行して時間を修正してもう一度インストールをやり直してみてください。
systemctl restart systemd-timesyncd