Git Flow のブランチモデルは図で描かれることが多いです。Excel や Illustrator で描くと綺麗ですが修正や管理が大変です。
PlantUML はテキストで書けて修正や管理が簡単です。そして図の表示もできる PlantUML で Git Flow を書きました。
- 前半は git-flow のブランチモデルを PlantUML で作成する手順を 5 Step で紹介します。
- 後半は GitHub Flow や GitLab Flow そして git-flow を改善した Git Epic Flow を紹介します。
用語説明
- Git は分散型バージョン管理システムです。
- Git Flow は Git の機能のブランチの作成や更新をするルールのモデルです。
- PlantUML はテキストで UML を記述できる DSL(ドメイン特化言語) です。
UML
UML のシーケンス図は、オブジェクト間のやり取りするメッセージと順序を表現します。
オブジェクトをブランチ、メッセージをコミット、順序を時間軸に置き換えてブランチモデルを表現します。

PlantUML to Git Flow
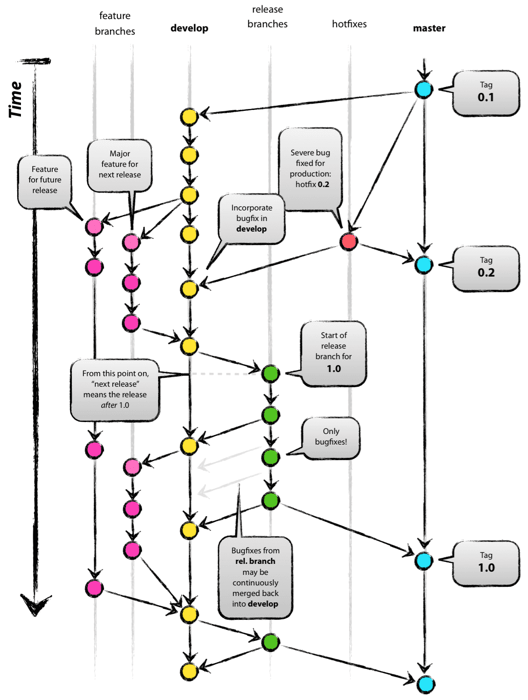
git-flow は A successful Git branching model で紹介されたブランチモデルです。
このブランチモデルと同じ図になるように PlantUML で書く手順を説明します。
Step 1 (Branch Order)
PlantUML の Sequence の記述を利用します。
-
entityでブランチの並びの位置を調整します。 -
?->o(Short incoming)でフロー以前のコミットを表示します。 -
->oとo<-でブランチのコミットを表示します。
view source
entity "feature/#2" as feature_2
entity "feature/#1" as feature_1
entity develop
entity release
entity hotfixes
entity master

?->o master
note right : Tag 0.1
develop o<- master
develop ->o develop
feature_1 o<- develop
note left : next release
feature_2 o<- develop
note left : future release
feature_1 ->o feature_1
feature_2 ->o feature_2
hotfixes o<- master
note left : hotfix 0.2
hotfixes ->o master
note right : Tag 0.2
develop o<- hotfixes
note left : bugfix in develop
feature_1 ->o develop
develop ->o release
note right : start of release for 1.0
release ->o release
note right : only bugfixes!
release ->o master
note right : Tag 1.0
develop o<- release
note left : merged back into develop
feature_2->o develop
develop ->o release
release ->o master
develop o<- release

Step 2 (Style Change)
PlantUML は skinparam でスタイルを変更することができます。
-
shadowing falseで影を非表示にします。 -
hide footboxでフッターを非表示にします。
view source
skinparam shadowing false
hide footbox

entity "feature/#2" as feature_2
entity "feature/#1" as feature_1
entity develop
entity release
entity hotfixes
entity master

?->o master
note right : Tag 0.1
develop o<- master
develop ->o develop
feature_1 o<- develop
note left : next release
feature_2 o<- develop
note left : future release
feature_1 ->o feature_1
feature_2 ->o feature_2
hotfixes o<- master
note left : hotfix 0.2
hotfixes ->o master
note right : Tag 0.2
develop o<- hotfixes
note left : bugfix in develop
feature_1 ->o develop
develop ->o release
note right : start of release for 1.0
release ->o release
note right : only bugfixes!
release ->o master
note right : Tag 1.0
develop o<- release
note left : merged back into develop
feature_2->o develop
develop ->o release
release ->o master
develop o<- release

Step 3 (Color Change)
色は skinparam の Color で変更します。色の指定は RGB Color Code です。
-
ArrowColorで矢印の色を変更します。 -
EntityBorderColorでブランチの枠の色を変更します。 -
SequenceLifeLineBorderColorでブランチの縦線の色を変更します。 -
NoteBorderColorでノートの枠の色を変更します。 -
NoteBackgroundColorでノートの背景の色を変更します。
view source
skinparam shadowing false
skinparam ArrowColor #dimgray
skinparam EntityBorderColor #gray
skinparam SequenceLifeLineBorderColor #gray
skinparam NoteBorderColor #grey
skinparam NoteBackgroundColor #gainsboro
hide footbox

entity "feature/#2" as feature_2
entity "feature/#1" as feature_1
entity develop
entity release
entity hotfixes
entity master

?->o master
note right : Tag 0.1
develop o<- master
develop ->o develop
feature_1 o<- develop
note left : next release
feature_2 o<- develop
note left : future release
feature_1 ->o feature_1
feature_2 ->o feature_2
hotfixes o<- master
note left : hotfix 0.2
hotfixes ->o master
note right : Tag 0.2
develop o<- hotfixes
note left : bugfix in develop
feature_1 ->o develop
develop ->o release
note right : start of release for 1.0
release ->o release
note right : only bugfixes!
release ->o master
note right : Tag 1.0
develop o<- release
note left : merged back into develop
feature_2->o develop
develop ->o release
release ->o master
develop o<- release

Step 4 (Color Change of branches)
個別の色は entity の RGB Color Code で変更します。
-
entityでブランチの背景の色を変更します。 -
roundcornerで角を丸くします。
view source
skinparam shadowing false
skinparam ArrowColor #dimgray
skinparam EntityBorderColor #gray
skinparam SequenceLifeLineBorderColor #gray
skinparam NoteBorderColor #grey
skinparam NoteBackgroundColor #gainsboro
skinparam roundcorner 15
hide footbox

entity "feature/#2" as feature_2 #hotpink
entity "feature/#1" as feature_1 #hotpink
entity develop  #gold
entity release #limegreen
entity hotfixes  #orangered
entity master  #lightskyblue

?->o master
note right : Tag 0.1
develop o<- master
develop ->o develop
feature_1 o<- develop
note left : next release
feature_2 o<- develop
note left : future release
feature_1 ->o feature_1
feature_2 ->o feature_2
hotfixes o<- master
note left : hotfix 0.2
hotfixes ->o master
note right : Tag 0.2
develop o<- hotfixes
note left : bugfix in develop
feature_1 ->o develop
develop ->o release
note right : start of release for 1.0
release ->o release
note right : only bugfixes!
release ->o master
note right : Tag 1.0
develop o<- release
note left : merged back into develop
feature_2->o develop
develop ->o release
release ->o master
develop o<- release

Step 5 (Sequence divider)
Step 4 で同じ図になっていますが PlantUML の機能で図を改善します。
境界線で作業を区切るとフローが理解しやすくなります。
ノートをメッセージに移動すると矢印が読みやすくなります。
-
==で境界線を表示します。 -
->oやo<-の:にnoteを移動します。
view source
skinparam shadowing false
skinparam ArrowColor #dimgray
skinparam EntityBorderColor #gray
skinparam SequenceLifeLineBorderColor #gray
skinparam NoteBorderColor #grey
skinparam NoteBackgroundColor #gainsboro
skinparam SequenceDividerBorderColor #gray
skinparam SequenceDividerFontStyle normal
skinparam roundcorner 15
skinparam maxmessagesize 60
hide footbox

entity "feature/#2" as feature_2 #hotpink
entity "feature/#1" as feature_1 #hotpink
entity develop  #gold
entity release #limegreen
entity hotfixes  #orangered
entity master  #lightskyblue

== Development ==

?->o master
note right : Tag 0.1
develop o<- master
develop ->o develop
feature_1 o<- develop : next release
feature_2 o<- develop : future release
feature_1 ->o feature_1
feature_2 ->o feature_2

== Production Bugfix ==

hotfixes o<- master : hotfix 0.2
hotfixes ->o master
note right : Tag 0.2
develop o<- hotfixes : bugfix in develop

== Production Release ==

feature_1 ->o develop
develop ->o release : start of release for 1.0
release ->o release : only bugfixes!
release ->o master
note right : Tag 1.0
develop o<- release : merged back into develop

== Development continues ==

feature_2->o develop
develop ->o release
release ->o master
develop o<- release

Git Flow Example
Step 5 を参考に PlantUML で描いたブランチモデルを紹介します。
GitHub flow
- GitHub flow は開発作業と運用作業を一体として管理する用途で利用されます。
- ブランチは
mainとfeatureの 2 つのみで管理します。 - ブランチの作成やマージは GitHub などで実施します。
- マージの前には Pull Request でコードレビューを実施します。
ブランチ役割
- main
- デプロイができる状態を維持します。
- マージされると自動でデプロイされます。(オプション)
- feature branches
- 機能の追加や変更のコードのコミットを実施します。
-
mainブランチからfeatureブランチを作成します。 -
mainブランチに Pull Request を登録します。
ブランチモデル
view source
skinparam shadowing false
skinparam ArrowColor #dimgray
skinparam EntityBorderColor #gray
skinparam SequenceLifeLineBorderColor #gray
skinparam NoteBorderColor #grey
skinparam NoteBackgroundColor #gainsboro
skinparam SequenceDividerBorderColor #gray
skinparam SequenceDividerFontStyle normal
skinparam roundcorner 15
skinparam maxmessagesize 60
hide footbox

entity "feature/#2" as feature_2 #hotpink
entity "feature/#1" as feature_1 #hotpink
entity main #lightskyblue

== Development ==

?->o main
feature_1 <- main : create branch
note right : next release
feature_2 <- main : create branch
note right : future release
feature_1 ->o feature_1: commit
feature_2 ->o feature_2: commit

== Production Release ==

feature_1 ->o main : pull request

== Development continues ==

feature_2->o main : pull request

GitLab Flow
- GitLab flow は開発作業と運用作業を分離して管理する用途で利用されます。
- ブランチは
mainやfeatureとpre productionやproductionの環境ブランチで管理します。- 緊急作業は
hotfixのブランチで対応します。
- 緊急作業は
- ブランチの作成やマージは GitLab などで実施します。
- マージの前には Merge Request でコードレビューを実施します。
ブランチ役割
- main
- デプロイができる状態を維持します。
-
pre productionブランチに Merge Request を登録します。
- feature branches
- 機能の追加や変更のコードのコミットを実施します。
-
mainブランチからfeatureブランチを作成します。 -
mainブランチに Merge Request を登録します。
- pre production
- 準本番環境にデプロイができる状態を維持します。
- マージされると自動でデプロイされます。(オプション)
-
productionブランチに Merge Request を登録します。
- production
- 本番環境にデプロイができる状態を維持します。
- マージされると自動でデプロイされます。(オプション)
- hotfix branches
- 本番環境の緊急対応のコードのコミットを実施します。
-
productionブランチからhotfixブランチを作成します。 -
production,pre production,mainブランチに Merge Request を登録します。
ブランチモデル
view source
skinparam shadowing false
skinparam ArrowColor #dimgray
skinparam EntityBorderColor #gray
skinparam SequenceLifeLineBorderColor #gray
skinparam NoteBorderColor #grey
skinparam NoteBackgroundColor #gainsboro
skinparam SequenceDividerBorderColor #gray
skinparam SequenceDividerFontStyle normal
skinparam roundcorner 15
skinparam maxmessagesize 60
hide footbox

entity "feature/#2" as feature_2 #hotpink
entity "feature/#1" as feature_1 #hotpink
entity main #lightskyblue
entity "hotfix/#3" as hotfix_3 #orangered
entity "pre production" as pre_production #deepskyblue
entity production #skyblue

== Development ==

?->o main
feature_1 <- main : create branch
note right : next release
feature_2 <- main : create branch
note right : future release
feature_1 ->o feature_1: commit
feature_2 ->o feature_2: commit

== Production Release ==

feature_1 ->o main : merge request
main ->o pre_production : merge request
pre_production ->o production : merge request

== Production Bugfix ==

hotfix_3 <- production : create branch
hotfix_3 ->o hotfix_3: commit
hotfix_3 ->o pre_production : merge request
hotfix_3 ->o production : merge request
hotfix_3 ->o main : merge request

== Development continues ==

feature_2->o main : merge request
main ->o pre_production : merge request

Git Epic Flow
- Git Epic Flow は複数の開発作業と運用作業を分離して管理する用途で利用されます。
- git-flow と GitLab Flow を融合して、一部を拡張しました。
- Epic は git-flow の
developブランチと同じような役割ですが、目的またはマイルストーンで複数作成します。
- ブランチは
mainやepic・featureとpre productionやproductionの環境ブランチで管理します。- 緊急作業は
hotfixのブランチで対応します。
- 緊急作業は
- ブランチの作成やマージは GitHub などで実施します。
- マージの前には Pull Request でコードレビューを実施します。
ブランチ役割
- main
- デプロイができる状態を維持します。
-
pre productionブランチに Pull Request を登録します。
- epic branches
-
featureブランチをデプロイする機能で集約します。 -
mainブランチからepicブランチを作成します。 -
mainブランチに Pull Request を登録します。
-
- feature branches
- 機能の追加や変更のコードのコミットを実施します。
-
epicブランチからfeatureブランチを作成します。 -
epicブランチに Pull Request を登録します。
- integration
- 統合環境にデプロイができる状態を維持します。
- マージされると自動でデプロイされます。
-
mainブランチに Pull Request を登録します。
- pre production
- 準本番環境にデプロイができる状態を維持します。
- マージされると自動でデプロイされます。
-
productionブランチに Pull Request を登録します。
- production
- 本番環境にデプロイができる状態を維持します。
- マージされると自動でデプロイされます。
- hotfix branches
- 本番環境の緊急対応のコードのコミットを実施します。
-
productionブランチからhotfixブランチを作成します。 -
production,pre production,mainブランチに Pull Request を登録します。
ブランチモデル
view source
skinparam shadowing false
skinparam ArrowColor #dimgray
skinparam EntityBorderColor #gray
skinparam SequenceLifeLineBorderColor #gray
skinparam NoteBorderColor #grey
skinparam NoteBackgroundColor #gainsboro
skinparam SequenceDividerBorderColor #gray
skinparam SequenceDividerFontStyle normal
skinparam roundcorner 15
skinparam maxmessagesize 60

entity "feature/#5" as feature_5 #hotpink
entity "epic/#2" as epic_2 #gold
entity "feature/#4" as feature_4 #hotpink
entity "feature/#3" as feature_3 #hotpink
entity "epic/#1" as epic_1 #gold
entity integration #limegreen
entity main #lightskyblue
entity "hotfix/#6" as hotfix_6 #orangered
entity "pre production" as pre_production #deepskyblue
entity production #skyblue

== Development ==

?->o main
epic_1 <- main : create branch
note right : next release
epic_2 <- main : create branch
note right : future release
feature_3 <- epic_1 : create branch
feature_4 <- epic_1 : create branch
feature_3 ->o feature_3: commit
feature_3 ->o epic_1 : pull request
feature_4 ->o feature_4: commit
feature_4 ->o epic_1 : pull request
feature_5 <- epic_2 : create branch
feature_5 ->o feature_5: commit
feature_5 ->o epic_2 : pull request

== Production Release ==

epic_1 <-o main : rebase
epic_1 ->o integration : pull request
integration ->o main : pull request
main ->o pre_production : pull request
pre_production ->o production : pull request

== Production Bugfix ==

hotfix_6 <- production : create branch
hotfix_6 ->o hotfix_6: commit
hotfix_6 ->o pre_production : pull request
hotfix_6 ->o production : pull request
hotfix_6 ->o main : pull request

== Development continues ==

epic_2 <-o main : rebase
epic_2 ->o integration : pull request
integration ->o main : pull request

ブランチ比較
| Git Epic Flow | git-flow | GitHub Flow | GitLab Flow |
|---|---|---|---|
| main | master | main(master) | main(master) |
| epic branches | develop | - | - |
| feature branches | feature branches | feature branches | feature branches |
| hotfix branches | hotfix branches | - | hotfix branches |
| integration | release branches | - | - |
| pre-production | - | - | pre-production |
| production | - | - | production |
Git Flow のブランチモデルは開発の内容や規模、また開発人数やリリースの状態、頻度など用途に応じてリポジトリ(プロジェクト)ごとに多々あると思います。
新しいブランチモデルをチームに導入するときに、仮説検証するためにも軽量なツールを利用する方がよさそうです。
Git Flow がテキストで書けるので Git Flow で Git Flow が管理できるようになりました。
追記
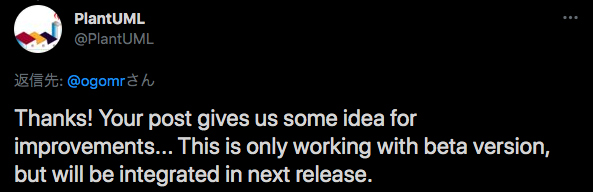
Twitter で @PlantUML さんから コメントを頂きました。改善のアイデアを提供できてよかったです。
ER 図 のように Git Flow の図も PlantUML の標準になるのかなと思いましたが、シーケンス図の縦線に個別の色が指定できるようになりそうです。