Git を練習したりコミュニティで使うことができる最低限のGitサーバーの構築しました。
最低限なので GitLab のWebサイトはSSL(暗号化通信)で保護はしますが GitLab からのメール送信は構築しません。
3Step は 3分 と書きたかったけどスペックより構築に 9分 ほどかかります。

![]()

Operating Systems
- Ubuntu 16.04
- さくらのクラウドで動作を確認済み
Installation
- Let’s Encrypt は Certbot で取得します。
- GitLab は Omnibus package で構築します。
Step 1
-
apt-getコマンドでパッケージをインストールします。 - ドメインの gitlab.example.com は任意に変更してください。
$ sudo apt-get install -y software-properties-common
$ sudo add-apt-repository -y ppa:certbot/certbot
$ sudo apt-get update
$ sudo apt-get install -y curl openssh-server ca-certificates certbot
$ curl https://packages.gitlab.com/install/repositories/gitlab/gitlab-ce/script.deb.sh | sudo bash
$ sudo EXTERNAL_URL="http://gitlab.example.com" apt-get install -y gitlab-ce
Step 2
- GitLab のコンフィグを編集します。
$ sudo vi /etc/gitlab/gitlab.rb
/etc/gitlab/gitlab.rb
nginx['custom_gitlab_server_config'] = "location ^~ /.well-known { root /var/www/letsencrypt; }"
-
gitlab-ctlコマンドで GitLab を再起動します。 -
certbotコマンドで Let’s Encrypt の証明書が取得できます。
$ sudo mkdir -p /var/www/letsencrypt
$ sudo gitlab-ctl reconfigure
$ sudo certbot certonly --webroot --webroot-path=/var/www/letsencrypt -d gitlab.example.com
- 証明書が取得されると
/etc/letsencrypt/live/にファイルが保存されます。
IMPORTANT NOTES:
 - Congratulations! Your certificate and chain have been saved at:
   /etc/letsencrypt/live/gitlab.example.com/fullchain.pem
   Your key file has been saved at:
   /etc/letsencrypt/live/gitlab.example.com/privkey.pem
Step 3
- GitLab のコンフィグを再び編集します。
$ sudo vi /etc/gitlab/gitlab.rb
/etc/gitlab/gitlab.rb
external_url 'https://gitlab.example.com'
nginx['redirect_http_to_https'] = true
nginx['ssl_certificate'] = "/etc/letsencrypt/live/gitlab.example.com/fullchain.pem"
nginx['ssl_certificate_key'] = "/etc/letsencrypt/live/gitlab.example.com/privkey.pem"
-
gitlab-ctlコマンドで GitLab を再び再起動します。
$ sudo gitlab-ctl reconfigure
-
https://gitlab.example.comにアクセスしてrootユーザーのパスワードの入力します。
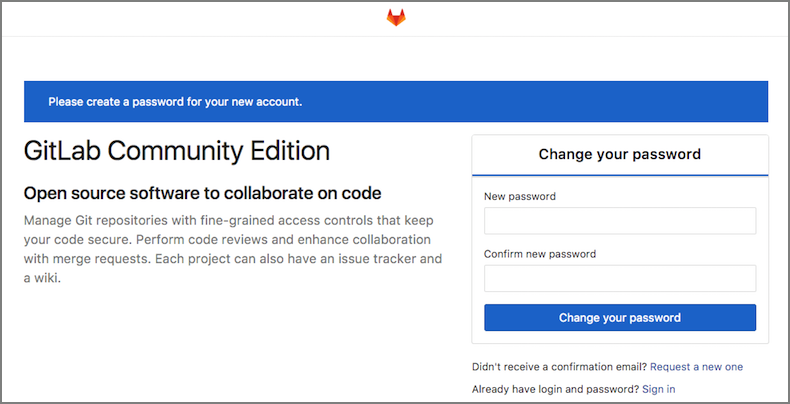
これで GitLab のサーバー管理者になりました。Admin Area > Settings で Sign-up enabled のチェックを外すと Register が表示されなくなりユーザーの登録を抑制できます。など管理者の力を使いましょう!
Let’s Administer life
Tips
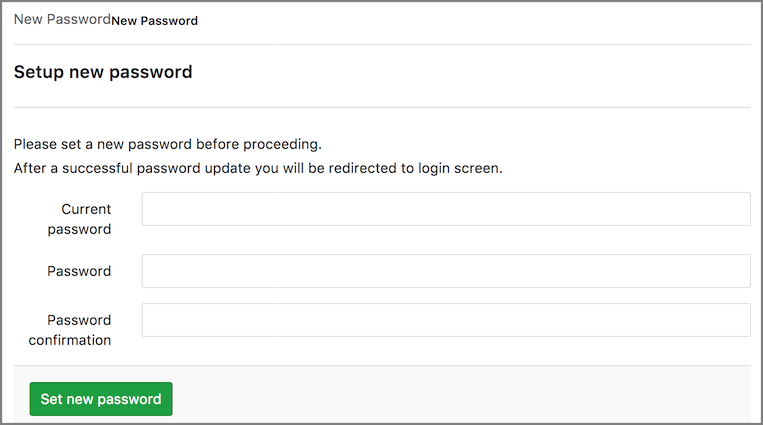
メール送信を構築していないのでパスワードをリセットしたい場合は rails console コマンドで編集します。(Ruby や Rails の知識があるといろいろできて便利かも)
$ sudo gitlab-rails console -e production
Loading production environment (Rails 4.2.8)
irb(main):001:0> User.find_by(username: :root).update!(password: :pass1234, password_confirmation: :pass1234, password_expires_at: Time.now)
password_expires_at に日付を設定すると仮パスワードの扱いになり サインイン をすると Setup new password で再設定ができます。
![]() 2018年3月10日のOSS Gate大阪ワークショップではGitLabのイベントを開催します。OSS開発に参加してコントリビュートしましょう!
2018年3月10日のOSS Gate大阪ワークショップではGitLabのイベントを開催します。OSS開発に参加してコントリビュートしましょう!