はじめに
Google HomeでYoutube連携機能がありますが、これは動画をchromecast上にcastするのみで音声のみをGoogle Home上で再生することはできません。1
Youtube上の音楽をGoogle Home上で再生できたらリビングで気軽に音楽聞けて便利では!と思ったのが今回の試みになります。
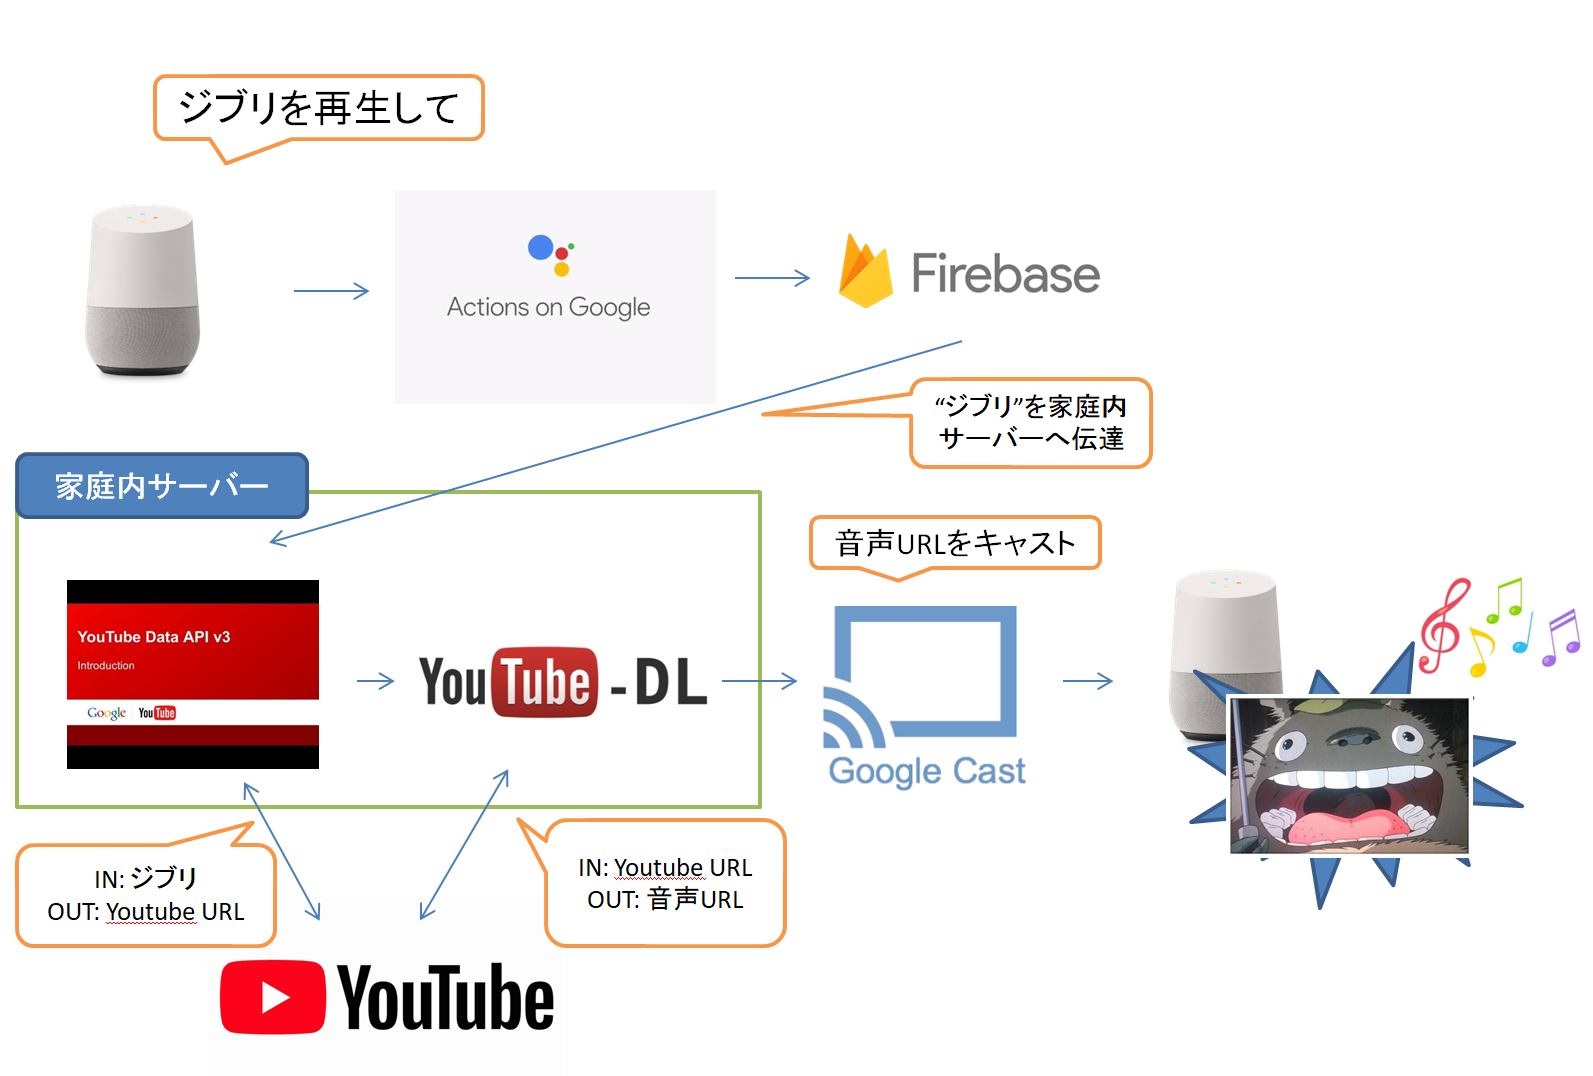
処理の流れ

Actions On Googleで任意のキーワードを取得 → Firebase DB経由で自宅内サーバーへ(ラズパイなど) → 自宅内サーバー上にてYoutube Data APIで動画ID取得 → youtube-dlで音声URL取得 → google home notifierで音声再生
(Actions On Googleの箇所はIFTTTでも代用可能ですが、こちらのほうが反応速度が早いです)
実際の例
Google Homeでyoutubeの音楽流すやつ改善できた。大分使いやすくなってキラーコンテンツ感が。
— ode (@odetarou) 2017年11月12日
- 曲名で検索可能(sys.anyキーワード使えた)
- 高速化(youtube-dl実行はラズパイやめて外部apiで)
- アプリ名をyoutube音楽にしてコマンドを短くした pic.twitter.com/Ek84XOAEha
実行時の喋り方
パターン1:
自分: ねぇグーグル Youtube音楽につないで
Google: わかりました。テストバージョンのYoutube音楽です。はい。
自分: xxx(曲名を言う)
Google: 再生します。
パターン2:
自分: ねぇグーグル Youtube音楽にXXXを再生してと言う
Google: わかりました。テストバージョンのYoutube音楽です。再生します。
Google on Actionのトリガーフレーズの規約は下記参照
https://developers.google.com/actions/localization/languages-locales#japanese
"$nameにつないで"
"$nameと話す"
"$nameにつなぐ"
"$nameと会話"
"$nameに ... 頼む"
"$nameに ... 言う"
パターン2の場合の最後の"言う"がつらいので、無くしてほしいところ。
「ねぇグーグル Youtube音楽でXXXを再生して」が理想なんですがGoogle Musicが起動しちゃいます。。あとアプリ名とテストバージョンと返事されるのもやめてほしい。
(テストバージョンと言われるのはGoogle on Actionがリリースにあたり承認手続き必要なものなので、今回の機能は開発テストバージョンでしか作れないためになります。個人用に気軽に使えるように改善してほしいところです。実はIFTTTのほうが楽かも、、IFTTTが早くなるといいんですが、、)
FirebaseのRealtime Database
FirebaseのRealtime Databaseの更新イベントをフックして家庭内サーバーヘイベントを通知します。
下記記事を参考に
[新着メールを知らせてくれるGoogle Home] (https://qiita.com/tetotetote/items/4d6ac866b716695fa4c9#firebase%E3%81%AE%E8%A8%AD%E5%AE%9A)
予め下記のようなデータを用意してください。
プロジェクト名-xxxxx
 └ googlehome
   └ word: ""
Actions On Google with Dialogflow
使い方を知っている前提になります。下記記事が参考になります。
[Dialogflow と Firebase Cloud Functions で Actions On Google 作り] (https://qiita.com/doki_k/items/11f8a23d71dce59409da)
今回用に設定する箇所は下記になります。
呼び出し時のアプリ名は「Youtube音楽」にしましたが、ここは呼びやすいもので構いません。
Intent
下記画像のように設定してください。
User saysでkeyword部分を選択して@sys.anyを設定するのが肝になります。
@sys.anyは任意の文字列を取得するEntitiesです。
Systemで用意されているEntitiesは@sys.music-artistなどのアーティスト名に特化したものなど他にもいろいろありますが、曲名で検索したいので今回はanyを使います。
System Entities

私の環境ですとsys.anyを利用した場合にエラーが起きる場合がありました。設定画面のML SettingタブにてMATCH MODEをML onlyに設定したら直りました。(その後Hybridにしても問題ないため謎ですが。。)

Entities
特に設定不要です。
Fulfillment
Inline EditorをEnableにして、下記の2ファイルに行を追記してください。
聞き取った曲名などのkeywordをdatabaseに保存するのみです。
  "dependencies": {
    "actions-on-google": "^1.5.x",
    "firebase-admin": "^4.2.1",
    "firebase-functions": "^0.5.7",
    "firebase": "*", // ←追加
    "apiai": "^4.0.3"
  }
Dialogflow v2の場合(最近はこちらになります。2018年4月中旬以降あたりより)
//先頭のほうに追加
// Initialize Firebase
var config = {
    apiKey: "xxxxx",
    authDomain: "xxxxx",
    databaseURL: "xxxxx",
    projectId: "xxxxx",
    storageBucket: "",
    messagingSenderId: "xxxxx"
};
firebase.initializeApp(config);

... 省略 ...
  // intentMap.set('your intent name here', googleAssistantHandler);
// これ以降に下記を追加
  intentMap.set(null, (agent) => { // nullを指定している箇所にintent名の文字列を渡せばintent別に処理が記述できます
    // agent.action'でaction.youtube'という文字列が取得できます。v1ではactionで処理を分けていたため必要でしたが、v2ではintent名を元に処理をするためaction名の出番は少なそうです。

    let msg = "再生します";
    console.log('keyword: '+agent.parameters.keyword);
    firebase.database().ref('googlehome/').set({word : 'youtube '+agent.parameters.keyword});

    let conv = agent.conv();
    conv.ask(msg);
    agent.add(conv);
  });
Dialogflow v1時代の場合
//先頭のほうに追加
// Initialize Firebase
var config = {
    apiKey: "xxxxx",
    authDomain: "xxxxx",
    databaseURL: "xxxxx",
    projectId: "xxxxx",
    storageBucket: "",
    messagingSenderId: "xxxxx"
};
firebase.initializeApp(config);

... 省略 ...


    // The default fallback intent has been matched, try to recover (https://dialogflow.com/docs/intents#fallback_intents)
    'input.unknown': () => {
      // Use the Actions on Google lib to respond to Google requests; for other requests use JSON
      if (requestSource === googleAssistantRequest) {
        sendGoogleResponse('I\'m having trouble, can you try that again?'); // Send simple response to user
      } else {
        sendResponse('I\'m having trouble, can you try that again?'); // Send simple response to user
      }
    },
// これ以降に下記を追加
    'action.youtube': () => {
      let msg = "再生します";
      console.log('keyword: '+parameters.keyword);
      firebase.database().ref('googlehome/').set({word : 'youtube '+parameters.keyword});

      app.tell(msg);
    },
自宅内サーバーで実行するアプリ
youtube-dlを入れます。言語はpythonです。
sudo pip3 install youtube-dl
下記nodejs用の3ファイルを利用します。
config/local.jsファイルのfirebase config, youtube api key, google-home-notifierの部分は適時書き換えてください。
// firebase configをここにペースト
const config = {
  apiKey: "xxxxx",
  authDomain: "xxxxx",
  databaseURL: "xxxxx",
  projectId: "xxxxx",
  storageBucket: "",
  messagingSenderId: "xxxxx"
};

module.exports = {
  fireBase : config,
  youtubeApiKey : 'xxx',
  googleHomeNotifier : {
    deviceName : 'xxxx', // google homeのdevice name
    ip : 'xxx.xxx.xxx.xxx',
    locale : 'ja'
  },
  youtubeDlMode : 'command', // 'command' or 'api'
  youtube_dl_api_server_host : 'http://xxxxxxxx' // api使用時のみ使用
};
'use strict';
const firebase = require("firebase");
const config = require('config');

firebase.initializeApp(config.fireBase);

const Youtube = require('youtube-node');
const youtube = new Youtube();
youtube.setKey(config.youtubeApiKey);

const notifier = require('google-home-notifier');
notifier.ip(config.googleHomeNotifier.ip);
notifier.device(config.googleHomeNotifier.deviceName, config.googleHomeNotifier.locale);
notifier.accent(config.googleHomeNotifier.locale);

const  exec = require('child_process').exec;


//database更新時
var db = firebase.database();
db.ref("/googlehome").on("value", function(changedSnapshot) {
  //値取得
  var value = changedSnapshot.child("word").val();
  if (value) {
    console.log("value:"+value);

    //コマンド生成
    getJsonData(value.split(" ")[0], {
      //電気
      "light": function() {
        let command = "";
        command += getJsonData(value.split(" ")[1], {
          "つけ": "on",         // つけて
          "オン": "on",         // オン
          "消し": "off",          // 消して
          "オフ": "off",          // オフ
          "default": value.split(" ").pop()
        });
        console.log(command);
        play_light(command);
      },
      // youtube
      "youtube": function() {
        let keyword = value.split(" ");
        keyword.shift();
        keyword = keyword.join(' ');
        console.log(keyword);
        play_youtube(keyword);
      }
    })();

    //firebase clear
    db.ref("/googlehome").set({"word": ""});

  }
});

function play_light(cmd) {
  const exec = require('child_process').exec;
  exec("python /home/ode/rm_mini3/BlackBeanControl/BlackBeanControl.py -c light_"+cmd);
}

//jsonからvalueに一致する値取得
function getJsonData(value, json) {
  for (var word in json)  if (value == word) return json[word]
  return json["default"]
}


function play_youtube(keyword) {
  // categoryIdの10はMusic https://stackoverflow.com/questions/17698040/youtube-api-v3-where-can-i-find-a-list-of-each-videocategoryid
  youtube.search(keyword, 1, {'type':'video', 'videoCategoryId':10}  , function(error, result) {
    if (error) {
      console.log(error);
      return ;
    }
    console.log(JSON.stringify(result, null, 2));
    for (const item of result.items) {
      if (item.id.videoId) {
        console.log(item.id.videoId);

        switch (config.youtubeDlMode) {
          case 'command':
            exec('youtube-dl -g -x https://www.youtube.com/watch?v='+item.id.videoId, function(error, stdout, stderr) {
              if (error !== null) {
                console.log('exec error: '+error);
              }
              const soundUrl = stdout;
              console.log(soundUrl);

              notifier.play(soundUrl, function(res) {
                console.log(res);
              });
            });
            break;
          case 'api':
            const request = require('request');
            let url = config.youtube_dl_api_server_host+'/api/info?url=https://www.youtube.com/watch?v='+item.id.videoId+'&format=bestaudio/best';
            let options = {
              url: url,
              method: 'GET',
              json: true
            };
            request(options, (error, response, body) => {
              console.log(body.info.url);
              notifier.play(body.info.url, res => {
                console.log(res);
              });
            });
            break;
          default:
            throw new Error("bad conifig. config.youtubeDlMode: "+config.youtubeDlMode);
            break;
        }
      }
    }
  });
}
{
  "name": "google_home",
  "version": "0.0.0",
  "description": "",
  "main": "index.js",
  "scripts": {
    "test": "echo \"Error: no test specified\" && exit 1"
  },
  "author": "",
  "license": "ISC",
  "dependencies": {
    "config": "^1.28.1",
    "firebase": "^4.6.0",
    "google-home-notifier": "^1.2.0",
    "request": "^2.83.0",
    "youtube-node": "^1.3.2"
  }
}
初回のみnpmでパッケージインストールを行います。
npm install
電気On,Off箇所のコードは関係ないですがいろいろコマンドを増やしていける例として一応記載してあります。
index.jsは Google Home、IFTTT、Firebase、Node.js、irMagicianを使ってシーリングライトを音声操作するを参考に改造しています。
google-home-notifier
を利用しているため、ラズパイの場合は下記インストールが必要でした。avahi-daemonデーモンを起動させてください(dbusデーモンの起動も必要でした)。
sudo apt-get install git-core libnss-mdns libavahi-compat-libdnssd-dev
Youtube検索に使用するapi keyの発行やapi自身について知りたい場合は下記が参考になります。
Node.js で youtube検索を行う
YouTube Data API の概要
API検索条件の詳細
検索絞込のcategoryIdの値 検索時にカテゴリを音楽に絞り込んでいます。
下記で起動します。
node index.js
&つけて実行するのをrc.localに雑に書くか、initdやsystemdなどで自動起動するようにしましょう。
終わりに
これでGoogle HomeでYoutubeの音楽が再生できると思います。
いつも個人では聞くことのなかった曲も聞いてしまいます。発音が悪くて画像と言った際に久石譲の曲が再生されて感動したので今のおすすめです。
久石譲 サマー
海の見える町
など
クラシック
とかも普段聞かないですが、手軽にリビングに再生できるので良いです。
全然違う曲が再生された時とかは笑いがおきますし。適当なキーワードで偶然の出会いもあるかもしれません。
では快適な音楽生活を!
ラズパイの場合はyoutube-dlの処理速度が遅くなります。
ラズパイ以外と早いと思ってたのは幻でした
— ode (@odetarou) 2017年11月10日
time youtube-dl -g (url)の速度
6秒はつらい
rp3
real 0m6.077s
user 0m5.200s
sys 0m0.110s
pcのdocker上
real 0m1.534s
user 0m0.590s
sys 0m0.080s
pythonフォルダをtmpfs化したら早くなりそうだけど、さすがにやめとこう
そのため外部apiを用意するか、youtube-dlのコンパイルを頑張るかをしたほうがよいです。
(私は諦めて、ラズパイではなくlinuxサーバー別途立てました)
下記APIサーバーを設置してAPI経由で音声urlを取得することが可能です。
https://github.com/jaimeMF/youtube-dl-api-server
doc
https://youtube-dl-api-server.readthedocs.io/en/latest/
上記をherokuなり、どこか外部サーバー(vpsなどでも)があればいれましょう。
herokuだと海外IPになるため、一部日本の動画が取得できない制限があります。
gaeからはyoutube側がip制限かけているようで無理でした。
youtube-dl-api-serverを外部サーバーにいれる場合
sudo pip3 install --pre youtube-dl-server
youtube-dl-server --host 0.0.0.0
別途自動起動設定
ラズパイでyoutube-dlが遅い件はこちらで議論されていて、コンパイルoptionでも改善するそうですが面倒そうなのと、そこまで改善されなそうなきがしたので試してはないです。
https://github.com/rg3/youtube-dl/issues/13122
https://github.com/rg3/youtube-dl/pull/8497
Youtube側の用意されているデータやyoutube-dlについて
アップロード時に下記URLに記載のフォーマットのデータを予め用意していると思われます。
[Youtubeで動画に使用されているコーデック(映像・音声それぞれ)の判別をする方法] (http://yuichiro-s.hatenablog.com/entry/2016/01/30/Youtube%E3%81%A7%E5%8B%95%E7%94%BB%E3%81%AB%E4%BD%BF%E7%94%A8%E3%81%95%E3%82%8C%E3%81%A6%E3%81%84%E3%82%8B%E3%82%B3%E3%83%BC%E3%83%87%E3%83%83%E3%82%AF%EF%BC%88%E6%98%A0%E5%83%8F%E3%83%BB%E9%9F%B3)
ビットレートやフォーマット(webm, m4a, mp4など)、音声のみのもあります。
今回は音声のみのwebm 160kbps(format id:251)のが高音質のためそれを利用しました(youtube-dlもデフォルトでこちらを返します)。
youtube-dl -g https://www.youtube.com/watch?v=-tKVN2mAKRI
を実行すると下記の結果が返ります。1行目が動画、2行目が音声データのurlになります。(ちなみにこの動画人気みたいで綺麗で、音楽もいいですが、実際の映画は地雷らしいですね。。)
https://r1---sn-nvoxu-ioq6.googlevideo.com/videoplayback?id=fad2953769802912&itag=136&source=youtube&requiressl=yes&initcwndbps=1736250&mv=m&pl=15&mn=sn-nvoxu-ioq6&mm=31&ms=au&ei=5LAPWtWQK4GjqAGcwr7oCg&ratebypass=yes&mime=video/mp4&gir=yes&clen=43312810&lmt=1507167457821063&dur=292.625&key=dg_yt0&mt=1510977662&signature=5B249F2A34523CDF8EE2D970AFDFAB00C350519F.65B4517FF33EB5C353490A31AD7EF0644AE177BA&ip=118.241.72.158&ipbits=0&expire=1510999364&sparams=ip,ipbits,expire,id,itag,source,requiressl,initcwndbps,mv,pl,mn,mm,ms,ei,ratebypass,mime,gir,clen,lmt,dur
https://r1---sn-nvoxu-ioq6.googlevideo.com/videoplayback?ipbits=0&mm=31&itag=251&key=yt6&mime=audio%2Fwebm&lmt=1505349771052557&mn=sn-nvoxu-ioq6&source=youtube&clen=4922723&mv=m&mt=1510977662&ms=au&dur=292.621&ei=5LAPWp3SB4rO4wLho7KYCA&ip=118.241.72.158&initcwndbps=1736250&sparams=clen%2Cdur%2Cei%2Cgir%2Cid%2Cinitcwndbps%2Cip%2Cipbits%2Citag%2Ckeepalive%2Clmt%2Cmime%2Cmm%2Cmn%2Cms%2Cmv%2Cpl%2Crequiressl%2Csource%2Cexpire&id=o-AAthIs6bVdRFulrlucF4GrycPEHpomA4ZnJqeaF1MmaP&expire=1510999364&gir=yes&keepalive=yes&pl=15&requiressl=yes&signature=8C56FBAC44DAA1041E88758BCBB737EC0DAD9980.2930A30E9E036059D115B338EBFFC052E0AE996E&ratebypass=yes
-gがurlのみ取得のoptionです。-xを指定すると音声のみになります。
通常利用時のブラウザからYoutubeを見る際は内部的にmp4のURLを取得し再生していると思われます。有効期限付きのURLのため後からは見ることはできません。
なおoption指定なしでURL指定だとデータファイルとしてぶっこ抜きダウンロードする本来の動作になります。
youtube-dlの引数でformatを指定することも可能です。bestaudioなどの指定が可能でformat一覧から最適なものを見つける仕組みになっているようです.
https://github.com/rg3/youtube-dl#format-selection
youtube-dl-serverに渡せるurlパラメータは下記のようです
https://github.com/jaimeMF/youtube-dl-api-server/blob/033cbf33d1174b2c8ebd5621898fb5d0a3f826df/youtube_dl_server/app.py#L113-L126
youtube-dl自体は下記のパラメータに対応しています。
https://github.com/rg3/youtube-dl/blob/3e4cedf9e8cd3157df2457df7274d0c842421945/youtube_dl/YoutubeDL.py#L137-L312
-
スマホのYoutubeアプリ上でもcast先は動画デバイスのみで、音声デバイスへはできなくなっています。恐らくYoutube Musicという有料サービスが米国で始まっているせいであえて制約しているかと推測します。 ↩