はじめに
この記事はTensorBoardのEmbedding Visualization のような、埋め込みベクトル(Embedding Vector) を可視化するデモサイトを作ることが目的です。
幾つかの方法を検討しましたが、最終的に採用されたthree.jsという3Dライブラリを使って作る方法を紹介します。
完成した物
サイト: https://vue-threejs-sandbox.netlify.com
コード: https://github.com/odanado/vue-threejs-sandbox
three.jsを採用した経緯
まず、three.jsを採用した経緯についてお話します。
今回の目的である可視化サイトを作ろうと考えた時に、次の3つの方法を検討しました。
- 既存のグラフライブラリを利用
- three.jsを使って3次元散布図を実装
- TensorBoardのEmbedding Visualizationの機能を切り出す
まず1.についてですが調べた結果、Plotly.jsやHighchartsと言ったライブラリが候補に挙がりました。しかしこれらのライブラリの3次元散布図は、各点に異なる画像を使用できず要件を満たしていませんでした。
3. については、TensorBoardのソースコードを読んだところTypeScript+WebComponentで実装されており、恐らくコンポーネントとして切り出すのは可能だと考えましたが、実装にかかる時間が見積もれないため見送りました1。
よって2.のthree.jsを使うことを決めました。
開発環境
vue-cliでwebpackのテンプレートを引っ張ってきて開発環境を構築しました。デモサイトにvue.jsを用いた理由は単に慣れているからで、コアの部分はその他フレームワークや生のJavascriptとして簡単に移植できると思います。
使用したライブラリのバージョンは次の通りです。
"stats.js": "^0.17.0",
"three": "^0.92.0",
"three-orbit-controls": "^82.1.0",
"vue": "^2.5.2",
"vue-router": "^3.0.1"
実装
Axisクラス
3次元空間上の軸を描画するクラスを用意します。
THREE.Lineクラスを継承しています。このクラスは直線を表すクラスです。これによってTHREE.Sceneクラスに直接addできるようになります。
import * as THREE from 'three';

class Axis extends THREE.Line {
  constructor(axis, length, color) {
    const material = new THREE.LineBasicMaterial({
      color,
    });

    const geometry = new THREE.Geometry();
    geometry.vertices.push(
      new THREE.Vector3(0, 0, 0),
    );
    if (axis === 'x') {
      geometry.vertices.push(
        new THREE.Vector3(length, 0, 0),
      );
    } else if (axis === 'y') {
      geometry.vertices.push(
        new THREE.Vector3(0, length, 0),
      );
    } else if (axis === 'z') {
      geometry.vertices.push(
        new THREE.Vector3(0, 0, length),
      );
    } else {
      throw new Error('axis error');
    }
    super(geometry, material);
  }
}

export default Axis;
DataPointクラス
次に散布図の各点を表すクラスを用意します。
THREE.Spriteとは3次元空間上で常に正面を向く3Dオブジェクトです。このクラスに画像をテクスチャとして設定することで、散布図の各点を画像と表示します。
class DataPoint extends THREE.Sprite {
  constructor(scale, x, y, z, image) {
    const material = new THREE.SpriteMaterial({
      map: new THREE.TextureLoader().load(image),
    });
    super(material);
    this.position.set(x, y, z);
    this.scale.set(scale, scale, scale);
  }
}
export default DataPoint;
3次元の散布図を描く
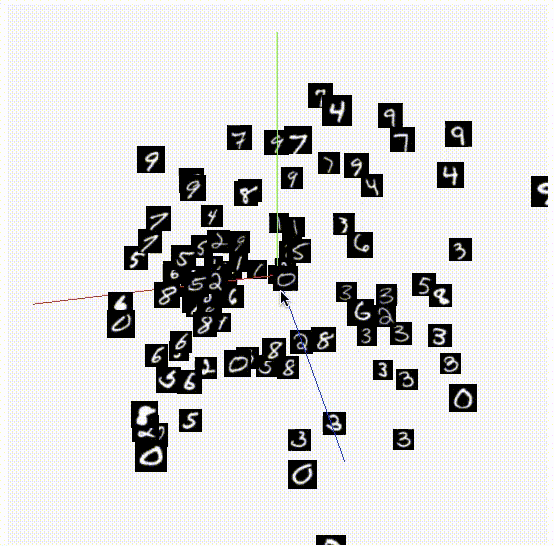
今回のデモサイトでは、MNISTと呼ばれる手書き文字分類のデータセットからランダムに1000枚のデータを取り出し、主成分分析(Principle Component Analysis; PCA)という手法で3次元に圧縮したものを可視化しています。次元圧縮したデータと画像データは、src/data/mnist_pca.jsonとstatic/mnist_sprite.bmpにあります。
3次元散布図を描画を行うコードは次のようになります。
ポイントとしては次のとおりです。
-
normalize関数で次元圧縮したデータを[-1, 1]の範囲に収まるようにしている - OrbitControlsによって、マウスでカメラ移動ができる
- 各点の画像をcanvasに一度描画した後に、
canvas.toDataURL()で3次元空間上に描画している
<template>
  <div ref="stage"></div>
</template>

<script>
import * as THREE from 'three';
import Stats from 'stats.js';

import DataPoint from '@/lib/DataPoint';
import Axis from '@/lib/Axis';

const OrbitControls = require('three-orbit-controls')(THREE);

const mnistPCA = require('@/data/mnist_pca.json');

const calcMean = xs => xs.reduce((x, y) => x + y, 0) / xs.length;
const calcStdev = (xs, mean) => xs.reduce((x, y) => x + ((y - mean) ** 2), 0) / xs.length;

const normalize = (vec) => {
  let ret = vec;

  const mean = calcMean(ret);
  const stdev = calcStdev(ret, mean);

  // データの平均と分散がそれぞれ0と1になるように標準化
  ret = ret.map(x => (x - mean) / stdev);

  const min = Math.min(...ret);
  const max = Math.max(...ret);

  // ベクトルの取る値が[0, 1]になるようにする
  ret = ret.map(v => (v - min) / (max - min));
  // ベクトルの取る値が[-1, 1]になるようにする
  ret = ret.map(x => (2 * x) - 1);

  // データの重心を計算
  const centroid = calcMean(ret);
  // データの重心を原点に移動する
  return ret.map(x => (x - centroid));
};


export default {
  data() {
    const width = 540;
    const height = 540;

    // Scene = 3次元空間
    const scene = new THREE.Scene();

    // WebGLのレンダラー
    const renderer = new THREE.WebGLRenderer();
    renderer.setSize(width, height);
    renderer.setClearColor(0xF9F9F9, 1.0);

    // カメラ = 3次元空間を切り取る2次元平面の位置
    const camera = new THREE.PerspectiveCamera(45, width / height);
    camera.position.set(80, 80, 80);

    // マウスでカメラ移動が可能になる
    const controls = new OrbitControls(camera, renderer.domElement);

    const stats = new Stats();

    return {
      scene,
      renderer,
      camera,
      controls,
      stats,
    };
  },

  mounted() {
    // 軸の設定
    const axisLength = 50;
    this.scene.add(new Axis('x', axisLength, 0x0000ff));
    this.scene.add(new Axis('y', axisLength, 0x00ff00));
    this.scene.add(new Axis('z', axisLength, 0xff0000));

    // 各点を取得
    const vectors = mnistPCA.map(x => x.vector);
    const xs = normalize(vectors.map(v => v[0]));
    const ys = normalize(vectors.map(v => v[1]));
    const zs = normalize(vectors.map(v => v[2]));

    const canvas = document.createElementNS('http://www.w3.org/1999/xhtml', 'canvas');
    // キャンバスを32x32にするのは、縦横の長さが2のべき乗にしないといけないため
    canvas.width = 32;
    canvas.height = 32;
    const context = canvas.getContext('2d');

    this.miniIcons = new Image();
    this.miniIcons.src = '/static/mnist_sprite.bmp';
    this.miniIcons.onload = () => {
      mnistPCA.forEach((x, i) => {
        // xs, ys, zsは[-1, 1]の間の座標なので拡大してやる
        const dx = xs[i] * axisLength;
        const dy = ys[i] * axisLength;
        const dz = zs[i] * axisLength;

        const left = mnistPCA[i].box[0];
        const top = mnistPCA[i].box[1];

        context.clearRect(0, 0, canvas.width, canvas.height);
        // MNISTに含まれる画像は28x28
        // いい感じに切り出して、32x32にリサイズする
        context.drawImage(this.miniIcons,
          left, top, 28, 28,
          0, 0, canvas.width, canvas.height);

        this.scene.add(new DataPoint(5, dx, dy, dz, canvas.toDataURL()));
      });
      this.$refs.stage.appendChild(this.renderer.domElement);
      // FPSを表示するため
      this.$refs.stage.appendChild(this.stats.dom);

      // アニメーションの開始
      this.animate();
    };
  },

  methods: {
    animate() {
      // 実際に描画を行っている関数
      requestAnimationFrame(this.animate);
      this.stats.begin();
      this.renderer.render(this.scene, this.camera);
      this.stats.end();
    },

  },
};
</script>
まとめ
three.jsを使って各点に画像を用いた3次元の散布図を描画することで、TensorBoardのEmbedding Visualizationのような可視化サイトを作成しました。
ただ、単に描画するだけでTensorBoardほどの機能は揃っていないため、もうちょっと真面目にやろうと思うと、TensorBoardの一部の機能を切り出す方針が良いと思います。
参考
three.jsを触る上で次のURLのサイトを一度読むのをおすすめします。とてもわかり易かったです。
https://ics.media/tutorial-three/index.html
-
そのうちやりたい... ↩