※追記で、kintoneの標準機能によるリンク作成の方法を記載しました。
JavaScriptによるボタン追加とページ遷移
行うことは、
・kintoneのカスタマイズで標準に無いボタンの設置
・ボタンの機能は、他ページへの遷移
とする
※この機能だけなら「ラベル」フィールドでリンクでええやん。アクションの設定でええやん。 と思うかもしれなが、カスタマイズの練習を兼ねている事と、もしかすると今後このボタンのワンクリックでいろいろ済むようにするかもしれない。ということで。進めて行く。
ボタンの設置について
標準機能に無い、ボタンの設置を設定していく。
以下手順
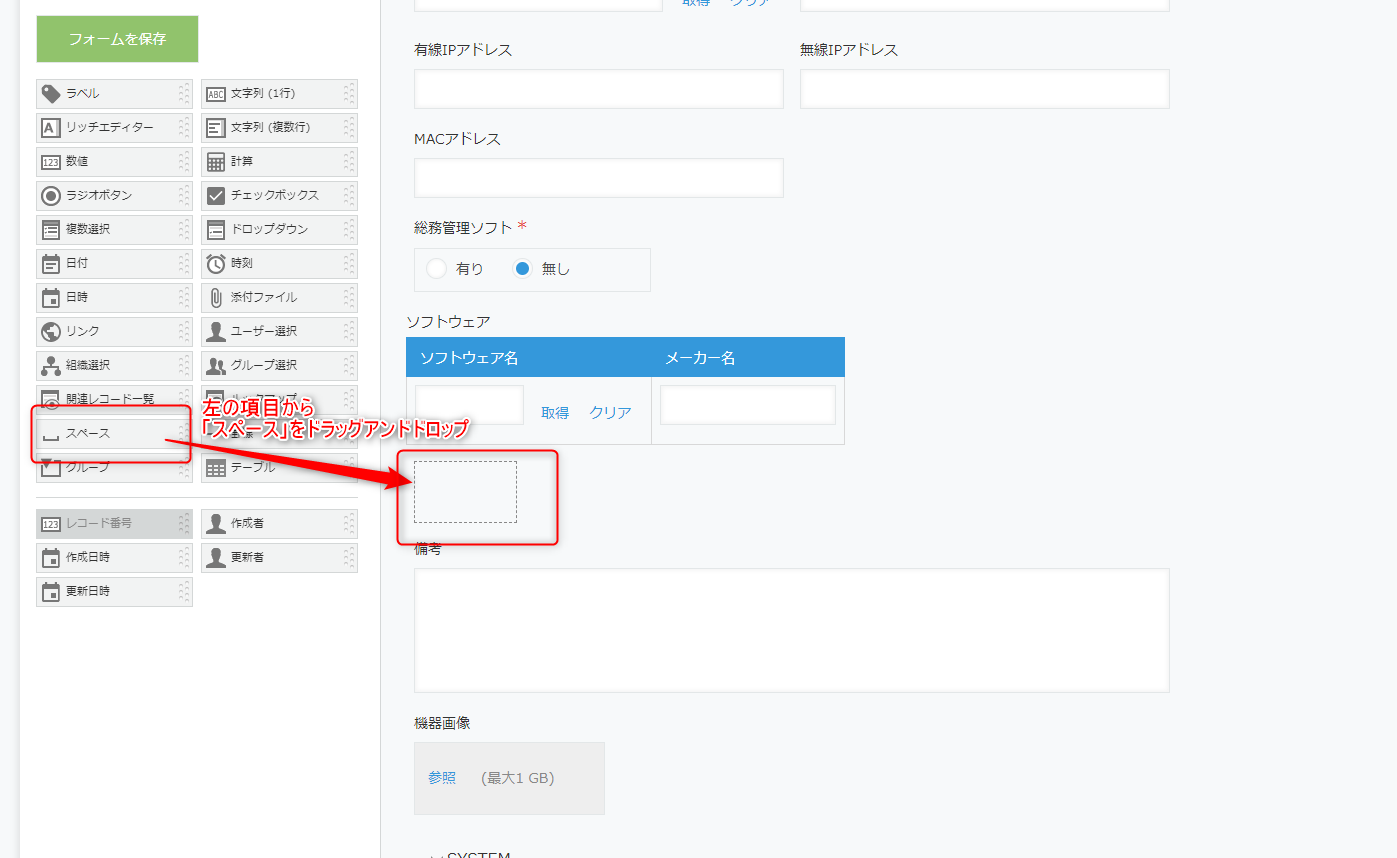
1 ボタン設置用のスペースを事前に追加しておく(kintone標準機能)
2 jsでボタン要素を生成
2-1ボタンにID属性の設定
2-2ボタンの表示テキスト(innerText)の設定
3 class属性の追加
4 onclick時の動作設定
5 事前に用意したボタン設置用スペースを取得して、新規生成した要素を設置用スペースの子要素に挿入
今回のコード
//ボタン追加用の関数
let addButton = function(event){
    let addSoftButton = document.createElement('button');
    addSoftButton.id = 'add_soft_button';
    addSoftButton.innerText = '遷移用ボタン';
    addSoftButton.classList.add('kintoneplugin-button-dialog-ok');
    addSoftButton.onclick = function(){
      window.open('https://*****.cybozu.com/','_blank');
    };
    kintone.app.record.getSpaceElement('button_ref').appendChild(addSoftButton);
};
//ボタン追加の関数を発火するイベントの設定
kintone.events.on(['app.record.detail.show'
                  ,'app.record.edit.show'
                  ,'app.record.create.show'
                  ],function(event) {
  //ボタンの追加
  addButton(event);

  return event;
});
kintoneのフィールド追加操作とコードの説明
ボタン設置用のスペースの追加
kintoneでの操作
ドラッグアンドドロップでボタン設置用にスペースフィールドを追加する

JavaScriptでボタン要素を生成
kintoneではJavaScript(以後JS)による機能のカスタマイズが可能。
JSEdit for kintoneというプラグインで書き込んでいく。
JSでボタン要素を生成
let addSoftButton = document.createElement('button');
生成したボタン要素にID,表示テキスト,classを追加
※classを追加する理由はボタンのデザインをkintoneの仕様に合わせるため
addSoftButton.id = 'add_soft_button';
addSoftButton.innerText = '遷移用ボタン';
addSoftButton.classList.add('kintoneplugin-button-dialog-ok');
onclick時の動作設定
※URLの「*****」部分はそれぞれの利用者ごとのサブドメイン
    addSoftButton.onclick = function(){
      window.open('https://*****.cybozu.com/','_blank');
    };
遷移方法
-
同タブ内でページ移動
location.href = '遷移先のURL' -
別タブで開く
window.open('遷移先のURL','新しいウィンドウの開き先')
ボタン設置用に用意したスペースフィールドにボタンを設置
kintone.app.record.getSpaceElement('button_ref').appendChild(addSoftButton);
所感
ボタンの追加は、
・開き方を別タブか同タブか
・ボタンのスタイル
を気にする程度かと思う。
動作に関しては、要望に応じてonclick内を変更していけばよい。
今回は、「ルックアップ先に必要なデータがなかったら、先にルックアップ先でデータを登録してね。」という状況の時に隣に遷移ボタンがあれば忘れにくいだろうということで、取り急ぎ追加してみた次第。
以上、標準に無いボタンの追加でした。
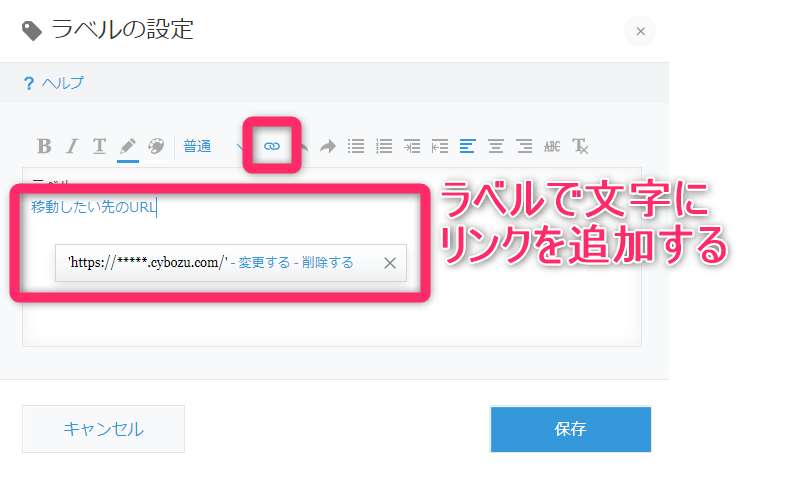
追記
ページ遷移ですが、
ラベル機能を利用する事で、ボタン作成、ページ移動と同様の動作を実現できます。
以上で文字をクリックすることで、ページ遷移ができるフィールドになります。
今回のボタン作成はJavaScriptの練習の参考にしてください。


