はじめに
Google が提供している Directions API と Google Maps SDK for iOS を使用して現在地から目的の場所までのルートを表示してみたいと思います
ドキュメントはこちら
開発環境
Xcode:11.1(11A1027)
Swift 5
iOS:13.1
実装
こちらの Google Maps SDK for iOS で現在地を表示 の続きから記載しています
モデルの作成
まず、経路検索APIのレスポンスをパースするための struct を定義します
Directions API のレスポンス形式
経路検索APIのレスポンス形式は以下のようなものになっています
{
  "status": "OK",
  "geocoded_waypoints" : [
     {
        "geocoder_status" : "OK",
        "place_id" : "ChIJ7cv00DwsDogRAMDACa2m4K8",
        "types" : [ "locality", "political" ]
     },
     {
        "geocoder_status" : "OK",
        "place_id" : "ChIJ69Pk6jdlyIcRDqM1KDY3Fpg",
        "types" : [ "locality", "political" ]
     },
     {
        "geocoder_status" : "OK",
        "place_id" : "ChIJgdL4flSKrYcRnTpP0XQSojM",
        "types" : [ "locality", "political" ]
     },
     {
        "geocoder_status" : "OK",
        "place_id" : "ChIJE9on3F3HwoAR9AhGJW_fL-I",
        "types" : [ "locality", "political" ]
     }
  ],
  "routes": [ {
    "summary": "I-40 W",
    "legs": [ {
      "steps": [ {
        "travel_mode": "DRIVING",
        "start_location": {
          "lat": 41.8507300,
          "lng": -87.6512600
        },
        "end_location": {
          "lat": 41.8525800,
          "lng": -87.6514100
        },
        "polyline": {
          "points": "a~l~Fjk~uOwHJy@P"
        },
        "duration": {
          "value": 19,
          "text": "1 min"
        },
        "html_instructions": "Head \u003cb\u003enorth\u003c/b\u003e on \u003cb\u003eS
        Morgan St\u003c/b\u003e toward \u003cb\u003eW Cermak Rd\u003c/b\u003e",
        "distance": {
          "value": 207,
          "text": "0.1 mi"
        }
      },
      ...
      ... additional steps of this leg
    ...
    ... additional legs of this route
      "duration": {
        "value": 74384,
        "text": "20 hours 40 mins"
      },
      "distance": {
        "value": 2137146,
        "text": "1,328 mi"
      },
      "start_location": {
        "lat": 35.4675602,
        "lng": -97.5164276
      },
      "end_location": {
        "lat": 34.0522342,
        "lng": -118.2436849
      },
      "start_address": "Oklahoma City, OK, USA",
      "end_address": "Los Angeles, CA, USA"
    } ],
    "copyrights": "Map data ©2010 Google, Sanborn",
    "overview_polyline": {
      "points": "a~l~Fjk~uOnzh@vlbBtc~@tsE`vnApw{A`dw@~w\\|tNtqf@l{Yd_Fblh@rxo@b}@xxSfytA
      blk@xxaBeJxlcBb~t@zbh@jc|Bx}C`rv@rw|@rlhA~dVzeo@vrSnc}Axf]fjz@xfFbw~@dz{A~d{A|zOxbrBbdUvpo@`
      cFp~xBc`Hk@nurDznmFfwMbwz@bbl@lq~@loPpxq@bw_@v|{CbtY~jGqeMb{iF|n\\~mbDzeVh_Wr|Efc\\x`Ij{kE}mAb
      ~uF{cNd}xBjp]fulBiwJpgg@|kHntyArpb@bijCk_Kv~eGyqTj_|@`uV`k|DcsNdwxAott@r}q@_gc@nu`CnvHx`k@dse
      @j|p@zpiAp|gEicy@`omFvaErfo@igQxnlApqGze~AsyRzrjAb__@ftyB}pIlo_BflmA~yQftNboWzoAlzp@mz`@|}_
      @fda@jakEitAn{fB_a]lexClshBtmqAdmY_hLxiZd~XtaBndgC"
    },
    "warnings": [ ],
    "waypoint_order": [ 0, 1 ],
    "bounds": {
      "southwest": {
        "lat": 34.0523600,
        "lng": -118.2435600
      },
      "northeast": {
        "lat": 41.8781100,
        "lng": -87.6297900
      }
    }
  } ]
}
モデルの定義
この中で経路案内に必要な情報のみをパースするようにします
struct Direction: Codable {
    let routes: [Route]
}

struct Route: Codable {
    let legs: [Leg]
}

struct Leg: Codable {
    /// 経路のスタート座標
    let startLocation: LocationPoint
    /// 経路の目的地の座標
    let endLocation: LocationPoint
    /// 経路
    let steps: [Step]

    enum CodingKeys: String, CodingKey {
        case startLocation = "start_location"
        case endLocation = "end_location"
        case steps
    }
}

struct Step: Codable {
    let startLocation: LocationPoint
    let endLocation: LocationPoint

    enum CodingKeys: String, CodingKey {
        case startLocation = "start_location"
        case endLocation = "end_location"
    }
}

struct LocationPoint: Codable {
    let lat: Double
    let lng: Double
}
Directions APIから経路を取得し、マップ上に表示
ViewController に以下のようにAPI通信部分を実装していきます
    /// 経路検索APIのエンドポイント. 経路検索APIはSDKとして提供されていないため、エンドポイントはベタ書きになります
    let baseUrl = "https://maps.googleapis.com/maps/api/directions/json"
    /// 仮の目的地の座標(適当に GINZA SIX にしてみています)
    let ginzaSixLocation = "35.669798,139.7639302"

    // ~~~~~~~ 省略 ~~~~~~~

  // 現在地から目的地までのルートを検索する
    private func getDirection(destination: String, start startLocation: String, completion: @escaping (Direction) -> Void) {

        guard var components = URLComponents(string: baseUrl) else { return }

        components.queryItems = [
            URLQueryItem(name: "key", value: GOOGLE_API_KEY),
            URLQueryItem(name: "origin", value: startLocation),
            URLQueryItem(name: "destination", value: destination)
        ]

        guard let url = components.url else { return }
        let task = URLSession.shared.dataTask(with: url) { (data, response, error) in
            if let data = data {
                let decorder = JSONDecoder()
                do {
                    let direction = try decorder.decode(Direction.self, from: data)
                    completion(direction)
                } catch {
                    print(error.localizedDescription)
                }
            } else {
                print(error ?? "Error")
            }
        }
        task.resume()
    }

    private func showRoute(_ direction: Direction) {
        guard let route = direction.routes.first, let leg = route.legs.first else { return }
        let path = GMSMutablePath()
        for step in leg.steps {
            // steps の中には曲がるところの座標が入っているので、
            // 曲がるところの座標を線で結んでいく
            path.add(CLLocationCoordinate2D(latitude: step.startLocation.lat,
                                            longitude: step.startLocation.lng))
            path.add(CLLocationCoordinate2D(latitude: step.endLocation.lat,
                                            longitude: step.endLocation.lng))
        }
        // 曲がるところを結んだ線を Map 上に表示する
        let polyline = GMSPolyline(path: path)
        polyline.strokeWidth = 4.0
        polyline.map = mapView
    }
}

extension ViewController: CLLocationManagerDelegate {

    func locationManager(_ manager: CLLocationManager, didChangeAuthorization status: CLAuthorizationStatus) {
        switch status {
        case .authorizedAlways, .authorizedWhenInUse:
            // 位置情報の取得が許可されていたら現在地を取得
            manager.requestLocation()
        case .notDetermined:
            manager.requestWhenInUseAuthorization()
        default:
            return
        }
    }

    /// 位置情報取得の認可状態が変化した際とCLLocationManagerのインスタンスが生成された際に呼び出されるメソッド
    func locationManager(_ manager: CLLocationManager, didUpdateLocations locations: [CLLocation]) {
        guard let location = locations.last else { return }
        let startLocation = "\(location.coordinate.latitude),\(location.coordinate.longitude)"
        getDirection(destination: ginzaSixLocation,
                     start: startLocation,
                     completion: { [weak self] direction in
                        DispatchQueue.main.async {
                            self?.showRoute(direction)
                        }
        })
    }

    func locationManager(_ manager: CLLocationManager, didFailWithError error: Error) {
        print(error.localizedDescription)
    }
}
この状態でビルドを行うと、以下のように表示されているかと思います
縮尺を調節
上記のスクリーンショットの状態だと、広域すぎてルートがわかりにくいです
なので、経路の全域をちょうど表示できるようなところまでマップを拡大する処理を入れていきます
    private func showRoute(_ direction: Direction) {
        guard let route = direction.routes.first, let leg = route.legs.first else { return }
        // ~~~~~~ 省略 ~~~~~~
        polyline.map = mapView

        // 以下、追記
        updateCameraZoom(startLat: leg.startLocation.lat,
                         startLng: leg.startLocation.lng,
                         endLat: leg.endLocation.lat,
                         endLng: leg.endLocation.lng)
    }

    private func updateCameraZoom(startLat: Double, startLng: Double, endLat: Double, endLng: Double) {
        let startCoordinate = CLLocationCoordinate2D(latitude: startLat, longitude: startLng)
        let endCoordinate = CLLocationCoordinate2D(latitude: endLat, longitude: endLng)
        let bounds = GMSCoordinateBounds(coordinate: startCoordinate, coordinate: endCoordinate)
        let cameraUpdate = GMSCameraUpdate.fit(bounds, withPadding: 16.0)
        mapView.moveCamera(cameraUpdate)
    }
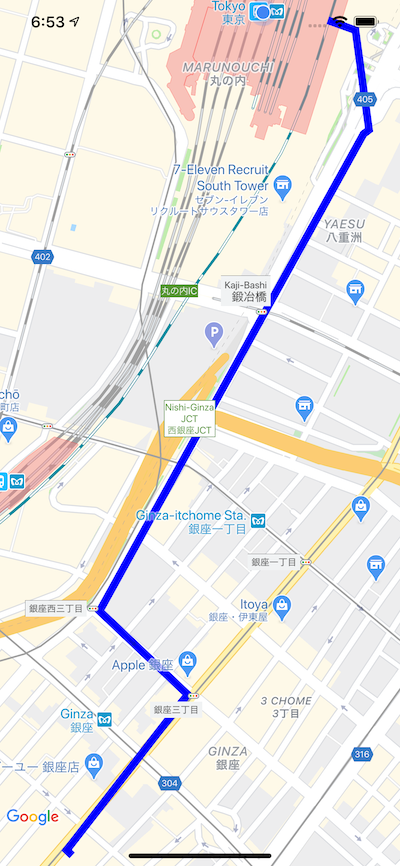
上記のように、表示領域を指定してあげると画面内に収まるように自動で縮尺を調節してくれるので、経路が見やすくなります
終わりに
今回は徒歩での経路案内を設定していますが、Directions API のパラメータに設定している "mode": "walking" を "mode": "drive" に変えてあげると車での経路検索も可能になります
コードの全容は github に載せています
https://github.com/nwatabou/TestCurrentLocation