はじめに
はじめまして、WEB フロントエンドエンジニアの nuintee です。
この度 Qiita アドベントカレンダーの記事用に用意したプロジェクトを Turborepo でモノレポ管理したので、
その過程を記事にしてみました。
Turborepo やモノレポ管理に少しでも興味のある方はぜひご覧ください。
フロントエンドの世界 2024 について
「フロントエンドの世界 2024」は普段 Next.js を書いている筆者が、同じフロントエンドライブラリである Svelte(Kit), Remix ,SolidJS, Qwik(City)の 4 つにアソート形式で触れ、理解を深めていく様子を収めたアドベントカレンダーです。
もくじ
- はじめに
- フロントエンドの世界 2024 について
- もくじ
- 前提
- モノレポとは?
- Turborepo とは?
- Turborepo の導入
- プロジェクト構成を確認
- Svelte(Kit)の導入
- Qwik(City)の導入
- SolidJS 導入
- Remix の導入
- 不要な apps と packages を削除
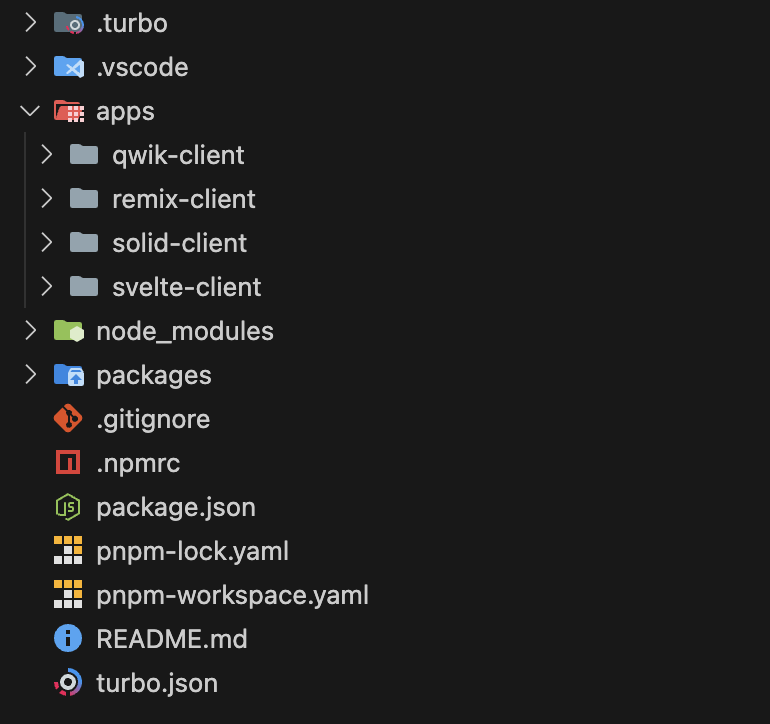
- 最終的なディレクトリ構造
- コマンド集
- おわりに
前提
- volta のインストール (参考: Getting Started | Volta)
- pnpm のインストール (参考: pnpm Support)
モノレポとは?
モノレポ(Monorepo)とは、「複数のプロジェクトを 1 つのリポジトリで管理する手法」のことです。
以下の点が特徴として挙げられます。
- コード共有の効率化: 共通の設定やライブラリを一箇所で管理できる。
- 変更の追跡が容易: 全プロジェクトで一貫した変更履歴を確認できる。
- ツールの一括管理:
LinterやFormatterなどを統一し、ツールのメンテナンスを簡素化できる。
Turborepo とは?
Turborepo は、モノレポを効率的に管理するためのツールです。
主な特徴は以下の通りです。
- キャッシュ機能: ビルドやテスト結果をローカルとリモートにキャッシュし、再実行を高速化。
- 分散タスク実行: 複数のパッケージで並列にタスクを実行可能。
- 柔軟なプロジェクト構成: 各プロジェクトを apps や packages として整理。
Turborepo の導入
create-turboコマンドで Turborepo プロジェクトを新しく作成します。
pnpm dlx create-turbo@latest
>>> TURBOREPO

>>> Welcome to Turborepo! Let's get you set up with a new codebase.

? Where would you like to create your turborepo? ./my-turborepo
? Which package manager do you want to use? pnpm

Downloading files. This might take a moment.

>>> Created a new Turborepo with the following:

apps
 - apps/docs
 - apps/web
packages
 - packages/eslint-config-custom
 - packages/tsconfig
 - packages/ui

Installing packages. This might take a couple of minutes.

>>> Success! Created a new Turborepo at "my-turborepo".
Inside that directory, you can run several commands:

  pnpm run build
     Build all apps and packages

  pnpm run dev
     Develop all apps and packages

  pnpm run lint
     Lint all apps and packages

Turborepo will cache locally by default. For an additional
speed boost, enable Remote Caching with Vercel by
entering the following command:

  pnpm dlx turbo login

We suggest that you begin by typing:

  cd my-turborepo
  pnpm dlx turbo login
今回プロジェクト名はfrontend-assort-2024にしています。
またパッケージマネージャーはpnpmを選択しました。
プロジェクト構成を確認
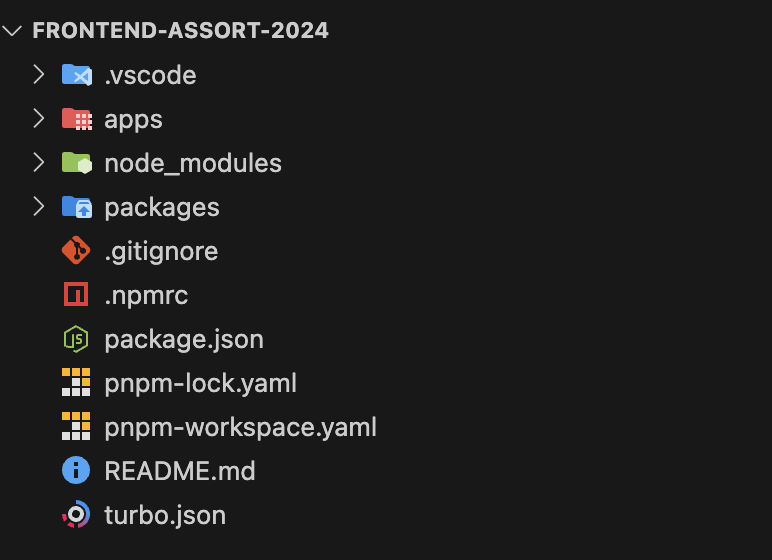
以下のファイルが生成されている事を確認します。
構成毎の役割
プロジェクトの構成は大きく3つに別れています。
| 要素 | 説明 |
|---|---|
| apps | 独立して動作するアプリケーション |
| packages | プロジェクトで共有して利用するプログラムや設定 |
| ルート | プロジェクト全体の管理に必要となる設定が配置 |
参考
node と pnpm のバージョンを固定
ルートのpackage.jsonでnodeとpnpmのバージョンを固定します。
18 系の node バージョンを固定
volta pin node@18
最新の pnpm バージョンを固定
volta pin pnpm
package.json の下部に volta の設定が含まれた事を確認します。
{
  "name": "frontend-assort-2024",
  "private": true,
  "scripts": {
    "build": "turbo build",
    "dev": "turbo dev",
    "lint": "turbo lint",
    "format": "prettier --write \"**/*.{ts,tsx,md}\""
  },
  "devDependencies": {
    "prettier": "^3.2.5",
    "turbo": "^2.3.0",
    "typescript": "5.5.4"
  },
  "packageManager": "pnpm@8.15.6",
  "engines": {
    "node": ">=18"
  },
  "volta": {
    "node": "18.20.5",
    "pnpm": "9.13.2"
  }
}
Svelte(Kit)の導入
apps配下にSvelteKitのプロジェクトを作成します。
npx sv create apps/svelte-client
┌  Welcome to the Svelte CLI! (v0.6.4)
│
◇  Which template would you like?
│  SvelteKit minimal
│
◇  Add type checking with Typescript?
│  Yes, using Typescript syntax
│
◆  Project created
│
◇  What would you like to add to your project? (use arrow keys / space bar)
│  none
│
◇  Which package manager do you want to install dependencies with?
│  pnpm
│
◆  Successfully installed dependencies
│
◇  Project next steps ─────────────────────────────────────────────────────╮
│                                                                          │
│  1: cd apps/svelte-client                                                          │
│  2: git init && git add -A && git commit -m "Initial commit" (optional)  │
│  3: pnpm dev --open                                                      │
│                                                                          │
│  To close the dev server, hit Ctrl-C                                     │
│                                                                          │
│  Stuck? Visit us at https://svelte.dev/chat                              │
│                                                                          │
├──────────────────────────────────────────────────────────────────────────╯
│
└  You're all set!
今回はapps配下にsvelte-clientという名前でプロジェクトを作成しました。
Svelte プロジェクトの立ち上げ
# ルートで実行
pnpm --filter svelte-client dev
Qwik(City)の導入
pnpm create qwik@latest empty apps/qwik-client
      ............
    .::: :--------:.
   .::::  .:-------:.
  .:::::.   .:-------.
  ::::::.     .:------.
 ::::::.        :-----:
 ::::::.       .:-----.
  :::::::.     .-----.
   ::::::::..   ---:.
    .:::::::::. :-:.
     ..::::::::::::
             ...::::


┌  Let's create a  Qwik App  ✨ (v1.10.0)
│
◇  Result ──────────────────────────────────────────────────────╮
│                                                               │
│  🦄  Success!  Project created in apps/qwik-client directory  │
│                                                               │
│  🤍 Integrations? Add Netlify, Cloudflare, Tailwind...        │
│     pnpm qwik add                                             │
│                                                               │
│  📄 Relevant docs:                                            │
│     https://qwik.dev/docs/getting-started/                    │
│                                                               │
│  💬 Questions? Start the conversation at:                     │
│     https://qwik.dev/chat                                     │
│     https://twitter.com/QwikDev                               │
│                                                               │
│  👀 Presentations, Podcasts and Videos:                       │
│     https://qwik.dev/media/                                   │
│                                                               │
│  🐰 Next steps:                                               │
│     cd apps/qwik-client                                       │
│     pnpm install                                              │
│     pnpm start                                                │
│                                                               │
│                                                               │
├───────────────────────────────────────────────────────────────╯
│
└  Happy coding! 🎉
package.json を編集
package の名前を先ほどプロジェクト作成時に入力したqwik-clientに変更します。
{
- "name": "my-qwik-empty-starter",
+ "name": "qwik-client",
  "description": "Blank project with routing included",
  "engines": {
    "node": "^18.17.0 || ^20.3.0 || >=21.0.0"
  },
  "engines-annotation": "Mostly required by sharp which needs a Node-API v9 compatible runtime",
  "private": true,
  "trustedDependencies": [
    "sharp"
  ],
  "trustedDependencies-annotation": "Needed for bun to allow running install scripts",
  "type": "module",
  "scripts": {
    "build": "qwik build",
    "build.client": "vite build",
    "build.preview": "vite build --ssr src/entry.preview.tsx",
    "build.types": "tsc --incremental --noEmit",
    "deploy": "echo 'Run \"npm run qwik add\" to install a server adapter'",
    "dev": "vite --mode ssr",
    "dev.debug": "node --inspect-brk ./node_modules/vite/bin/vite.js --mode ssr --force",
    "fmt": "prettier --write .",
    "fmt.check": "prettier --check .",
    "lint": "eslint \"src/**/*.ts*\"",
    "preview": "qwik build preview && vite preview --open",
    "start": "vite --open --mode ssr",
    "qwik": "qwik"
  },
  "devDependencies": {
    "@builder.io/qwik": "^1.10.0",
    "@builder.io/qwik-city": "^1.10.0",
    "@types/eslint": "8.56.10",
    "@types/node": "20.14.11",
    "@typescript-eslint/eslint-plugin": "7.16.1",
    "@typescript-eslint/parser": "7.16.1",
    "eslint": "8.57.0",
    "eslint-plugin-qwik": "^1.10.0",
    "prettier": "3.3.3",
    "typescript": "5.4.5",
    "undici": "*",
    "vite": "5.3.5",
    "vite-tsconfig-paths": "^4.2.1"
  }
}
pnpm の対象アーキテクチャ追加
筆者は Apple Silicon チップで以下のエラーが出たのでpackage.jsonの下部にpnpmの対象 os と cpu 設定を追加します。
...
"pnpm": {
    "supportedArchitectures": {
      "os": [
        "win32",
        "darwin",
        "current"
      ],
      "cpu": [
        "x64",
        "arm64"
      ]
    }
  }
Qwik プロジェクトの立ち上げ
# ルートで実行
pnpm --filter qwik-client dev
SolidJS 導入
pnpm dlx degit olidjs/templates/ts-tailwindcss apps/solid-client
solidjs/templates/<テンプレートの種類> でテンプレートの指定が可能です。
(参考: templates)
今回は apps 配下にsolid-clientという名前でプロジェクトを作成しました。
packages.json を編集
package 名をsolid-clientに変更します。
{
- "name": "vite-template-solid",
+ "name": "solid-client",
  "version": "0.0.0",
  "description": "",
  "scripts": {
    "start": "vite",
    "dev": "vite",
    "build": "vite build",
    "serve": "vite preview"
  },
  "license": "MIT",
  "devDependencies": {
    "solid-devtools": "^0.29.2",
    "vite": "^5.0.11",
    "vite-plugin-solid": "^2.8.2"
  },
  "dependencies": {
    "solid-js": "^1.8.11"
  }
}
SolidJS プロジェクトの立ち上げ
# ルートで実行
pnpm --filter solid-client dev
Remix の導入
pnpm dlx create-remix@latest
 remix   v2.14.0 💿 Let's build a better website...
      ◼  Directory: Using apps/remix-client as project directory

      ◼  Using basic template See https://remix.run/guides/templates for more
      ✔  Template copied

   git   Initialize a new git repository?
         No

  deps   Install dependencies with pnpm?
         Yes

      ✔  Dependencies installed

      ✔  Git initialized

  done   That's it!

         Enter your project directory using cd ./apps/remix-client
         Check out README.md for development and deploy instructions.

         Join the community at https://rmx.as/discord
今回は apps 配下にremix-clientという名前でプロジェクトを作成しました。
package.json の編集
package の名前を先ほどプロジェクト作成時に入力したremix-clientに変更します。
{
- "name": "apps-remix-client",
+ "name": "remix-client",
  "private": true,
  "sideEffects": false,
  "type": "module",
  "scripts": {
    "build": "remix vite:build",
    "dev": "remix vite:dev",
    "lint": "eslint --ignore-path .gitignore --cache --cache-location ./node_modules/.cache/eslint .",
    "start": "remix-serve ./build/server/index.js",
    "typecheck": "tsc"
  },
  "dependencies": {
    "@remix-run/node": "^2.14.0",
    "@remix-run/react": "^2.14.0",
    "@remix-run/serve": "^2.14.0",
    "isbot": "^4.1.0",
    "react": "^18.2.0",
    "react-dom": "^18.2.0"
  },
  "devDependencies": {
    "@remix-run/dev": "^2.14.0",
    "@types/react": "^18.2.20",
    "@types/react-dom": "^18.2.7",
    "@typescript-eslint/eslint-plugin": "^6.7.4",
    "@typescript-eslint/parser": "^6.7.4",
    "autoprefixer": "^10.4.19",
    "eslint": "^8.38.0",
    "eslint-import-resolver-typescript": "^3.6.1",
    "eslint-plugin-import": "^2.28.1",
    "eslint-plugin-jsx-a11y": "^6.7.1",
    "eslint-plugin-react": "^7.33.2",
    "eslint-plugin-react-hooks": "^4.6.0",
    "postcss": "^8.4.38",
    "tailwindcss": "^3.4.4",
    "typescript": "^5.1.6",
    "vite": "^5.1.0",
    "vite-tsconfig-paths": "^4.2.1"
  },
  "engines": {
    "node": ">=20.0.0"
  }
}
Remix プロジェクトの立ち上げ
# ルートで実行
pnpm --filter remix-client dev
不要な apps と packages を削除
Turborepo プロジェクトセットアップ時に最初から含まれていた不要なappsとpackagesを削除します。
rm -r apps/docs
rm -r apps/web
rm -r packages/ui
最終的なディレクトリ構造
コマンド集
全ての apps 立ち上げ
pnpm dev
全てのパッケージをインストール
pnpm install
特定の apps 立ち上げ
pnpm --filter [apps名]
おわりに
初めてゼロから Turborepo のプロジェクトを構築しましたが、導入の簡単さと複数のフレームワークを統合的に管理できる利便性を実感しました。
モノレポの採用はチームやプロジェクトの規模によって向き不向きがありますが、一元管理や効率化を重視する開発では非常に有用だと思います。
モノレポを試す際にはぜひ活用を検討してみてください。
この記事が Turborepo やモノレポに興味を持つ方の参考になれば幸いです。
またコメントは随時受け付けています。
ご意見・ご質問等あればお気軽にお願いします!
この記事は フロントエンドの世界 Advent Calendar 2024の 23 記事目です。
次の記事はこちら フロントエンドの世界 2024: Qiita CLI を利用した執筆環境 (おまけ)


