はじめに
GitLabをCLI操作するためのGitLab CLI (glab)の環境構築方法を紹介する。Claude CodeなどのAIエージェントからGitLabを操作する場合に有用(参考)。
動作確認環境
方法
インストール
公式ドキュメントの手順に従ってインストールする。以下にOSごとのインストール方法を記載する。
Windows
Windowsパッケージマネージャーを使う場合
Windowsパッケージマネージャーを使うと簡単にインストールできる。
winget install glab.glab
以下のように表示されればインストール成功。
見つかりました GLab [GLab.GLab] バージョン 1.72.0
このアプリケーションは所有者からライセンス供与されます。
Microsoft はサードパーティのパッケージに対して責任を負わず、ライセンスも付与しません。
ダウンロード中 https://gitlab.com/gitlab-org/cli/-/releases/v1.72.0/downloads/glab_1.72.0_Windows_x86_64_installer.exe
  ██████████████████████████████  12.2 MB / 12.2 MB
インストーラーハッシュが正常に検証されました
パッケージのインストールを開始しています...
インストーラーは管理者として実行するように要求するため、プロンプトが表示されます。
インストールが完了しました
インストーラーを使う場合
公式のリリースページから、glab_x.xx.x_Windows_x86_64_installer.exeをダウンロードしてインストールする。
Ubuntu
Snapを使う場合
sudo snap install --edge glab
以下のように表示されればインストール成功。
glab (edge) v1.72.0 from Clement Sam (profclems) installed
インストーラーを使う場合
公式のリリースページから、glab_x.xx.x_linux_amd64.debをダウンロードしてインストールする。
cd /tmp
wget https://gitlab.com/gitlab-org/cli/-/releases/v1.72.0/downloads/glab_1.72.0_linux_amd64.deb
sudo dpkg -i glab_1.72.0_linux_amd64.deb
GitLab CEの初期設定(OAuthの設定)
GitLab CEの初期設定方法を記載する。初回のみ必要、GitLab CEの管理者が実施する。
GitLab CLI (glab)は、OAuth認証を使うために、GitLab CE上で設定が必要となる(詳細は公式ドキュメントを参照)。
「Admin Area」-「Add new application」で以下のように設定し「Save application」ボタンを押す。
| 設定項目 | 設定値 | 説明 |
|---|---|---|
| Name | gitlab-cli | 任意の名前 |
| Redirect URI | http://localhost:7171/auth/redirect | リダイレクト用URL |
| Confidential | 選択しない | - |
| Scopes | api / read_user / write_repository / openid / profile / | 対象範囲 |
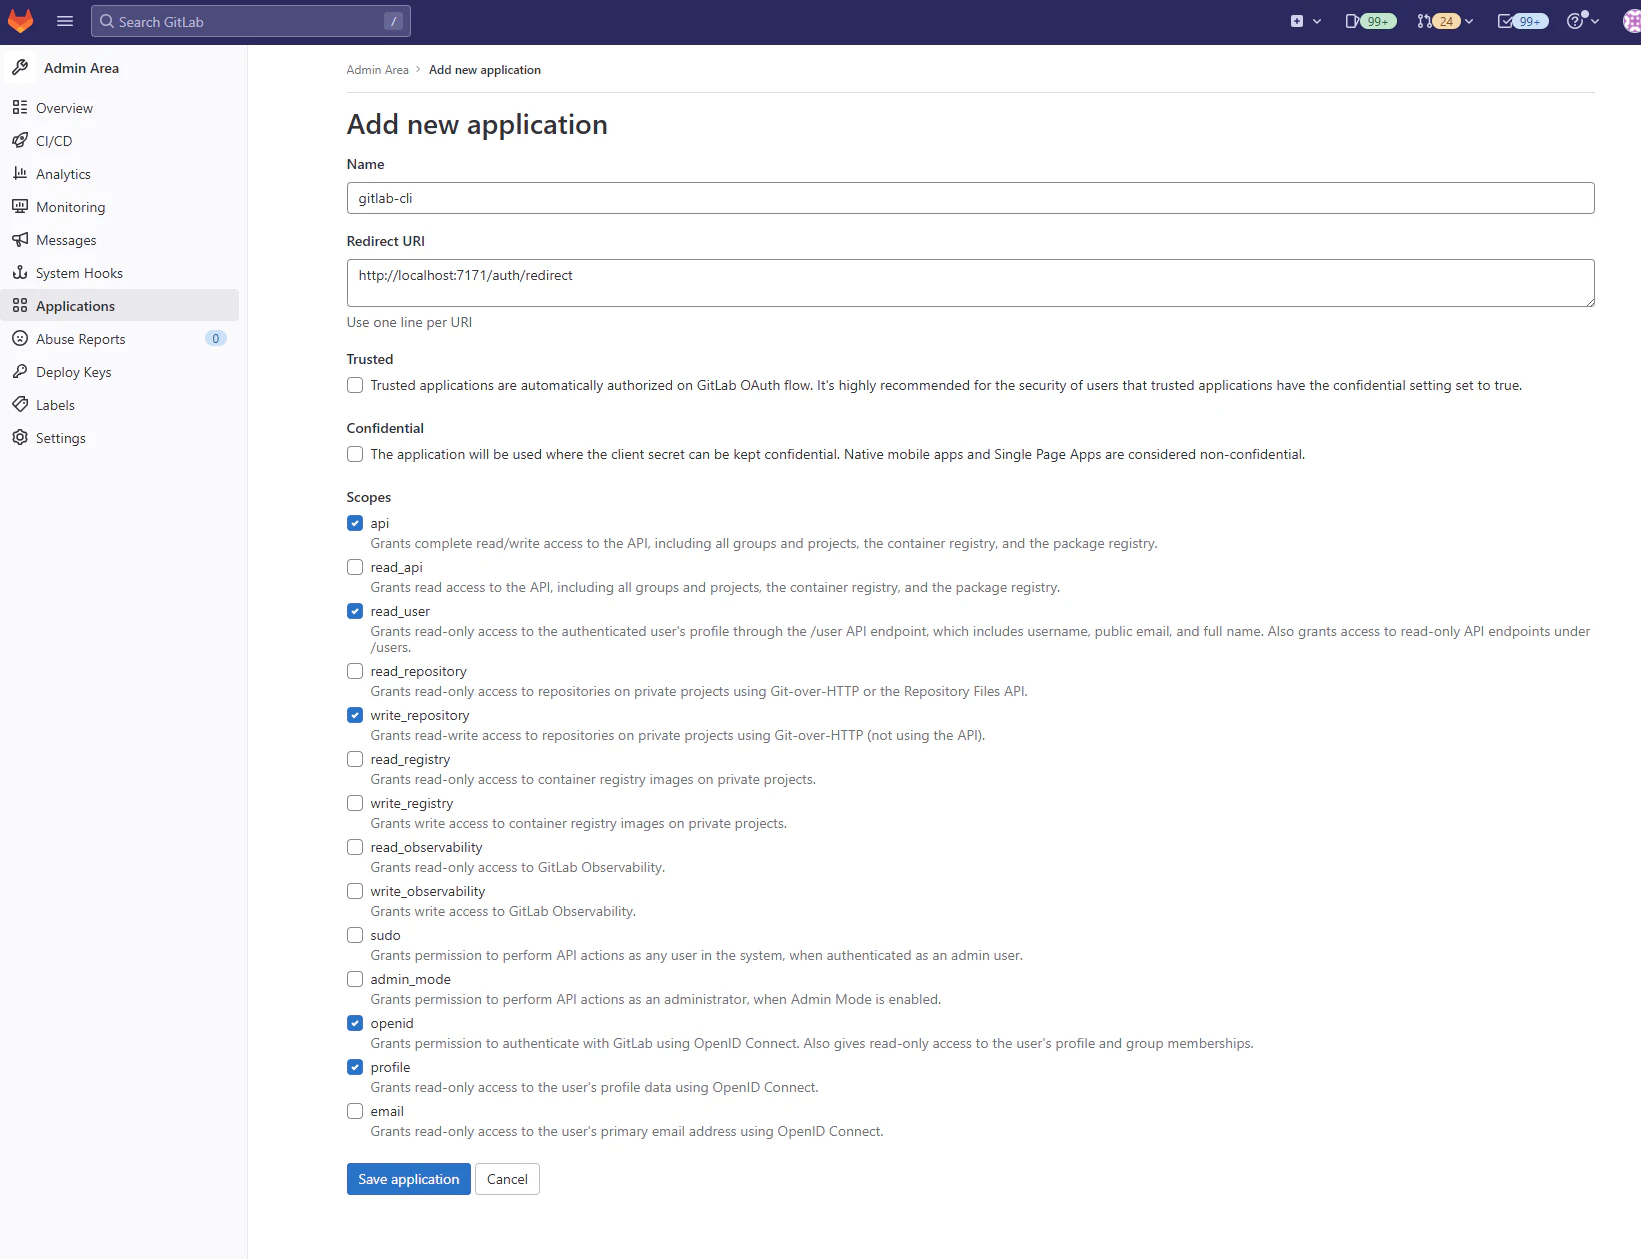
登録が完了したら、Application IDと、Secretが表示されているのでメモしておく。Secretは今後確認ができないので必ずメモすること。

GitLab CLIの使い方
認証設定
Webログインとトークンの2種類がある。Webログインで上手くいかない場合はトークンを試すことを推奨する。
【オプション1】Webログイン
参考
SSH接続先でGitLab CLI (glab)を利用する場合は、VS CodeでSSH接続し、VS Code上のターミナルで実施すると良い(ポートフォワーディングされるのでブラウザから認証のリダイレクト画面にアクセスできるため)。
最初にターミナルで以下を入力する。
glab config set client_id {Application ID} -g --host {Host Name}
- {Application ID}: GitLab CEサーバーのOAuth設定でメモしておいた
Application ID - {Host Name}: GitLab CEサーバーのホスト名(例: 192.168.1.10:8080)
次に以下を入力して対話形式で設定を行う。
glab auth login --hostname {Host Name}
- ? How would you like to sign in?
Web-
Webを選択
-
- ? What domains does this host use for the container registry and image dependency proxy?
{Container Registry Name}- コンテナレジストリを利用している場合は、レジストリ名を入力する(例: 192.168.1.10:5000)。
以下のような認証用のブラウザが開いたら、Authorizeボタンを押して認証する。
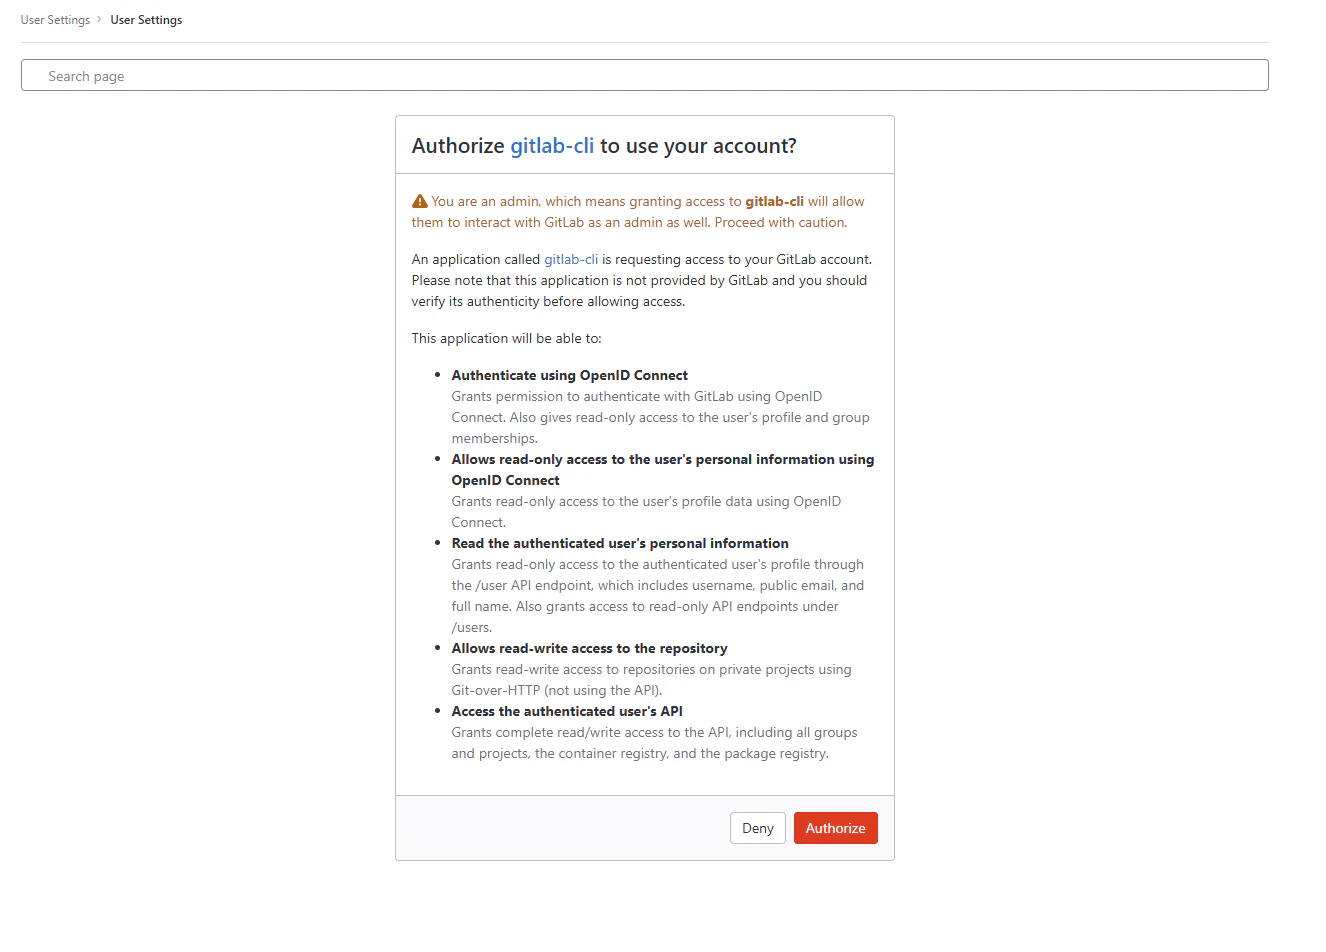
以下のようになり、ブラウザが開かない場合は、記載されているリンクをコピーしてブラウザで開く。
? How would you like to sign in? Web
? What domains does this host use for the container registry and image dependency proxy? {Container Registry Name}
Failed opening a browser at https://{Host Name}/oauth/authorize?client_id=xxx....xxx&code_challenge=V-xxx...xxx&code_challenge_method=S256&redirect_uri=http%xxx2Fauth%2Fredirect&response_type=code&scope=openid+profile+read_user+write_repository+api&state=xxx
Encountered error: fork/exec /home/{User Name}/.vscode-server/cli/servers/Stable-xxx/server/bin/helpers/browser.sh: permission denied
Try entering the URL in your browser manually.
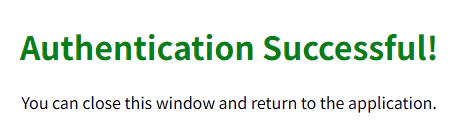
認証が成功すると、以下がブラウザに表示される。
ターミナルに戻り、以下を順に設定する。
- ? Choose default Git protocol:
HTTPS - ? Authenticate Git with your GitLab credentials?
Yes - ? Choose host API protocol:
HTTPS
以下のようなメッセージが出れば成功。
- glab config set -h {Host Name} git_protocol https
✓ Configured Git protocol.
- glab config set -h {Host Name} api_protocol https
✓ Configured API protocol.
✓ Logged in as {User Name}
✓ Configuration saved to /home/{User Name}/snap/glab/xxxx/.config/glab-cli/config.yml
【オプション2】トークン
「User Settings」-「Access Tokens」を開いてGitLab CLI (glab)用のアクセストークンを作成しておく(参考)。
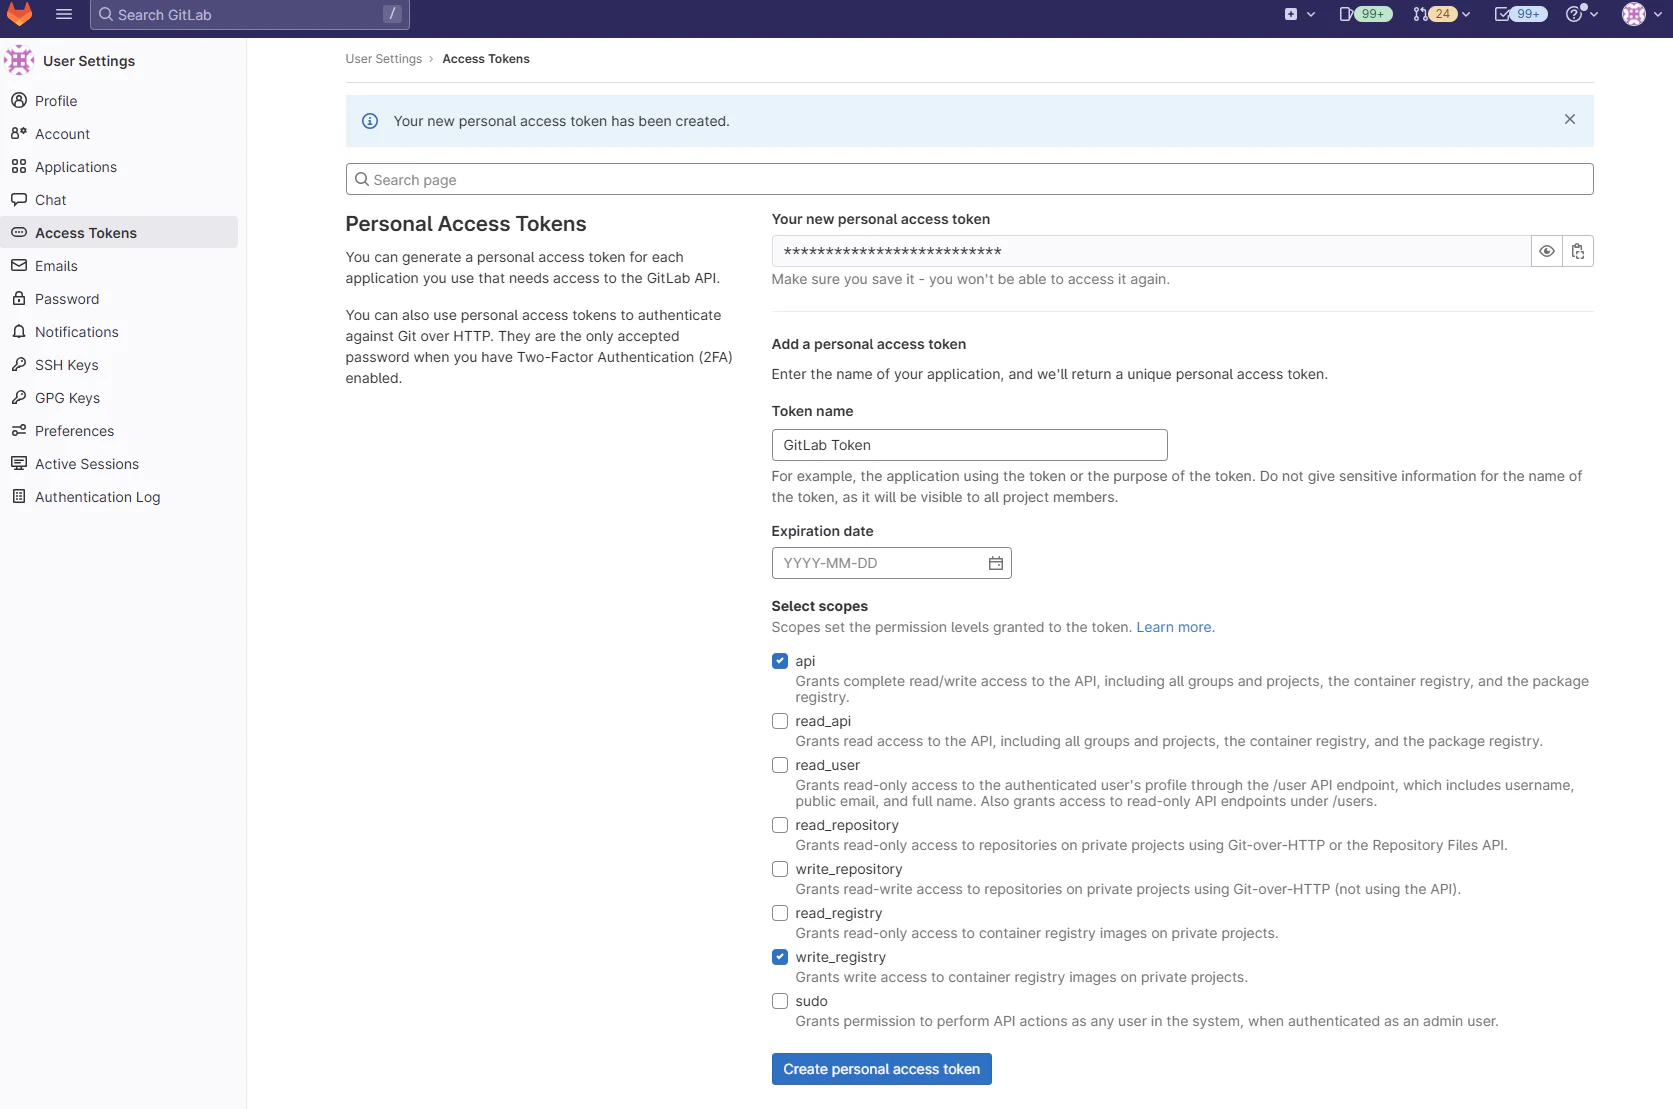
Select scopesで以下にチェックを入れて有効にする。
- api
- write_repository
Token nameは、任意の名前(例:GLab Token)にする。
「Create personal access token」ボタンを押して、トークンを作成すると、Your new personal access tokenが表示されるのでメモしておく。
最初にターミナルで以下を入力する。
glab config set client_id {Application ID} -g --host {Host Name}
- {Application ID}: GitLab CEのOAuth設定でメモしておいた
Application ID - {Host Name}: GitLab CEのホスト名(例: 192.168.1.10:8080)
次に以下を入力して対話形式で設定を行う。
glab auth login --hostname {Host Name}
- ? How would you like to sign in?
Token-
Tokenを選択
-
- ? What domains does this host use for the container registry and image dependency proxy?
{Container Registry Name}- コンテナレジストリを利用している場合は、レジストリ名を入力する(例: 192.168.1.10:5000)。
- トークンを聞かれるので、メモしたトークンを貼り付ける。
Tip: generate a personal access token at {Host Name}/-/user_settings/personal_access_tokens?scopes=api,write_repository. The minimum required scopes are 'api' and 'write_repository'. ? Paste your authentication token: ************************** - ? Choose default Git protocol:
HTTPS - ? Authenticate Git with your GitLab credentials?
Yes - ? Choose host API protocol:
HTTPS
以下のように表示されれば成功。
- glab config set -h {Host Name} git_protocol https
✓ Configured Git protocol.
- glab config set -h {Host Name} api_protocol https
✓ Configured API protocol.
✓ Logged in as {User Name}
✓ Configuration saved to /home/{User Name}/.config/glab-cli/config.yml
デフォルトホストの設定
以下のコマンドを実行して、登録したGitLab CEサーバーをデフォルトのホストとして設定する(参考)。
glab config set -g host {Host Name}
- {Host Name}: GitLab CEサーバーのホスト名
認証情報の確認
ターミナルで以下を入力する。
glab auth status
以下のように表示されれば成功。
gitlab.com
  x gitlab.com: API call failed: GET https://gitlab.com/api/v4/user: 401 {message: 401 Unauthorized}
  ✓ Git operations for gitlab.com configured to use ssh protocol.
  ✓ API calls for gitlab.com are made over https protocol.
  ✓ REST API Endpoint: https://gitlab.com/api/v4/
  ✓ GraphQL Endpoint: https://gitlab.com/api/graphql/
  ! No token found (checked config file, keyring, and environment variables).
{Host Name}
  ✓ Logged in to {Host Name} as {User Name} (/home/{User Name}/snap/glab/4591/.config/glab-cli/config.yml)
  ✓ Git operations for {Host Name} configured to use https protocol.
  ✓ API calls for {Host Name} are made over https protocol.
  ✓ REST API Endpoint: {Host Name}/api/v4/
  ✓ GraphQL Endpoint: {Host Name}/api/graphql/
  ✓ Token found: **************************
ERROR:
x could not authenticate to one or more of the configured GitLab instances.
以下のエラーが出ているが、これはGitLab.com用の認証が通っていないエラーなので無視して構わない。エラーを消したい場合は、後述の設定ファイル(config.yml)からgitlab.comの設定情報を削除する。
bash ERROR: x could not authenticate to one or more of the configured GitLab instances.
リポジトリの操作コマンド
コマンドの詳細はGitLab CLIマニュアルを参照。
リポジトリ一覧表示
glab repo list -a
Issue操作
Issue一覧確認
glab issue list -R {Group Name}/{Repository Name}
Issueの詳細確認
glab issue view {Issue Number} -R {Group Name}/{Repository Name}
(参考情報)設定ファイル
設定ファイル(config.yml)が保存される。中身は以下のようになっている。{Host Name}のキーで情報が登録される。
# What protocol to use when performing Git operations. Supported values: ssh, https.
git_protocol: ssh
# What editor glab should run when creating issues, merge requests, etc. This global config cannot be overridden by hostname.
editor:
# What browser glab should run when opening links. This global config cannot be overridden by hostname.
browser:
# Set your desired Markdown renderer style. Available options are [dark, light, notty]. To set a custom style, refer to https://github.com/charmbracelet/glamour#styles
glamour_style: dark
# Allow glab to automatically check for updates and notify you when there are new updates.
check_update: true
# Last update check timestamp, used for checking when the last update check was performed.
last_update_check_timestamp: 2025-08-18T17:18:09+09:00
# Whether or not to display hyperlink escape characters when listing items like issues or merge requests. Set to TRUE to display hyperlinks in TTYs only. Force hyperlinks by setting FORCE_HYPERLINKS=1 as an environment variable.
display_hyperlinks: false
# Default GitLab hostname to use.
host: gitlab.com
# Set to true (1) to disable prompts, or false (0) to enable them.
no_prompt: false
# Set to false (0) to disable sending usage data to your GitLab instance or true (1) to enable.
# See https://docs.gitlab.com/administration/settings/usage_statistics/
# for more information
telemetry: true
# Configuration specific for GitLab instances.
hosts:
    gitlab.com:
        # What protocol to use to access the API endpoint. Supported values: http, https.
        api_protocol: https
        # Configure host for API endpoint. Defaults to the host itself.
        api_host: gitlab.com
        # Your GitLab access token. To get one, read https://docs.gitlab.com/user/profile/personal_access_tokens/
        token:
        # The domains of associated container registries. These are used to configure the
        # Docker credential helper.
        container_registry_domains: gitlab.com,gitlab.com:443,registry.gitlab.com
    {Host Name}:
        client_id: xxxx....xxxx
        is_oauth2: "true"
        oauth2_refresh_token: xxxx....xxxx
        oauth2_expiry_date: 18 Aug 25 19:18 JST
        token: xxxx....xxxx
        container_registry_domains: {Container Registry Name}
        api_host: {Host Name}
        git_protocol: https
        api_protocol: https
        user: {User Name}
設定ファイルの保存場所
設定ファイル(config.yml)の保存場所はインストール方法により異なる。
- 例
- Windows
C:\Users\{User Name}\.config\glab-cli\config.yml
- Ubuntu
- Snap
/home/{User Name}/snap/glab/4591/.config/glab-cli/config.yml
- バイナリ
/home/{User Name}/.config/glab-cli/config.yml
- Snap
- Windows
まとめ
GitLabをCLI操作するためのGitLab CLI (glab)の環境構築方法を紹介した。Claude CodeなどのAIエージェントからGitLabを操作する場合に有用なので活用してみてほしい。
トラブルシューティング
以前接続できていたGitLab CLIに接続できなくなった
以下で認証できているか確認。
glab auth status
{Host Name}
  x {Host Name}: API call failed: oauth2: "invalid_grant" "The provided authorization grant is invalid, expired, revoked, does not match the redirection URI used in the authorization request, or was issued to another client."
  ✓ Git operations for {Host Name} configured to use https protocol.
  ✓ API calls for {Host Name} are made over https protocol.
  ✓ REST API Endpoint: {Host Name}/api/v4/
  ✓ GraphQL Endpoint: {Host Name}/api/graphql/
  ✓ Token found: **************************
上記に×がある場合、認証エラーとなっているので以下のコマンドで再認証する。
glab auth login
基本的にEnterキーを押して、保存されている設定を利用する。
? What GitLab instance do you want to sign in to? {Host Name}
- Signing into {Host Name}
? You're already logged into {Host Name} as {User Name}. Do you want to re-authenticate? Yes
? How would you like to sign in? Web
? What domains does this host use for the container registry and image dependency proxy? {Host Name},registry.{Host Name}
? Choose default Git protocol: HTTPS
以下のように表示されれば成功。
- glab config set -h {Host Name} git_protocol https
✓ Configured Git protocol.
- glab config set -h {Host Name} api_protocol https
✓ Configured API protocol.
✓ Logged in as {User Name}
✓ Configuration saved to /home/{User Name}/.config/glab-cli/config.yml
うまくいかない場合は、再度認証設定をやり直す。
参考