MVVMパターンとは
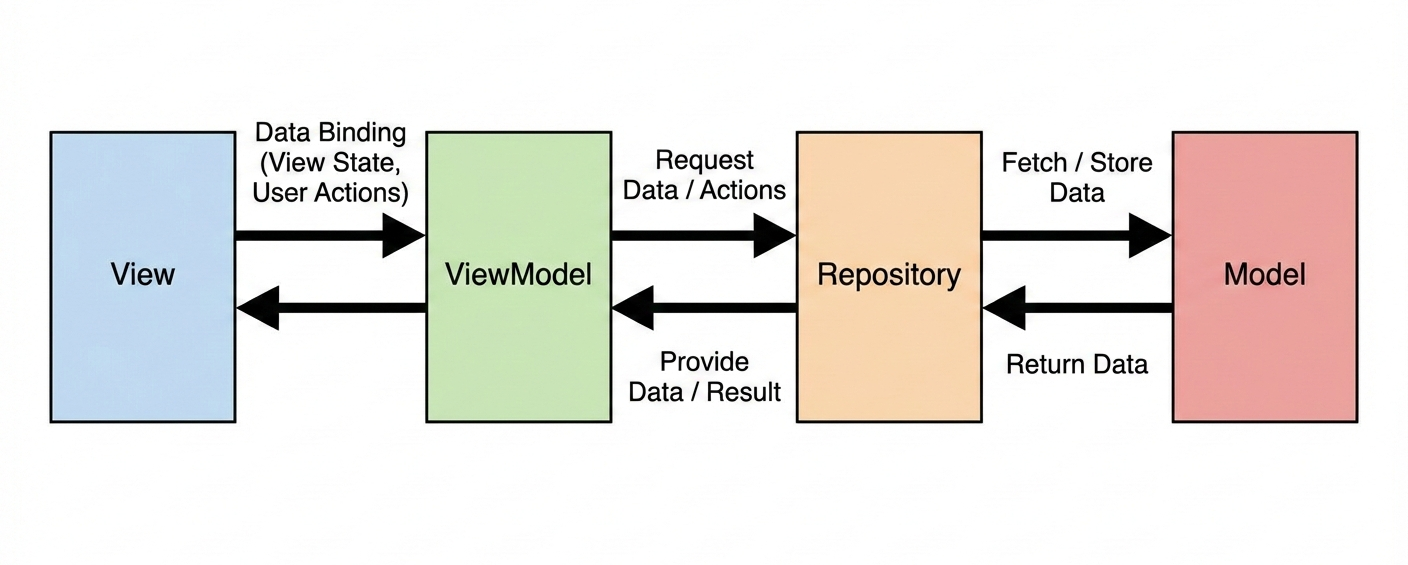
Model(モデル)・View(ビュー)・ViewModel(ビューモデル)の3つのクラスで構成されるアーキテクチャです。
文脈によって「MVVMパターン」、「MVVMアーキテクチャ」、「MVVMモデル」など表記されることが多いですが、基本的にすべて同じものを指していることが多いです。
それぞれの役割と責務が明確となっており、パターンに則った設計・実装を行うことで学習コストや導入コストを低くできるメリットがあります。
M/V/VMに加えてRepository(リポジトリ)クラスが定義される場合もあります。
Repositoryはデータの永続化を定義するもので、ViewModelは永続化先(MySQL, Redis, LocalStorageなど)を意識せずデータ操作に集中できます。
例えばデータ永続化の手段がLocalStorageからFirestoreに変更となった際も、Repositoryクラスを修正するだけで済むので、コード修正による影響範囲を小さくとどめることができます。
FlutterにおけるMVVMパターン
Flutter公式ドキュメントに Guide to app architecture というページがあります。
Flutterアプリを設計する際のベストプラクティスが記載されており、「関心の分離」を最重要項目として以下のレイヤーで分割することを推奨しています。
・Views
・ViewModels
・Repositories
・Services
この設計に近しい既存のアーキテクチャパターンとしてMVVMが紹介されています。
「Flutter設計のベストプラクティスはMVVMパターン」ではないことにご留意ください。
状態管理(データバインディング)について
コーポレートサイトやランディングページなどの静的なアプリケーションを除き、多くのアプリは動的なオブジェクトやデータを持ちます。
今回のメモアプリもメモ内容が動的な状態です。
Flutterでは一度描画されたViewは基本的に変更されません。
なので、状態が変化した時にViewを再描画してもらう仕組みが必要となります。
今回は標準パッケージである ChangeNotifier を利用して状態管理を行っています。
エントリーポイントでProviderを宣言し、ViewModelで状態を変更した時に notifyListeners() メソッドを実行することでViewへ通知を送り、再描画を行っています。
Viewの役割
ViewはUIの表示・更新や、ボタンや画面遷移などの操作を定義します。
また、ボタン押下などのユーザー操作が実行された時、ViewModelで定義されたメソッドを呼び出します。
Viewから呼び出すメソッドは基本的にViewModelクラスのもののみです。
ViewModelの役割
ViewがUIに表示するためのデータを取得したり、データの操作を行います。
Viewから渡されたデータを加工して保存したり、削除を行います。
ViewModelから呼び出すメソッドは基本的にRepositoryクラスとModelクラスのものになります。
Repositoryの役割
データの永続化を行います。
ViewModelから渡されたデータをLocalStorageやDBに保存したり、渡されたKey(IDなど)から削除を行ったりします。
小規模なアプリではRepositoryクラスを作らず、データ永続化の処理をModelクラスで行う場合もあります。
Repositoryから呼び出すメソッドは基本的にModelクラスのもののみです。
Modelの役割
データモデルの定義を行います。
Repositoryクラスがない場合、データの永続化も行います。
また、シリアライズ(JSON変換など)もModelクラスで定義する場合があります。
ModelクラスからView/ViewModel/Repositoryクラスのメソッドを呼び出すことはありません。
コードで見るMVVM
FlutterアプリのソースコードからMVVMパターンでの実装を具体的に見ていきます。
Flutterアプリを新規作成して、各クラスのディレクトリとファイルを lib ディレクトリ以下に作成しました。
簡単なメモアプリをAIの力を借りつつ実装し、作成・編集・削除機能と一覧表示機能があります。
コード量が多いファイルについては一部抜粋して記載します。
ディレクトリ構造
lib/
├── models/
│   └── memo.dart
├── repositories/
│   └── memo_repository.dart
├── viewmodels/
│   └── memo_view_model.dart
├── views/
│   ├── memo_list_page.dart
│   └── memo_edit_page.dart
└── main.dart
エントリーポイント
lib/main.dart
void main() async {
  WidgetsFlutterBinding.ensureInitialized();
  final repository = MemoRepository();
  await repository.init();

  runApp(
    MultiProvider(
      providers: [
        ChangeNotifierProvider(
          create: (_) => MemoViewModel(repository)..init(),
        ),
      ],
      child: const MyApp(),
    ),
  );
}

class MyApp extends StatelessWidget {
  const MyApp({super.key});

  @override
  Widget build(BuildContext context) {
    return MaterialApp(
      title: 'メモアプリ',
      theme: ThemeData(
        colorScheme: ColorScheme.fromSeed(seedColor: Colors.blue),
        useMaterial3: true,
      ),
      home: const MemoListPage(),
    );
  }
}
今回のアプリでエントリーポイントとなるファイルです。
リポジトリの初期化を行い、メモ一覧のViewをホームとして設定しています。
また、作成や編集・削除されたメモをメモ一覧に反映させるための初期化設定も行っています。
View
lib/views/memo_list_page.dart
class MemoListPage extends StatelessWidget {
  const MemoListPage({super.key});

  @override
  Widget build(BuildContext context) {
    return Scaffold(
      appBar: AppBar(
        title: const Text('メモアプリ'),
        elevation: 0,
        centerTitle: true,
      ),
      body: Consumer<MemoViewModel>(
        builder: (context, viewModel, child) {
          // ローディング画面切り替え
          if (viewModel.isLoading) {
            // ...
          }
          // メモが空の場合の表示内容を定義
          if (viewModel.memos.isEmpty) {
            return Center(
                // ...
            );
          }

          return ListView.builder(
            // ...
          );
        },
      ),
      // メモ追加ボタン
      floatingActionButton: FloatingActionButton(
        onPressed: () {
          Navigator.of(context).push(
            MaterialPageRoute(
              builder: (context) => const MemoEditPage(),
            ),
          );
        },
        tooltip: '新規作成',
        child: const Icon(Icons.add),
      ),
    );
  }
  // メモ削除ダイアログ
  void _showDeleteDialog(
    BuildContext context,
    MemoViewModel viewModel,
    String memoId,
  ) {
    // ...
  }
}
lib/views/memo_edit_page.dart
class MemoEditPage extends StatefulWidget {
  final Memo? memo;

  const MemoEditPage({
    // ...
  });

  @override
  State<MemoEditPage> createState() => _MemoEditPageState();
}

class _MemoEditPageState extends State<MemoEditPage> {
  late TextEditingController _titleController;
  late TextEditingController _contentController;

  @override
  void initState() {
    // ...
  }

  @override
  void dispose() {
    // ...
  }
  // メモ編集画面
  @override
  Widget build(BuildContext context) {
    // ...
  }

  bool _hasChanges() {
    if (widget.memo == null) {
      return _titleController.text.isNotEmpty || _contentController.text.isNotEmpty;
    }
    return _titleController.text != widget.memo!.title ||
        _contentController.text != widget.memo!.content;
  }
  // 中止ダイアログ
  Future<bool?> _showDiscardDialog(BuildContext context) {
    // ...
  }

  Future<void> _saveMemo(
    BuildContext context,
    MemoViewModel viewModel,
    bool isEditMode,
  ) async {
    try {
      if (isEditMode) {
        await viewModel.updateMemo(
          widget.memo!.id,
          _titleController.text,
          _contentController.text,
        );
        if (context.mounted) {
          ScaffoldMessenger.of(context).showSnackBar(
            const SnackBar(content: Text("メモを更新しました")),
          );
          Navigator.pop(context);
        }
      } else {
        await viewModel.addMemo(
          _titleController.text,
          _contentController.text,
        );
        if (context.mounted) {
          ScaffoldMessenger.of(context).showSnackBar(
            const SnackBar(content: Text("メモを作成しました")),
          );
          Navigator.pop(context);
        }
      }
    } catch (e) {
      if (context.mounted) {
        ScaffoldMessenger.of(context).showSnackBar(
          SnackBar(content: Text('エラーが発生しました: $e')),
        );
      }
    }
  }

  String _formatDateTime(DateTime dateTime) {
    return '${dateTime.year}年${dateTime.month}月${dateTime.day}日 ${dateTime.hour}:${dateTime.minute.toString().padLeft(2, '0')}';
  }
}
Widget build(BuildContext context)... で実際に表示されるUIの定義を行っています。
(長いコードになっているので省略しています)
memo_edit_page.dartで viewModel クラスの updateMemo() や addMemo() などViewModelクラスのメソッドを呼び出しています。
ViewModel
lib/viewmodels/memo_view_model.dart
class MemoViewModel extends ChangeNotifier {
  final MemoRepository _repository;
  List<Memo> _memos = [];
  bool _isLoading = false;

  MemoViewModel(this._repository);

  // Getter
  List<Memo> get memos => _memos;
  bool get isLoading => _isLoading;

  // 初期化
  Future<void> init() async {
    await _repository.init();
    await loadMemos();
  }

  // メモを読み込み
  Future<void> loadMemos() async {
    _isLoading = true;
    notifyListeners();

    try {
      _memos = await _repository.getAllMemos();
      // 新しい順(更新日時の降順)でソート
      _memos.sort((a, b) => b.updatedAt.compareTo(a.updatedAt));
    } catch (e) {
      print('Error loading memos: $e');
    }

    _isLoading = false;
    notifyListeners();
  }

  // メモを追加
  Future<void> addMemo(String title, String content) async {
    if (title.isEmpty) {
      throw Exception('Title cannot be empty');
    }

    try {
      final newMemo = await _repository.addMemo(title, content);
      _memos.insert(0, newMemo);
      notifyListeners();
    } catch (e) {
      print('Error adding memo: $e');
      rethrow;
    }
  }

  // メモを更新
  Future<void> updateMemo(String id, String title, String content) async {
    // ...
  }

  // メモを削除
  Future<void> deleteMemo(String id) async {
    // ...
  }
}
メモ操作の実装を行っています。
今回はRepositoryクラスを定義しているので MemoRepository クラスの getAllMemos() などのメソッドを呼び出しています。
Repository
lib/repositories/memo_repository.dart
class MemoRepository {
  static const String _storageKey = 'memos';
  late SharedPreferences _prefs;

  MemoRepository();

  // 初期化
  Future<void> init() async {
    _prefs = await SharedPreferences.getInstance();
  }

  // すべてのメモを取得
  Future<List<Memo>> getAllMemos() async {
    final jsonString = _prefs.getString(_storageKey);
    if (jsonString == null || jsonString.isEmpty) {
      return [];
    }

    try {
      final List<dynamic> jsonList = jsonDecode(jsonString);
      return jsonList.map((json) => Memo.fromJson(json as Map<String, dynamic>)).toList();
    } catch (e) {
      print('Error loading memos: $e');
      return [];
    }
  }

  // メモを追加
  Future<Memo> addMemo(String title, String content) async {
    final memos = await getAllMemos();
    final newMemo = Memo(
      id: DateTime.now().millisecondsSinceEpoch.toString(),
      title: title,
      content: content,
      createdAt: DateTime.now(),
      updatedAt: DateTime.now(),
    );
    memos.add(newMemo);
    await _saveMemos(memos);
    return newMemo;
  }

  // メモを更新
  Future<Memo> updateMemo(String id, String title, String content) async {
    // ...
  }

  // メモを削除
  Future<void> deleteMemo(String id) async {
    // ...
  }

  // メモをIDで取得
  Future<Memo?> getMemoById(String id) async {
    // ...
  }

  // メモを保存(内部用)
  Future<void> _saveMemos(List<Memo> memos) async {
    final jsonList = memos.map((memo) => memo.toJson()).toList();
    final jsonString = jsonEncode(jsonList);
    await _prefs.setString(_storageKey, jsonString);
  }
}
メモの永続化を行っています。
今回はSharedPreferencesを利用して内部ストレージに保存するように実装しています。
Model
lib/models/memo.dart
class Memo {
  final String id;
  final String title;
  final String content;
  final DateTime createdAt;
  final DateTime updatedAt;

  Memo({
    required this.id,
    required this.title,
    required this.content,
    required this.createdAt,
    required this.updatedAt,
  });

  // JSONへの変換
  Map<String, dynamic> toJson() {
    // ...
  }

  // JSONからの変換
  factory Memo.fromJson(Map<String, dynamic> json) {
    // ...
  }

  // コピーメソッド(部分更新時に使用)
  Memo copyWith({
    // ...
  }

  @override
  String toString() =>
      'Memo(id: $id, title: $title, content: $content, createdAt: $createdAt, updatedAt: $updatedAt)';
}
メモのデータモデルを定義しています。
シリアライズの処理はアプリの規模が大きくなるにつれ、Repositoryごとの管理かDTOを切り出して管理することが多くなります。
まとめ
今回はごく小規模なメモアプリを例にMVVMパターンについての理解を深めました。
規模が大きくなるにつれ、外部APIと通信をしてキャッシュの管理まで行うServicesレイヤーや、複数のModel/Repositoryにアクセスして複雑なドメインロジックに対応するUseCasesレイヤーなど、アーキテクトも複雑になっていきます。
設計の基本思想を抑えることで、スパゲティ化させない、ブレのない実装を進めていけたら良いなと感じました。
参考
Guide to app architecture
https://docs.flutter.dev/app-architecture/guide
Flutter設計パターン入門
https://zenn.dev/flutteruniv/books/flutter-architecture
MVVMモデルとは? より効率的にシステムを開発するためのソフトウェアアーキテクチャについてご紹介
https://tech.sme.co.jp/entry/2024/10/22/200000
【Android】分かった気になれる!アーキテクチャ・MVVM概説
https://qiita.com/iTakahiro/items/6b1b22efa69e55cea3fa
「MVVM=双方向データバインディング」じゃない!Flutterで正しく理解するMVVM
https://zenn.dev/assign/articles/bb4ff51d8e4c0c