9回に分けて説明してきたラズパイとAWS IoTを使った見守りシステムリポジトリーを実際に作ってみます。リポジトリーのREADMEのConstruction procedureに沿ってコマンド入力します。
事前準備
以下の事前準備が完了している必要があります。
- RaspberryPi OS imageの作成完了、RaspberryPi OS Lite (64-bit) が推奨です。
- AWSアカウントの作成完了。
- IAM userを作成して、./user_policyに格納されているポリシーテンプレートを使ってユーザー管理ポリシーを作成してIAM userにアタッチ、加えて AWSIoTFullAccessとIAMReadOnlyAccessもIAM userにアタッチします。
- IAM userのaccess key IDとsecret access keyをダウンロードしておきます。
- awslabsに後悔されているCloudFormation MacroテンプレートのCountをデプロイしておきます。
参考文献:CloudFormationでループ処理を実装する - ラズパイのmicroSDカードスロットにOS imageの入ったmicroSDカードを挿してラズパイを起動します。
- ssh接続できるようにしておきます。
- wifi又は有線LAN経由でインターネットに接続します。Raspberry Pi imagerでOS imageを作成する場合は、公開認証鍵のpub keyとwifi接続を一括して設定出来ます。
パラメーターの決定
ここまでの説明と同様にラズパイ4台で4か所を見守りする設定にしたいと思います。
Project名
- MyLiving
モノの名前(ラズパイ設置場所名)
- CatBed1
- CatBed2
- CatBed3
- CatBed4
S3Bucket名
- neko-mimamori
センサーのタイプはこちらに説明があります。
イベント録画のトリガーは状況や好みでセンサートリガーか動体検知かを選びます。
1台目のラズパイとAWSリソースの構築
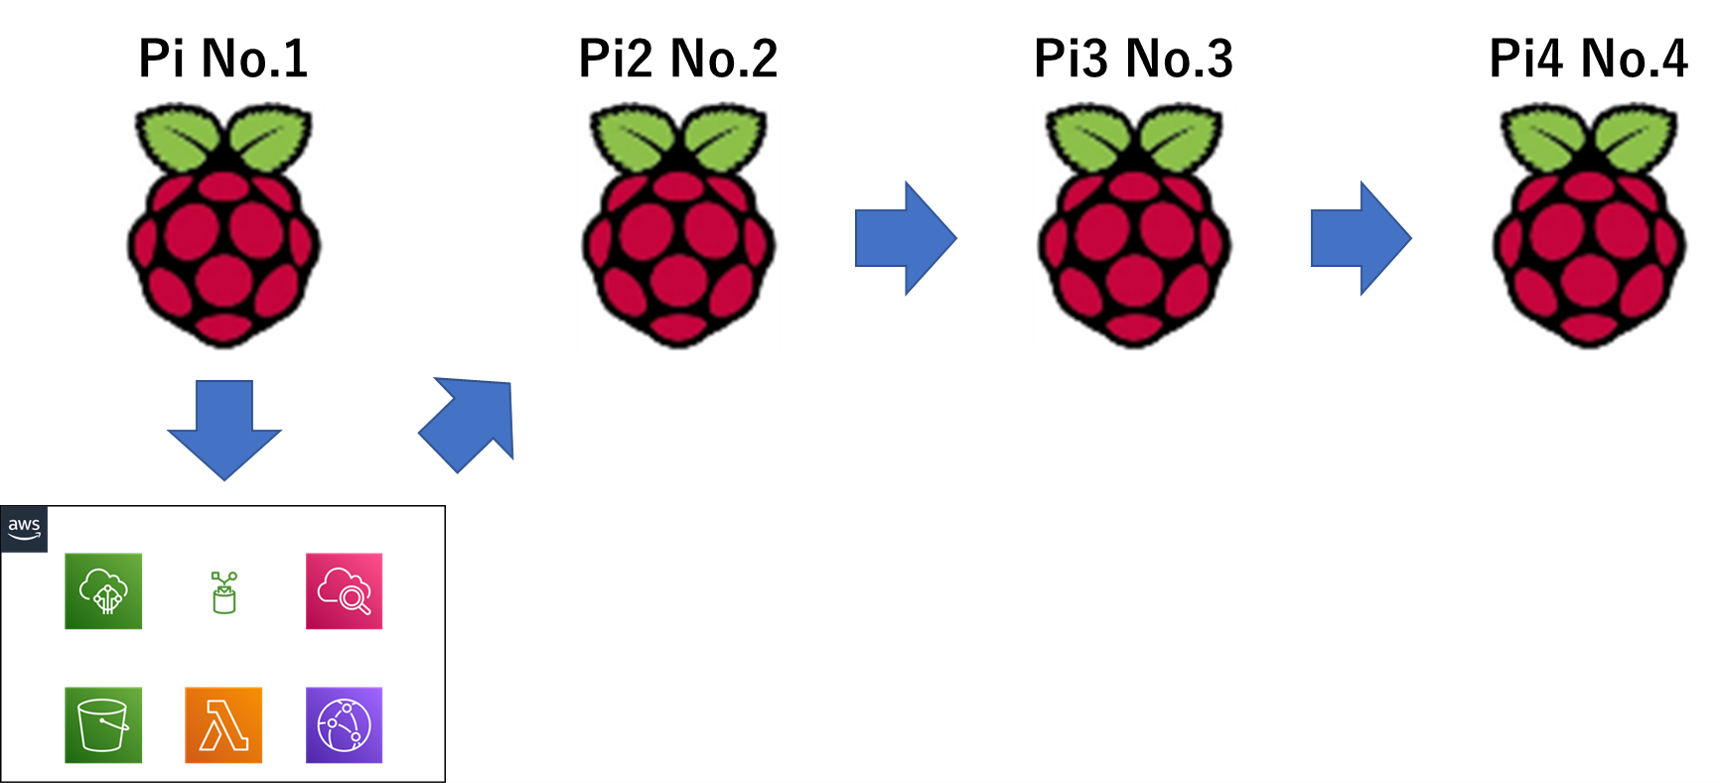
AWSリソースはSAMで一括構築したいので1台目のラズパイ構築時にラズパイのcliからdeployしました。ラズパイ4台を使う想定では下図のような順序で設定します。
推奨のOSはcli版なのでpython3-dev、python3-pip、gitがプリインストールされていません。リポジトリーをgit cloneする前に導入します。
sudo apt install -y python3-dev python3-pip git
python3 -m pip install --upgrade pip
次にリポジトリーをgit cloneします。
git clone https://github.com/nsaito9628/Monitoring-system-with-Raspberry-Pi-and-AWS.git
録画確認用のweb pageの写真をカスタムしたい場合はここでimageを上書きしておきます。ファイル名は同じ名前(place1.jpg~place4.jpg)にします。
/Monitoring-system-with-Raspberry-Pi-and-AWS/template
┣ /img
┃ ┣ place1.jpg
┃ ┣ place2.jpg
┃ ┣ place3.jpg
┃ ┗ place4.jpg
・  ・
・  ・
次にパラメーターの対話入力をします。
cd ./Monitoring-system-with-Raspberry-Pi-and-AWS
python set_parameters.py
パラメーターの決定で決めたパラメーターを入力していきます。
センサーはCatBed3だけnormal close、残りはnormal openという想定にしました。
イベント録画のトリガーはカメラ映像の動体検知にしてあります。AWS account Idは12桁の数字で表される自分のアカウントIDを入力します。
What number is this place to set RaspberryPi and cam (Allowed values are 1, 2, 3 or 4): 1
Input project name e.g., room name such as 'MyLiving': MyLiving
Input number of places you need to watch over (less than 4): 4
Input for Place No.1
Input place name: CatBed1
Input sensor type if normal close is '0' else normal open is '1': 1
Input for Place No.2
Input place name: CatBed2
Input sensor type if normal close is '0' else normal open is '1': 1
Input for Place No.3
Input place name: CatBed3
Input sensor type if normal close is '0' else normal open is '1': 0
Input for Place No.4
Input place name: CatBed4
Input sensor type if normal close is '0' else normal open is '1': 1
Input trigger type if to use sensor is '0' else motion detection is '1': 1
Input S3 bucket name to upload mp4 files: neko-mimamori
Input your AWS account Id : ${your AWS account id}
入力完了すると./Monitoring-system-with-Raspberry-Pi-and-AWS/src/certにiot_prov_configが、./Monitoring-system-with-Raspberry-Pi-and-AWS/templateにtemplate.yamlが確認できます。
ls ../Monitoring-system-with-Raspberry-Pi-and-AWS/src/cert -al
total 16
drwxr-xr-x 2  4096 Aug 31 21:29 .
drwxr-xr-x 3  4096 Aug 31 21:29 ..
-rw-r--r-- 1   112 Aug 31 21:32 iot_prov_config
-rw-r--r-- 1  3772 Aug 31 21:29 iot_prov.sh

ls ../Monitoring-system-with-Raspberry-Pi-and-AWS/template -al
total 116
drwxr-xr-x  9  4096 Aug 31 21:32 .
drwxr-xr-x 11  4096 Aug 31 21:29 ..
drwxr-xr-x  2  4096 Aug 31 21:29 css
drwxr-xr-x  2  4096 Aug 31 21:29 function
drwxr-xr-x  2  4096 Aug 31 21:29 img
-rw-r--r--  1  5713 Aug 31 21:29 index.html
-rw-r--r--  1   627 Aug 31 21:29 mimamori-project-deploy.sh
drwxr-xr-x  2  4096 Aug 31 21:29 Place1
drwxr-xr-x  2  4096 Aug 31 21:29 Place2
drwxr-xr-x  2  4096 Aug 31 21:29 Place3
drwxr-xr-x  2  4096 Aug 31 21:29 Place4
-rw-r--r--  1 19245 Aug 31 21:29 template_body.txt
-rw-r--r--  1   841 Aug 31 21:32 template_head.txt
-rw-r--r--  1 20498 Aug 31 21:29 template_org.yaml
-rw-r--r--  1 20086 Aug 31 21:32 template.yaml
ラズパイでエッジ実行するPythonのProjectをuser rootに展開します。
cd ..
cp -r ./Monitoring-system-with-Raspberry-Pi-and-AWS/src/* ~
ラズパイにmqtt、openCV、awscli、samcli、boto3と依存関係を導入します。postfix導入時に設定を聞かれるのでlocal onlyにします。
sudo chmod u+x environment.sh
./environment.sh
aws credentialsとregionの設定をします。事前にダウンロードしてあるIAM userのaccess key IDとsecret access keyを入力します。日本で使うならregionは東京になります。
aws configure
(Replace with your own key)
AWS Access Key ID[]: your Access Key ID
AWS Secret Access Key []: your Secret Access Key
Default region name []: ap-northeast-1
Default output format []:
AWS IoTにラズパイをモノとして登録してクライアント証明書を発行、ダウンロードします。同時にラズパイの自動起動設定をします。
cd cert
sudo chmod u+x iot_prov.sh
./iot_prov.sh
ここまででラズパイ側の設定は完了します。
続いてAWS IoTへのモノの登録以外のAWSリソースの一括登録をします。
cd ../Monitoring-system-with-Raspberry-Pi-and-AWS/template
sam build
sam deploy --guided --capabilities CAPABILITY_NAMED_IAM --stack-name MyLiving
Setting default arguments for 'sam deploy' =========================================
Stack Name [MyLiving]:
AWS Region [ap-northeast-1]:
Parameter ProjectName [MyLiving]:
Parameter Place1 [CatBed1]:
Parameter Place2 [CatBed2]:
Parameter Place3 [CatBed3]:
Parameter Place4 [CatBed4]:
Parameter OrgBucketName [neko-mimamori]:
Parameter NameTag [MyLiving]:
Parameter EventPrefix [emr]:
#Shows you resources changes to be deployed and require a 'Y' to initiate deploy Confirm changes before deploy [Y/n]: Y
#SAM needs permission to be able to create roles to connect to the resources in your template Allow SAM CLI IAM role creation [Y/n]: Y
#Preserves the state of previously provisioned resources when an operation fails Disable rollback [Y/n]: Y
Save arguments to configuration file [Y/n]: Y
SAM configuration file [samconfig.toml]:
SAM configuration environment [default]:
CloudFrontDomainがOutputされてAWSリソースの構築が完了します。
Key DomainName
===============================================
Description -
Value xxxxxxxxxxx12345.cloudfront.net
===============================================
Successfully created/updated stack - MyLiving in ap-northeast-1
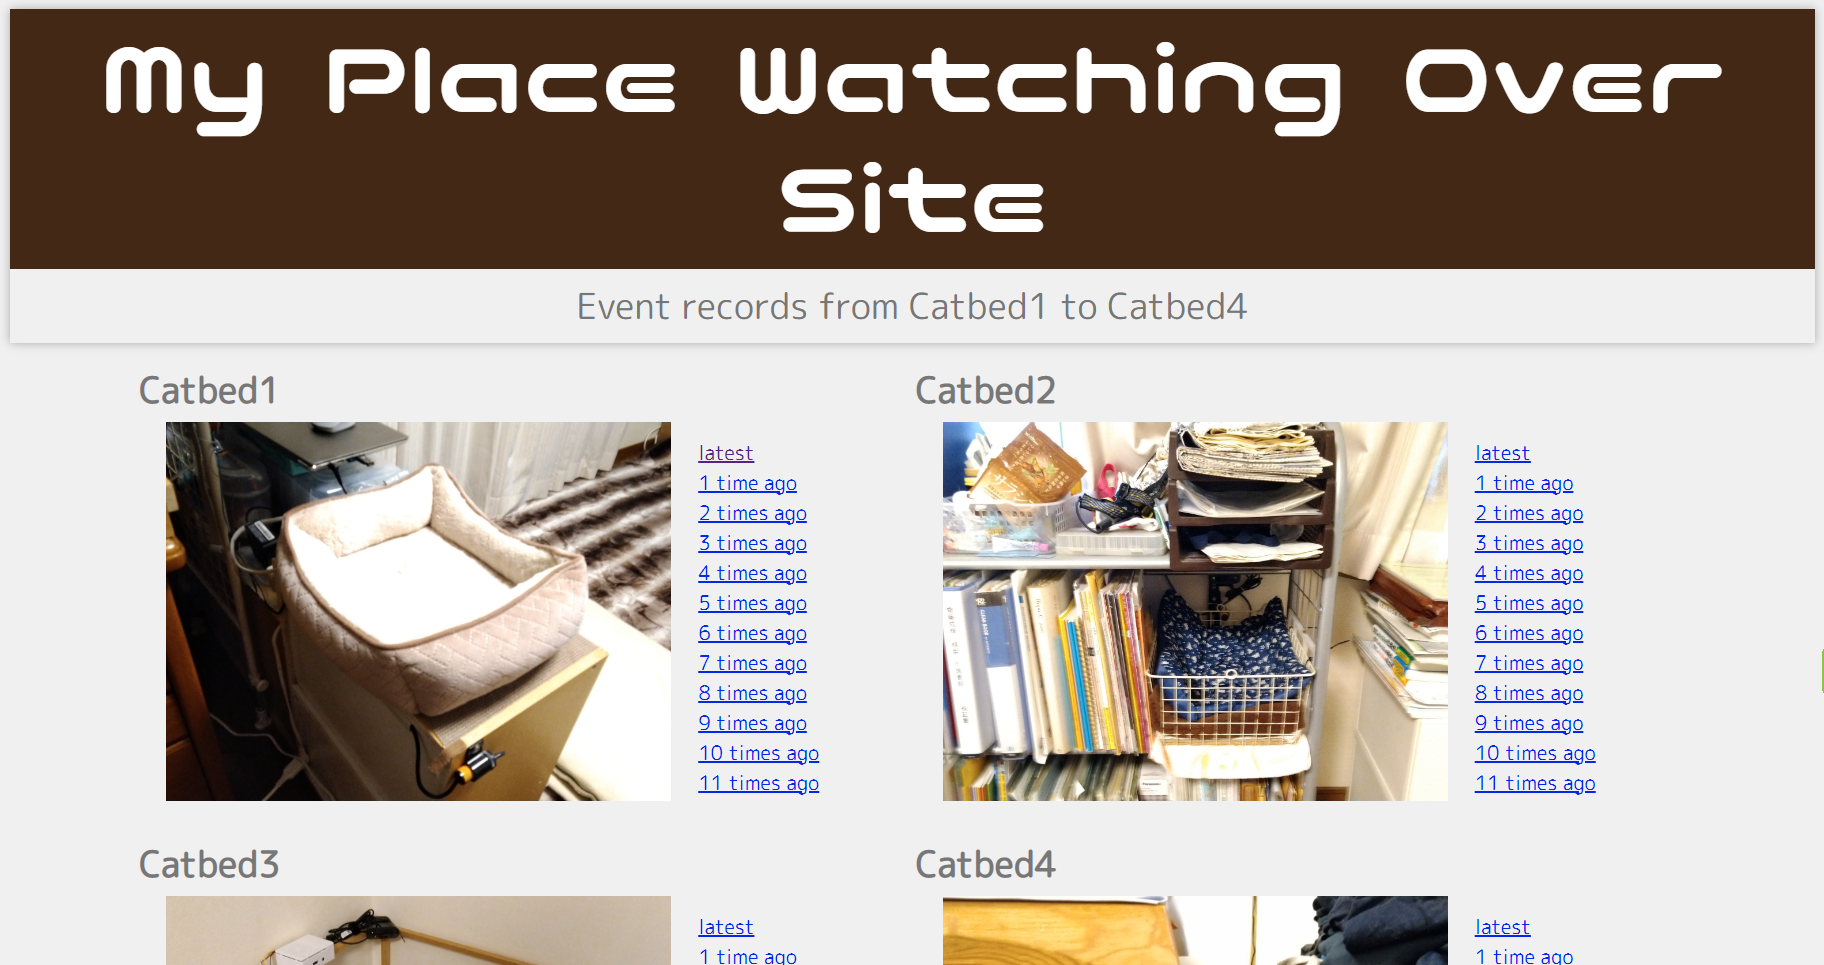
イベント録画の確認用web pageをS3に実装します。
sudo chmod u+x mimamori-project-deploy.sh
./mimamori-project-deploy.sh
CloudFrontDomainのURLに移動して動画ページが開くことを確認します。
再起動して動作を確認します。
sudo reboot
2台目以降のラズパイの構築
手順は1台目と同様です。
まず、microSDカードに二台目のラズパイ用のimageを焼き、ssh、インターネット接続が出来る状態にします。
普段、複数のホスト設定をしない方は、同じhostnameでimageを作らないように注意しましょう。起動後にstatic ipを設定する場合もipが重複しないようにご注意を。
以下、2台目の設定を想定してコマンドの入力をトレースします。
git cloneする前にpython3-dev、python3-pip、gitを導入します。
sudo apt install -y python3-dev python3-pip git
python3 -m pip install --upgrade pip
次にリポジトリーをgit cloneします。
git clone https://github.com/nsaito9628/Monitoring-system-with-Raspberry-Pi-and-AWS.git
次にパラメーターの対話入力をします。
cd ./Monitoring-system-with-Raspberry-Pi-and-AWS
python set_parameters.py
該当するラズパイのパラメーターだけパラメーターの決定で決めた値を入力していきます。
What number is this place to set RaspberryPi and cam (Allowed values are 1, 2, 3 or 4): 2
Input for Place No.2
Input place name: CatBed2
Input sensor type if normal close is '0' else normal open is '1': 1
Input trigger type if to use sensor is '0' else motion detection is '1': 1
Input S3 bucket name to upload mp4 files: neko-mimamori
Input your AWS account Id : ${your AWS account id}
入力完了すると./Monitoring-system-with-Raspberry-Pi-and-AWS/src/certにiot_prov_configが確認できます。
ls ../Monitoring-system-with-Raspberry-Pi-and-AWS/src/cert -al
total 16
drwxr-xr-x 2  4096 Aug 31 23:10 .
drwxr-xr-x 3  4096 Aug 31 23:10 ..
-rw-r--r-- 1   114 Aug 31 23:10 iot_prov_config
-rw-r--r-- 1  3772 Aug 31 23:10 iot_prov.sh
ラズパイでエッジ実行するPythonのProjectをuser rootに展開します。
cd ..
cp -r ./Monitoring-system-with-Raspberry-Pi-and-AWS/src/* ~
ラズパイにmqtt、openCV、awscli、samcli、boto3と必要な依存関係を導入します。postfix導入時に設定を聞かれるのでlocal onlyにします。
sudo chmod u+x environment.sh
./environment.sh
aws credentialsとregionの設定をします。事前にダウンロードしてあるIAM userのaccess key IDとsecret access keyを入力します。日本で使うならregionは東京になります。
aws configure
(Replace with your own key)
AWS Access Key ID[]: your Access Key ID
AWS Secret Access Key []: your Secret Access Key
Default region name []: ap-northeast-1
Default output format []:
AWS IoTにラズパイをモノとして登録してクライアント証明書を発行、ダウンロードします。
同時にラズパイの自動起動設定をします。
cd cert
sudo chmod u+x iot_prov.sh
./iot_prov.sh
再起動して動作を確認します。
sudo reboot
microSDカードの書込み保護
連続使用時は、書き込みの繰り返しや停電などの負荷でファイルシステムが破壊されないように、スワップ停止とRAMへの書き込み設定をします。
取り組み当初の3年半前からro.gitを使わせてもらってます。こちらやこちらを参考にさせて頂きました。
.sh化して楽をしようと思いましたが理解が不十分でrootで実行しないとできませんでした。
cd ..
sudo su
swapfileを停止します。
apt-get install git subversion rsync gawk busybox bindfs
echo Disabling swap
dphys-swapfile swapoff
dphys-swapfile uninstall
update-rc.d dphys-swapfile disable
systemctl disable dphys-swapfile
ro.gitをcloneします。
git clone https://github.com/josepsanzcamp/root-ro.git
起動設定をして再起動します。
rsync -va root-ro/etc/initramfs-tools/* /etc/initramfs-tools/
mkinitramfs -o /boot/initrd.gz
echo initramfs initrd.gz >> /boot/config.txt
reboot
mmcblk0p2が/mnt/root-roにmountされていることを確認します。

一度書込み保護を解除します。
sudo mount -o remount,rw /dev/mmcblk0p1
sudo grep -v initramfs /mnt/boot-ro/config.txt >/tmp/config.txt
sudo cp /tmp/config.txt /mnt/boot-ro/config.txt
sudo reboot
書込み保護/保護解除を.sh化してあるので/binにコピーして実行権限を付けます。
cd ..
sudo cp ./Monitoring-system-with-Raspberry-Pi-and-AWS/protect/protect /bin/
sudo cp ./Monitoring-system-with-Raspberry-Pi-and-AWS/protect/nonprotect /bin/
cd /bin
sudo chmod u+x protect
sudo chmod u+x nonprotect
構築と動作確認が終了したらmicroSDカードを書込み保護モードにして再起動します。
sudo protect
所感
約3年間、浅く広く、非力な自分にしては欲張って色々調べたLinuxとAWSの知識を振り返りました。
基本的には自分の備忘録ですが、自分のような境遇で近いアプローチをする方がこの投稿を見た時に何かの役に立てば幸いに存じます。
見守りシステムを題材とした学習の今後として、CloudFormationのmacroを試した後にcdkに挑戦したいと思います。
追記
修正 2022.09.04
リポジトリー修正箇所の解説を加筆修正しました。
set_parameters.pyの対話入力項目にイベント録画のトリガーを追加した部分の解説を追記しました。
修正 2022.10.25
IoT policyをResourceとtopicで制限した際にAWSアカウントIDの入力項を追加しました。