はじめに
これまで Nios® V プロセッサーの開発環境として対応しているのが Intel® Quartus® Prime Pro Edition のみでしたが、Intel® Quartus® Prime Standard Edition でも Version 22.1 より対応を開始しました。そこで、無償版の Intel® Quartus® Prime Lite Edition でも Nios® V プロセッサーの開発や評価が行えるか気になり、試してみました。
目次
1. 評価環境
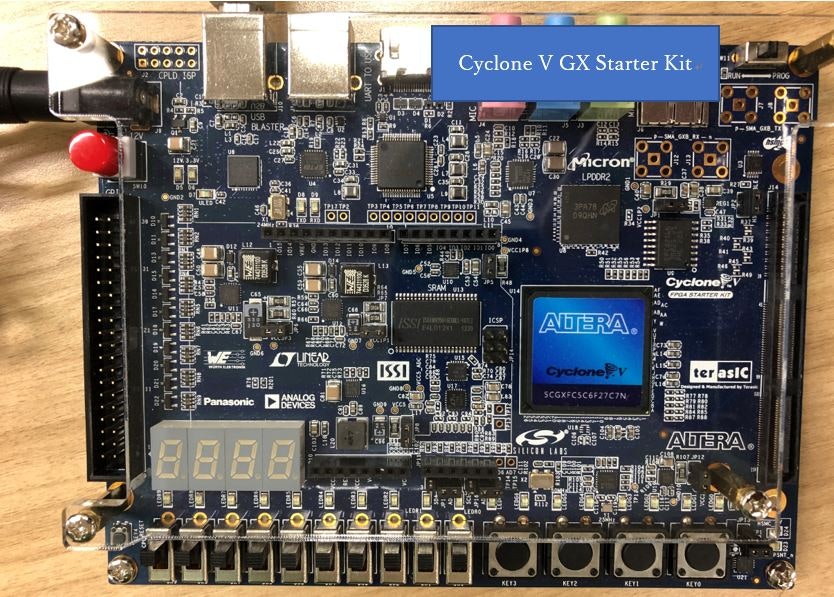
1.1 評価基板
Terasic 社の Cyclone V Starter Kit を使用して評価します。
1.2 開発ツールのインストール
Nios® V プロセッサーを開発するにあたり、下記の2つの開発ツールが必要になります。
- Intel® Quartus® Prime Lite Edition Version 22.1
- RiscFree IDE for Intel® FPGAs 22.1std.0.915
Intel® Quartus® Prime Lite Edition のダウンロードページには RiscFree IDE for Intel® FPGAs が存在しないので、Intel® Quartus® Prime Standard Edition のダウンロードページから RiscFree IDE for Intel® FPGAs はダウンロードしました。
(補足)RiscFree IDE for Intel® FPGAs 22.1std.0.915 は、Intel® Quartus® Prime Standard Edition のダウンロードページの Additional Software タブを選択していただき、画面を下へスクロールすることで確認できます。

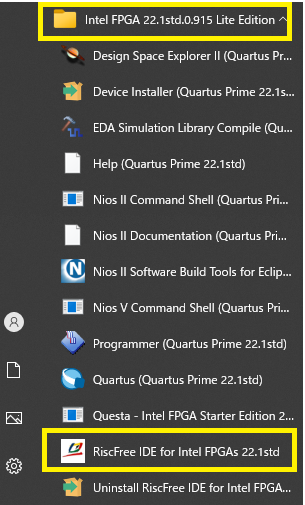
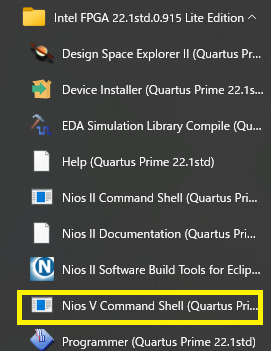
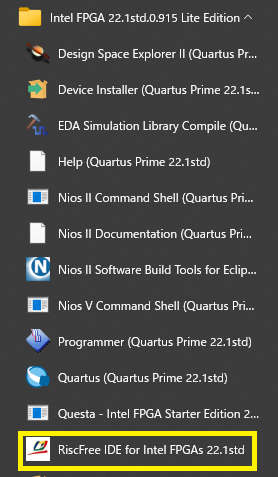
2つの開発ツールをそれぞれインストールします。インストール後は Windows スタートメニューから下記のように Intel® Quartus® Prime Lite Edition Version 22.1 の中に RiscFree IDE for Intel® FPGAs 22.1std.0.915 が確認できると思います。
1.3 Nios® V のライセンスダウンロード
Intel® Quartus® Prime Lite Edition で Nios® II/e を使用する場合、ライセンスファイルは必要なかったかと思いますが、Nios® V は無償のライセンス発行が必要となります。
手順は下記のサイトを参考に発行しました。
https://www.macnica.co.jp/business/semiconductor/articles/intel/140701/
(補足) Quartus へのライセンスファイルの設定方法も上記リンクの下にある関連記事に記載がありました。
2. FPGA デザインの作成
実際にFPGAのデザインを作成していきます。
2.1 新規プロジェクトの生成
下記のデバイス型番を選択してプロジェクトを作成します。
Device:5CGXFC5C6F27C7
2.2 Platform Designer デザイン
下記のように Platform Designer でデザインを作成しました。
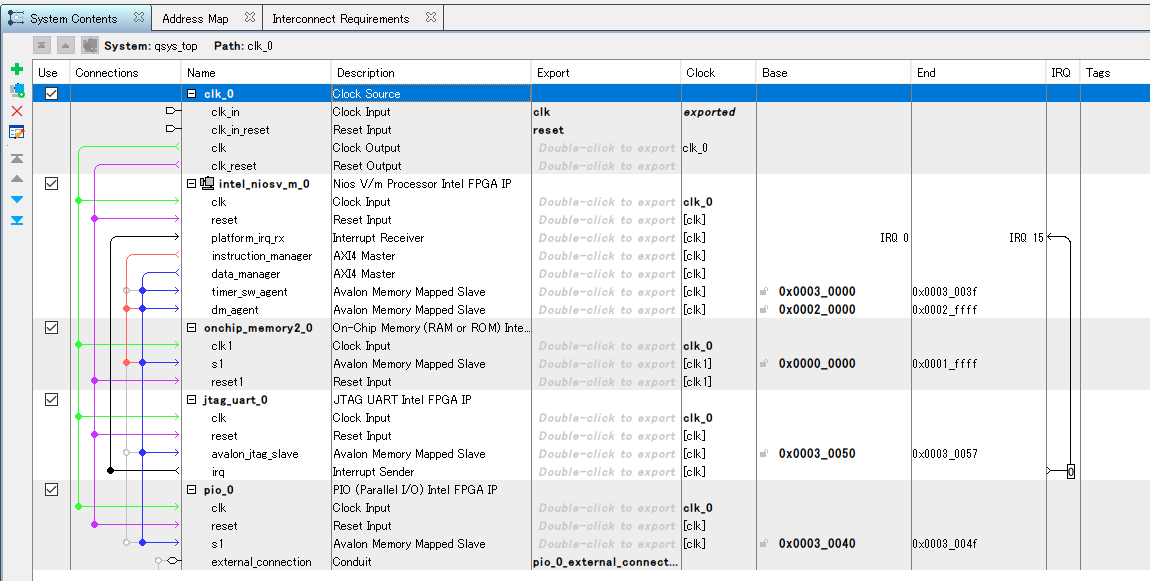
各種 IP のデフォルト設定から変更したのは下記の2か所のみです。
-
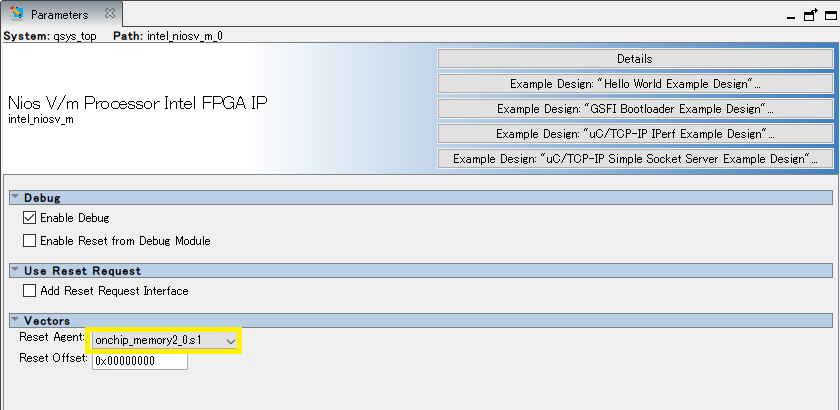
NIOS V/m Processor Intel FPGA IP の設定
下記の通り、Reset Agent を onchip_memory2_0.s1に変更しました。それ以外はデフォルトになります。
-
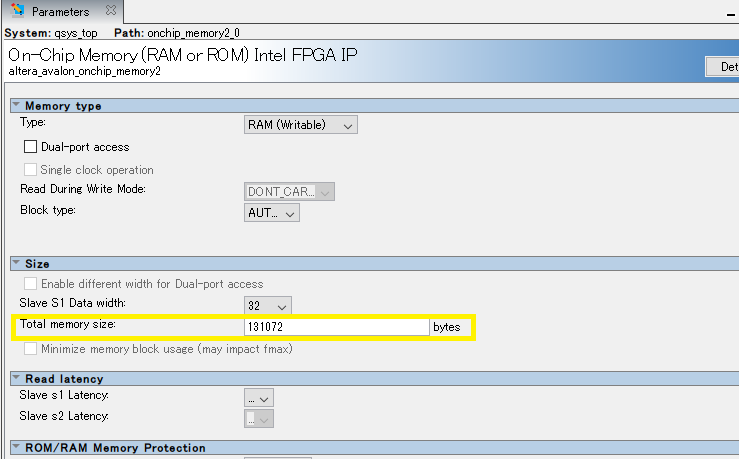
On-Chip Memory(RAM or ROM) Intel FPGA IP
下記の通り、Total memory size を 131072 byte に変更しています。
2.3 TOP 階層の作成
RTL の TOP 階層を下記のように記述します。
module top (
	input  wire 		clk,
	input  wire 		reset_n,
	output wire [7:0]	led
);

    qsys_top u_qsys_top (
        .clk_clk                          (clk),
        .reset_reset_n                    (reset_n),
        .pio_0_external_connection_export (led)
    );

endmodule
2.4 ピン配置
下記のようにピン配置を行いました。
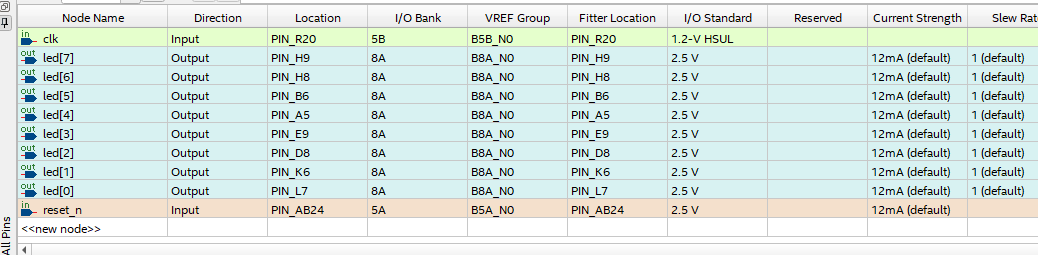
qsfファイルのピン配置部分は、下記のようになります。
set_location_assignment PIN_R20 -to clk
set_instance_assignment -name IO_STANDARD "1.2-V HSUL" -to clk
set_location_assignment PIN_AB24 -to reset_n
set_location_assignment PIN_H9 -to led[7]
set_location_assignment PIN_H8 -to led[6]
set_location_assignment PIN_B6 -to led[5]
set_location_assignment PIN_A5 -to led[4]
set_location_assignment PIN_E9 -to led[3]
set_location_assignment PIN_D8 -to led[2]
set_location_assignment PIN_K6 -to led[1]
set_location_assignment PIN_L7 -to led[0]
2.5 コンパイル
コンパイルを実施します。
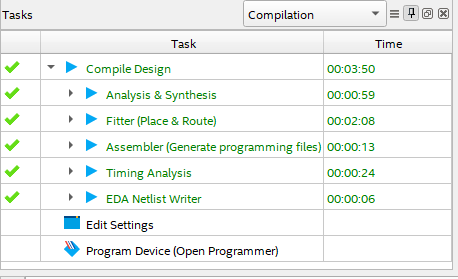
ここまでできたらFPGAデザインについては作成完了です。
3. ソフトウェアデザインの作成
続いてソフトウェアのデザインを作成していきます。
3.1 Application フォルダを作成
下記のようにプロジェクトフォルダ(.qpf, .qsf のあるフォルダ)に software フォルダを作成し、その下に app フォルダを作成します。
<プロジェクトフォルダ>/software/app
作成した app フォルダの中に C のソースコードを格納します。
今回は下記のように Intel® Quartus® Prime Pro Edition の Hello World Example Design のソフトウェアと PIO (LED) を制御するソフトウェアを記述して app フォルダに格納しました。
#include <stdio.h>
#include <unistd.h>
#include <io.h>
#include "system.h"

void looper() {
    for (int i = 0; i < 1000; ++i) {
        printf("Hello world, this is the Nios V/m cpu checking in %d...\n", i);
    }
}

int main() {

	// Hello World TEST
    looper();
    usleep(1000000);
    printf("Bye world!\n");

	// LED TEST
	while(1)
	{
		IOWR(PIO_0_BASE, 0, 0x55);
		usleep(500000);
		IOWR(PIO_0_BASE, 0, 0xAA);
		usleep(500000);
	}

    return 0;

}
3.2 BSP Editor の起動
Intel® Quartus® Prime Pro Edition とは起動方法が異なるので注意が必要です。
(Pro 版は Platform Designer から起動可能)
まず、Nios V Command Shell を起動します。
Nios V Command Shell が起動できたら、プロジェクトフォルダに移動し、
niosv-bsp-editor とタイプし、BSP Editor を起動します。
Entering Nios V shell
Microsoft Windows [Version 10.0.19044.2251]
(c) Microsoft Corporation. All rights reserved.

[niosv-shell] C:\intelFPGA_lite\22.1std> cd "C:\work\niosv\sample"

[niosv-shell] C:\work\niosv\sample> niosv-bsp-editor
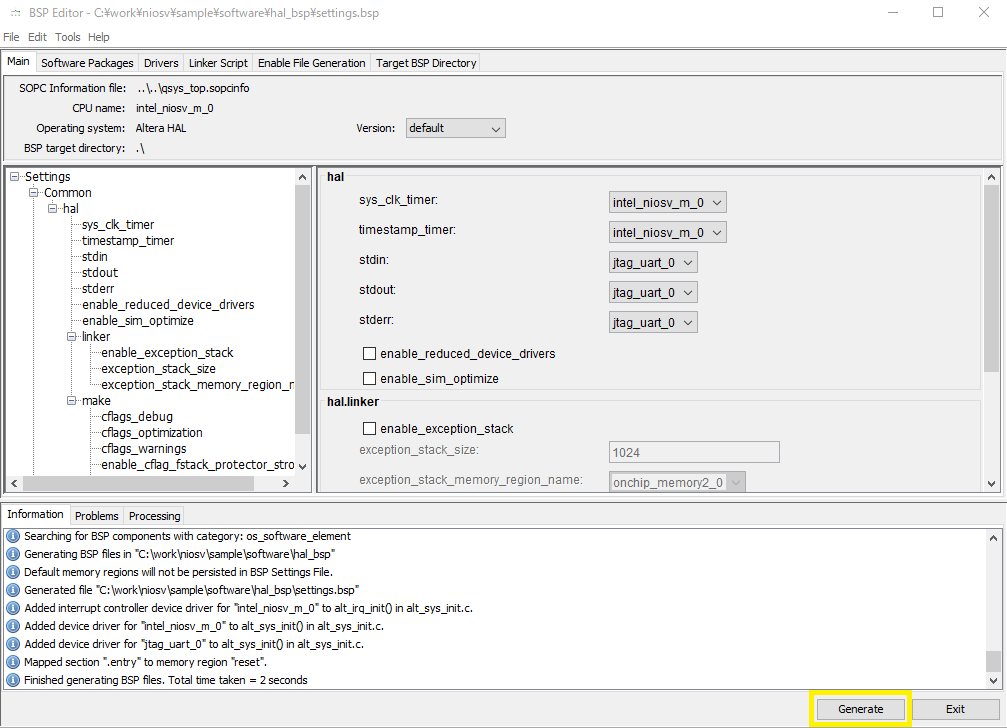
BSP Editor 起動後、File → New BSP を選択し、qsys ファイルを generate した時に生成された sopcinfo ファイルを取り込みます。あとはデフォルトのまま OK を選択します。

下記の画面が表示されますので、設定変更することなくそのまま Generate をクリックします。
3.3 Application Project の実行
3.3.1 CMakelist.txt の生成
下記のコマンドにて CMakelist.txt を出力します。
[niosv-shell] C:\work\niosv\sample> niosv-app --bsp-dir=software/hal_bsp --app-dir=software/app --srcs=software/app/sample.c --elf-name=sample.elf
2022.11.29.09:51:59 Info: Elf name is set to "sample.elf".
2022.11.29.09:51:59 Info: "software\app\CMakeLists.txt" was generated.
3.3.2 Cmake の実行
下記のコマンドにて Cmake を実行します。
[niosv-shell] C:\work\niosv\sample> cmake.exe -G "Unix Makefiles" -DCMAKE_BUILD_TYPE=Debug -B software/app/build/Debug -S software/app
-- The ASM compiler identification is GNU
-- Found assembler: C:/intelFPGA_lite/22.1std/riscfree/toolchain/riscv32-unknown-elf/bin/riscv32-unknown-elf-gcc.exe
-- The C compiler identification is GNU 11.2.0
-- Detecting C compiler ABI info
-- Detecting C compiler ABI info - done
-- Check for working C compiler: C:/intelFPGA_lite/22.1std/riscfree/toolchain/riscv32-unknown-elf/bin/riscv32-unknown-elf-gcc.exe - skipped
-- Detecting C compile features
-- Detecting C compile features - done
-- The CXX compiler identification is GNU 11.2.0
-- Detecting CXX compiler ABI info
-- Detecting CXX compiler ABI info - done
-- Check for working CXX compiler: C:/intelFPGA_lite/22.1std/riscfree/toolchain/riscv32-unknown-elf/bin/riscv32-unknown-elf-g++.exe - skipped
-- Detecting CXX compile features
-- Detecting CXX compile features - done
-- Configuring done
-- Generating done
-- Build files have been written to: C:/work/niosv/sample/software/app/build/Debug
4. ソフトウェアのプロジェクト生成
4.1 RiscFree IDE for Intel® FPGAs の起動
スタートメニューから下記のように RiscFree IDE for Intel® FPGAs を起動します。
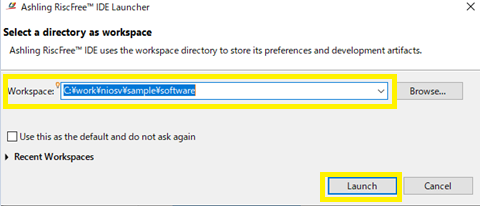
4.1.1 RiscFree IDE for Intel® FPGAs の WorkSpace の設定
立ち上げるとWorkSpaceを聞かれるので、<プロジェクトフォルダ>/software を選択してLaunchします。今回の例では、C:\work\niosv\sample\software になります。
4.1.2 RiscFree IDE for Intel® FPGAs の 新規 Project を起動
File => New => Project...より 新 Project を起動します。

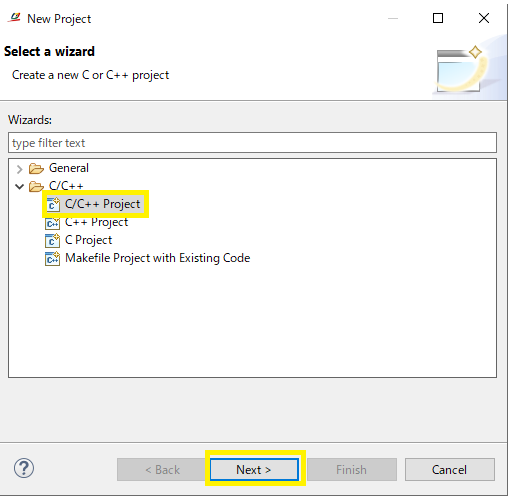
4.1.3 RiscFree IDE for Intel® FPGAs の Project の Wizard 選択
Wizard は C/C++ フォルダの中にある C/C++ Project を選択し、Next をクリックします。
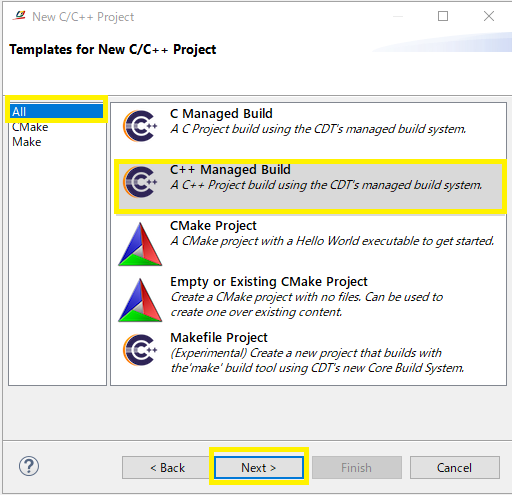
4.1.4 RiscFree IDE for Intel® FPGAs の Project Template を選択
All を選択肢、C++ Manged Build を選択して、Next をクリックします。
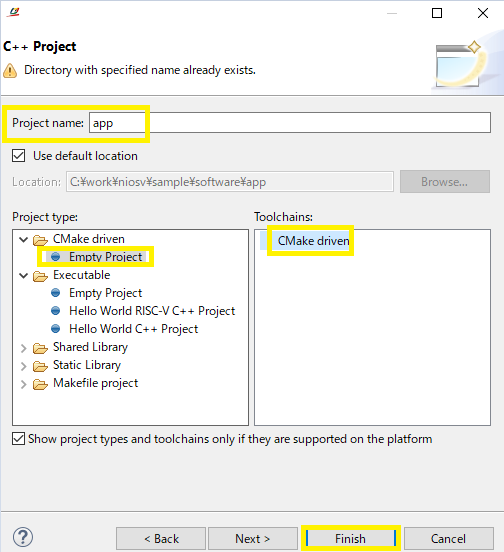
4.1.5 RiscFree IDE for Intel® FPGAs の Project の生成
Project Name に application フォルダの app を選択し、
Project Type: を CMake Driven の Empty Project を選択して、
Toolchains: を CMake Driven を選択します。
そして最後に Finish をクリックします。
以上で、プロジェクトの生成は完了です。
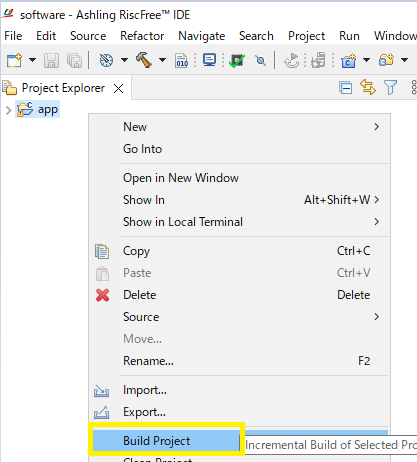
4.1.6 RiscFree IDE for Intel® FPGAs を使用して Project の ビルド
下記のように Project Explorer 内の app を右クリックして Build Project を実行します。
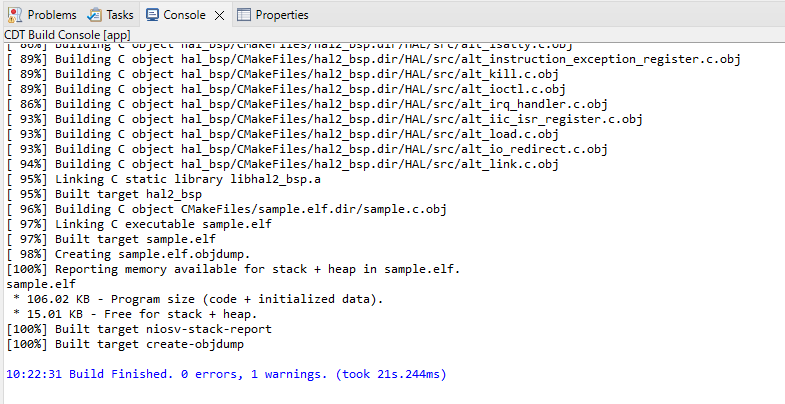
ビルド実行結果は下記のようになります。
5. NIOS V の動作確認
Cyclone V GX Starter Kit と PC を USB ケーブルで接続して、Cyclone V GX Starter Kit の電源を入れます。
5.1 Programmer を使用して sof ファイルの書き込み
Programmer を使用して sof ファイルを書き込みます。

5.2 ソフトウェアの実行
5.2.1 Risc Free IDE の Run As を実行
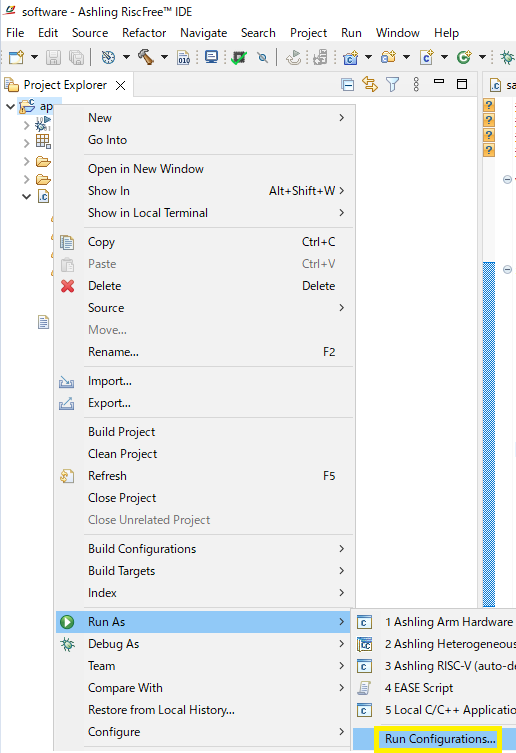
下記のように Project Explorer 内の app を右クリックして Run As を選択し Run Configuraions... を実行します。
5.2.2 Run Configuration の New Configuration 起動
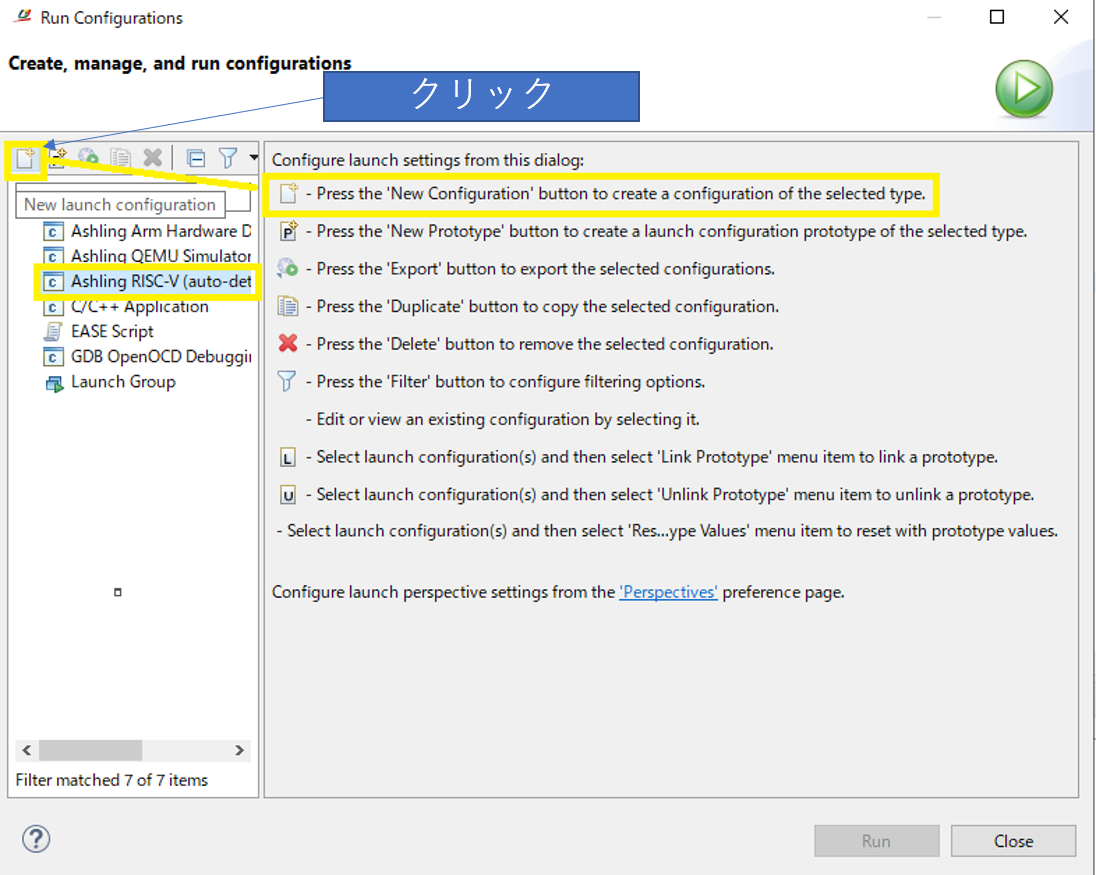
Ashling RISC-V(auto-detect)Hardware Debugging を選択して、左上の New Configuration のアイコンをクリックします。
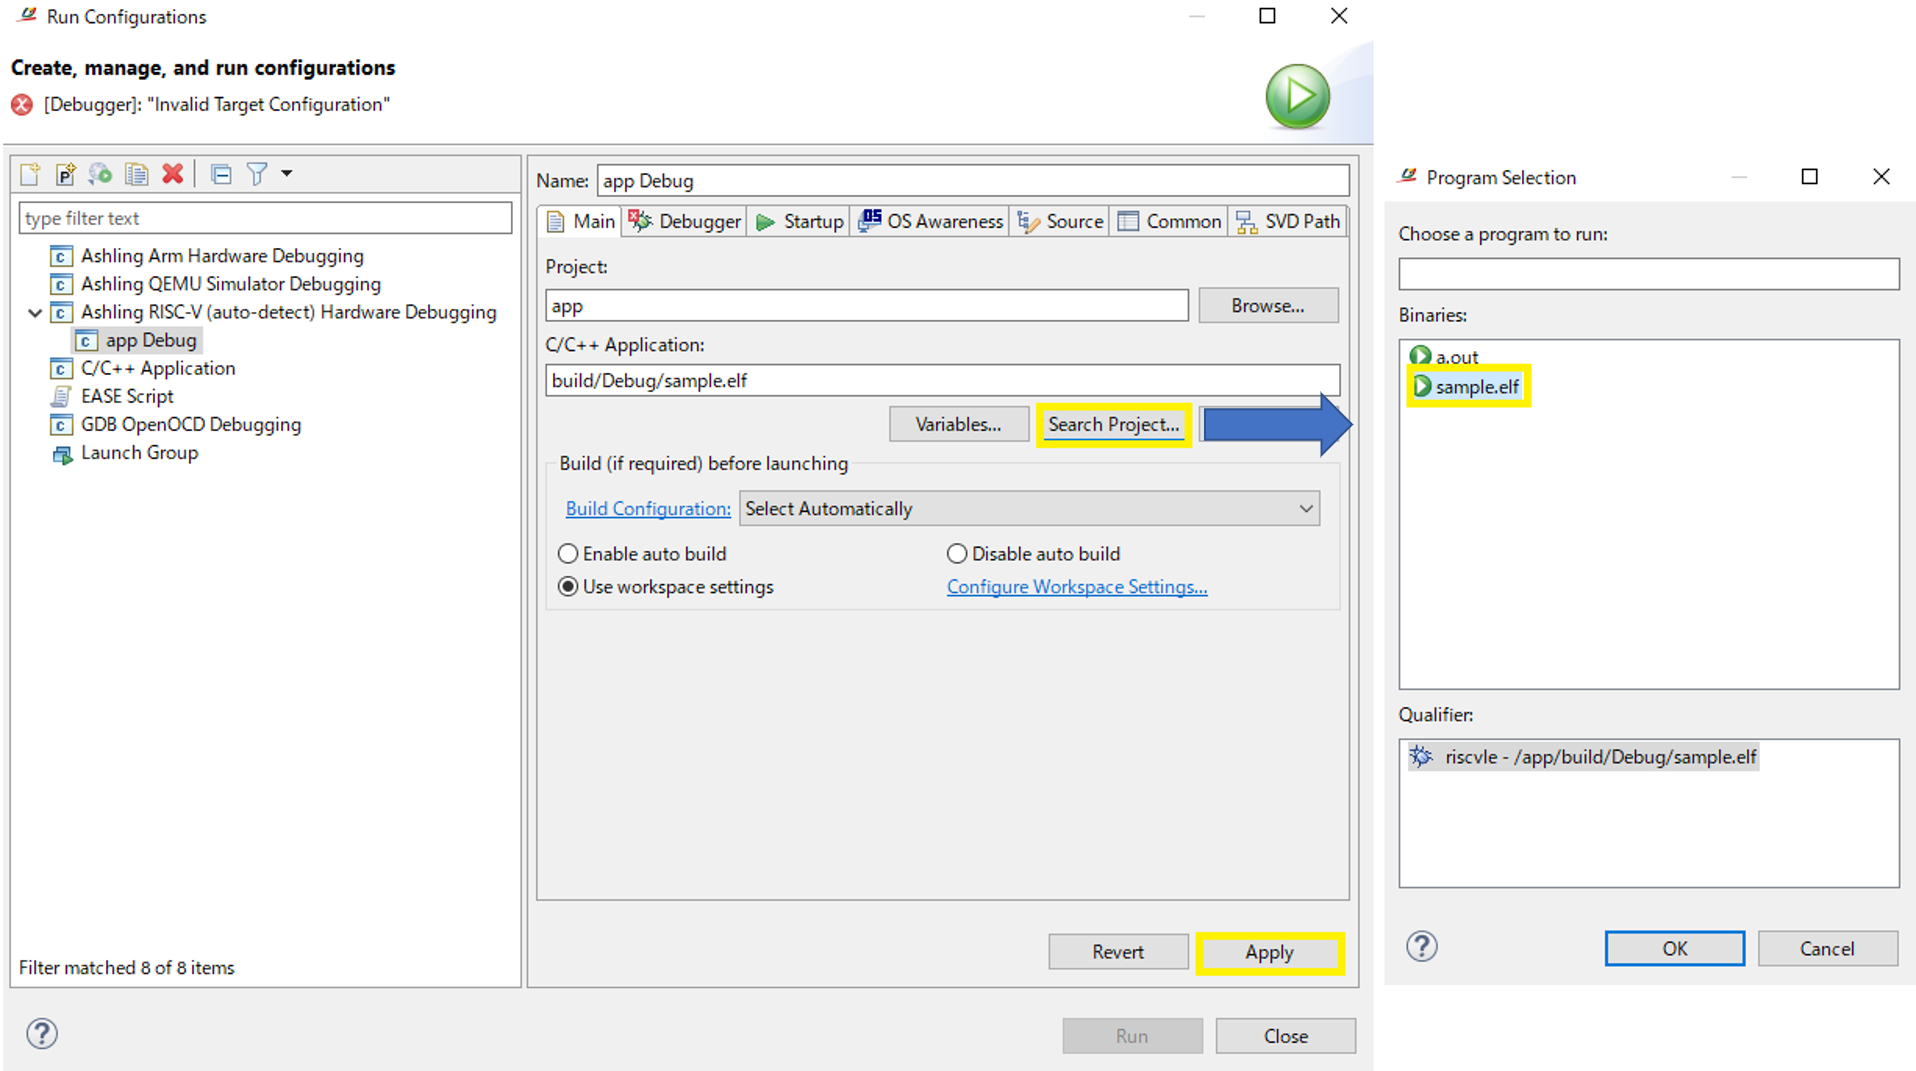
5.2.3 Run Configuration の Main タブ設定
Main タブの Serach Project... から対象の elf を選択します。(今回は sample.elf )
選択したら、右下の Apply をクリックします。
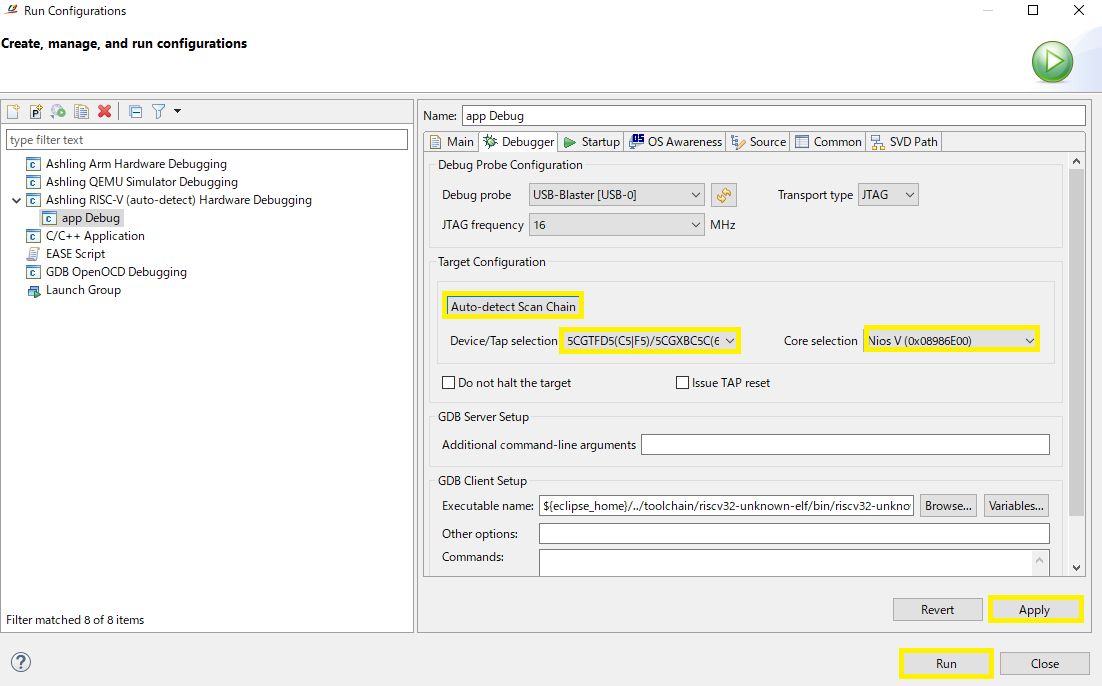
5.2.4 Run Configuration の Debugger タブ設定
次に Debugger タブに移動します。
Auto-detect Scan Chain をクリックします。
クリック後、Device/Tap Selection にデバイス情報、Core Selection に NIOS V の情報が表示されていることを確認して Apply をクリックします。
その後、RUN をクリックします。
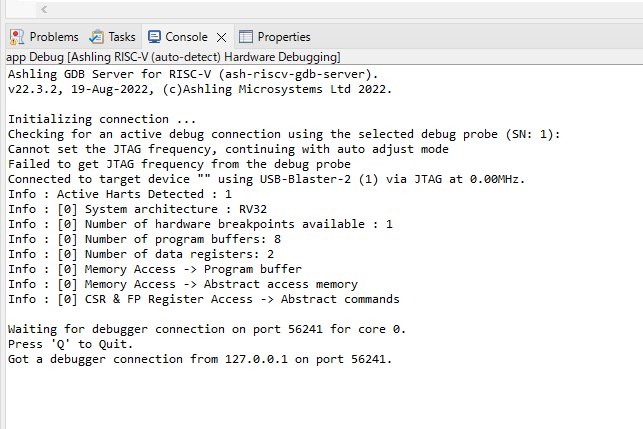
5.2.5 Run As 実行後のコンソール画面
ソフトウェアを実行した後のコンソールは下記の状態になり、Hello World も出力されず期待している LED も点灯されていません。
5.2.6 Run As 実行後のコンソール画面
Hello World を標準出力するために、JTAG UART を有効する必要があります。
下記のように juart-terminal.exe を NIOS V Command Shell から実行いただくと
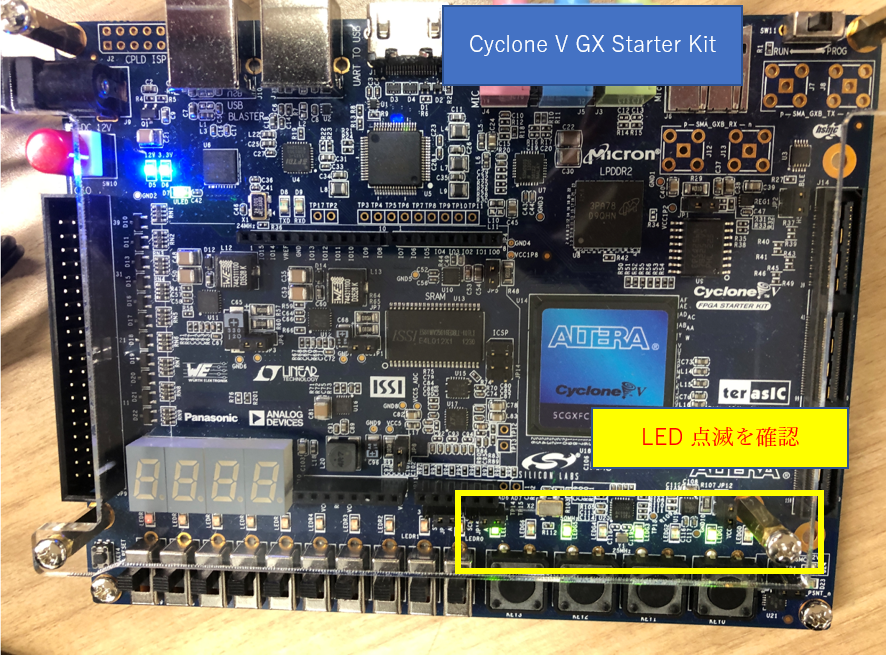
1000回 Hello World が標準出力され、Cyclone V GX Starter Kit の LED が点滅を開始します。
Entering Nios V shell
Microsoft Windows [Version 10.0.19044.2251]
(c) Microsoft Corporation. All rights reserved.

[niosv-shell] C:\intelFPGA_lite\22.1std> juart-terminal.exe
juart-terminal: connected to hardware target using JTAG UART on cable
juart-terminal: "USB-Blaster [USB-0]", device 1, instance 0
juart-terminal: (Use the IDE stop button or Ctrl-C to terminate)

Hello world, this is the Nios V/m cpu checking in 0...
Hello world, this is the Nios V/m cpu checking in 1...
Hello world, this is the Nios V/m cpu checking in 2...
Hello world, this is the Nios V/m cpu checking in 3...
Hello world, this is the Nios V/m cpu checking in 4...
Hello world, this is the Nios V/m cpu checking in 5...
Hello world, this is the Nios V/m cpu checking in 6...
Hello world, this is the Nios V/m cpu checking in 7...
Hello world, this is the Nios V/m cpu checking in 8...
Hello world, this is the Nios V/m cpu checking in 9...
Hello world, this is the Nios V/m cpu checking in 10...
Hello world, this is the Nios V/m cpu checking in 11...
<中略>
Hello world, this is the Nios V/m cpu checking in 988...
Hello world, this is the Nios V/m cpu checking in 989...
Hello world, this is the Nios V/m cpu checking in 990...
Hello world, this is the Nios V/m cpu checking in 991...
Hello world, this is the Nios V/m cpu checking in 992...
Hello world, this is the Nios V/m cpu checking in 993...
Hello world, this is the Nios V/m cpu checking in 994...
Hello world, this is the Nios V/m cpu checking in 995...
Hello world, this is the Nios V/m cpu checking in 996...
Hello world, this is the Nios V/m cpu checking in 997...
Hello world, this is the Nios V/m cpu checking in 998...
Hello world, this is the Nios V/m cpu checking in 999...
Bye world!
そして基板の LED も点滅することが確認できました。
6. まとめ
今回 Intel® Quartus® Prime Lite Edition Version 22.1 で Nios® V /m 動作するか試してみましたが、無事動作することを確認できました。
最後に個人的にハマったポイントを記載しておきます。
- Intel® Quartus® Prime Lite Edition Version 22.1 のダウンロードサイトには RiscFree IDE for Intel® FPGAs が存在しないので、Intel® Quartus® Prime Standard Edition Version 22.1 版のダウンロードサイトからダウンロードする必要がある
- Nios® V を開発する上で無償のライセンスをインテル公式サイトから発行する必要がある
- BSP Editor の起動は Nios V Command Shell から起動する必要がある ( Pro 版は Platform Designer から起動可能)
- 標準出力するときには Nios V Command Shell から juart-terminal.exe を実行する必要がある
Quartus の無料版でも Nios® V /m が使えることが分かったので、皆様もお試しください。