前回の環境構築後に実際にUnityで強化学習を行っていく!
前回の記事はこちら、https://qiita.com/nol_miryuu/items/32cda0f5b7172197bb09
前提条件
Unityの基礎知識が多少必要です(オブジェクトの作り方・名前の付け方)
目的
青い球(AI Agent)が床から落ちずに黄色い箱(Target)に素早く近づくことができるようにAIを学習させる
構成
状態:Vector Observation(サイズ=8)
・ TargetのX,Y,Z座標の3つ
・ RollerAgentのX,Y,Z座標の3つ
・ RollerAgentのX,Z方向速度の2つ(Y方向には移動しないので除外)
行動:Continuous(サイズ=2)
・ 0:RollerAgentのX方向に加える力
・ 1:RollerAgentのZ方向に加える力
報酬:
・ RollerAgentがTargetに近づいた(RollerAgentとTargetとの距離が0に近づいた)場合,報酬(+1.0)を与え、エピソード完成
・ RollerAgentが床から落ちた(RollerAgentのY方向の位置が0未満になったら)場合、報酬を与えずにエピソード完了
決定:
・ 10ステップごと
強化学習サイクル(1ステップごとに実行されるプロセス)
状態取得 → 行動決定 → 行動実行と報酬取得 → ポリシー更新
学習環境の準備
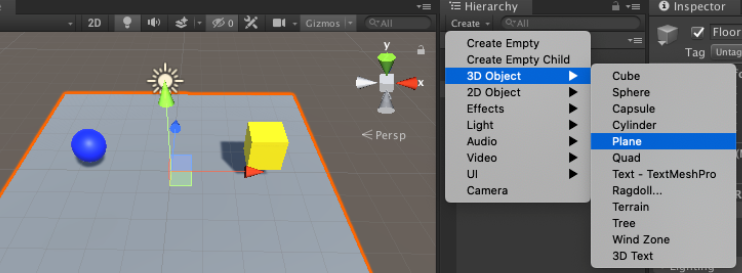
1.青い球、名前=RollerAgentを配置する
2.黄色い箱 名前=Target を配置する
3.床 名前=Floor を配置する
4.Main Camera : カメラの位置・角度を赤丸のように設定(全体がよく見える位置に調整するため)
5.各オブジェクトに色を付けるためにMaterialを作成(Asset>create)
6.メニューのWindowからPackage Managerを選択(ML-Agentをインポートする)
左上の「+」ぼたんを押してAdd package from diskを選択
前回作成したディレクトリに行き、ml-agents/com.unity.ml-agents/package.jsonを選択する
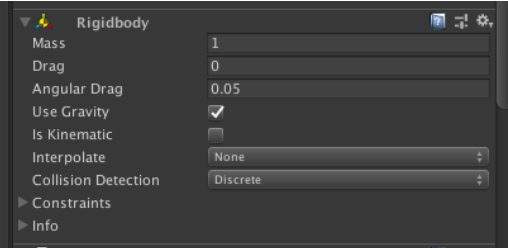
7.RollerAgent(青い球)にコンポーネント(機能)を追加する
・ Rigidbody : 物理シミュレーションの仕組み
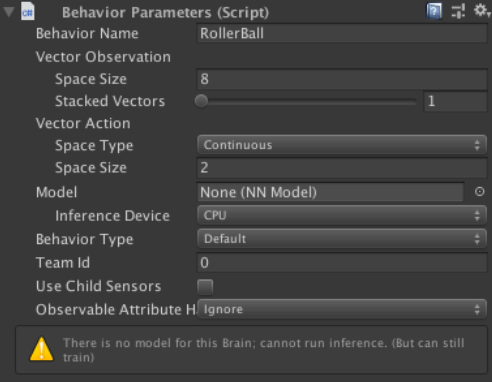
・ Behavior Parameters : RollerAgentの状態と行動のデータを設定
・ Decision Requester : 何ステップごとに「決定」を要求するかを設定
基本的にステップは0.02秒ごとに実行される。Decision Periodが「5」の場合は5 x 0.02 = 0.1秒ごと、 「10」の場合は10 x 0.02 = 0.2秒ごとに「決定」が実行されるRollerAgentに対しては最終的に下図のように設定する
Behavior Paramenters
・Behavior Name:RollerBall(この名前でモデルが生成される)
・Vector ObservationのSpace Size:8(観察する状態の種類)
・Space Type:Continuous(行動の種別)
・Vector ActionのSpace Size:2(行動の種類)

8.RollerAgents.csスクリプトを作成
・void Initialize()・・・エージェントのゲームオブジェクト生成時に1回だけ呼ばれる
・OnEpisodeBegin()・・・エピソード開始時に呼ばれる
・CollectObservations(VectorSensor sensor)・・・エージェントに渡す状態データを設定する
・OnActionReceived(float[] vactorAction)・・・決定された行動を実行し、報酬取得とエピソード完了を行う
using System.Collections;
using System.Collections.Generic;
using UnityEngine;
using Unity.MLAgents;
using Unity.MLAgents.Sensors;

public class RollerAgent : Agent
{
    public Transform target;
    Rigidbody rBody;

    public override void Initialize()
    {
        this.rBody = GetComponent<Rigidbody>();
    }

    // エピソード開始時に呼ばれる
    public override void OnEpisodeBegin()
    {
        if (this.transform.position.y < 0) // RollerAgent(球)が床から落下している時に以下をリセット
        {
            this.rBody.angularVelocity = Vector3.zero; // 回転加速度をリセット
            this.rBody.velocity = Vector3.zero;         // 速度をリセット
            this.transform.position = new Vector3(0.0f, 0.5f, 0.0f); // 位置をリセット
        }
        // Target(キューブ)の位置をリセット
        target.position = new Vector3(Random.value * 8 - 4, 0.5f, Random.value * 8 - 4);
    }

    // エージェントに渡す観察データ(8項目)を設定する
    public override void CollectObservations(VectorSensor sensor)
    {
        sensor.AddObservation(target.position); // Target(キューブ)のXYZ座標
        sensor.AddObservation(this.transform.position); // RollerAgentのXYZ座標
        sensor.AddObservation(rBody.velocity.x); // RollerAgentのX軸方向の速度
        sensor.AddObservation(rBody.velocity.z); // RollerAgentのZ軸方向の速度
    }

    // 行動実行時に呼ばれる
    public override void OnActionReceived(float[] vectorAction)
    {
        // RollerAgentに力を加える
        Vector3 controlSignal = Vector3.zero;

        controlSignal.x = vectorAction[0]; // ポリシーによって決定された行動データをセットする
                                                              // vectorAction[0]は X方向 に加える力(-1.0 〜 +1.0)
        controlSignal.z = vectorAction[1]; // ポリシーによって決定された行動データをセットする
                                                              // vectorAction[1]は Y方向 に加える力(-1.0 〜 +1.0)

        rBody.AddForce(controlSignal * 10);

        // RollerAgentとTargetとの距離を測定
        float distanceToTarget = Vector3.Distance(this.transform.position, target.position);

        // RollerAgentがTargetの位置に到着したとき
        if(distanceToTarget < 1.42f)
        {
            AddReward(1.0f); // 報酬を与える
            EndEpisode(); // エピソードを完了する
        }

        // RollerAgentが床から落下したとき
        if(this.transform.position.y < 0)
        {
            EndEpisode(); // 報酬を与えずにエピソードを完了する
        }
    }
}
9.RollerAgentのプロパティを設定
Max Step:エピソードの最大ステップ数、エピソードのステップ数が設定値を超えるとエピソード完了となる
Max Stepを1000、Target欄に黄色の箱「Target」を選択
10.ハイパラメータ設定ファイルの作成
・ml-agents/config/にsampleディレクトリ作成
・その中にRollerBall.yamlファイルを作成、ファイル内容は以下のとおり
`ハイパーパラメータ(訓練設定ファイル 拡張子.yaml[ヤムルと読む] )
- 学習に利用するパラメータ
- 人間が調整する必要がある
- 強化学習アルゴリズム(PPO/SAC)ごとに設定項目が異なる
`
behaviors:
  RollerBall:
    trainer_type: ppo
    summary_freq: 1000
    hyperparameters:
      batch_size: 10
      buffer_size: 100
      learning_rate: 0.0003
      learning_rate_schedule: linear
      beta: 0.005
      epsilon: 0.2
      lambd: 0.95
      num_epoch: 3
    network_settings:
      normalize: true
      hidden_units: 128
      num_layers: 2
      vis_encode_type: simple
    reward_signals:
      extrinsic:
        gamma: 0.99
        strength: 1.0
    keep_checkpoints: 5
RollerAgentの学習開始
前回のQittaで作成した仮想環境を動かす
poetry shell
ml-agentsディレクトリで以下のコマンドを実行する
mlagents-learn config/sample/RollerBall.yaml --run-id=model01
最後のmodel01は新たに訓練するたびに別名をつける
Start training by pressing the Play button in the in the Unity Editor.
上のコードがterminalに表記されたらUnityに戻って再生ボタンを押すと実行されます
1.Unityの再生ボタンを押すと訓練が始まる。
Stepが50000ごとにターミナルに情報が表示される。
Mean Reward:平均報酬ポイント・・・値が高くなれば精度が上がる. 1.0になったら訓練終了してしましょう。


