はじめに
- Cloud Composerに入門した時に確認したことのメモです。(QA方式)
確認したこと
Cloud Composerとは?
- Apache Airflow で構築された、フルマネージドのワークフローオーケストレーションサービス
- ハイブリッドおよびマルチクラウド環境にまたがるパイプラインを作成、スケジューリング、モニタリング
- Apache Airflow のオープンソースのプロジェクト上に構築され、Python を使用して運用
- 特定のベンダーに依存する必要がなくなり、使用も簡単
仕組みは?
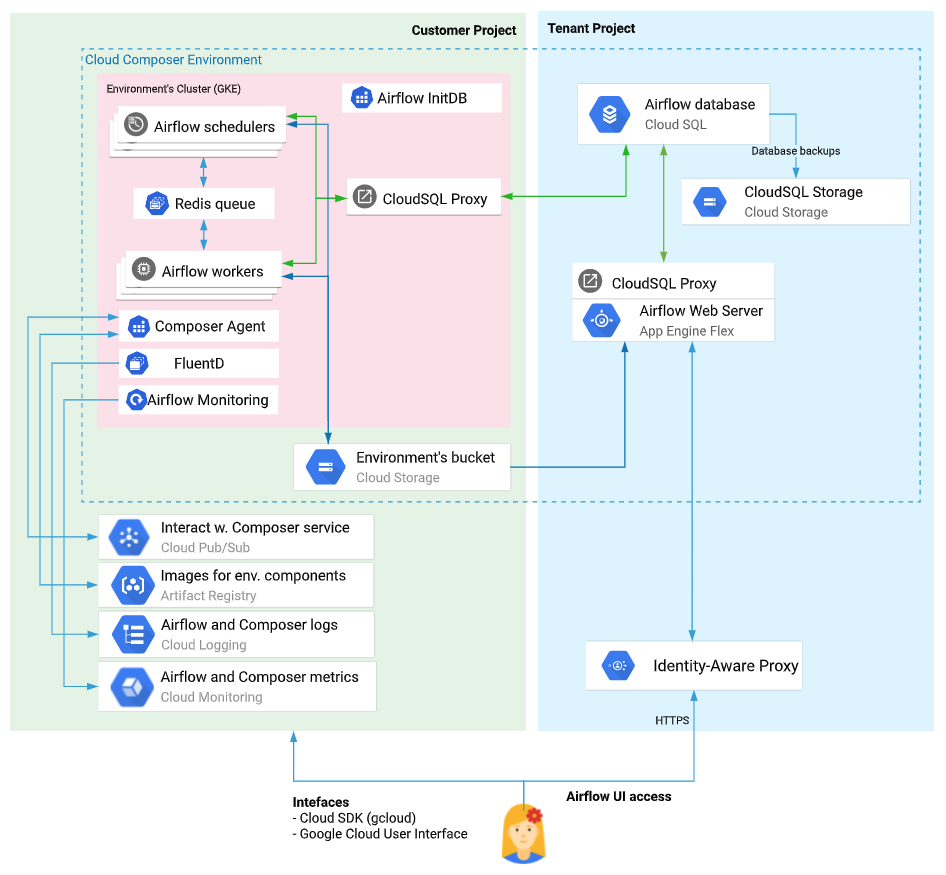
Cloud Composer 環境のアーキテクチャ から引用
- 利用者としては、「DAGファイル」と呼ばれる.pyのファイルをGCSの指定のバケット下に置くだけで、ワークフローをどんどん追加して、やりたいタスクを動かしていくことができる
- Airflow Worker(s): 各タスクを実行するワーカー。node_countの設定で増やせる
- Cloud Storage
- DAGs: ワークフローを記述するファイルを配置する
- Logs: 各ワーカー上で出力されたログのファイルが配置される
- plugin: DAGのなかで読み込みたい外部ファイルやモジュールなどを配置する
シンプルな構築・利用手順は?
1. Cloud Composer APIの有効化
- コンソールからCloud Composer APIのENABLEを押下
2. Cloud Composer 環境を作成する
- コンソールからComposer
- -> 環境の作成
Location: us-central1など
Image Version: composerとairflowのバージョン
Maintenance windows: 週に12h必要
Service account: This service account runs the pods of your environment and performs environment operations such as upgrading your environment to a new version
Environment resources: Scheduler, Web server, WorkerのCPU・Memory・Storageなど
Network configuration: GKEのネットワーク設定(IPレンジなど)
- -> GKEやGCSが作成される(GKEのコンソール画面からclustersやServicesが確認できる)
3. DAGファイルの作成
- v2の場合の例
example_v2_dag.py
from airflow.decorators import dag, task
from airflow.utils.dates import days_ago

@dag(default_args={'owner': 'airflow'}, schedule_interval=None, start_date=days_ago(2))
def tutorial_taskflow_api_etl():
   @task
   def extract():
       return {"1001": 301.27, "1002": 433.21, "1003": 502.22}

   @task
   def transform(order_data_dict: dict) -> dict:
       total_order_value = 0

       for value in order_data_dict.values():
           total_order_value += value

       return {"total_order_value": total_order_value}

   @task()
   def load(total_order_value: float):

       print("Total order value is: %.2f" % total_order_value)

   order_data = extract()
   order_summary = transform(order_data)
   load(order_summary["total_order_value"])

tutorial_etl_dag = tutorial_taskflow_api_etl()
- v1の場合の例
tutorial.py
from datetime import datetime, timedelta
from textwrap import dedent
# The DAG object; we'll need this to instantiate a DAG
from airflow import DAG
# Operators; we need this to operate!
from airflow.operators.bash import BashOperator
# These args will get passed on to each operator
# You can override them on a per-task basis during operator initialization
default_args = {
'owner': 'airflow',
'depends_on_past': False,
'email': ['airflow@example.com'],
'email_on_failure': False,
'email_on_retry': False,
'retries': 1,
'retry_delay': timedelta(minutes=5),
# 'queue': 'bash_queue',
# 'pool': 'backfill',
# 'priority_weight': 10,
# 'end_date': datetime(2016, 1, 1),
# 'wait_for_downstream': False,
# 'dag': dag,
# 'sla': timedelta(hours=2),
# 'execution_timeout': timedelta(seconds=300),
# 'on_failure_callback': some_function,
# 'on_success_callback': some_other_function,
# 'on_retry_callback': another_function,
# 'sla_miss_callback': yet_another_function,
# 'trigger_rule': 'all_success'
}
with DAG(
'tutorial',
default_args=default_args,
description='A simple tutorial DAG',
schedule_interval=timedelta(days=1),
start_date=datetime(2021, 1, 1),
catchup=False,
tags=['example'],
) as dag:
# t1, t2 and t3 are examples of tasks created by instantiating operators
t1 = BashOperator(
task_id='print_date',
bash_command='date',
)
t2 = BashOperator(
task_id='sleep',
depends_on_past=False,
bash_command='sleep 5',
retries=3,
)
t1.doc_md = dedent(
"""\
#### Task Documentation
You can document your task using the attributes `doc_md` (markdown),
`doc` (plain text), `doc_rst`, `doc_json`, `doc_yaml` which gets
rendered in the UI's Task Instance Details page.

"""
)
dag.doc_md = __doc__ # providing that you have a docstring at the beginning of the DAG
dag.doc_md = """
This is a documentation placed anywhere
""" # otherwise, type it like this
templated_command = dedent(
"""
{% for i in range(5) %}
echo "{{ ds }}"
echo "{{ macros.ds_add(ds, 7)}}"
echo "{{ params.my_param }}"
{% endfor %}
"""
)
t3 = BashOperator(
task_id='templated',
depends_on_past=False,
bash_command=templated_command,
params={'my_param': 'Parameter I passed in'},
)
t1 >> [t2, t3]
4. DAG の Cloud Storage へのアップロード
- DAGファイルをCloud Storageのdagsフォルダにアップロードすると、ファイルがCloud Composerによって解析される
gsutil cp ./example_v2_dag.py <DAGs_folder_path>
- -> (参考)コンソールからDAGを確認
DAGの書き方は?
基本編
上記 example_v2_dag.py 参照(Airflow 2.0対応の書き方)
-
①ライブラリのインポート
- airflow自体のライブラリなどのインポートなどをする
-
②デフォルト引数の定義
- タスクを実行するために必要となる、DAGのデフォルト引数を定義する
- DAG内の全オペレータに共通して設定するパラメータを定義する
- airflow.models.BaseOperator
-
③DAGの作成
- DAG自体を作成する。DAG本体の名前や説明、どの間隔でタスクを実行するかを定義する
- airflow.DAGのコンストラクタで設定できる引数の一覧と説明は、airflow.models.dag.DAGのドキュメント参照
-
④タスクの宣言
- 実際に実行するタスク (ジョブ) を宣言する。実行するすべてのタスクを宣言して、前の手順で作成したDAGの一部とする
t1 = BashOperator(
    task_id='print_date',
    bash_command='date',
    dag=dag,
)
- ⑤依存関係の記載
v1
# ワークフロー t2タスクの上流にt1をセット
t2.set_upstream(t1)
# ワークフロー t3タスクの上流にt1をセット
t3.set_upstream(t1)

# ワークフローは下記のような記述もできる
#t1.set_downstream([t1, t3])
#t1 >> [t2, t3]
#[t2, t3] << t1
応用編
-
外から変数を渡したい時はどうするか
-
ユースケース
- バッチによってはパラメータ付きで手動実行したい
- 一時的なデータ投入・更新バッチのために毎回DAG定義を書くのではなく、汎用的なDAGを用意してパラメータで実行するコマンドを動的に切り替えできると便利(日付など)
-
渡す側
-
- CLIからパラメータ付き実行
airflow trigger_dag -c '{"key1":1, "key2":2}' dag_id
-
- GUIからパラメータ付き実行
ヘッダのBrowse -> DAG Runs -> + アイコンクリックで新規DAG Run作成画面に遷移する
-
- REST API
$ curl -X POST \ http://localhost:8080/api/experimental/dags/<DAG_ID>/dag_runs \ -H 'Cache-Control: no-cache' \ -H 'Content-Type: application/json' \ -d '{"conf":"{\"key\":\"value\"}"}'
-
-
-> 渡される側(オペレータ) ①template文字列内で受け取る
bash_task = BashOperator( task_id="bash_task", bash_command='echo "Here is the message: ' '{{ dag_run.conf["json_key"] }}" ', dag=dag, ) -
-> 渡される側(オペレータ) ②context経由で受け取る
- Operator内部のcontextという変数にdag_runが入っている
def print_value(**context):
    print(context['dag_run'].conf['json_key'])

PythonOperator(
    python_callable=print_value,
)
-
-
スクリプト(bash, SQLなど)ファイルを各オペレータから読み込みたい時はどうするか
- 実行するQueryを記述したSQLファイルは、 GCSのdags/sql配下にまとめて管理
transform_1 = bigquery_operator.BigQueryOperator(
   task_id="transform_1",
   sql="sql/query_1.sql",
   destination_dataset_table="{{params.sample_table}}",
   write_disposition="WRITE_APPEND",
)
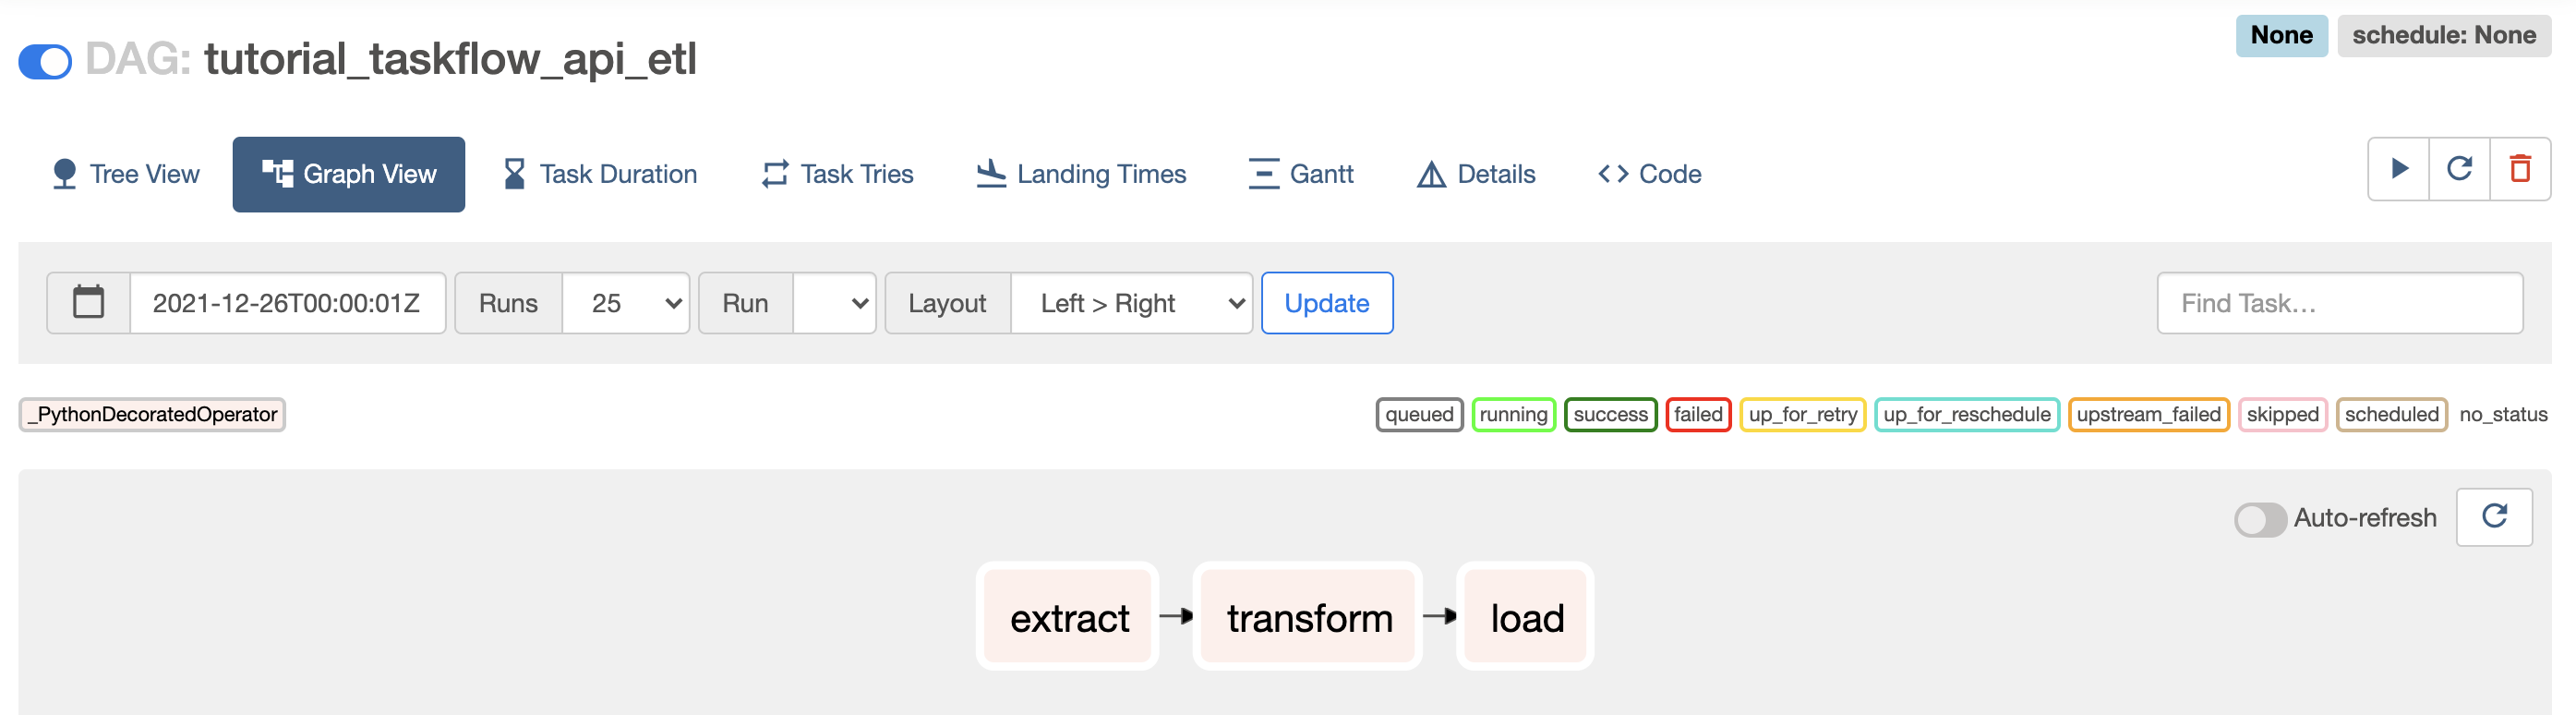
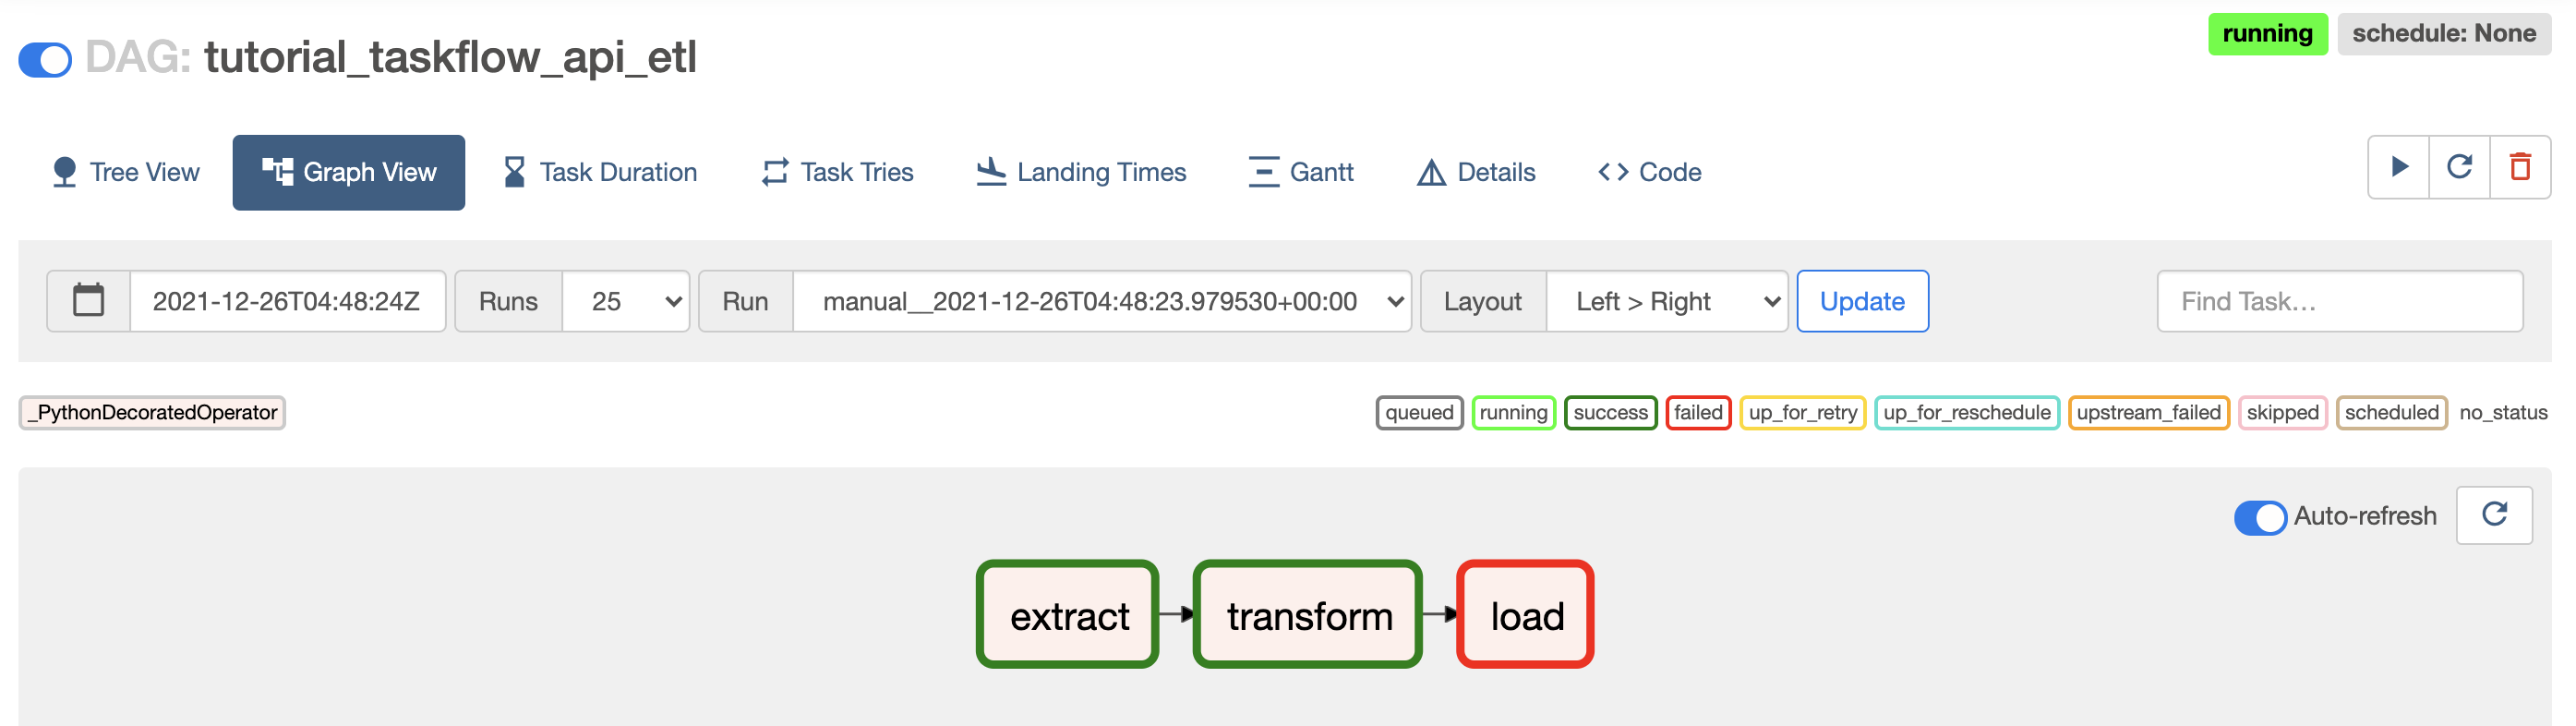
実行結果確認方法は?
実行結果ステータス
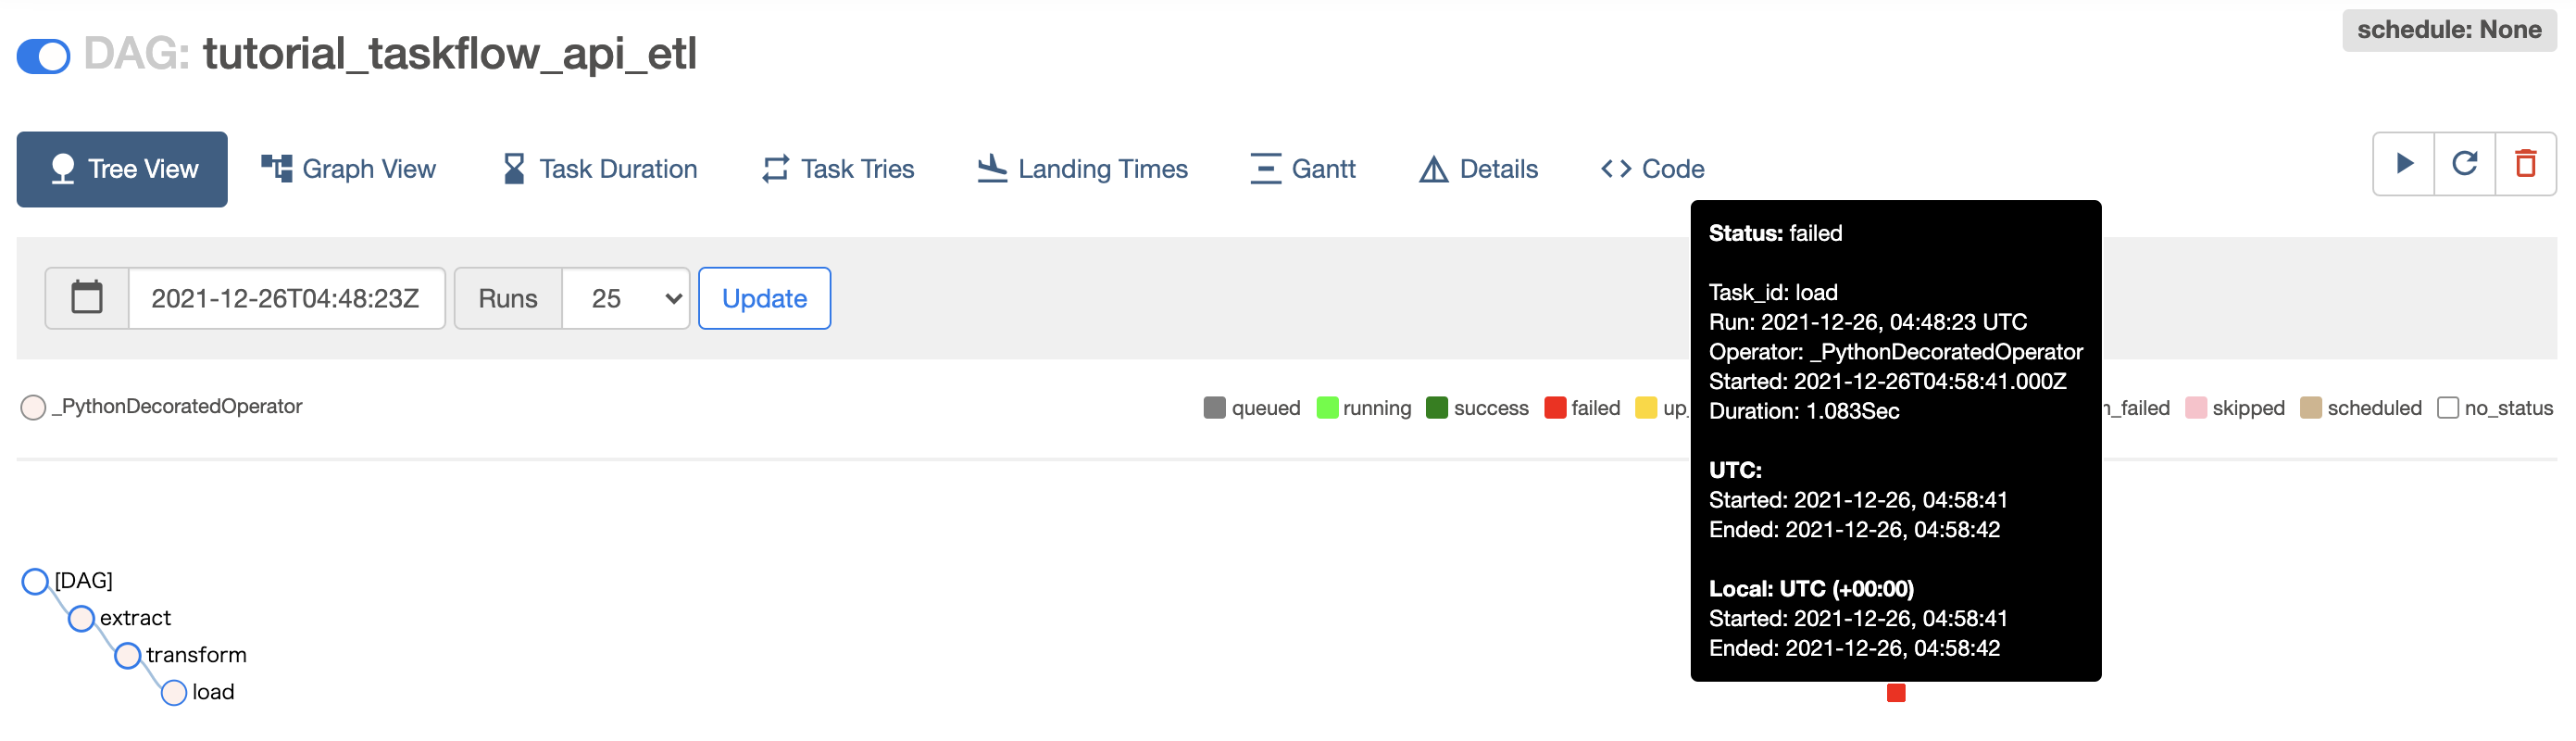
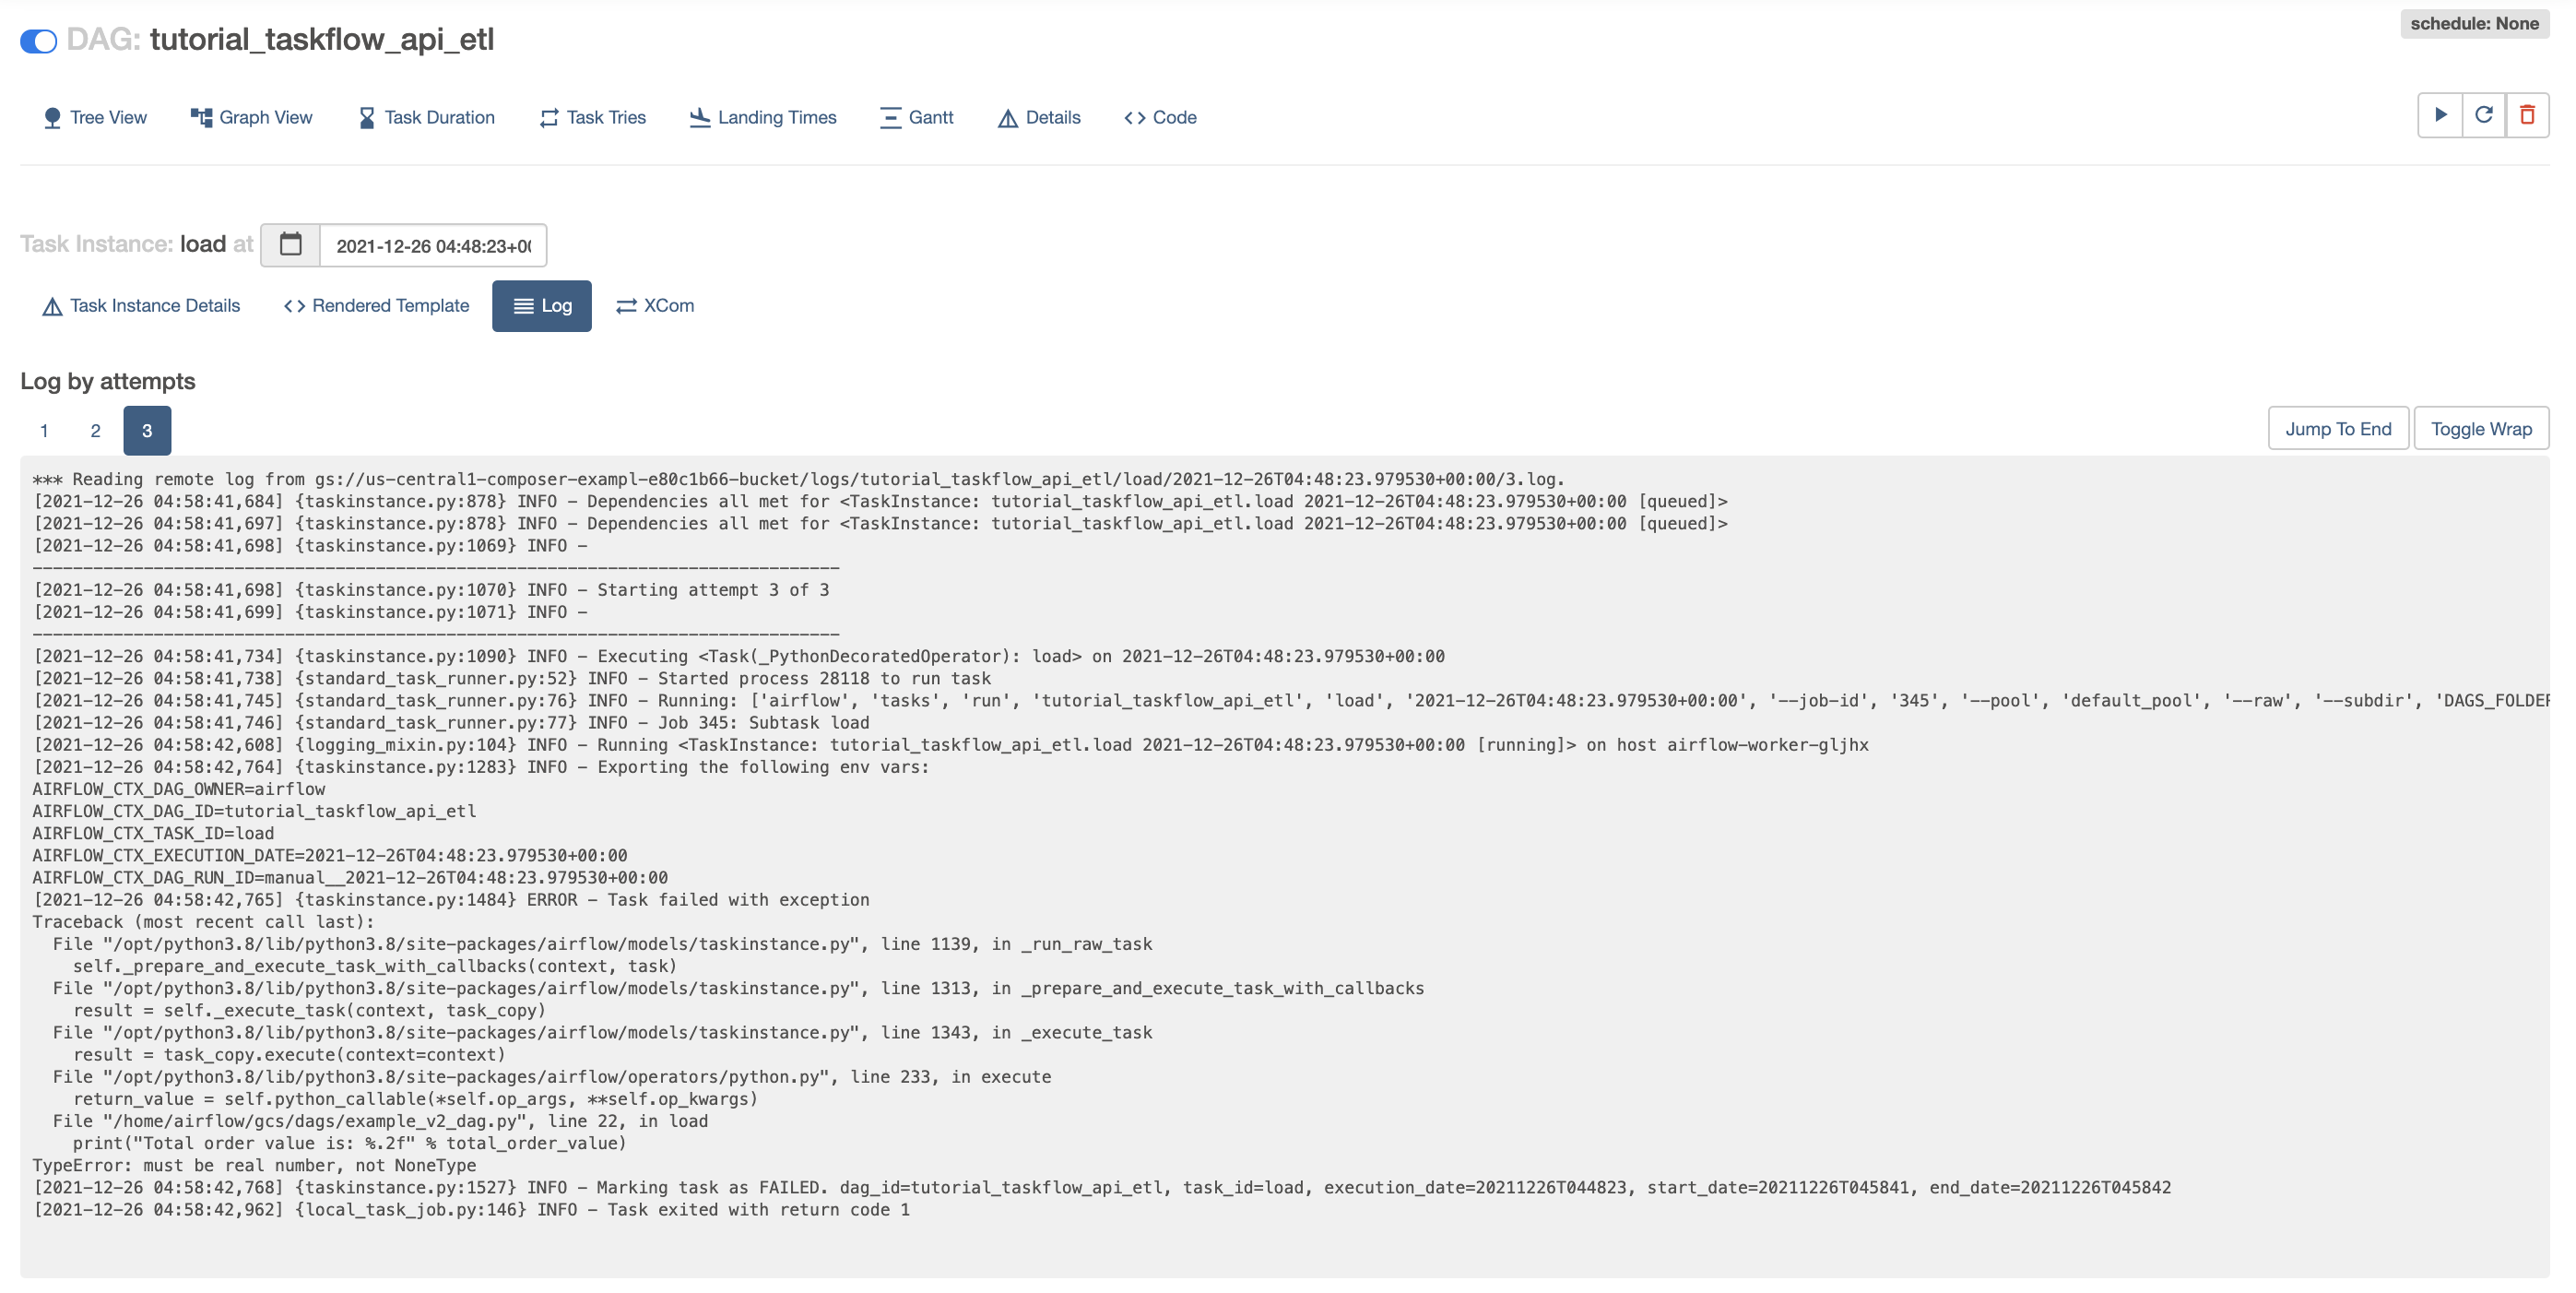
実行結果ログ
アラート通知方法は?
エラー
- メール通知は
default_argsの通り - Slack通知はAirflowのDAGの実行状況をSlackに通知して監視する参照
- Operatorのパラメータに on_success_callback または on_failure_callback を設定しておくとタスクの成功/失敗時に指定した関数を実行することができるので、ここにタスクの成功/失敗時にそれをSlackに通知する関数を指定しておく。
遅延
- airflowは各Task に対してSLA 値(時間)を設定できる
- メール通知の場合は下記の通り。sla_miss_callback設定も可能
t1 = PythonOperator(
    task_id='sla_test',
    python_callable=example_call,
    sla=timedelta(seconds=10),
    email="xxx.yyy@example.com",
    dag=dag
)
リトライ方法は?
-
AirflowのTips 11選 参照
- コンソール画面からClearする(Clear=リトライなので注意。Clearを押下すると、すぐにリトライが始まる)

権限管理方法は?
-
ログインユーザ
- Userinfo
- User Name: accounts.google.com:1234XXXXXXXX
- Role: [Op]
- Personal Info
- First Name: tanakataro @ gmail.com
- Email: tanakataro @ gmail.com
- Userinfo
-
Composerの認証
Google Cloud クライアント ライブラリでは、アプリケーションのデフォルト認証情報(ADC)と呼ばれる方式を使用してアプリケーションの認証情報を検出している。クライアント ライブラリが使用される際は以下の順番で認証情報がチェックされます。
- 環境変数 GOOGLE_APPLICATION_CREDENTIALSを確認
- 環境変数が設定されていない場合、ADC ではサービスで実行されているアプリケーションに応じて、Compute Engine、Google Kubernetes Engine、Cloud Run、 App Engine、Cloud Functions によって提供されているデフォルトのサービス アカウントを使用する。
- ウェブサーバ
Airflow ウェブサーバーは、Identity-Aware Proxy と統合されています。Cloud Composer は IAP インテグレーションの詳細を隠し、ウェブサーバーへのアクセスに十分な権限を持つユーザー アカウントに、ウェブサーバーへのアクセスを提供します。
スケール方法は?
- 実質GKEと同じ
- workerとなっているGKEのノードはauto scalingが有効になっていない。 -> composer作成時に決めたノードで、適切にジョブの計算資源を管理し、他Podの兼ね合いも考慮するなら、kubernetes_pod_operatorを用いてリミットを設定した上でジョブを実行させるようにする必要がある
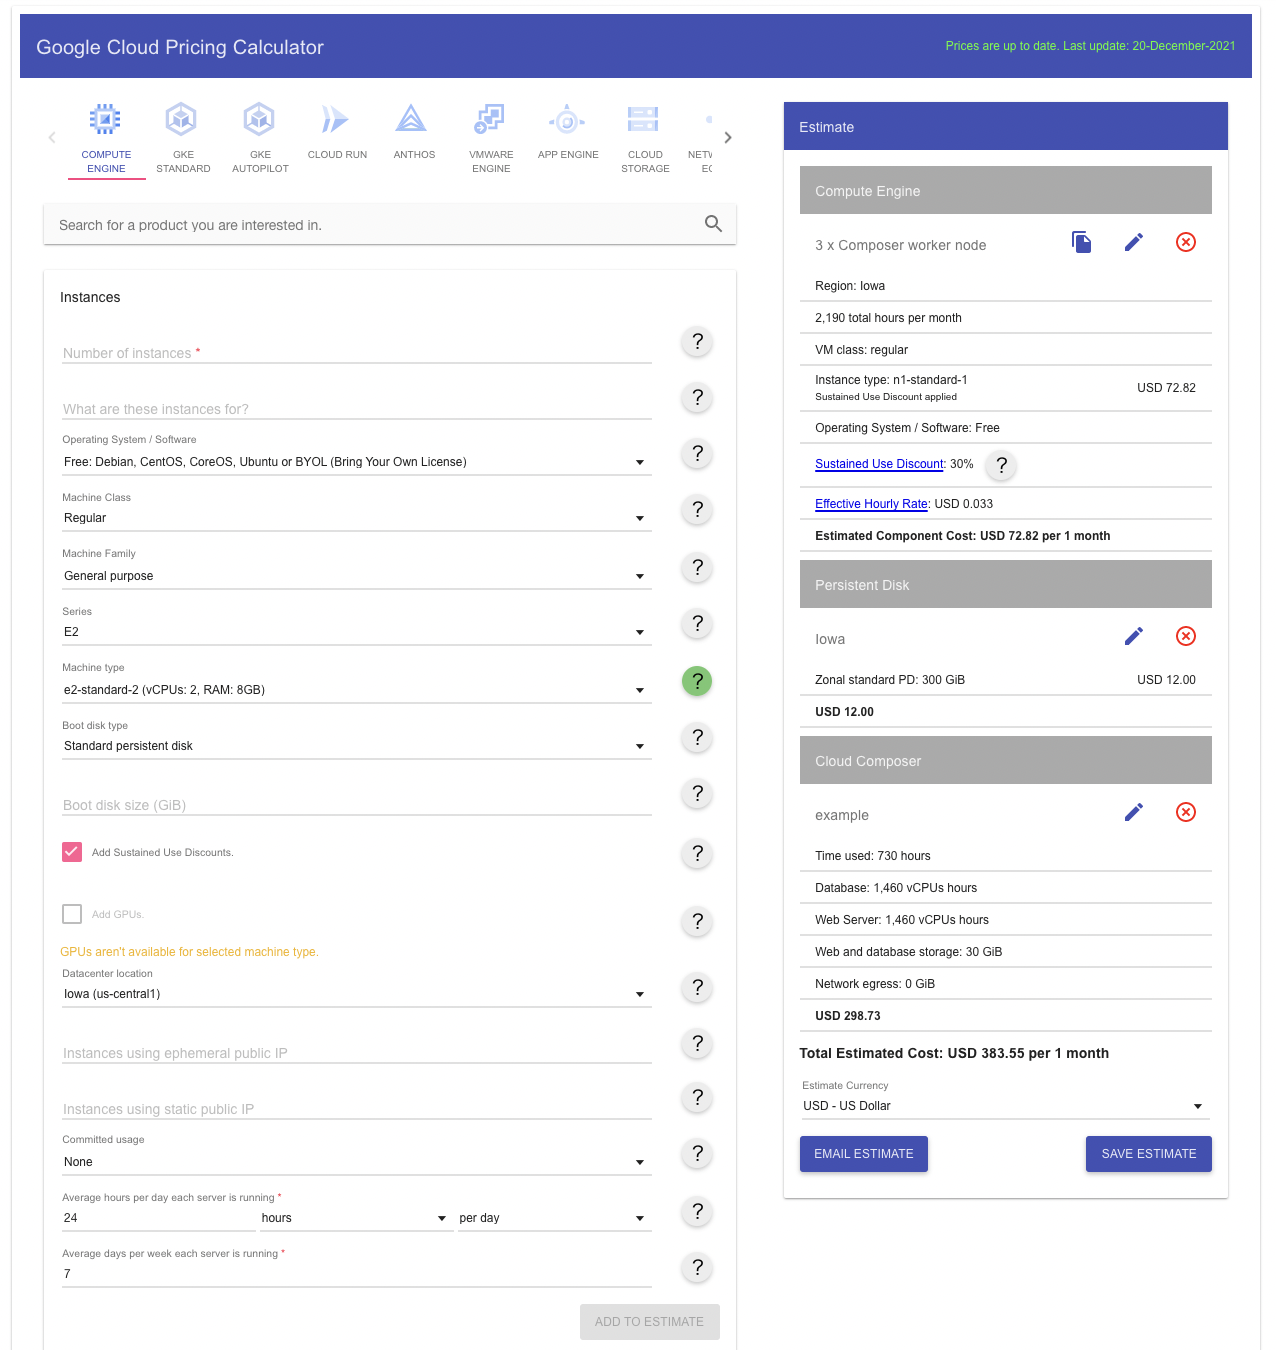
コストは?
- ほぼ最小構成でも約月4万円/月
その他、気を付けることは?
- 実行時刻の考え方
-
start_date + schecule_interval経過後に初回DAG実行 - 過去分が実行されるので注意
- intervalの設定を12時間ごとにしてstart_dateを2日前にしてDAGを実行すると、2日前の12時,24時,1日前の12時,24時の分も実行される
- 実行したくない場合は、 catchup=False 指定により回避する
-
dag = DAG(
    'blog_example_execution_date',
    schedule_interval=timedelta(minutes=1),
    start_date=datetime(
        2020, 1, 29, 15, 30, tzinfo=pendulum.timezone('Asia/Tokyo')), # 明示的にタイムゾーンを指定
)

...
# execution_date = 2019/01/29 15:30:00 +09:00
#   => DAG に指定した start_date と同一

# start_date = 2019/01/29 15:31:00 +09:00
#   => DAG に指定した start_date に schedule_interval を足した日時と同一
- メンテナンスウィンドウに注意する
- Variable: GUI上からトークンなどを設定できる。key-valueで取得できる。
bucket=Variable.get('sample_gcs_bucket'),
- 接続情報の管理(DBなど)は、Secret Managerを利用する
- connection: Airflow needs to know how to connect to your environment. Information such as hostname, port, login and passwords to other systems and services is handled in the Admin->Connections section of the UI. The pipeline code you will author will reference the ‘conn_id’ of the Connection objects.
airflow connections add 'my_prod_db' \
    --conn-type 'my-conn-type' \
    --conn-login 'login' \
    --conn-password 'password' \
    --conn-host 'host' \
    --conn-port 'port' \
    --conn-schema 'schema' \
postgres_query = PostgresOperator(
    task_id="query_one",
    postgres_conn_id=<my_postgres_conn_id>,
    sql=<my_sql_statement>,
    autocommit=True,
)