この記事はフラー Advent Calendar 2019 の 19 日目の記事です。
前日の18日目はShota Kobayashiで、「快適なUI開発生活を提供する Angular CDK の Portal と Overlay」でした。
はじめに
私はフラーでフロントエンドエンジニアをしています。
最近はあまり新しい技術のキャッチアップができていなかったので、今回のAdvent Calendarでは気になっていた技術をいろいろと試してみました。
この記事では、すでにFirebase Hostingで公開しているReactのWebサイトを、GitHub Actionsを使ってCIできるようにする方法について紹介します。
また、あまりにも簡単にできてしまったのでLighthouse CIの設定もしてみました。
React Webサイト
ReactのWebサイトはCreate React Appで作成しており、npm run buildするとbuildディレクトリにアプリが生成されます。
https://github.com/nobux42/portfolio-react
また、Firebase Hostingの設定もすでにされいます。
Firebase Hostingの設定についてこちらを参照ください:
https://qiita.com/junara/items/74801923ca108b328b26
GitHub Actionsの設定
1. GitHub Actions のページを開く
GitHubのリポジトリで[Actions]ページを開きます。
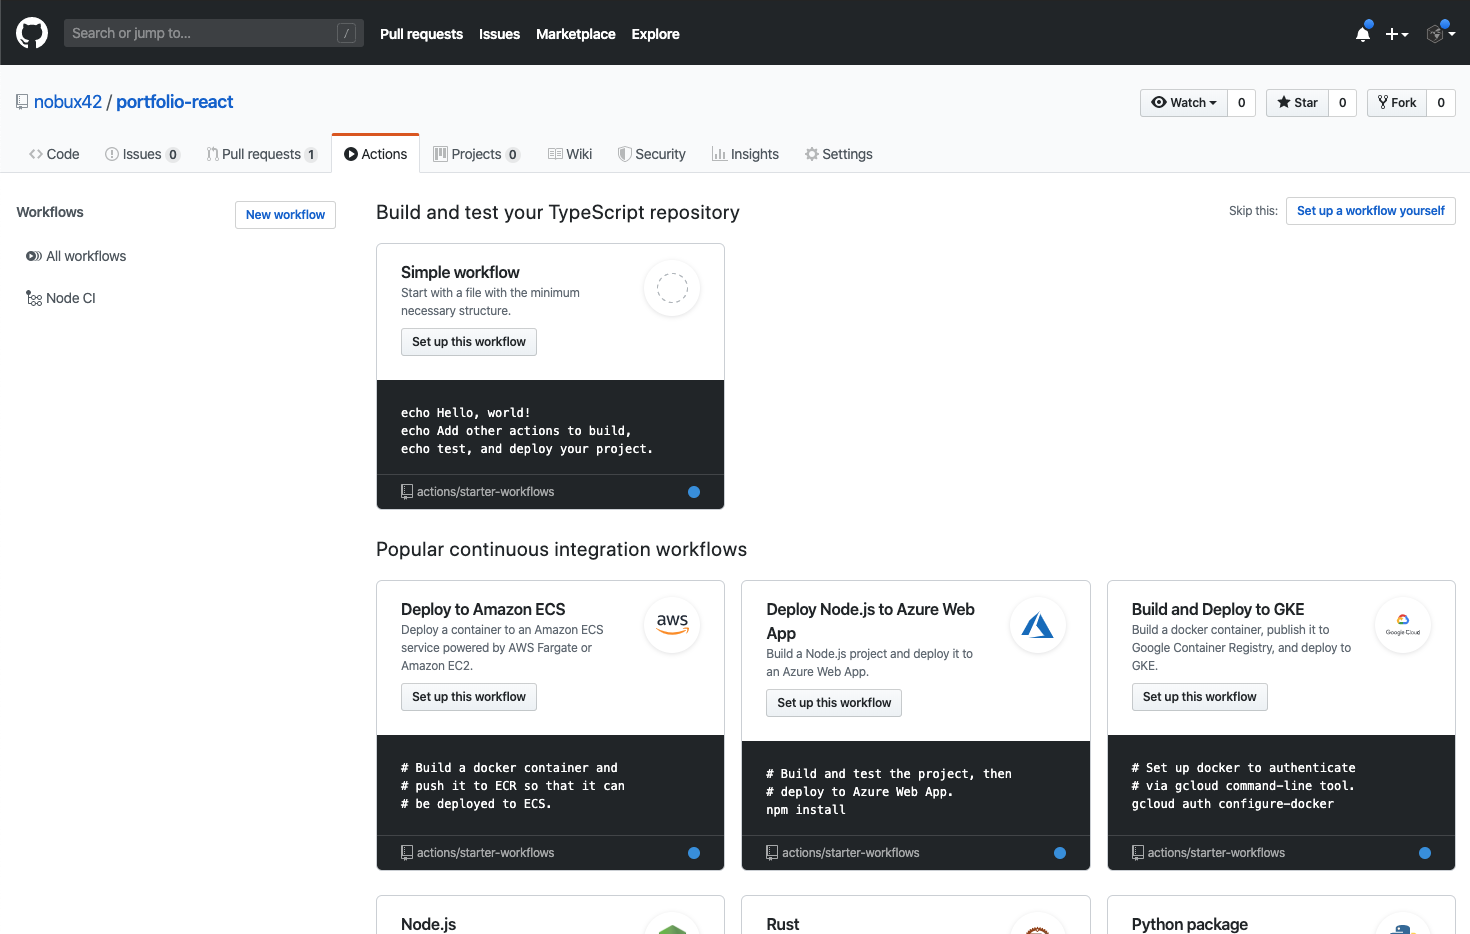
2. テンプレートの作成
[Node.js]のテンプレートを選択します。
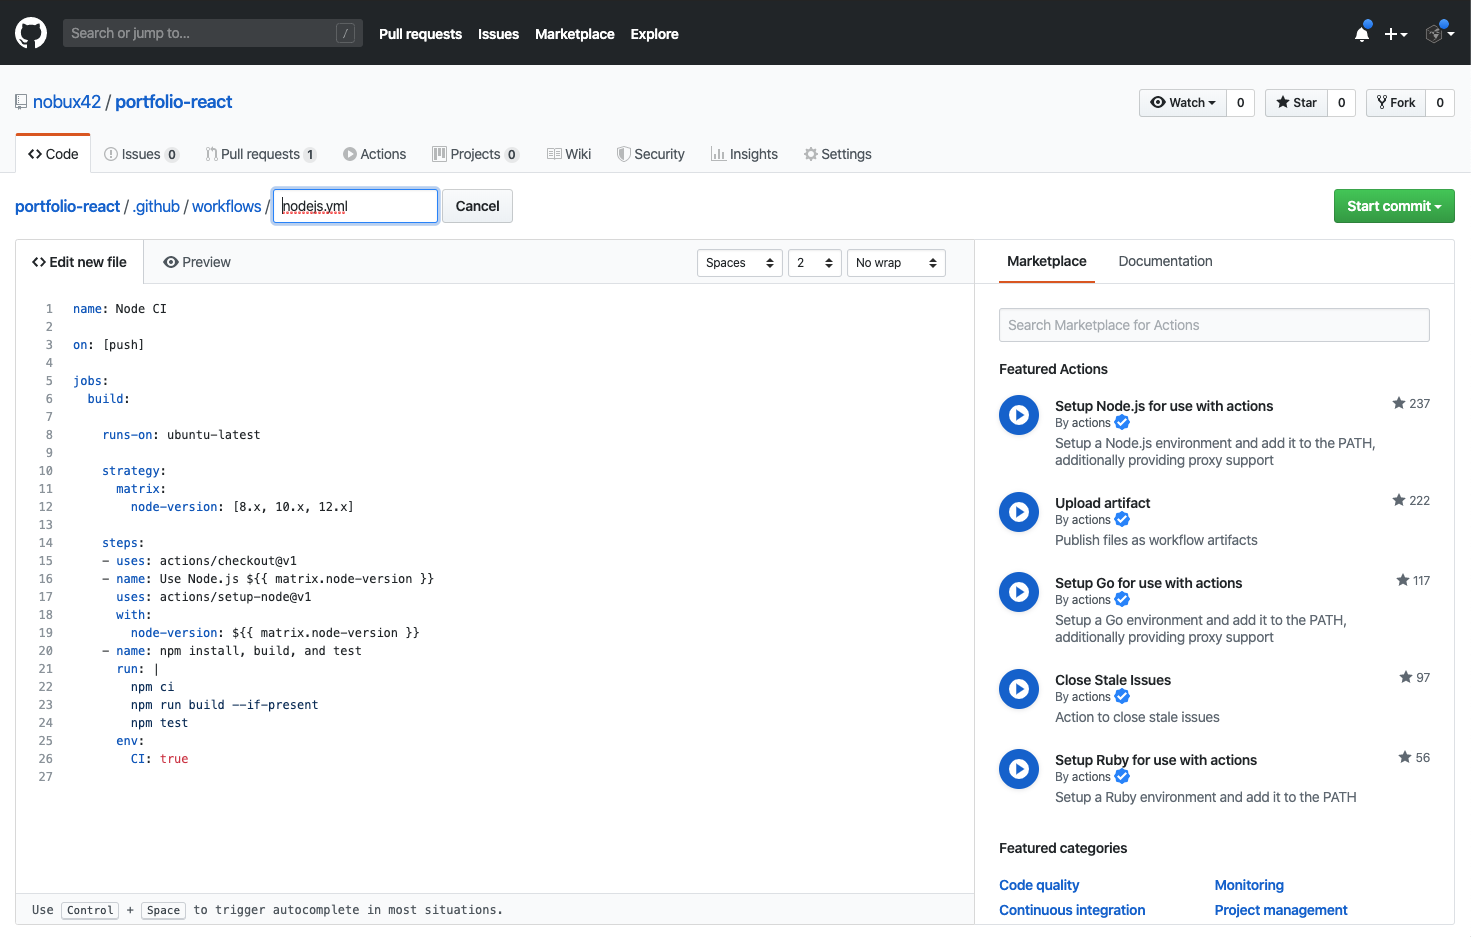
.github/workflow/nodejs.yaml というファイルが作成されます。
3. Firebaseにデプロイするための設定を追加
- steps に以下を追加
     - name: deploy to Firebase Hosting
        run: |
          npm install -g firebase-tools
          firebase deploy --token=${{ secrets.FIREBASE_TOKEN }}
4.Firebase トークンの設定
まずはローカルでコマンドを叩いてトークンを取得します。
$ firebase login:ci
****
GitHubリポジトリページに移動し、トークンを登録。
- [Settings] > [Secrets] > [Add a new secret]
- Name: FIREBASE_TOKEN
- Value: ****
ちなみに firbase.json は以下のようになっています。
["firbase.json"]
{
  "hosting": {
    "public": "build",
    "ignore": [
      "firebase.json",
      "**/.*",
      "**/node_modules/**"
    ],
    "rewrites": [
      {
        "source": "**",
        "destination": "/index.html"
      }
    ]
  }
}
試してみる
ローカルからプッシュしてみます。
$ git push origin masger
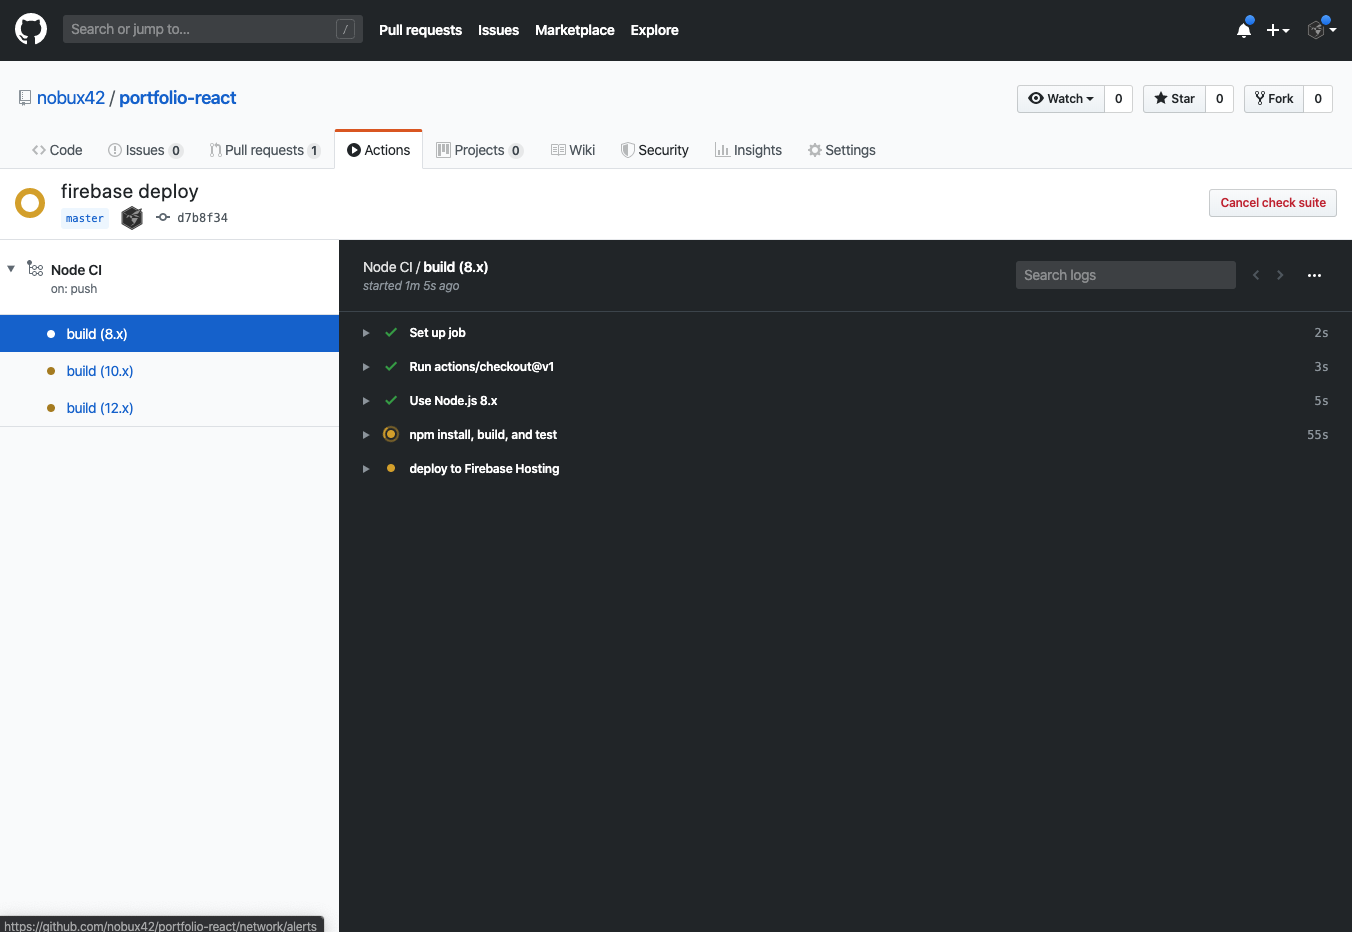
うごきました。
無事にデプロイもされました。
たったこれだけで、無事にビルドされてFirebaseにもホスティングされてしまいました。
個人でCIを構築するのにもGithub Actionsはとてもおすすめだと思います。
Lighthouse CI
ちょっと簡単すぎたので、LighthouseをGithubアクションに組み込んでパフォーマンスチェックもしたいと思います。
LighthouseとはGoogleのSEOチェックツールで、CI用にLighthouse CIというのも用意されていると聞いたので早速組み込んでみました。
以下の設定をワークフローに設定することで簡単に動作させる方法もありますが、
   - name: run Lighthouse CI
        run: |
          npm install -g @lhci/cli@0.3.x
          lhci autorun --upload.target=temporary-public-storage || echo "LHCI failed!"
CI上でエラーなどを出したかったため、.lighthouse.jsonという設定ファイルを用意してパフォーマンスに問題がある場合はエラーになるようにしました。
[".lighthouse.json"]
{
  "ci": {
    "collect": {
      "numberOfRuns": 3,
      "startServerCommand": "npm run start",
      "url": [
        "http://localhost:3000/",
        "http://localhost:3000/about"
      ]
    },
    "assert": {
      "assertions": {
        "offscreen-images": "off",
        "uses-webp-images": "off",
        "first-contentful-paint": ["error", {"maxNumericValue": 10000}]
      }
    },
    "upload": {
      "target": "temporary-public-storage"
    }
  }
}
ワークフローへ追加した設定は以下になります。
- steps に以下を追加
    - name: run Lighthouse CI
      run: |
        npm install -g @lhci/cli@0.3.x
        lhci autorun --config=./.lighthouserc.json
最終的なワークフローは以下のようになりました
["nodejs.yaml"]
name: Node CI

on:
  push:
    branches:
      - master
jobs:
  build:
    runs-on: ubuntu-latest

    strategy:
      matrix:
        node-version: [10.x]

    steps:
    - uses: actions/checkout@v1
    - name: Use Node.js ${{ matrix.node-version }}
      uses: actions/setup-node@v1
      with:
        node-version: ${{ matrix.node-version }}
    - name: npm install, build, and test
      run: |
        npm ci
        npm run build --if-present
      env:
        CI: true
    - name: run Lighthouse CI
      run: |
        npm install -g @lhci/cli@0.3.x
        lhci autorun --config=./.lighthouserc.json
    - name: deploy to Firebase Hosting
      run: |
        npm install -g firebase-tools
        firebase deploy --token=${{ secrets.FIREBASE_TOKEN }}
Lighthouse CIでは解析結果を自前の公開サーバーに格納して、簡単に確認できるようになっています。
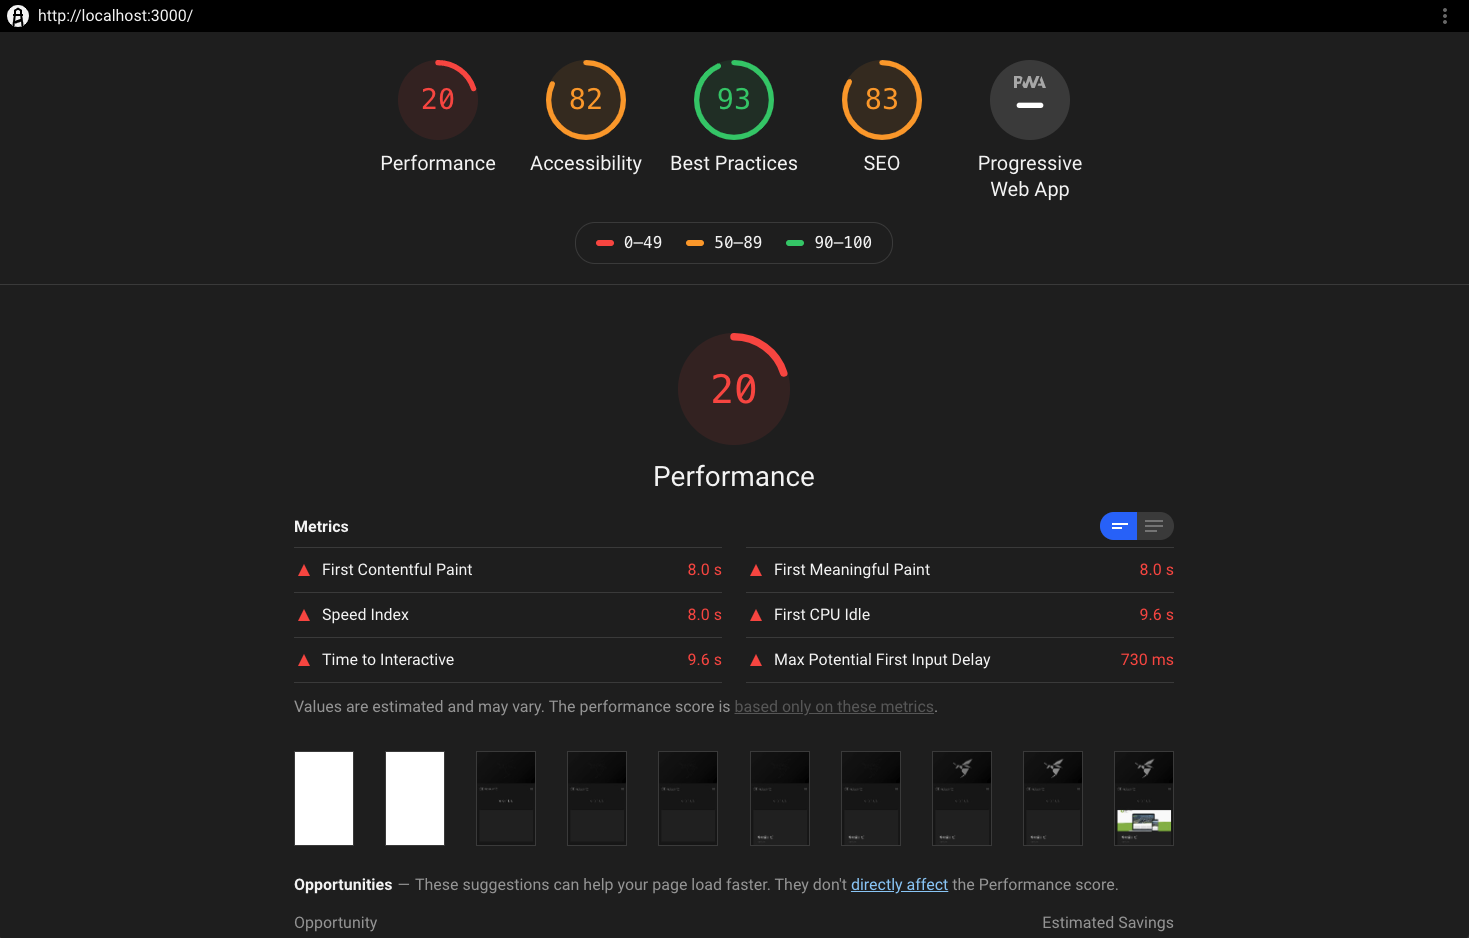
(色々と問題があるのがわかったので、少しずつ修正していきたいと思います。)