はじめに
以下の記事で、CloudFormationを使ってEC2インスタンスを構築しました。
https://qiita.com/nkserveren26/items/aa0f185b0c3c40c33545
本記事では、AWS CLIとCloudFormationを使って同様の構成を構築します。
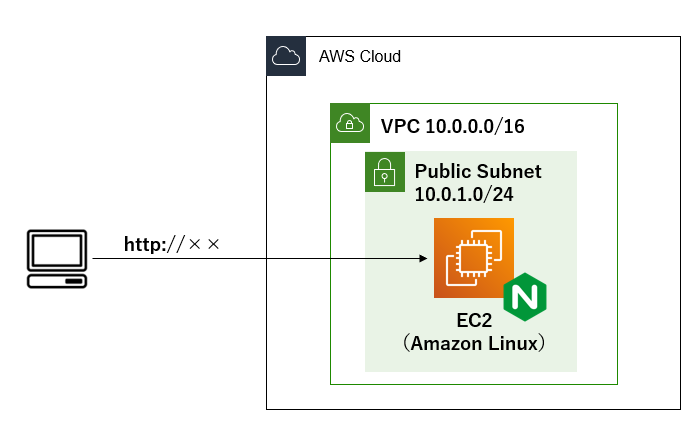
インフラ構成図
作成するインフラ構成図を以下に示します。
EC2はAmazon Linuxです。

前提条件
・リソースを作成できるIAMユーザー
・キーペア
・テンプレートファイル
以下のGithubリポジトリにアップロードしたテンプレートファイルをローカル環境上に配置します。
https://github.com/nkserveren26/ec2-cloudformation
・cli実行環境
Windows 10
参考記事
手順
テンプレートファイルのチェック
validate-templateコマンドを実行し、テンプレートファイルの内容に問題がないかチェックします。
ローカル環境上でのテンプレートファイルは--template-bodyにfile://でアクセスします。
カレントディレクトリにテンプレートファイルが配置されている前提で、以下のコマンドを実行します。
問題がなければ、以下の出力が返されます。
# aws cloudformation validate-template --template-body file://EC2.yaml
{
    "Parameters": [
        {
            "ParameterKey": "KeyName",
            "NoEcho": false,
            "Description": "The EC2 Key Pair to allow SSH access to the instance"
        }
    ],
    "Description": "Provision VPC,PubSub, and EC2"
}
スタック作成
テンプレートファイルの内容に問題がなければ、create-stackコマンドでスタックの作成を実行し、環境を構築します。
validate-templateと同様に、ローカル環境上のテンプレートファイルを使用するので、--template-bodyとfile://でテンプレートファイルを指定します。
--stack-nameで作成するスタック名を指定します(必須オプションです)。
今回使用するテンプレートファイルはParametersにキーペアを設定しているので、--parametersでキーペアを指定します。
# aws cloudformation create-stack --template-body file://EC2.yaml --stack-name cli-ec2-test --parameters ParameterKey=KeyName,ParameterValue=hogehogeKey
{
    "StackId": "arn:aws:cloudformation:ap-northeast-1:819628840011:stack/cli-ec2-test/d08a23a0-f4fd-11ec-a89d-0e44a2fe1fab"
}
作成したスタックのステータスをdescribe-stacksで確認します。--stack-nameが必須オプションです。
StackStatusが「CREATE_COMPLETE」となっていれば作成完了です。
# aws cloudformation describe-stacks --stack-name cli-ec2-test
{
    "Stacks": [
        {
            "StackId": "arn:aws:cloudformation:ap-northeast-1:819628840011:stack/cli-ec2-test/d08a23a0-f4fd-11ec-a89d-0e44a2fe1fab",
            "StackName": "cli-ec2-test",
            "Description": "Provision VPC,PubSub, and EC2",
            "Parameters": [
                {
                    "ParameterKey": "KeyName",
                    "ParameterValue": "privateKey"
                }
            ],
            "CreationTime": "2022-06-26T03:12:53.648000+00:00",
            "RollbackConfiguration": {},
            "StackStatus": "CREATE_COMPLETE",
            "DisableRollback": false,
            "NotificationARNs": [],
            "Outputs": [
                {
                    "OutputKey": "EC2PublicIP",
                    "OutputValue": "35.78.247.50",
                    "Description": "Public IP of EC2 instance"
                }
            ],
            "Tags": [],
            "EnableTerminationProtection": false,
            "DriftInformation": {
                "StackDriftStatus": "NOT_CHECKED"
            }
        }
    ]
}
接続確認
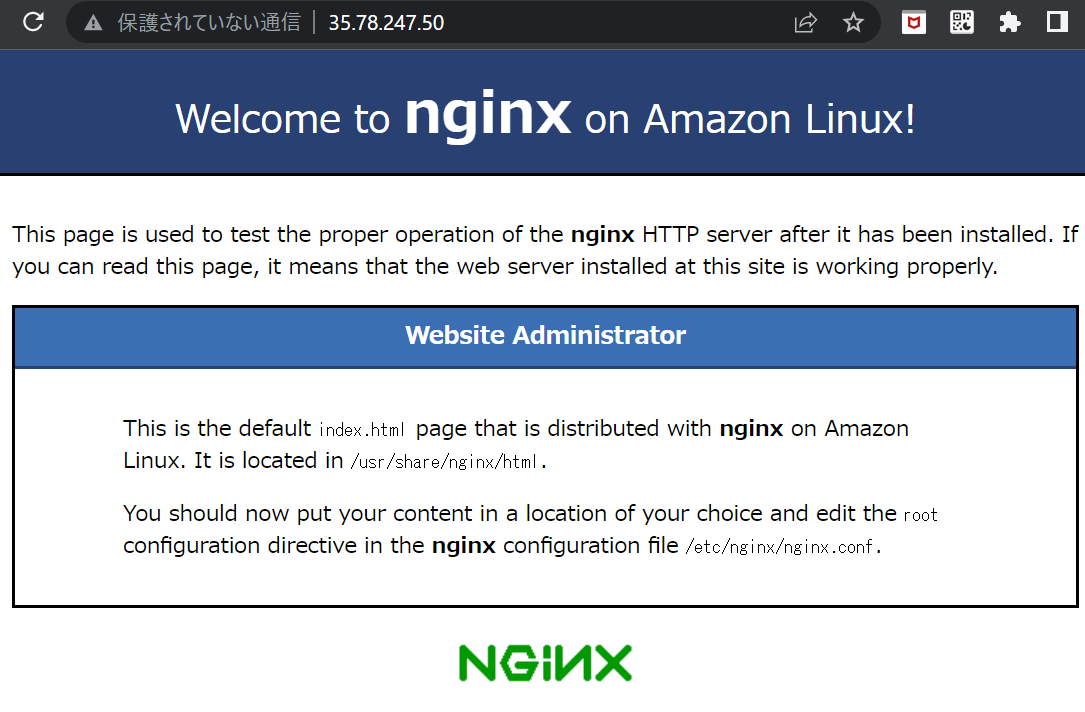
作成したEC2インスタンスにNginxがインストールされ、サービスが起動しているか確認します。
↑の出力結果の、OutputValueに記載されているパブリックIPをコピーします。
ブラウザに、「http://パブリックIP」と入力します。
以下の画面が表示されればOKです。

リソース削除
作成したリソースの削除はdelete-stackで実行します。
stack-nameで削除するスタックを指定します。
# aws cloudformation delete-stack --stack-name cli-ec2-test
おわりに
- CloudFormationで環境構築するだけでも便利ですが、cliで実行できるとさらに便利ですね。
- 今後はGithub Actionsを使った環境構築自動化にもチャレンジしたいと思います。