はじめに
- 職場で社内用の各種サーバーの管理を任されることになったので、まずは簡単そうなものから構築できるようになろうと考え、第一弾としてChronyを使ったNTPサーバーを立ててみました。
- この記事は構築手順をまとめたものとなりますが、あくまでも「学習用」としてNTPサーバーを構築したので、このままの設定などで本番用としては使えないかもしれません。
- NTPそのものについては、こちらの記事をご覧ください。
全体像
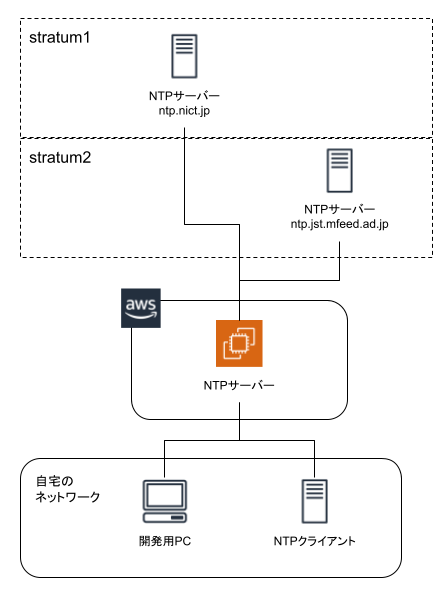
- AWS上にChronyを使ったNTPサーバーを立てて、自宅のLinuxサーバー(NTPクライアント)がそのNTPサーバーを参照する形にします。
- AWS上のNTPサーバーは、上位のNTPサーバーを参照して時刻を同期させます。
テストに使用した環境
- NTPクライアント(※既存の端末)がCentOS7ですが、NTPサーバー側はあえてRocky Linuxを使ってみました。
- 技術的にRocky Linuxが必要ということではなく、単にRocky Linuxを使ってみたかったというだけです。
NTPサーバー
- 仮想マシン
- AWSのEC2インスタンス(t3a.nano)
- OS
- Rocky Linux release 8.4 (Green Obsidian)
- NTP
- chronyc (chrony) version 3.5
NTPクライアント
- CPU
- Pentium G4560
- マザーボード
- ASRock H110M-STX
- メモリ
- 8GB(4GB×2枚)
- ストレージ
- 256GB SSD(NVMe)
- OS
- CentOS 7.9(2009)
- NTP
- chronyc (chrony) version 3.4
サーバー側の設定
仮想マシンの作成
- Rocky Linuxの仮想マシンを作った後、セキュリティグループに以下のインバウンドルールを追加しました。
- NTPクライアントからNTPサーバーへの接続に必要な設定となります。
| タイプ | プロトコル | ポート範囲 | ソース |
|---|---|---|---|
| カスタムUDP | UDP | 123 | 自宅のグローバルIP |
firewalldの設定
- AWSやAzureを使う場合はセキュリティグループの設定で十分だと思いますが、オンプレ環境を使う場合はファイアウォールの設定が必要になると思います。
- 最初にfirewalldをインストールして、firewalldを起動しておきます。
[rocky@ip-10-0-1-29 ~]$ sudo yum install firewalld

[rocky@ip-10-0-1-29 ~]$ sudo systemctl start firewalld
[rocky@ip-10-0-1-29 ~]$ sudo systemctl enable firewalld
[rocky@ip-10-0-1-29 ~]$ sudo firewall-cmd --state
running
- 次にfirewalldで通信を許可されているサービスを確認します。
- ここでは、servicesにntpが入っていないはずです。
[rocky@ip-10-0-1-29 ~]$ sudo firewall-cmd --list-all
public (active)
  target: default
  icmp-block-inversion: no
  interfaces: eth0
  sources:
  services: cockpit dhcpv6-client ssh
  ports:
  protocols:
  masquerade: no
  forward-ports:
  source-ports:
  icmp-blocks:
  rich rules:
- 通信を許可するサービスにntpを追加して、設定内容を確認します。
- 設定後は、servicesにntpが入っているはずです。
[rocky@ip-10-0-1-29 ~]$ sudo firewall-cmd --add-service=ntp
success

[rocky@ip-10-0-1-29 ~]$ sudo firewall-cmd --add-service=ntp --permanent
Warning: ALREADY_ENABLED: ntp
success
[rocky@ip-10-0-1-29 ~]$ sudo firewall-cmd --list-all
public (active)
  target: default
  icmp-block-inversion: no
  interfaces: eth0
  sources:
  services: cockpit dhcpv6-client ntp ssh
  ports:
  protocols:
  masquerade: no
  forward-ports:
  source-ports:
  icmp-blocks:
  rich rules:
Chronyの起動
- Chronyの自動起動設定をした後、Chronyを起動します。
[rocky@ip-10-0-1-29 ~]$ sudo systemctl enable chrony
[rocky@ip-10-0-1-29 ~]$ sudo systemctl start chronyd
Chronyの設定変更
-
/etc/chrony.confを編集して、「参照する上位のNTPサーバー」と「NTPサーバーへの接続を許可するIPアドレス範囲」を変更します。 - 今回は自宅の端末しかNTPサーバーを参照できないようにしました。
- デフォルトでも
iburstオプションが付いていますが、このオプションを付けると時刻同期が高速化するそうです。 - 自宅からAWS等の外部サーバーに接続している時であれば、
w -iコマンドを使うと自宅のグローバルIPがすぐに分かります。 - 詳しくはこちらの記事を参照してください。
[rocky@ip-10-0-1-29 ~]$ vi /etc/chrony.conf
--------------------------------------------------------------------------------
# Use public servers from the pool.ntp.org project.
# Please consider joining the pool (http://www.pool.ntp.org/join.html).
# pool 2.pool.ntp.org iburst  ←★コメントアウト
# JST stratum 1
server ntp.nict.jp iburst  ←★追記
# JST stratum 2
server ntp.jst.mfeed.ad.jp iburst  ←★追記

# Record the rate at which the system clock gains/losses time.
driftfile /var/lib/chrony/drift

# Allow the system clock to be stepped in the first three updates
# if its offset is larger than 1 second.
makestep 1.0 3

# Enable kernel synchronization of the real-time clock (RTC).
rtcsync

# Enable hardware timestamping on all interfaces that support it.
# hwtimestamp *

# Increase the minimum number of selectable sources required to adjust
# the system clock.
# minsources 2

# Allow NTP client access from local network.
# allow 192.168.0.0/16
allow {自宅のグローバルIP}  ←★追記
--------------------------------------------------------------------------------
時刻同期と確認
- Chronyを再起動して設定を反映した後、念のため手動で時刻合わせをします。
- 最後に同期先となるNTPサーバーが、設定ファイルに指定したものであることを確認します。
[rocky@ip-10-0-1-29 ~]$ sudo systemctl restart chronyd
[rocky@ip-10-0-1-29 ~]$ sudo chronyc makestep
200 OK

[rocky@ip-10-0-1-29 ~]$ sudo chronyc sources
210 Number of sources = 2
MS Name/IP address         Stratum Poll Reach LastRx Last sample
===============================================================================
^* ntp-b3.nict.go.jp             1   6    17    18    -50us[ -456us] +/-  932us
^- ntp1.jst.mfeed.ad.jp          2   6    17    18   -495us[ -902us] +/-   57ms
クライアント側の設定
設定ファイルの編集
- 既存の参照先NTPサーバーの設定をコメントアウトして、今回作成したNTPサーバーを参照先として設定します。
[root@akagi ~]# vi /etc/chrony.conf
--------------------------------------------------------------------------------
# Use public servers from the pool.ntp.org project.
# Please consider joining the pool (http://www.pool.ntp.org/join.html).
# server 0.centos.pool.ntp.org iburst  ←★コメントアウト
# server 1.centos.pool.ntp.org iburst  ←★コメントアウト
# server 2.centos.pool.ntp.org iburst  ←★コメントアウト
# server 3.centos.pool.ntp.org iburst  ←★コメントアウト

server {NTPサーバーのIPもしくはFQDN} iburst  ←★追記
--------------------------------------------------------------------------------
- Chronyを再起動して設定を反映した後、念のため手動で時刻合わせをします。
- 最後に同期先のサーバーが「構築したNTPサーバー」であることを確認します。
[root@akagi ~]# systemctl restart chronyd
[root@akagi ~]# chronyc makestep
200 OK

[root@akagi ~]# chronyc sources
210 Number of sources = 1
MS Name/IP address         Stratum Poll Reach LastRx Last sample
===============================================================================
^* ec2-54-95-39-162.ap-nort>     2   6    17    12   +541us[ +597us] +/- 5283us