「Db2 on Cloudを使ってみる」シリーズ
Db2 on CloudはREST APIで操作可能です。
APIドキュメントはこちら。
当記事ではDb2 on CloudのREST APIを使用したデータロードの方法を説明します。RESTなのでcurlコマンドで実行可能ですが、ヘッダーやパラメーターの設定やレスポンスのパースが面倒なので、pythonを使用したコードで説明します。一応curlコマンドでの方法も載せます。
尚Db2 Warehouse on Cloudの場合は微妙に違うので以下を参照してください:
Db2 Warehouse on CloudのREST APIを使用したデータロード (python & curl)
こちらで使用しているpythonのコードはnotebookとして以下でダウンロード可能です:
https://github.com/kyokonishito/Db2onCloud_RESTAPI/blob/main/notebooks/Db2_on_Cloud_API_Load.ipynb
重要
- 2021年8月10日現在、ロードするCSVファイルの一行目にヘッダー(項目名)が付いているファイルは、ヘッダーを除いたロードができませんので、ヘッダーを除いたデータのみのCSVファイルを準備してください。
- ファイルの文字コードがUTF-8の場合は「BOMなし」で準備してください。BOMがあると一行目一行目の読み込みで思わぬエラーが発生する可能性があります。
1. 前準備
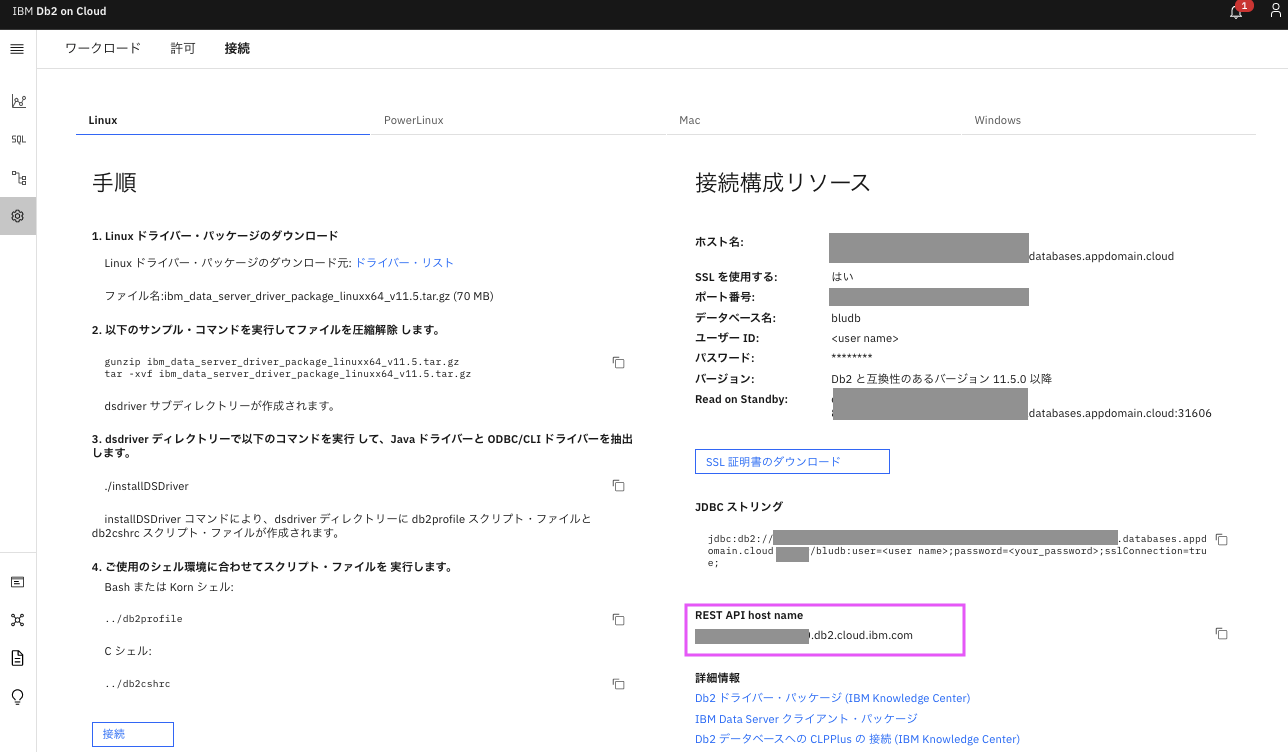
REST APIで使用するREST API host nameとCRNをあらかじめ取得しておきます。
1.1 REST API host name情報の取得
まずはREST API host name情報を取得します。
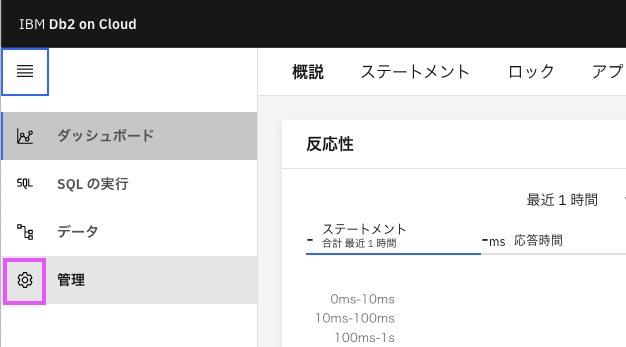
1.1.1. Db2 Webコンソールを開いて、左側のメニューから歯車のアイコン、「管理」をクリック
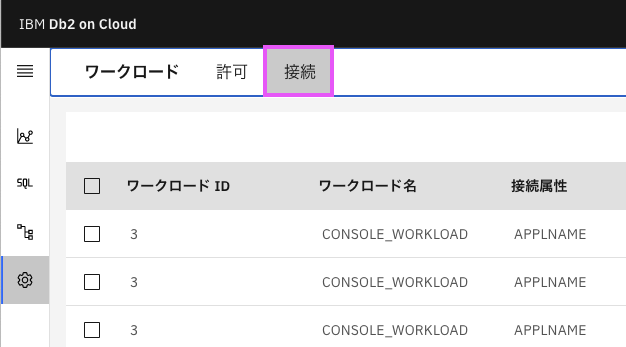
1.1.2. 上部メニューから接続をクリック
1.1.3.REST API host name からREST API URL情報を取得する
ここで取得したURLがAPIのhost nameになります。
1.2. CRN情報の取得
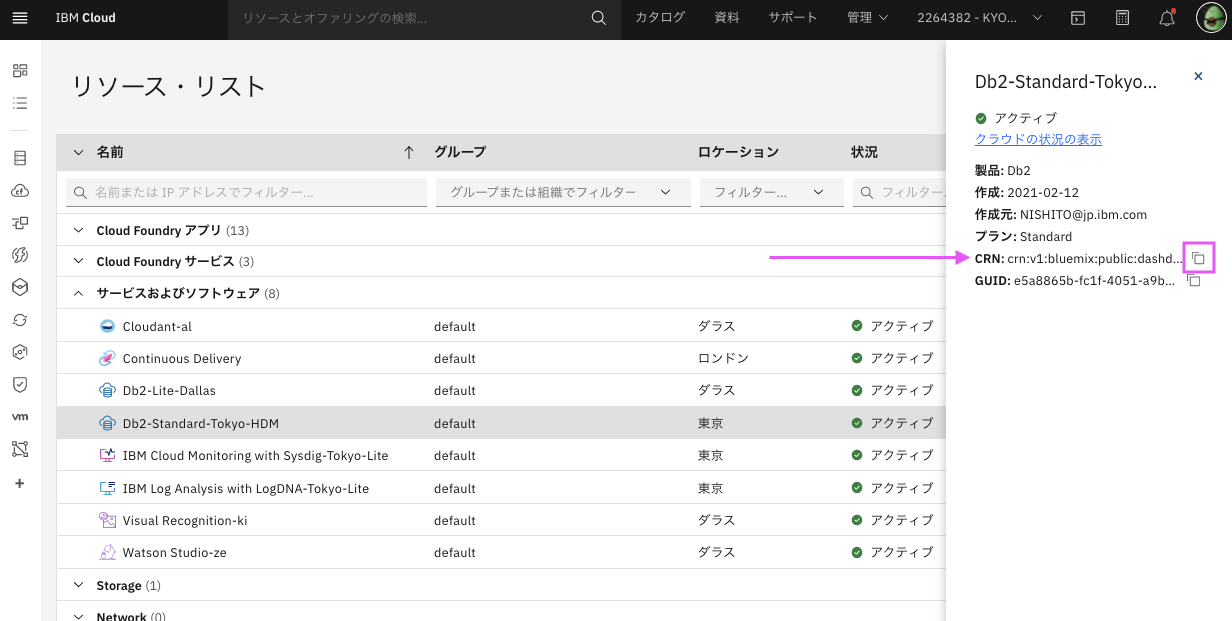
CRN情報はいくつかの場所から取得できますが、ここではリソースリストから取得する方法を説明します。
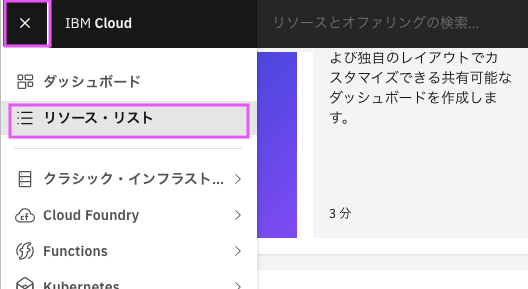
1.2.1. IBM Cloudのダッシュボードの右上のメニューから「リソース・リスト」を選択
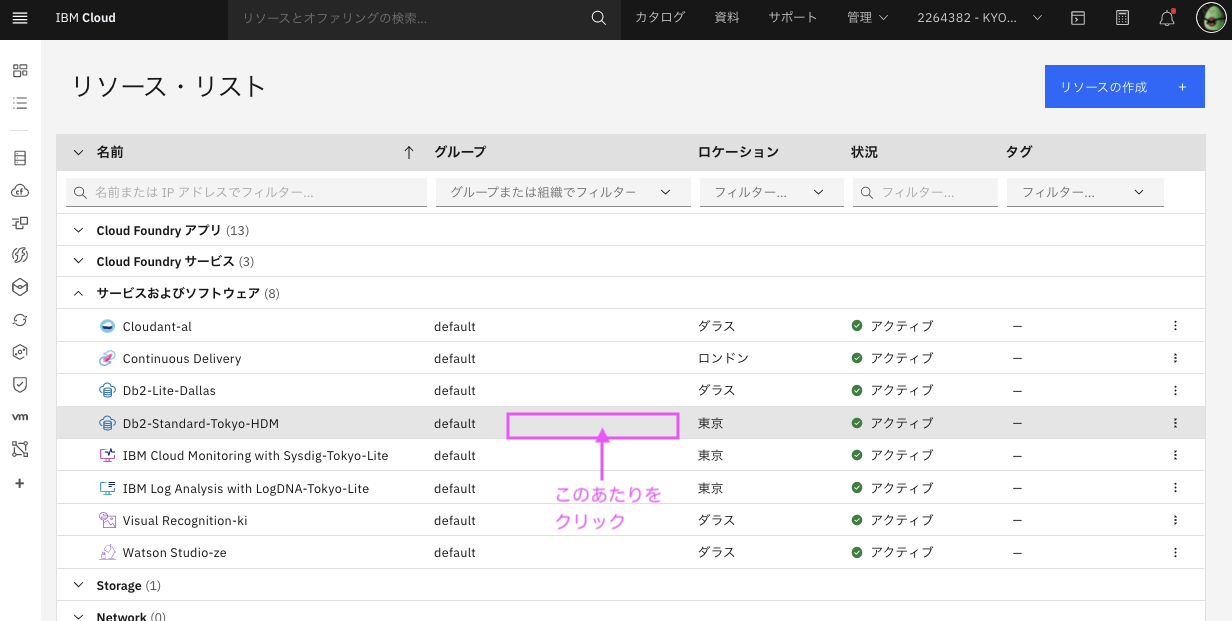
1.2.2. 「サービスおよびソフトウェア」をクリックして開き、接続したいDb2の名前の行の「真ん中あたり」をクリック
1.2.3. CRNが表示されるので、右側のコピーアイコンでコピーし、テキストファイルなどどこかに貼り付けておく
2. アクセストークンの取得
ここからpythonまたはcurlコマンドを使用します。
Db2のuserid, passwordを使用して、API実行に必要なアクセストークンをREST APIで取得します。
指定したuseridの権限と、APIで実行可能な権限は同じとなります。
useridとpasswordなど作った覚えのない方は、こちらの方法で取得してください。
API Doc: https://cloud.ibm.com/apidocs/db2-on-cloud/db2-on-cloud-v4#authenticate
python
python前準備
冒頭で必要なライブラリと変数をセットしておきます。
<>で囲まれた部分は前準備で取得した値に置き換えてください。
#必要なライブラリのimport
import requests
import json
import sys

#必要な変数のセット
REST_API_URL = "<1.1.3で取得したAPI hostname>"
CRN = "<1.2.3で取得したCRN>"
DB_USERID = "<dbのuserid>"
DB_PW = "<dbのpassword>"
LOAD_FILE = "<ロードするファイル名(PATH付き)>"
SCHEMA_NAME = "<ロード先テーブルのスキーマ名>"
TABLE_NAME = "<ロード先テーブル名>"
本編
実行が成功すると変数access_tokenにアクセストークンの値が入ります。
#REST API の  URL 作成
service_name = '/dbapi/v4/auth/tokens'
url = 'https://' + REST_API_URL + service_name

# request header作成
headers = {}
headers ['content-type'] = "application/json"
headers ['x-deployment-id']= CRN


# parameter dbアクセス用のuid, pwを指定
params = {}
params['userid'] = DB_USERID
params['password']= DB_PW

# Call the RESTful service
try:
    r = requests.post(url, headers=headers,  json=params)
except Exception as err:
    print("RESTful call failed. Detailed information follows.")
    print(err)
    sys.exit()

# Check for Invalid credentials
if (r.status_code == 401): # There was an error with the authentication
    print("RESTful called failed.")
    message = r.json()['errors']
    print(message)
    sys.exit()

# Check for anything other than 200/401
if (r.status_code != 200): # Some other failure
    print("RESTful called failed. Detailed information follows.")
    print(r.json())
    sys.exit()

# Retrieve the access token
try:
    access_token = r.json()['token']
    #print(r.json())
except:
    print("RESTful call did not return an access token.")
    print(r.json())
    sys.exit()

print (access_token)
curl
<>で囲まれた部分は前準備で取得した値に置き換えて実行してください。
curl -X POST   https://<1.1.3で取得したAPI hostname>/dbapi/v4/auth/tokens \
-H 'content-type: application/json' \
-H 'x-deployment-id: <1.2.3で取得したCRN>' \
-d '{"userid":"<dbのuserid>","password":"<dbのpassword>"}'
出力例: tokenの値(青くマークした部分)がアクセストークンの値になります(一部マスキングしてます)。

3. ロードするファイル(CSVファイル)のアップロード
「え? データロードしないの?」 と思う方もいるかもしれません。どこにも書いてありませんが(!)、Db2 REST APIでデータロードするにはまずロードするファイルをテンポラリーのDb2用のcloud object storageにアップロードする必要があります。この記事では説明しませんが、自分のS3やIBM Cloud Object Storage(ICOS)にアップロードしたものでもロードできます。ローカルから直にはできないようです。
API Doc: https://cloud.ibm.com/apidocs/db2-on-cloud/db2-on-cloud-v4#uploadhomestoragefile
python
2の前準備、本編コードを実行して、必要なシェル変数、access_tokenにアクセストークンの値が入っていることが前提です。
実行が成功すると変数FILE_PATHにアップロードしたファイルのPATHの値が入ります。
#REST API の  URL 作成
service_name = '/dbapi/v4/home_content/'
url = 'https://' + REST_API_URL + service_name

# request header作成
headers = {}
headers ['authorization'] =  'Bearer ' + access_token #アクセストークンをHeaderにセット
headers ['x-deployment-id'] = CRN

# アップロードするファイルのセット
file = {'file': open( LOAD_FILE , 'rb')}


try:
    r = requests.post(url, headers=headers, files=file)
    print( r.status_code)
    #print(r.json())
except Exception as err:
    print("RESTful call failed. Detailed information follows.")
    print(err)


# Check for Invalid credentials
if (r.status_code == 401): # There was an error with the authentication
    print("RESTful called failed.")
    message = r.json()['errors']
    print(message)


# Check for anything other than 201/401
elif (r.status_code != 201): # Some other failure
    print("RESTful called failed. Detailed information follows.")
    print(r.text)
    #print(json.dumps(r.json(), indent=4))


# Print resppose
else:
    print(json.dumps(r.json(), indent=4))
    FILE_PATH = r.json()["resources"][0]["location"]
    print("FILE_PATH: " + FILE_PATH)
出力例: カレントDirにある130001_tokyo_covid19_patients.csvというファイルをアップロード
201
{
    "count": 1,
    "resources": [
        {
            "size": 20201563,
            "contents": [],
            "is_folder": "no",
            "name": "130001_tokyo_covid19_patients.csv",
            "location": "./130001_tokyo_covid19_patients.csv"
        }
    ]
}
curl
2のコードを実行して、アクセストークンの値を取得していることが前提です。
<>で囲まれた部分は前準備、2で取得した値、アップロードするファイル名に置き換えてください。
!curl  -X POST   'https://<1.1.3で取得したAPI hostname>/dbapi/v4/home_content/' \
-H 'authorization: Bearer <2で取得したアクセストークンの値>' \
-H 'content-type: multipart/form-data'  \
-H 'x-deployment-id: <1.2.3で取得したCRN>'  \
-F 'data=@<ロードするファイル名(PATH付き)>'
出力例: カレントDirにある130001_tokyo_covid19_patients.csvというファイルをアップロード
locationの値は次で使います。
{"count":1,"resources":[{"size":20201563,"contents":[],"is_folder":"no","name":"130001_tokyo_covid19_patients.csv","location":"./130001_tokyo_covid19_patients.csv"}]}
4. データロードジョブの作成
アップロードしたファイルをロードするジョブを作成し、ロードを実行します。
前述したように、この記事では説明しませんが、自分のS3やIBM Cloud Object Storage(ICOS)にアップロードしたものでもロードできます。その場合のパラメーター等は下記のAPI Docを参照してください。
API Doc: https://cloud.ibm.com/apidocs/db2-on-cloud/db2-on-cloud-v4#createloadjob
file_optionsとload_actionは必要に応じて変更してください。
file_optionsはWebコンソールから「データのロード」する際の、「定義」で指定するオプションと同じです。

注意点:
- code_page: ファイルのコードページ, utf-8であれば1208 SJISは943 その他はこちらから
- has_header_row: Header(1行目の項目名) なし noのみセット可
- load_action: 追加でINSERT INSERT / データの置換 REPLACE
    "file_options":{
        "code_page":"1208",  #ファイルのコードページ, utf-8であれば1208
        "has_header_row":"no", # Header(1行目の項目名)なし no のみセット可
        "column_delimiter":",", #カラムのデリミター
        "date_format":"YYYY-MM-DD", #Dateのフォーマット
        "time_format":"HH:MM:SS", #Timeのフォーマット
        "timestamp_format":"YYYY-MM-DD HH:MM:SS"},  #TimeStampのフォーマット
    "load_action": "INSERT", # 追加でINSERT INSERT / データの置換 REPLACE
    "server_source":{"file_path": LOAD_FILE} #アップロードしたファイルのPATH
python
2の前準備、本編、3のコードを実行して、必要なシェル変数、access_tokenにアクセストークンの値、 FILE_PATHの値が入っていること、ロードするファイルのアップロード実施済みが前提です。
実行が成功すると変数JOB_IDにアップロードしたデータロード ジョブのIDの値が入ります。
#REST API の  URL 作成
service_name = '/dbapi/v4/load_jobs'
url = 'https://' + REST_API_URL + service_name

# request header作成
headers = {}
headers ['content-type'] = "application/json"
headers ['authorization'] =  'Bearer ' + access_token #アクセストークンをHeaderにセット
headers ['x-deployment-id'] = CRN

# ロード属性のセット
data = {
   "load_source": "SERVER",
   "schema": SCHEMA_NAME,
    "table":TABLE_NAME,
    "file_options":{
        "code_page":"1208", #ファイルのコードページ, utf-8であれば1208
        "has_header_row":"NO", # Header(1行目の項目名) なし NO
        "column_delimiter":",", #カラムのデリミター
        "date_format":"YYYY-MM-DD", #Dateのフォーマット
        "time_format":"HH:MM:SS", #Timeのフォーマット
        "timestamp_format":"YYYY-MM-DD HH:MM:SS"}, #TimeStampのフォーマット
    "load_action": "INSERT", # 追加でINSERT INSERT / データの置換 REPLACE
    "server_source":{"file_path":FILE_PATH}  #アップロードしたファイルのPATH
}

try:
    r = requests.post(url, headers=headers, json=data)
    print( r.status_code)
except Exception as err:
    print("RESTful call failed. Detailed information follows.")
    print(err)


# Check for Invalid credentials
if (r.status_code == 401): # There was an error with the authentication
    print("RESTful called failed.")
    message = r.json()['errors']
    print(message)


# Check for anything other than 201/401
elif (r.status_code != 201): # Some other failure
    print("RESTful called failed. Detailed information follows.")
    print(r.text)
    #print(json.dumps(r.json(), indent=4))


# Print response
else:
    print(json.dumps(r.json(), indent=4))
    JOB_ID = r.json()["id"]
    print(f"JOB_ID: {JOB_ID}" )
出力例:
3でアップロードした130001_tokyo_covid19_patients.csvファイルの データロードジョブを作成。 JOB_IDは1625689910940
201
{
    "schema": "YYYYYYYY",
    "database": "crn:v1:bluemix:public:xxxxx",
    "load_source": "SERVER",
    "load_action": "INSERT",
    "id": 1625689910940,
    "userid": "xxxxxx",
    "table": "COVID_19_\u6771\u4eac",
    "status": "Initialized"
}
JOB_ID: 1625689910940
curl
2, 3のコードを実行して、アクセストークンの値、アップロードしたファイルのPATHを取得、ロードするファイルのアップロード実施済みが前提です。
<>で囲まれた部分は前準備、2、3で取得した値に置き換えてください。
file_optionsについてはこのセクションの最初の説明を参照してください。
curl -X POST https://<1.1.3で取得したAPI hostname>/dbapi/v4/load_jobs \
-H 'authorization: Bearer <2で取得したアクセストークンの値>'\
-H 'content-type: application/json' \
-H 'x-deployment-id: <1.2.3で取得したCRN>' \
-d '{  \
"load_source":"SERVER", \
"load_action":"INSERT", \
"schema":"<ロード先テーブルのスキーマ名>", \
"table":"<ロード先テーブル名>", \
"server_source":{"file_path":"<3で取得したlocationの値>"}, \
"file_options":{"code_page":"1208", \
"has_header_row":"no", \
"column_delimiter":",", \
"date_format":"YYYY-MM-DD", \
"time_format":"HH:MM:SS", \
"timestamp_format":"YYYY-MM-DD HH:MM:SS"}}'
出力例:
idの値は次で使います。
{"schema":"YYYYYYYY","database":"crn:v1:bluemix:public:xxxxx","load_source":"SERVER","load_action":"INSERT","id":1625690314460,"userid":"xxxxx","table":"COVID_19_東京","status":"Initialized"}
5. データロードジョブの状況確認
作成したジョブの実行状況を確認します。
API Doc: https://cloud.ibm.com/apidocs/db2-on-cloud/db2-on-cloud-v4#getloadjobbyid
ここで確認できる内容はWebコンソールの「データ」→「履歴のロード」でも確認できます。

python
2の前準備、本編、3,4のコードを実行して、必要なシェル変数、access_tokenにアクセストークンの値、 JOB_IDの値が入っていることが前提です。
#REST API の  URL 作成
service_name = '/dbapi/v4/load_jobs'
url = 'https://' + REST_API_URL + service_name + '/' +  str(JOB_ID)

# request header作成
headers = {}
headers ['content-type'] = "application/json"
headers ['authorization'] =  'Bearer ' + access_token #アクセストークンをHeaderにセット
headers ['x-deployment-id'] = CRN


try:
    r = requests.get(url, headers=headers)
    print( r.status_code)
except Exception as err:
    print("RESTful call failed. Detailed information follows.")
    print(err)


# Check for Invalid credentials
if (r.status_code == 401): # There was an error with the authentication
    print("RESTful called failed.")
    message = r.json()['errors']
    print(message)


# Check for anything other than 201/401
elif (r.status_code != 200): # Some other failure
    print("RESTful called failed. Detailed information follows.")
    print(r.text)
    #print(json.dumps(r.json(), indent=4))


# Print response
else:
    print(json.dumps(r.json(), indent=4))
出力例:
4で出力されたJOB_IDのデータロードジョブの状況確認。
status.statusに"status": "Success"となっており、成功しています。
ロードされた行数など状況詳細はstatusの中身を確認する。
200
{
    "request": {
        "schema": "YYYYYYYY",
        "stream_source": {
            "file_name": ""
        },
        "auto_create_table": {
            "column_names": [],
            "execute": ""
        },
        "load_source": "SERVER",
        "cloud_source": {
            "path": "",
            "endpoint": "",
            "auth_id": "",
            "auth_secret": ""
        },
        "max_warning_count": "1000",
        "isET": "false",
        "load_action": "INSERT",
        "max_row_count": "",
        "server_source": {
            "file_path": "./130001_tokyo_covid19_patients.csv"
        },
        "file_options": {
            "date_delimiter": "",
            "ignore_zero": "",
            "has_header_row": "no",
            "time_format": "HH:MM:SS",
            "date_style": "",
            "string_delimiter": "",
            "column_delimiter": ",",
            "null_value": "",
            "escape_char": "",
            "time_style": "",
            "encoding": "",
            "require_quotes": "",
            "delimiter_priority": "",
            "boolean_tyle": "",
            "code_page": "1208",
            "timestamp_format": "YYYY-MM-DD HH:MM:SS",
            "string_blanks": "",
            "cde_analyze_frequency": "",
            "identity_columns": "",
            "use_defaults_for_missing_values": "",
            "time_delimiter": "",
            "implicitly_hidden_columns": "",
            "ctrl_chars": "",
            "date_format": "YYYY-MM-DD"
        },
        "table": "COVID_19_\u6771\u4eac"
    },
    "metadata": {
        "updated_at": "",
        "guid": "",
        "created_at": "",
        "url": ""
    },
    "id": "1625689910940",
    "userid": "xxxxxxx",
    "status": {
        "rows_loaded": 252169,
        "sub_status": "Success",
        "end_time": 1628643465444,
        "rows_rejected": 0,
        "bad_file": "",
        "error_count": 0,
        "start_time": 1628643456318,
        "rows_read": 252169,
        "rows_deleted": 0,
        "rows_committed": 252169,
        "errors_summary": [],
        "log_file": "load_1625689910940_YYYYYYYY_COVID_19_\u6771\u4eac_20210811-005736-GMT.txt",
        "warning_count": 0,
        "warnings_summary": [],
        "rows_partitioned": 0,
        "status": "Success",
        "rows_skipped": 0
    }
}
curl
2, 3, 4のコードを実行して、アクセストークンの値取得済み、ロードするファイルのアップロード 、データロードジョブ実施済み、が前提です。
<>で囲まれた部分は前準備、2、4で取得した値に置き換えてください。
curl -X POST https://<1.1.3で取得したAPI hostname>/dbapi/v4/load_jobs/<4で取得したid> \
-H 'authorization: Bearer <2で取得したアクセストークンの値>'\
-H 'content-type: application/json' \
-H 'x-deployment-id: <1.2.3で取得したCRN>' \
出力例:
{"request":{"schema":"YYYYYYYY","stream_source":{"file_name":""},"auto_create_table":{"column_names":[],"execute":""},"load_source":"SERVER","cloud_source":{"path":"","endpoint":"","auth_id":"","auth_secret":""},"max_warning_count":"1000","isET":"false","load_action":"REPLACE","max_row_count":"","server_source":{"file_path":"./130001_tokyo_covid19_patients.csv"},"file_options":{"date_delimiter":"","ignore_zero":"","has_header_row":"no","time_format":"HH:MM:SS","date_style":"","string_delimiter":"","column_delimiter":",","null_value":"","escape_char":"","time_style":"","encoding":"","require_quotes":"","delimiter_priority":"","boolean_tyle":"","code_page":"1208","timestamp_format":"YYYY-MM-DD HH:MM:SS","string_blanks":"","cde_analyze_frequency":"","identity_columns":"","use_defaults_for_missing_values":"","time_delimiter":"","implicitly_hidden_columns":"","ctrl_chars":"","date_format":"YYYY-MM-DD"},"table":"COVID_19_東京"},"metadata":{"updated_at":"","guid":"","created_at":"","url":""},"id":"1625689910940","userid":"xxxxxxxx","status":{"rows_loaded":252169,"sub_status":"Success","end_time":1628643465444,"rows_rejected":0,"bad_file":"","error_count":0,"start_time":1628643456318,"rows_read":252169,"rows_deleted":0,"rows_committed":252169,"errors_summary":[],"log_file":"load_1625689910940_YYYYYYYY_COVID_19_東京_20210811-005736-GMT.txt","warning_count":0,"warnings_summary":[],"rows_partitioned":0,"status":"Success","rows_skipped":0}}
6. まとめ
Db2 on CloudのREST APIを使用したデータロードには以下のステップを踏むことが必要です:
- アクセストークンの取得
- ロードするファイル(CSVファイル)のアップロード
- データロードジョブの作成
- データロードジョブの状況確認
ここでのコードは説明のために冗長に書いています。関数などでまとめてしまえば簡単に書けるかと思いますので、ぜひ実際の業務でも使用してみてください。
