はじめに
ローカルに構築したMCPサーバーに対して、Claude Desktopからチャットでアクセスできるようにする
なぜMCPなのか?
MCP は、LLM 上にエージェントと複雑なワークフローを構築するのに役立ちます。LLM はデータやツールとの統合が頻繁に必要になりますが、MCP は次の機能を提供します。
- プログラミングによる細かい制御
- コードさえ書ければ大体のデータソースにアクセスできる
1.全体構成図

参考: https://www.ai-souken.com/article/claude-mcp-overview
ClaudeのModel Context Protocol(MCP)はClaudeが様々なデータソース・ツールと連携するためのオープンプロトコルです。
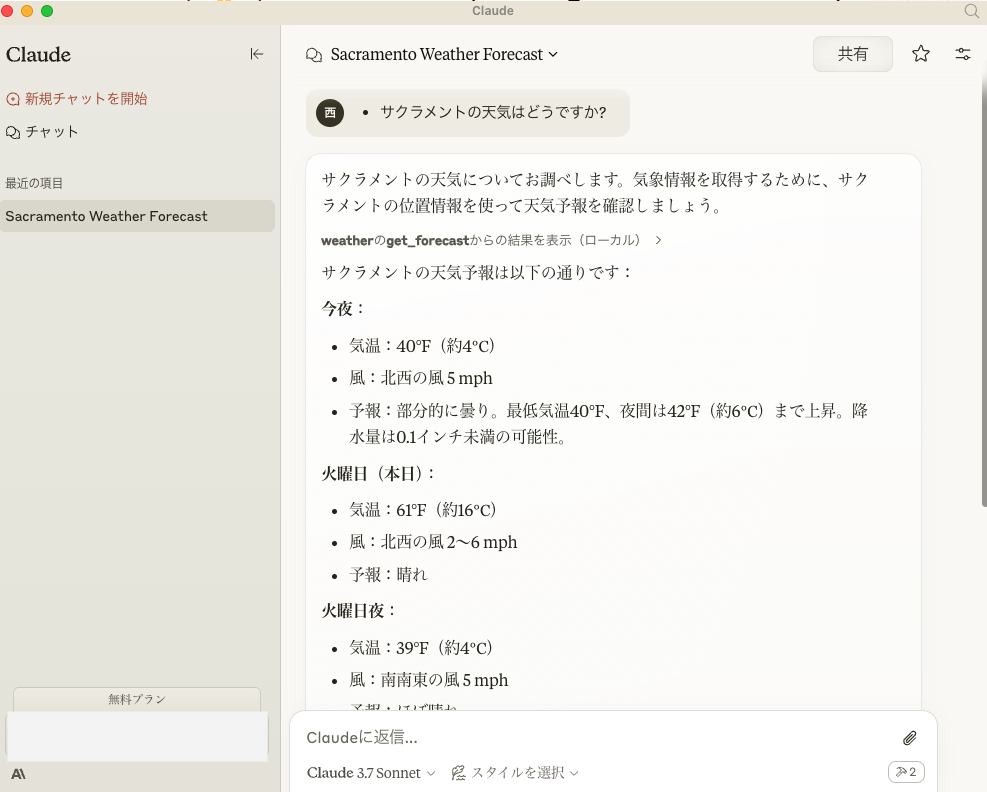
操作イメージ例
例:Claude DesktopのチャットからローカルのMCPサーバーに対して天気予報を聞いている
2.構築手順
ディレクトリ全体

# mcp-serverディレクトリ内の各ファイルの役割
## `weather.py`
天気情報を提供するMCPサーバーのメインスクリプトです。`FastMCP`を使用してサーバーを初期化し、NWS APIから天気情報を取得してフォーマットする関数が含まれています。

### 主な関数
- `make_nws_request(url: str) -> dict[str, Any] | None`: NWS APIにリクエストを送信し、エラーハンドリングを行います。
- `format_alert(feature: dict) -> str`: 天気警報の情報を読みやすい形式にフォーマットします。
- `get_alerts(state: str) -> str`: 指定された州の天気警報を取得します。
- `get_forecast(latitude: float, longitude: float) -> str`: 指定された緯度経度の天気予報を取得します。
コード全体
.py
from typing import Any
import httpx
from mcp.server.fastmcp import FastMCP

# Initialize FastMCP server
mcp = FastMCP("weather")

# Constants
NWS_API_BASE = "https://api.weather.gov"
USER_AGENT = "weather-app/1.0"

# Helper functions
async def make_nws_request(url: str) -> dict[str, Any] | None:
    """Make a request to the NWS API with proper error handling."""
    headers = {
        "User-Agent": USER_AGENT,
        "Accept": "application/geo+json"
    }
    async with httpx.AsyncClient() as client:
        try:
            response = await client.get(url, headers=headers, timeout=30.0)
            response.raise_for_status()
            return response.json()
        except Exception:
            return None

def format_alert(feature: dict) -> str:
    """Format an alert feature into a readable string."""
    props = feature["properties"]
    return f"""
Event: {props.get('event', 'Unknown')}
Area: {props.get('areaDesc', 'Unknown')}
Severity: {props.get('severity', 'Unknown')}
Description: {props.get('description', 'No description available')}
Instructions: {props.get('instruction', 'No specific instructions provided')}
"""

@mcp.tool()
async def get_alerts(state: str) -> str:
    """Get weather alerts for a US state.

    Args:
        state: Two-letter US state code (e.g. CA, NY)
    """
    url = f"{NWS_API_BASE}/alerts/active/area/{state}"
    data = await make_nws_request(url)

    if not data or "features" not in data:
        return "Unable to fetch alerts or no alerts found."

    if not data["features"]:
        return "No active alerts for this state."

    alerts = [format_alert(feature) for feature in data["features"]]
    return "\n---\n".join(alerts)

@mcp.tool()
async def get_forecast(latitude: float, longitude: float) -> str:
    """Get weather forecast for a location.

    Args:
        latitude: Latitude of the location
        longitude: Longitude of the location
    """
    # First get the forecast grid endpoint
    points_url = f"{NWS_API_BASE}/points/{latitude},{longitude}"
    points_data = await make_nws_request(points_url)

    if not points_data:
        return "Unable to fetch forecast data for this location."

    # Get the forecast URL from the points response
    forecast_url = points_data["properties"]["forecast"]
    forecast_data = await make_nws_request(forecast_url)

    if not forecast_data:
        return "Unable to fetch detailed forecast."

    # Format the periods into a readable forecast
    periods = forecast_data["properties"]["periods"]
    forecasts = []
    for period in periods[:5]:  # Only show next 5 periods
        forecast = f"""
{period['name']}:
Temperature: {period['temperature']}°{period['temperatureUnit']}
Wind: {period['windSpeed']} {period['windDirection']}
Forecast: {period['detailedForecast']}
"""
        forecasts.append(forecast)

    return "\n---\n".join(forecasts)


if __name__ == "__main__":
    # Initialize and run the server
    mcp.run(transport='stdio')
3. Claude Desktopの設定
- Claude for Desktopをインストールする
- ターミナルで以下のファイルを作成して、jsonファイルを編集しMCPサーバーを登録する
 # macの場合
 vim ~/Library/Application Support/Claude/claude_desktop_config.json
{
  "mcpServers": {
    "weather": {
      "command": "uv", # "TODO": which uvでuvを実行できる絶対パスを指定する
      "args": [
        "--directory",
        "/Users/xxx/yyy/.../mcp-server", # TODO mcp-serverのディレクトリの絶対パスを指定する
        "run",
        "weather.py" # NOTE: MCPサーバーの実行ファイル
      ]
    }
  }
}
MCPクライアント

HTTP経由でアクセスするためには?
SSEの実装が必要
https://modelcontextprotocol.io/docs/concepts/transports#server-sent-events-sse
FastMCPの特徴
- FastMCP(Fast Model Controller Protocol)は主にリアルタイムのチャットアプリやAIアシスタントなどの双方向通信を目的として設計された独自のプロトコルです。
- WebSocketを基盤とし、高速かつ双方向性を持つリアルタイム通信を提供します。
- 接続が持続的(persistent)であり、一度確立すると通信が継続されます。
- クライアントとサーバーの間で双方向に即時にデータがやり取りされます。
- パフォーマンス重視の用途で特に優れています。
SseServerTransport(SSE)の特徴:
- SSE(Server-Sent Events)はHTTPベースの一方向通信プロトコルであり、クライアントがサーバーに対してデータを送信する手段を持ちません。
- クライアント側で受信するだけのシンプルな仕組みで、HTTP接続を開いたままにしてサーバーからのイベントを待ちます。
- HTTPベースであるため、既存のWebインフラと相性がよく、プロキシやファイアウォール越えも簡単に行えます。
- シンプルで導入が容易ですが、双方向通信が必要な用途には向きません。
- ブラウザに標準で組み込まれているため、特別なクライアントライブラリが不要です。
主な違いのまとめ:
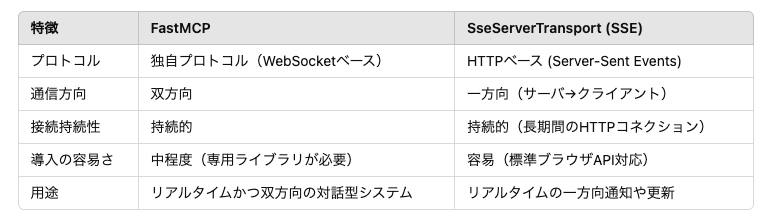
用途に応じて、FastMCPは高速・双方向リアルタイム通信が必要な対話型アプリ、SseServerTransportは単純なサーバーからクライアントへのリアルタイム通知に最適です。
終わりに
- 思った以上にMCPサーバーの実装例が少ない
- Pythonでのサンプル例も少ない
- 結局SSEで構築まで辿り着けなかった
- MCPサーバーの構築フレームワークなるものもあるみたいなので生で書くのは微妙...?