0. スライドパズル
今日はスライドパズルをつくります。
だいたい170行程度のシンプルなやつです。
elm-animatorを使っていますが, 簡単な使い方などは 「elm-animatorでアニメーション(Animator.Inline)」 をどうぞ。
1. プロジェクトを作成
利用するパッケージをインストールして, src/Main.elm でインポートしましょう。
% elm init
% elm install elm/random
% elm install elm/time
% elm install elm-community/list-extra
% elm install mdgriffith/elm-animator
module Main exposing (main)

import Animator
import Animator.Inline as Inline
import Browser
import Html exposing (Html, div, text)
import Html.Attributes exposing (style)
import Html.Events as Events
import List.Extra as List
import Random
import Time exposing (Posix)
2. データ構造
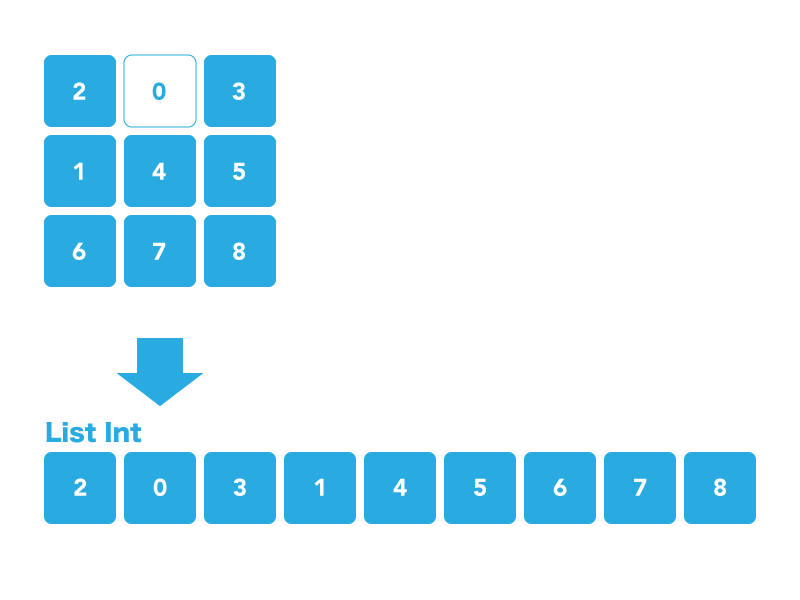
パズルの盤面を List Int として扱います。
elm-animatorで利用したいので, List Int を Animator.Timeline で包んでおきましょう。
-- モデル
type alias Model = Animator.Timeline (List Int)
3. 乱数でステージを初期化する
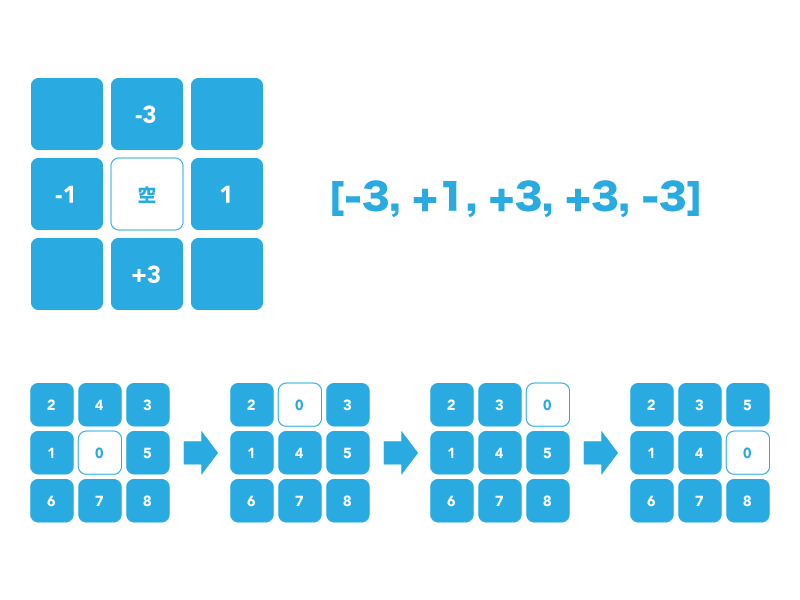
パズルなので最初にランダムに盤面をシャッフルして問題を作る必要がありますね。
空白のセル(0)を上下左右のいずれかのセルと入れ替えることを繰り返してシャッフルすることにしましょう。
今回は init で -1, +1, -3, +3 のいずれかの要素を24個持つリストを Random.generate で生成します。
つまり, 0のセルと上下左右のセルを24回入れ替えるためのデータです。
type Msg = Shuffle (List Int)

default : List Int
default = List.range 0 8

init : () -> ( Model, Cmd Msg )
init _ =
    ( Animator.init default
    , Random.uniform 1 [ -1, -3, 3 ]
        |> Random.list 24
        |> Random.generate Shuffle
    )
生成したデータを元にセルを入れ替えていく関数を定義しましょう。
簡単のため, 今回は引数に現在の0のインデックスを与えています。 List.Extra.swapAt を使えばリストの要素の入れ替えは楽々です。
shuffle : Int -> List Int -> List Int -> List Int
shuffle zero dirs nums =
    case dirs of
        [] ->
            nums

        x :: xs ->
            let
                next =
                    zero + x
            in
            if 0 <= next && next <= 8 then
                List.swapAt zero next nums
                    |> shuffle next xs

            else
                shuffle zero xs nums
_Random.generate_は_update_で生成したランダムなデータを受け取る必要があるので, update関数を定義します。
update : Msg -> Model -> ( Model, Cmd Msg )
update msg model =
    case msg of
        Shuffle nexts ->
            let
                stage =
                    model
                        |> Animator.current
                        |> shuffle 0 nexts
                        |> Debug.log "model"
            in
            ( Animator.go Animator.immediately stage model
            , Cmd.none
            )
まだ, _main_と_subscriptions_と_view_を定義していなかったので, 追加しておきましょう。
main : Program () Model Msg
main =
    Browser.element
        { init = init
        , update = update
        , subscriptions = subscriptions
        , view = view
        }

subscriptions : Model -> Sub Msg
subscriptions model = Sub.none

view : Model -> Html Msg
view model = div [] []
そうしたら,実行です。
% elm reactor
で localhost:8000 とかにアクセスして,Main.elmを開き,F12キーなどでブラウザの開発者ツールを起動すると,ランダムにシャッフルされた盤面の内容がコンソールに表示されているはずです。
(参考までに,ここまでのソースコードはこちら)
Main.elm:523 model: [3,1,2,0,6,4,5,7,8]
[4,3,5,1,6,0,2,7,8] のようにランダムにシャッフルされた数字のリストが確認できましたね。
これでパズルの盤面に最初に表示するデータを作成できました!
4. アニメーションの設定をする
今回は, パズルのセルがスライドする際にアニメーションするようにしていますので, その処理を追加しましょう。
このあたりは, ほとんどそのまま 「elm-animatorでアニメーション(Animator.Inline)」 の内容です。
 type Msg
     = Shuffle (List Int)
+    | Tick Posix
-- Model更新用関数(ほぼテンプレート)
animator : Animator.Animator Model
animator =
    Animator.animator
        |> Animator.watching identity always

-- subscriptionで一定時間ごとにTickを呼び出すようにする
subscriptions : Model -> Sub Msg
subscriptions model =
    Animator.toSubscription Tick model animator

-- 一定時間ごとにModelを更新する
update : Msg -> Model -> ( Model, Cmd Msg )
update msg model =
    case msg of
        Tick posix ->
            ( Animator.update posix animator model, Cmd.none )
5. 盤面を描画する
view : Model -> Html Msg
view model =
    div
        [ style "width" "300px"
        , style "margin" "auto"
        , style "padding" "100px 0"
        ]
        [ div [] (List.map (cell model) (Animator.current model))
        ]
そして盤面の個々のセルを描画する関数を定義しましょう。
0は空欄なので div [] [] を返し, それ以外ならオレンジ色のセルを返します。
cell : Animator.Timeline (List Int) -> Int -> Html Msg
cell timeline value =
    case value of
        0 ->
            div [] []

        _ ->
            div
                [ style "position" "absolute"
                , Inline.xy timeline <|
                    \xs ->
                        let
                            i =
                                List.elemIndex value xs
                                    |> Maybe.withDefault 0
                        in
                        { x = Animator.at (toFloat (100 * remainderBy 3 i))
                        , y = Animator.at (toFloat (100 * (i // 3)))
                        }
                , style "background-color" "orange"
                , style "width" "99px"
                , style "height" "99px"
                ]
                [ text (String.fromInt value) ]
重要なのは Inline.xy timeline <|... の箇所です。
Animator.Inline.xy を使うことで, セルを表示したい座標と現在のセルの座標が異なる場合にcssアニメーションによってスライドするようにしています。

リロードする度に3x3のシャッフルされたパズルが表示されていますね。
ソースコード
6. クリックしてセルをスライドさせる
オレンジ色のセルをクリックしたら, それを update 関数で検知できるようにしましょう。
まずは _Msg_型 を修正します。
 type Msg
     = Shuffle (List Int)
     | Tick Posix
+    | Click Int
そして, セルをクリックした際にイベントが呼び出されるようにします。
先ほどの cell 関数に手を加えましょう。
  _ ->
      div
          [ style "position" "absolute"
+         , Events.onClick (Click value)
          , Inline.xy timeline <|
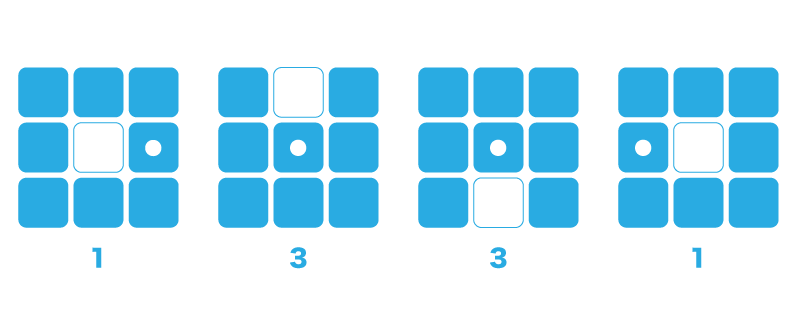
スライドの処理は, クリックされたセルと空白(0)のセルが隣り合っている場合は, それらを入れ替えることで実現します。
リスト上のクリックされたセルと0のセルのインデックスを取得し, 差の絶対値が1または3である場合はスワップしましょう。
    Click n ->
            let
                clicked =
                    List.elemIndex n (Animator.current model)
                        |> Maybe.withDefault -1

                blank =
                    List.elemIndex 0 (Animator.current model)
                        |> Maybe.withDefault -1

                distance =
                    abs (clicked - blank)

                next =
                    if distance == 1 || distance == 3 then
                        List.swapAt clicked blank (Animator.current model)

                    else
                        Animator.current model
            in
            ( Animator.go Animator.slowly next model
            , Cmd.none
            )
Modelさえ更新すれば, elm-animatorがスライドアニメーションをやってくれます。
7. クリア判定する
クリア条件は現在の盤面が default の値と同じならば 0〜8 まで整列していることになるのでチェックは簡単ですね。
if Animator.current model == default then
    -- クリアしている
else
    -- クリアしていない
今回はシンプルに, クリアしていたら "SOLVED!" と表示するようにしましょう。
_view_関数に以下の_div_を追加してください。
  [
+     div
+         [ style "height" "64px"
+         , style "text-align" "center"
+         , style "font-size" "32px"
+         ]
+         [ if Animator.current model == default then
+               text "SOLVED!"
+           else
+               text ""
+           ]
        , div [] (List.map (cell model) (Animator.current model))
        ]
さあ, これで完成です!
elm-animatorを使うことで, Modelは盤面の状態だけしかもっていなくても比較的簡単にスライドアニメーションを追加することができました。
パズルのことだけを考えていたら, 盤面の状態において本質的でないけれどもあったほうが絶対に嬉しいアニメーションが実現できるなんてお得ですね。