はじめに
本記事のソースコードは下記の GitHub リポジトリで公開しております。
https://github.com/nikaera/azure-nestjs-sample
PlayFab の CloudScript 向けに Azure Functions の開発をすることになり、当初は .NET Azure Functions の採用を検討していました。
しかし、開発速度が求められる案件であり C# を書ける人材がいなくて Mac 使いが多く Node.js を使いたいとのことだったので、その中で良さそうな開発ツールを選定しました。
結果 NestJS の Azure Functions HTTP module を採用しようとなりました。
最終的には下記が決め手でした。
- Azure Functions へのアクセス手段として HTTP Trigger を使用する
- Webアプリケーション開発の感覚で Azure Functions の開発が可能である
- Azure Cosmos DB へは MongoDB API を用いれば TypeORM Module を用いて接続可能である
- ユニットテストや E2E テストを書くのが容易である
本記事では下記について記載していきます。
- NestJS の導入から開発環境のセットアップ
- Azure Cosmos DB を絡めた Azure Functions の開発からテスト環境の構築
- GitHub Actions を用いた CI 環境の構築
- Azure KeyVault を用いたシークレット情報の管理までの手順
動作環境
- Azure Functions Core Tools
- core 2.11.1
- func 3.0.2931
- Node.js 10.22.1
- MongoDB 4.4.1
- Docker 19.03.13
- Docker Compose 1.27.4
Azure Functions Core Tools の導入
Azure Functions の開発をする上で、ローカルで動作確認を行ったり、CI 環境構築をするためにターミナルからデプロイ作業を済ませたくなる状況が発生します。
そのため、まずは上記のためのツールである Azure Functions Core Tools を公式サイトの手順に従ってインストールします。本記事では v3.x 系を利用しています。
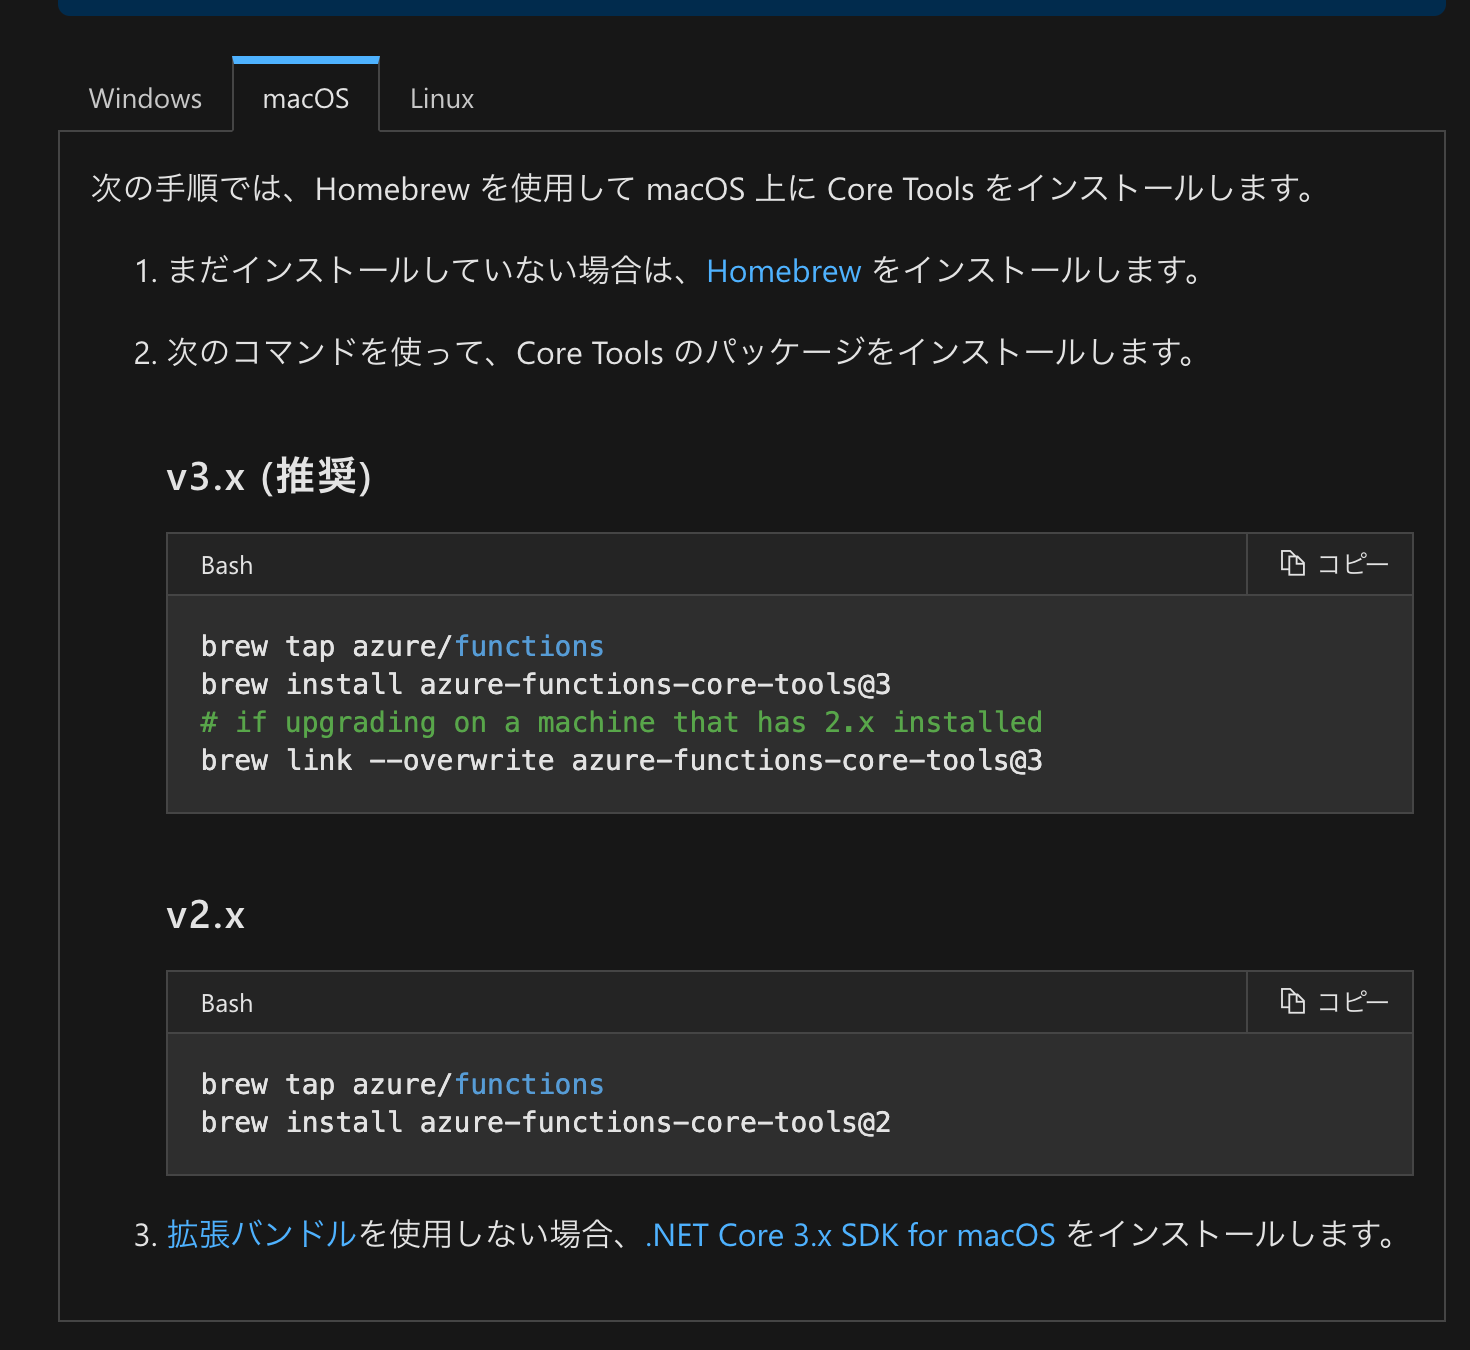
公式サイトの Azure Functions Core Tools のインストール手順
NestJS のインストール及び Azure Functions HTTP module の導入
公式サイトを見る限り、現時点 (2020/10/23) では Node.js のバージョンとして 10.x もしくは 12.x を利用する必要があります。本記事では v10.22.1 を利用しました。
Node.js のバージョン 10.x または 12.x がインストールされていることを確認します。
何はともあれ NestJS では CLI を用いて開発していくので、まずは CLI ツールをグローバルインストールします。
npm install @nestjs/cli -g
インストールが完了したら、CLI 経由で NestJS プロジェクトを作成し、Azure Functions HTTP module のインポートまで行います。
# NestJS アプリケーションを作成する
nest new azure-sample

# NestJS アプリケーションに Azure Functions HTTP module をインポートする
cd azure-sample
nest add @nestjs/azure-func-http
無事にコマンドの実行に成功していれば、プロジェクトフォルダ内は下記の構造になっているはずです。
# tree コマンドでプロジェクトフォルダ構成を確認する
tree -I node_modules -L 2 ./
./
├── README.md
├── host.json
├── local.settings.json
├── main
│   ├── function.json
│   ├── index.ts
│   └── sample.dat
├── node_modules
├── nest-cli.json
├── package-lock.json
├── package.json
├── proxies.json
├── src
│   ├── app.controller.spec.ts
│   ├── app.controller.ts
│   ├── app.module.ts
│   ├── app.service.ts
│   ├── main.azure.ts
│   └── main.ts
├── test
│   ├── app.e2e-spec.ts
│   └── jest-e2e.json
├── tsconfig.build.json
└── tsconfig.json
これで Azure Functions の開発環境は整いました。
早速動作検証が可能な状態となっているか確かめてみましょう。
ローカル環境で Azure Functions の環境を起動する
src/app.controller.ts の中に既に getHello 関数が存在しているので、helloworld というパスでアクセス可能な状態にしてみます。
import { Controller, Get } from '@nestjs/common';
import { AppService } from './app.service';

@Controller()
export class AppController {
  constructor(private readonly appService: AppService) {}

  // @Get 内に helloworld と記載することで、
  // http://localhost:7071/api/helloworld のようなエンドポイントでアクセス可能になる
  @Get('helloworld')
  getHello(): string {
    return this.appService.getHello();
  }
}
上記改修が完了したら npm run start:azure コマンドを実行してみます。
コマンドの実行が成功すると http://localhost:7071/api/{*segments} で各種 API へアクセス可能になります。
早速先程アクセス可能にした API へ http://localhost:7071/api/helloworld でアクセスしてみましょう。

http://localhost:7071/api/helloworld のアクセス結果
画面上に Hello World! の文字列が表示されていれば成功です。
NestJS で機能開発を行うための準備をする
本記事ではイベントを CRUD する機能を開発します。
NestJS では モジュール 単位で開発します。プログラムをモジュール単位で区切り、組み合わせることで、機能実装を進めていきます。 モジュールを区切る基準は開発者に委任されているため、採用するアーキテクチャによって異なります。
それでは早速 nest g module events コマンドでモジュールを新規作成します。
# モジュールを作成する
nest g module events
CREATE src/events/events.module.ts (82 bytes)
UPDATE src/app.module.ts (370 bytes)
すると、モジュールが新規作成されるのと同時に、そのモジュールを読み込むための記述が自動で src/app.module.ts に書き込まれます。
AppModule は NestJS でルートモジュールと呼ばれるもので、
アプリ起動時、最初に読み込まれるモジュールとなっております。
import { Module } from '@nestjs/common';
import { AppController } from './app.controller';
import { AppService } from './app.service';
// 新規追加された EventsModule を import で読み込む
import { EventsModule } from './events/events.module';

@Module({
  // ルートモジュールである AppModule から EventsModule を読み込む
  imports: [EventsModule],
  controllers: [AppController],
  providers: [AppService],
})
export class AppModule {}
次に EventsModule の実体を作成するために コントローラー を作成します。NestJS のコントローラーは入出力の制御する役割を担います。 具体的にはルーティングやリクエストに応じたハンドリングを行います。
コントローラーもモジュールの時と同様 NestJS の nest g controller events コマンドで新規作成します。
# コントローラーを作成する
nest g controller events
CREATE src/events/events.controller.spec.ts (485 bytes)
CREATE src/events/events.controller.ts (99 bytes)
UPDATE src/events/events.module.ts (170 bytes)
*.spec.ts ファイルは生成したクラスのテストファイルになります。
NestJS はテストフレームワークに Jest を採用しています。
コントローラーが作成され、コントローラーを読み込むための記述が、自動で先程作成したモジュールに書き込まれました。このように NestJS では CLI でスキャフォールド (開発に必要なファイル群の生成) する際に同名パスを指定すると自動的にインポートの記述が追加されていきます。
import { Module } from '@nestjs/common';
// 新規追加された EventsController を import で読み込む
import { EventsController } from './events.controller';

@Module({
  // EventsController を読み込むための記述が追加されている
  controllers: [EventsController]
})
export class EventsModule {}
次に、コントローラーに機能を実装していく前に、新たに プロバイダ を作成します。NestJS のプロバイダはいわゆるサービス層の役割を担うクラス全般を指します。 リポジトリやファクトリー、ヘルパー等を指します。
今回は EventsService というプロバイダを新規作成して、イベントの CRUD を行うための実装を書いていきます。コントローラーで EventsService を用いることで、CRUD の処理をコントローラー経由で実行可能にします。nest g service events コマンドでプロバイダを新規作成します。
# プロバイダ (サービス) を作成する
nest g service events
CREATE src/events/events.service.spec.ts (453 bytes)
CREATE src/events/events.service.ts (89 bytes)
UPDATE src/events/events.module.ts (247 bytes)
EventsService が作成され、EventsService を読み込むための記述が自動で EventsModule に書き込まれます。
import { Module } from '@nestjs/common';
import { EventsController } from './events.controller';
// 新規追加された EventsService を import で読み込む
import { EventsService } from './events.service';

@Module({
  controllers: [EventsController],
  // EventsService を読み込むための記述が追加されている
  providers: [EventsService]
})
export class EventsModule {}
これでイベントの CRUD 機能を Azure Functions の関数として実装していくための準備が整いました。
上述の通り、NestJS では nest コマンドを用いてスキャフォールド (開発に必要なファイル群の生成) した後に実装を進めるというフローを繰り返すのが一般的なフローとなっております。
Azure Cosmos DB の開発をローカルで行うための環境を構築する
イベントの CRUD 機能実装にあたって、今回はデータベースに Azure Cosmos DB を採用しますが、ローカルで開発する際は MongoDB を利用します。
そのため、まずは開発用に MongoDB の Docker イメージ を使用できるようにします。今後 E2E テストを行う際に Docker Compose を利用する想定のため、devenv/docker-compose.yml に MongoDB を利用する記述を書いていきます。
version: '3.8'
services:
  mongodb:
    image: mongo:latest
    ports:
        - "27017:27017"
    environment:
        MONGO_INITDB_ROOT_USERNAME: azure-sample
        MONGO_INITDB_ROOT_PASSWORD: azure-sample
        MONGO_INITDB_DATABASE: azure-sample
        TZ: Asia/Tokyo
devenv/docker-compose.yml の記述が終わったら、下記コマンドで MongoDB のコンテナをデーモン状態で起動します。
# Docker Compose で MongoDB コンテナをデーモンで起動する
cd devenv
docker-compose up -d

# MongoDB のコンテナが起動できたか確認する (NAMES の欄に devenv_mongodb_1 が表示されていれば成功)
docker ps
CONTAINER ID        IMAGE               COMMAND                  CREATED              STATUS              PORTS                      NAMES
f78f09cd4f5b        mongo:latest        "docker-entrypoint.s…"   About a minute ago   Up About a minute   0.0.0.0:27017->27017/tcp   devenv_mongodb_1
無事起動できれば devenv_mongodb_1 という名前のコンテナが起動していることが docker ps コマンドで確認できるはずです。
これで MongoDB で開発する環境は整ったのですが、今はまだ使用しないので docker-compose down コマンドでコンテナを停止しておきます。
# Docker Compose で起動したコンテナを停止する
cd devenv
docker-compose down
Stopping devenv_mongodb_1 ... done
Removing devenv_mongodb_1 ... done
Removing network devenv_default
TypeORM を用いてイベントの CRUD 機能を実装する
それでは早速 TypeORM でイベントの CRUD 機能を実装していきます。
流れとして、まずはデータベース URI をコンフィグで管理できるようにした後、イベントのテーブルスキーマを定義していきます。その後、イベントの CRUD 機能を実装していきます。
NestJS の Configuration module でデータベースの接続情報を管理する
まずは TypeORM で MongoDB に接続するための情報を NestJS の Configuration module を使って管理できるようにします。
# Configuration module をインストールする
npm i --save @nestjs/config
Configuration module は内部的に dotenv を利用しています。そのため、記法は dotenv と同じになります。
MONGODB_URI=mongodb://azure-sample:azure-sample@localhost:27017/azure-sample?authSource=admin
MongoDB への接続 URI を .env ファイルで MONGODB_URI として記載しました。NestJS で上記を読み込むための記述を src/app.module.ts に追記します。
import { Module } from '@nestjs/common';
import { ConfigModule } from '@nestjs/config';
import { AppController } from './app.controller';
import { AppService } from './app.service';
import { EventsModule } from './events/events.module';

@Module({
  imports: [
    // ConfigModule の記述を追加することで .env の変数を自動で読み込むようになる
    ConfigModule.forRoot(),
    EventsModule
  ],
  controllers: [AppController],
  providers: [AppService],
})
export class AppModule {}
ルートモジュールで読み込んでいるため、ConfigModule で読み込んだ .env ファイルに記載した変数は全てのモジュールで利用可能です。 試しに正常に読み込めていそうか EventsModule に console.log を追記して確かめてみます。
import { Controller, Get } from '@nestjs/common';
import { AppService } from './app.service';

@Controller()
export class AppController {
  constructor(private readonly appService: AppService) {}

  @Get('helloworld')
  getHello(): string {
    return this.appService.getHello();
  }

  // http://localhost:7071/api/database-uri にアクセスした時に変数の値を確認出来る API を追加
  @Get('database-uri')
  getDatabaseURI(): string {
    return process.env.MONGODB_URI;
  }
}
# Azure Functions のローカル環境を起動する
npm run start:azure
src/app.controller.ts を書き換えて、npm run start:azure した後に http://localhost:7071/api/database-uri へアクセスした結果は下記になるはずです。

http://localhost:7071/api/database-uri のアクセス結果
無事に変数が読み込めていそうなことが確認できたら
getDatabaseURI関数は削除しておきましょう。本番環境でこの API が残っているとセキュリティ上問題があります。
これで TypeORM で MongoDB に接続するための情報を ConfigModule で管理できることが確認できました。
NestJS の TypeORM Module を導入してテーブルの定義を行う
次に NestJS の TypeORM Module をインストールします。また今回は MongoDB に接続するため Mongoose も同時にインストールしておきます。
TypeORM でサポートしているデータベースであれば、基本的に NestJS の TypeORM Module で利用可能です。たとえば MongoDB 以外にも PostgreSQL, MySQL, SQLite 等々がサポートされているようです。
# NestJS で TypeORM Module を Mongoose で利用するのに必要なライブラリをインストールする
npm i --save @nestjs/typeorm typeorm @nestjs/mongoose mongoose

# TypeScript で利用するため Mongoose の型情報を追加インストールする
npm i --save-dev @types/mongoose
TypeORM で MongoDB に接続するための記述からイベントテーブルの定義までを公式ページの手順に沿って進めます。まずは MongoDB への接続処理を src/app.module.ts に記載します。
import { Module } from '@nestjs/common';
import { ConfigModule } from '@nestjs/config';
import { MongooseModule } from '@nestjs/mongoose';
import { AppController } from './app.controller';
import { AppService } from './app.service';
import { EventsModule } from './events/events.module';

@Module({
  imports: [
    ConfigModule.forRoot(),
    // MongooseModule を用いて MongoDB との接続を行う
    MongooseModule.forRoot(process.env.MONGODB_URI),
    EventsModule
  ],
  controllers: [AppController],
  providers: [AppService],
})
export class AppModule {}
イベントテーブルの定義を src/events/events.schema.ts に書いていきます。イベントテーブルには name 属性のみが存在します。
import { Prop, Schema, SchemaFactory } from '@nestjs/mongoose';
import { Document } from 'mongoose';

// イベントテーブルの定義
@Schema()
export class Event extends Document {
  // イベント名を保持する必須フィールドのみを持つ
  @Prop({ required: true })
  name: string;
}

export const EventSchema = SchemaFactory.createForClass(Event);
次にイベントテーブルの操作を扱うモジュール EventsModule に EventSchema を利用するための記述を追記します。
import { Module } from '@nestjs/common';
import { MongooseModule } from '@nestjs/mongoose';
import { EventsController } from './events.controller';
import { EventsService } from './events.service';
import { Event, EventSchema } from './events.schema'

@Module({
  // 先程定義した EventSchema を MongooseModule でインポートする
  // これで Controller や Provider で Event が利用可能になる
  // 今回は Provider である EventsService で利用する想定
  imports: [
    MongooseModule.forFeature([
      { name: Event.name, schema: EventSchema },
    ]),
  ],
  controllers: [EventsController],
  providers: [EventsService]
})
export class EventsModule {}
TypeORM でイベントの CRUD 機能を実装する
イベントテーブルを定義したクラス Event を用いて、まずは EventsService に CRUD を実装していきます。
import { Injectable } from '@nestjs/common';
import { InjectModel } from '@nestjs/mongoose';
import { Model } from 'mongoose';
import { Event } from './events.schema'

@Injectable()
export class EventsService {
    // コンストラクターインジェクションで EventModule で import した Model<Event> を生成する
    constructor(
        // MongooseModule でインポートした場合は @nestjs/mongoose に用意されている
        // @InjectModel デコレータでインジェクション時に名前を定義する必要がある
        @InjectModel(Event.name)
        private eventModel: Model<Event>,
    ) {}

    // Event を作成する
    async create(name: string): Promise<Event> {
        const createdEvent = new this.eventModel({ name: name });
        return createdEvent.save();
    }

    // Id 指定した Event を読み込む
    async readOne(id: string): Promise<Event> {
        return this.eventModel.findById(id).exec();
    }

    // Event を全件読み込む
    async readAll(): Promise<Event[]> {
        return this.eventModel.find().exec();
    }

    // Id 指定した Event を更新する
    async update(id: string, name: string): Promise<Event> {
        // データ更新時に、更新後のデータを返却するためのオプションとして { new: true } を指定する
        // { new: true } を指定しないと更新前のデータが返却されるようになる
        return this.eventModel.findByIdAndUpdate(
            id, { name: name }, { new: true }
        ).exec();
    }

    // Id 指定した Event を削除する
    async delete(id: string): Promise<Event> {
        return this.eventModel.findByIdAndDelete(id).exec();
    }
}
次に EventsController を実装していきたいのですが、その前にリクエストやレスポンスのデータバリデーションも兼ねて、各種 DTO を作成します。
// POST events の際の Body Request 定義
export interface CreateRequest {
    name: string
}

// PATCH events/:id の際の Body Request 定義
export interface UpdateEventDto {
    name: string
}
リクエストパラメーターの DTO を作成したら EventsController を実装します。
import { Param, Body, Controller, Get, Post, Patch, Delete } from '@nestjs/common';
import { EventsService } from './events.service'
import { Event } from './events.schema'
import {
    CreateRequest,
    IdParams,
    UpdateRequest
} from './events.request'

@Controller('events')
export class EventsController {
    // コンストラクターインジェクションで EventsService を生成して EventsController で利用する
    constructor(private readonly eventsService: EventsService) {}

    // POST events へアクセス時に呼び出される関数
    @Post()
    async create(@Body() request: CreateEventDto): Promise<Event> {
        return this.eventsService.create(request.name)
    }

    // GET events/:id へアクセス時に呼び出される関数
    @Get(':id')
    async readOne(@Param('id') id: string): Promise<Event> {
        return this.eventsService.readOne(id)
    }

    // GET events へアクセス時に呼び出される関数
    @Get()
    async readAll(): Promise<Event[]> {
        return this.eventsService.readAll()
    }

    // PATCH events/:id へアクセス時に呼び出される関数
    @Patch(':id')
    async update(@Param('id') id: string, @Body() request: UpdateEventDto): Promise<Event> {
        return this.eventsService.update(id, request.name)
    }

    // DELETE events/:id へアクセス時に呼び出される関数
    @Delete(':id')
    async delete(@Param('id') id: string): Promise<Event> {
        return this.eventsService.delete(id)
    }
}
NestJS では events/:id のように定義した際、:id の内容は @Param デコレータを利用することで、引数から値を取得できます。
各種 API の正常系の動作検証を curl で行う
各種 API の正常系の動作確認を curl で行ってみます。
# 1. Azure Functions のローカル環境を起動する
npm run start:azure

# 2. Docker Compose で MongoDB インスタンスを起動する
cd devenv
docker-compose up -d

# 3. Event を 2つ作成する
curl -X POST -H "Content-Type: application/json" -d '{"name": "test-event-1"}' http://localhost:7071/api/events
{"_id":"5f945260a503fa9ceae111ae","name":"test-event-1","__v":0}

curl -X POST -H "Content-Type: application/json" -d '{"name": "test-event-2"}' http://localhost:7071/api/events
{"_id":"5f945278a503fa9ceae111af","name":"test-event-2","__v":0}

# 4. 特定の Event を読み込む
curl -X GET http://localhost:7071/api/events/5f945260a503fa9ceae111ae
{"_id":"5f945260a503fa9ceae111ae","name":"test-event-1","__v":0}

# 5. 登録されてる Event を全件読み込む
curl -X GET http://localhost:7071/api/events
[{"_id":"5f945260a503fa9ceae111ae","name":"test-event-1","__v":0},{"_id":"5f945278a503fa9ceae111af","name":"test-event-2","__v":0}]

# 6. 特定の Event を更新する
curl -X PATCH -H "Content-Type: application/json" -d '{"name": "test-event-3"}' http://localhost:7071/api/events/5f945260a503fa9ceae111ae
{"_id":"5f945260a503fa9ceae111ae","name":"test-event-3","__v":0}

# 6-1 特定の Event が更新されたかどうかを確認する
curl -X GET http://localhost:7071/api/events/5f945260a503fa9ceae111ae

# 先程は test-event-1 だった値が test-event-3 に更新されていることが確認できた
{"_id":"5f945260a503fa9ceae111ae","name":"test-event-3","__v":0}

# 7. 特定の Event を削除する
curl -X DELETE http://localhost:7071/api/events/5f945260a503fa9ceae111ae
{"_id":"5f945260a503fa9ceae111ae","name":"test-event-3","__v":0}

# 7-1 特定の Event が削除されたかどうかを確認する
curl -X GET http://localhost:7071/api/events

# イベント全件取得した際に 2件登録したうちの 1件しか返却されず、7. で削除した id を含むデータは返却されないことが確認できた
[{"_id":"5f945278a503fa9ceae111af","name":"test-event-2","__v":0}]

# 8. Docker Compose で MongoDB インスタンスを破棄する
cd devenv
docker-compose down
イベントの CRUD 機能の実装及び動作検証は完了しましたが、機能改修のたびにこれらの動作検証を手動で行うのは面倒なので、E2E テストを実装していきます。
また、E2E のテスト環境は Docker Compose で構築していきます。
イベントの CRUD 機能の E2E テストを実装する
それではイベントの CRUD API の正常系及び異常系の E2E テストを書いていきます。
NestJS では E2E テストを書く場所は test フォルダの中となっています。また、テスト実行時は環境変数を .env ではなく .env.test で管理するようにします。 ローカルでの検証環境とテスト環境でのコンフィグは分けておきたいからです。
# 現状は .env と同じ内容を .env.test にも記載する
MONGODB_URI=mongodb://azure-sample:azure-sample@localhost:27017/azure-sample?authSource=admin
import { Test, TestingModule } from '@nestjs/testing';
import { INestApplication } from '@nestjs/common';
import * as request from 'supertest';
import { ConfigModule } from '@nestjs/config';
import { MongooseModule } from '@nestjs/mongoose';
import { EventsModule } from '../src/events/events.module';
import { AppController } from '../src/app.controller';
import { AppService } from '../src/app.service';
import { CreateRequest, UpdateRequest } from '../src/events/events.request';
import { Event } from '../src/events/events.schema'

describe('AppController (e2e)', () => {
  let app: INestApplication;

  beforeEach(async () => {
    const moduleFixture: TestingModule = await Test.createTestingModule({
      imports: [
          // テスト用の dotenv ファイルである .env.test をコンフィグとして読み込む
        ConfigModule.forRoot({
          envFilePath: '.env.test',
        }),
        MongooseModule.forRoot(process.env.MONGODB_URI),
        EventsModule,
      ],
      controllers: [AppController],
      providers: [AppService],
    }).compile();

    app = moduleFixture.createNestApplication();
    await app.init();
  });

  // イベント全件取得のための関数
  const getEventAll = async (): Promise<Array<Event>> => {
    const res = await request(app.getHttpServer()).get('/events');
    expect(res.status).toEqual(200);

    return res.body as Array<Event>;
  }

  describe('EventsController (e2e)', () => {
    // イベントの Create API に関するテスト
    describe('Create API of Event', () => {
      // API の実行に成功する
      it('OK /events (POST)', async () => {
        const body: CreateRequest = {
          name: "test-event"
        }
        const res = await request(app.getHttpServer())
          .post('/events')
          .set('Accept', 'application/json')
          .send(body);
        expect(res.status).toEqual(201);

        const eventResponse = res.body as Event;
        expect(eventResponse).toHaveProperty('_id');
        expect(eventResponse.name).toEqual(body.name);
      });

      // 不正なパラメタで API の実行に失敗する
      it('NG /events (POST): Incorrect parameters', async () => {
        const body = {
          namee: "test-event"
        }
        const res = await request(app.getHttpServer())
          .post('/events')
          .set('Accept', 'application/json')
          .send(body);
        expect(res.status).toEqual(400);
      });

      // 空のパラメタで API の実行に失敗する
      it('NG /events (POST): Empty parameters.', async () => {
        const body = {}
        const res = await request(app.getHttpServer())
          .post('/events')
          .set('Accept', 'application/json')
          .send(body);
        expect(res.status).toEqual(400);
      });
    });

    // イベントの Read API に関するテスト
    describe('Read API of Event', () => {
      // API の実行に成功する
      it('OK /events (GET)', async () => {
        const eventsResponse = await getEventAll();
        expect(eventsResponse.length).toEqual(1);
      });

      // API の実行に成功する
      it('OK /events/:id (GET)', async () => {
        const eventsResponse = await getEventAll();

        const res = await request(app.getHttpServer())
          .get(`/events/${eventsResponse[0]._id}`);
        expect(res.status).toEqual(200);

        const eventResponse = res.body as Event;
        expect(eventResponse).toHaveProperty('_id');
        expect(eventResponse.name).toEqual('test-event');
      });

      // 不正な id で API の実行に失敗する
      it('NG /events/:id (GET): Invalid id.', async () => {
        const res = await request(app.getHttpServer())
          .get('/events/XXXXXXXXXXX');
        expect(res.status).toEqual(400);
      });

      // 存在しない id で API の実行に失敗する
      it('NG /events/:id (GET): id that doesn\'t exist.', async () => {
        const res = await request(app.getHttpServer())
          .get('/events/5349b4ddd2781d08c09890f4');
        expect(res.status).toEqual(404);
      });
    });

    // イベントの Update API に関するテスト
    describe('Update API of Event', () => {
        // API の実行に成功する
        it('OK /events/:id (PATCH)', async () => {
          const eventsResponse = await getEventAll();

          const body: UpdateRequest = {
            name: "new-test-event"
          }
          const res = await request(app.getHttpServer())
            .patch(`/events/${eventsResponse[0]._id}`)
            .set('Accept', 'application/json')
            .send(body);
          expect(res.status).toEqual(200);

          const eventResponse = res.body as Event;
          expect(eventResponse).toHaveProperty('_id');
          expect(eventResponse.name).toEqual(body.name);
        });

        // 不正な id で API の実行に失敗する
        it('NG /events/:id (PATCH): Incorrect parameters', async () => {
          const eventsResponse = await getEventAll();

          const body = {
            namee: "new-test-event"
          }
          const res = await request(app.getHttpServer())
            .patch(`/events/${eventsResponse[0]._id}`)
            .set('Accept', 'application/json')
            .send(body);
          expect(res.status).toEqual(400);
        });

        // 空のパラメタで API の実行に失敗する
        it('NG /events/:id (PATCH): Empty parameters.', async () => {
          const eventsResponse = await getEventAll();

          const body = {}
          const res = await request(app.getHttpServer())
            .patch(`/events/${eventsResponse[0]._id}`)
            .set('Accept', 'application/json')
            .send(body);
          expect(res.status).toEqual(400);
        });

        // 空の id で API の実行に失敗する
        it('NG /events/:id (PATCH): Empty id.', async () => {
          const eventsResponse = await getEventAll();

          const body = {
            namee: "new-test-event"
          }
          const res = await request(app.getHttpServer())
            .patch('/events')
            .set('Accept', 'application/json')
            .send(body);
          expect(res.status).toEqual(404);
        });

        // 不正な id で API の実行に失敗する
        it('NG /events/:id (PATCH): Invalid id.', async () => {
          const body: UpdateRequest = {
            name: "new-test-event"
          }
          const res = await request(app.getHttpServer())
            .patch('/events/XXXXXXXXXXX')
            .set('Accept', 'application/json')
            .send(body);
          expect(res.status).toEqual(400);
        });

        // 存在しない id で API の実行に失敗する
        it('NG /events/:id (PATCH): id that doesn\'t exist.', async () => {
          const body = {}
          const res = await request(app.getHttpServer())
            .patch('/events/5349b4ddd2781d08c09890f4')
            .set('Accept', 'application/json')
            .send(body);
          expect(res.status).toEqual(404);
        });
    });

    // イベントの Delete API に関するテスト
    describe('Delete API of Event', () => {
        // API の実行に成功する
        it('OK /events/:id (DELETE)', async () => {
          const eventsResponse = await getEventAll();

          const res = await request(app.getHttpServer())
            .delete(`/events/${eventsResponse[0]._id}`);
          expect(res.status).toEqual(200);
        });

        // 空の id で API の実行に失敗する
        it('NG /events/:id (DELETE): Empty id.', async () => {
          const res = await request(app.getHttpServer())
            .delete('/events')
          expect(res.status).toEqual(404);
        });

         // 不正な id で API の実行に失敗する
        it('NG /events/:id (DELETE): Invalid id.', async () => {
          const res = await request(app.getHttpServer())
            .delete('/events/XXXXXXXXXXX')
          expect(res.status).toEqual(400);
        });

        // 存在しない id で API の実行に失敗する
        it('NG /events/:id (DELETE): id that doesn\'t exist.', async () => {
          const res = await request(app.getHttpServer())
            .delete('/events/5349b4ddd2781d08c09890f4');
          expect(res.status).toEqual(404);
        });
    });
  })

  // 各テスト実行後は app を破棄する (DB コネクションの解放を行わないと、テストを完了することが出来ない)
  afterEach(async () => {
    await app.close();
  });
});
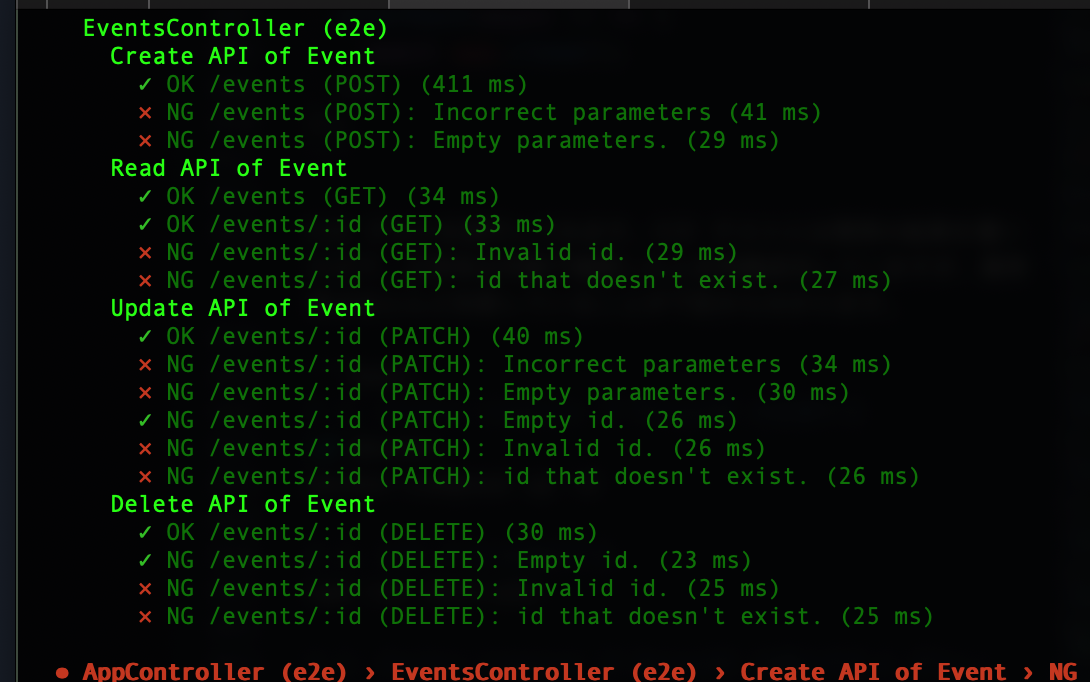
上記内容で E2E テストを実行してみます。E2E テストには理想の結果を書いたので、正常系は手動で確認したとき同様成功するはずですが、異常系のテストはほとんど失敗しているはずです。
# 1. Docker Compose で MongoDB を起動する
cd devenv
docker-compose up -d

# 2. E2E テストを実行する
npm run test:e2e

# 3. Docker Compose で MongoDB の破棄する
cd devenv
docker-compose down
E2E テストが通るようにイベントの CRUD 機能を改修する
テストを通すために、例外処理周りの記述を追記していく際、NestJS の Exception filters を利用していきます。NestJS の Exception filters を利用することで簡易に例外処理を実装することが可能になると同時に、適切な範囲でそれらの適用範囲を設定することが可能になります。
今回は主に Mongoose 周りのエラーをフィルタリングしていきたいので Mongoose に関する ExceptionFilter を作成します。
import { ArgumentsHost, Catch, ExceptionFilter, HttpStatus } from '@nestjs/common';
import { Error } from 'mongoose';

@Catch(Error)
export class MongooseExceptionFilter implements ExceptionFilter {
  catch(exception: Error, host: ArgumentsHost) {
    const response = host.switchToHttp().getResponse();
    switch(exception.name) {
      // Mongoose の検証エラーが発生したら HTTP BadRequest エラーを返却する
      case Error.ValidationError.name:
      case Error.CastError.name:
        response.status(HttpStatus.BAD_REQUEST).json(null);
        break;
      // Mongoose でデータが見つからなかった時に HTTP NotFound エラーを返却する
      case Error.DocumentNotFoundError.name:
        response.status(HttpStatus.NOT_FOUND).json(null);
        break;
    }
  }
}
EventsController に先程作成した MongooseExceptionFilter を適用します。これにより、Mongo DB クエリの例外処理をコントローラー全体に一括で設定可能です。
import { Param, Body, Controller, Get, Post, Patch, Delete, UseFilters } from '@nestjs/common';
import { EventsService } from './events.service'
import { Event } from './events.schema'
import {
    CreateEventDto,
    UpdateEventDto
} from './events.dto'
import { MongooseExceptionFilter } from '../mongoose.exception.filter';

@Controller('events')
// 関数全てに適用したいので class 定義の上で @UseFilters デコレータを用いて
// コントローラーの関数全てに MongooseExceptionFilter を適用する
@UseFilters(MongooseExceptionFilter)
export class EventsController {
    constructor(private readonly eventsService: EventsService) {}

    @Post()
    async create(@Body() request: CreateEventDto): Promise<Event> {
        return this.eventsService.create(request.name)
    }

    @Get(':id')
    async readOne(@Param('id') id: string): Promise<Event> {
        return this.eventsService.readOne(id)
    }

    @Get()
    async readAll(): Promise<Event[]> {
        return this.eventsService.readAll()
    }

    @Patch(':id')
    async update(@Param('id') id: string, @Body() request: UpdateEventDto): Promise<Event> {
        return this.eventsService.update(id, request.name)
    }

    @Delete(':id')
    async delete(@Param('id') id: string): Promise<Event> {
        return this.eventsService.delete(id)
    }
}
また Update 時に name の null チェックを行いたいので EventsService を改修します。null 時は明示的に Mongoose の Error を作成して throw することで、例外を MongooseExceptionFilter に補足させます。
import { Injectable } from '@nestjs/common';
import { InjectModel } from '@nestjs/mongoose';
import { Model, Error } from 'mongoose';
import { Event } from './events.schema'

@Injectable()
export class EventsService {
    constructor(
        @InjectModel(Event.name)
        private eventModel: Model<Event>,
    ) {}

    async create(name: string): Promise<Event> {
        const createdEvent = new this.eventModel({ name: name });
        return createdEvent.save();
    }

    async readOne(id: string): Promise<Event> {
        return this.eventModel.findById(id).orFail().exec();
    }

    async readAll(): Promise<Event[]> {
        return this.eventModel.find().exec();
    }

    async update(id: string, name: string): Promise<Event> {
        // name の null チェックをおこなう
        // https://github.com/Automattic/mongoose/issues/6161#issuecomment-368242099
        if(name == null) {
            const validationError = new Error.ValidationError(null);
            validationError.addError('docField', new Error.ValidatorError({ message: 'Empty name.' }));

            throw validationError;
        }
        return this.eventModel.findByIdAndUpdate(
            id, { name: name }, { new: true }
        ).orFail().exec();
    }

    async delete(id: string): Promise<Event> {
        return this.eventModel.findByIdAndDelete(id).orFail().exec();
    }
}
再度 E2E テストを実行してみます。今度は無事 E2E テストが全て通ることを確認できるはずです。
# 1. Docker Compose で MongoDB を起動する
cd devenv
docker-compose up -d

# 2. E2E テストを実行する
npm run test:e2e

# 3. Docker Compose で MongoDB の破棄する
cd devenv
docker-compose down
しかし、現状だと手動で Docker Compose で MongoDB を起動して閉じるフローが挟まっているため、E2E テストを走らせるためには手動でいくつかの作業が必要な状況です。
流石に E2E テストの実行が面倒な上、CI で走らせることが出来ないため NestJS アプリケーション自体も Docker Compose に乗せていきます。それにより、自動で MongoDB と NestJS アプリケーションを同時に起動して E2E テストが実行できる環境を構築します。
Docker Compose で E2E テストを実行可能にする
まずは Docker Compose に NestJS アプリケーションを乗せるため、Dockerfile を書いていきます。また、不要なファイルを Docker イメージに含めたくないため .dockerignore も書いていきます。
# Azure Functions で利用している Docker イメージを使用する
FROM mcr.microsoft.com/azure-functions/node:2.0-node10

# Docker イメージのビルドキャッシュに node_modules を含めるための記述
WORKDIR /azure-sample
COPY package*.json /azure-sample/
RUN npm install

# NestJS アプリケーションのコード群を Docker イメージに追加する
ADD ./ /azure-sample

# Docker コンテナ起動時にデフォで E2E テストを実行する
CMD npm run test:e2e
# Ref: https://www.toptal.com/developers/gitignore?templates=node
# Logs
logs
*.log

# Runtime data
pids
*.pid
*.seed

# Directory for instrumented libs generated by jscoverage/JSCover
lib-cov

# Coverage directory used by tools like istanbul
coverage

# Grunt intermediate storage (http://gruntjs.com/creating-plugins#storing-task-files)
.grunt

# node-waf configuration
.lock-wscript

# Compiled binary addons (http://nodejs.org/api/addons.html)
build/Release

# Dependency directory
# https://www.npmjs.org/doc/misc/npm-faq.html#should-i-check-my-node_modules-folder-into-git
node_modules

README.md
.env*

local.settings.json
coverage
dist
次に devenv/docker-compose.yml を改修して、NestJS アプリケーションを定義します。
version: '3.8'
services:
    # NestJS アプリケーションの定義を追加
    app:
        build: ../.
        env_file:
            - ../.env.test
        links:
            - mongodb
    mongodb:
        image: mongo:latest
        ports:
            - "27017:27017"
        environment:
            MONGO_INITDB_ROOT_USERNAME: azure-sample
            MONGO_INITDB_ROOT_PASSWORD: azure-sample
            MONGO_INITDB_DATABASE: azure-sample
            TZ: Asia/Tokyo
また E2E テストはこれから Docker Compose で回したいので、.env.test は Docker Compose で回す前提で改修します。
# localhost の部分を docker-compose.yml で定義した mongodb に変更する
# Docker Compose 上でしか E2E テストの実行が出来なくなるので注意する
MONGODB_URI=mongodb://azure-sample:azure-sample@mongodb:27017/azure-sample?authSource=admin
この状態で Docker Compose を起動すると、MongoDB の起動後、NestJS アプリケーションの E2E テストが走るようになっているはずです。
それでは、試しに Docker Compose を起動してみましょう。
今回起動時に --abort-on-container-exit オプションを追加したのは、NestJS アプリケーションのテストが終了した時点で Docker Compose を落としたいからです。
# NestJS アプリケーションで E2E テストが完了してコンテナが終了したら Mongo DB コンテナも含めて Docker 停止させたいので --abort-on-container-exit オプションを指定する
# そうしないと明示的に停止しない限り docker-compose コマンドが終了しなくなる (テストが終了したと同時にコマンドも終了してほしい)
cd devenv
docker-compose up --abort-on-container-exit
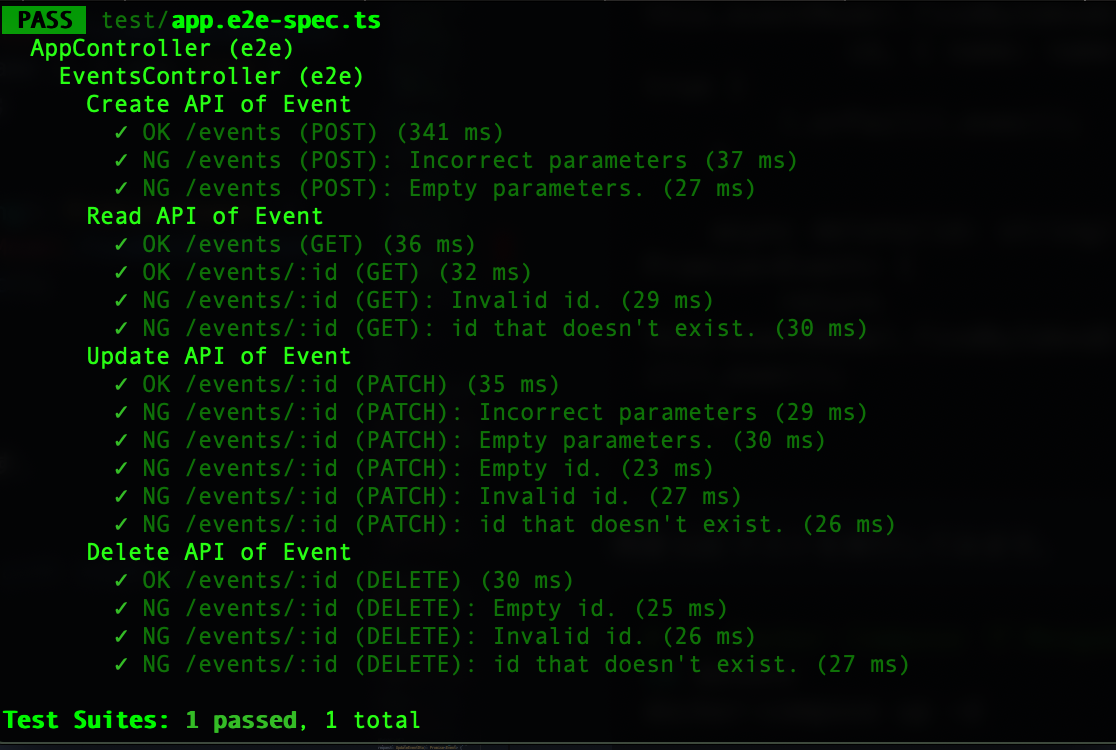
実行した際に下記の標準出力が確認できたら OK です。
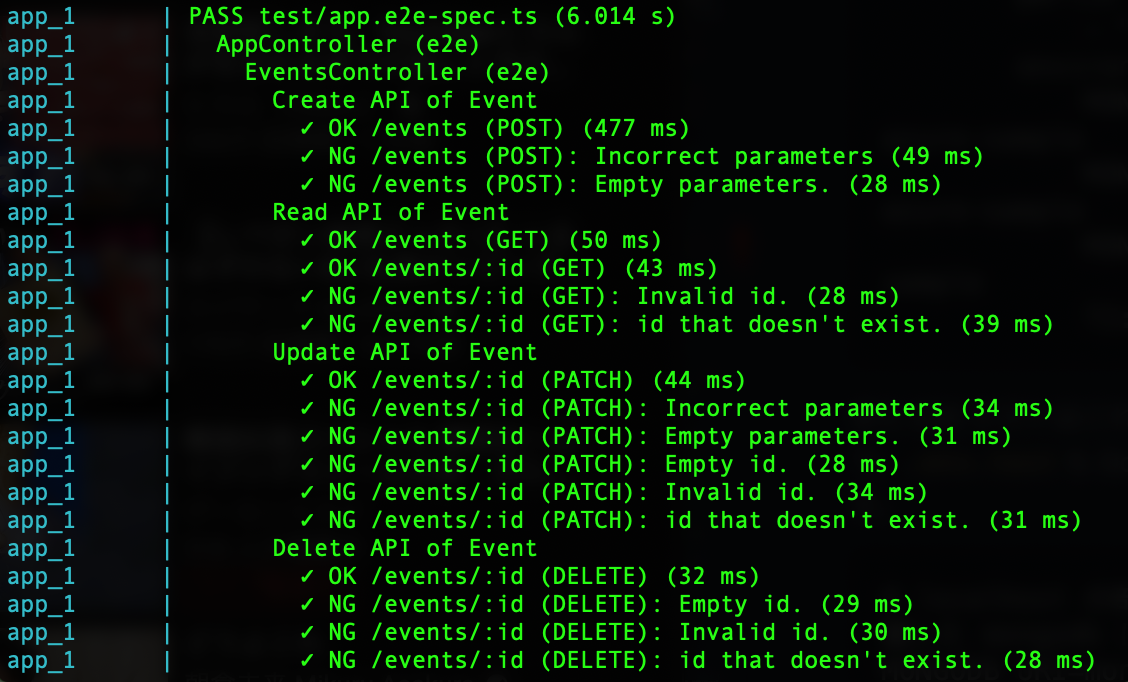
Docker Compose での E2E テストの実行結果 (成功)
GitHub Actions で E2E テストを実行する
本記事の内容を採用したプロジェクトではソースコード管理を GitHub で行っていたので、CI 環境として GitHub Actions を採用していました。
そのため、今回は GitHub Actions で Docker Compose の E2E テストを実行できるようにしていきます。
# Pull Request が更新されるたびに走らせる
on:
  pull_request:
    types: [opened, synchronize]

jobs:
  build-and-test:
    name: Build and Test
    runs-on: ubuntu-latest
    strategy:
      matrix:
        node: [ '10.22.1' ]
    steps:
    # Pull Request 出された branch の最新の commit のソースコードを使用する
    - name: checkout pushed commit
      uses: actions/checkout@v2
      with:
        ref: ${{ github.event.pull_request.head.sha }}
    - name: Use Node.js ${{ matrix.node }}
      uses: actions/setup-node@v1
      with:
        node-version: ${{ matrix.node }}
    # Node.js のビルドが通るか検証する
    - name: npm install, build.
      run: |
        npm install
        npm run build --if-present
    # E2E テストを Docker Compose で実行する
    - name: run test on docker-compose
      run: |
        docker-compose build
        docker-compose up --abort-on-container-exit
      working-directory: ./devenv
上記ファイル作成後、適当にブランチを切ってコミットしてからリモートリポジトリに push して PR を出すと、下記のように GitHub Actions が動いていることが確認できるはずです。
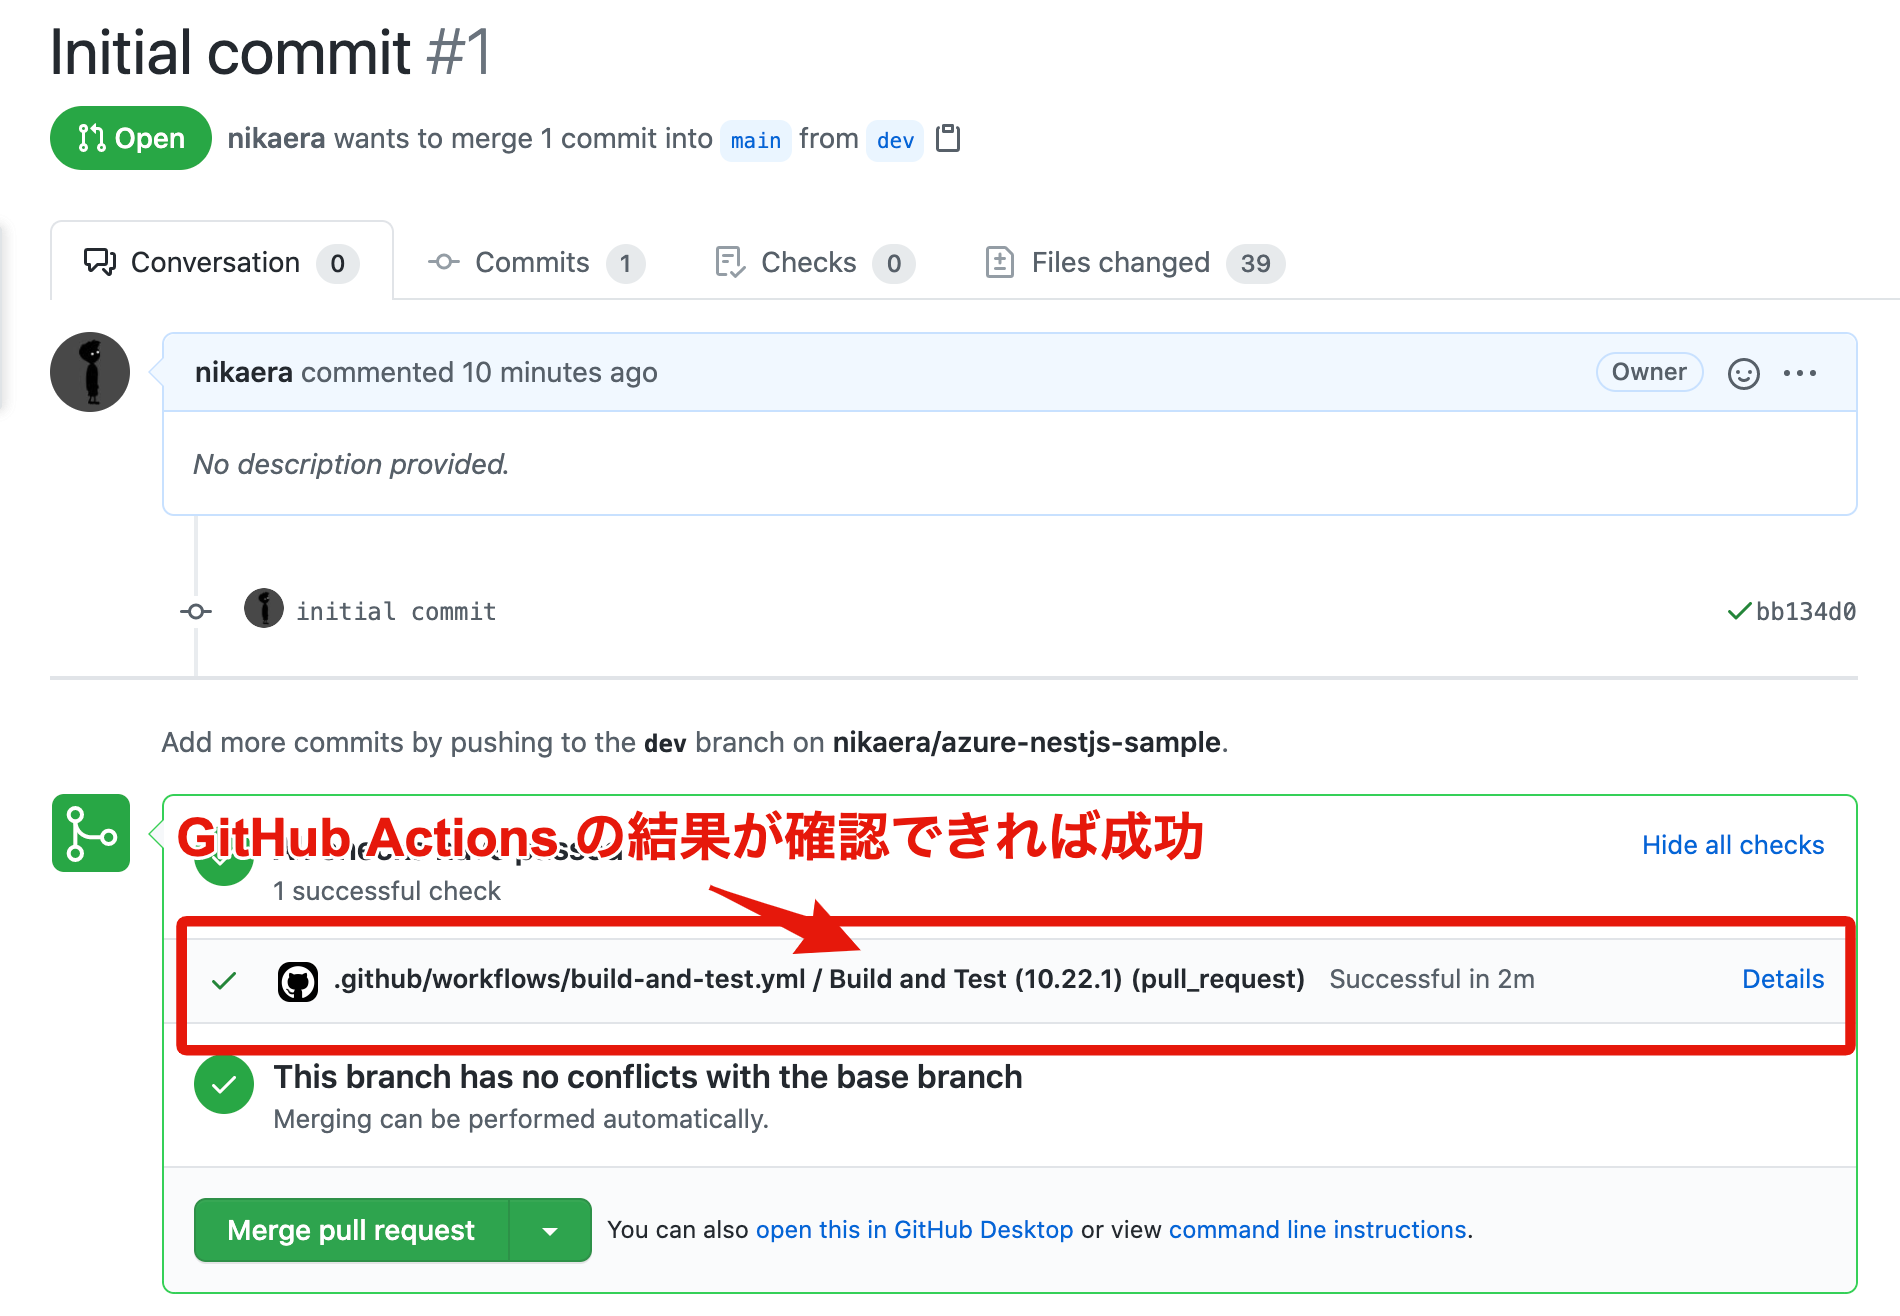
GitHub Actions で E2E テストが動いているか確認する
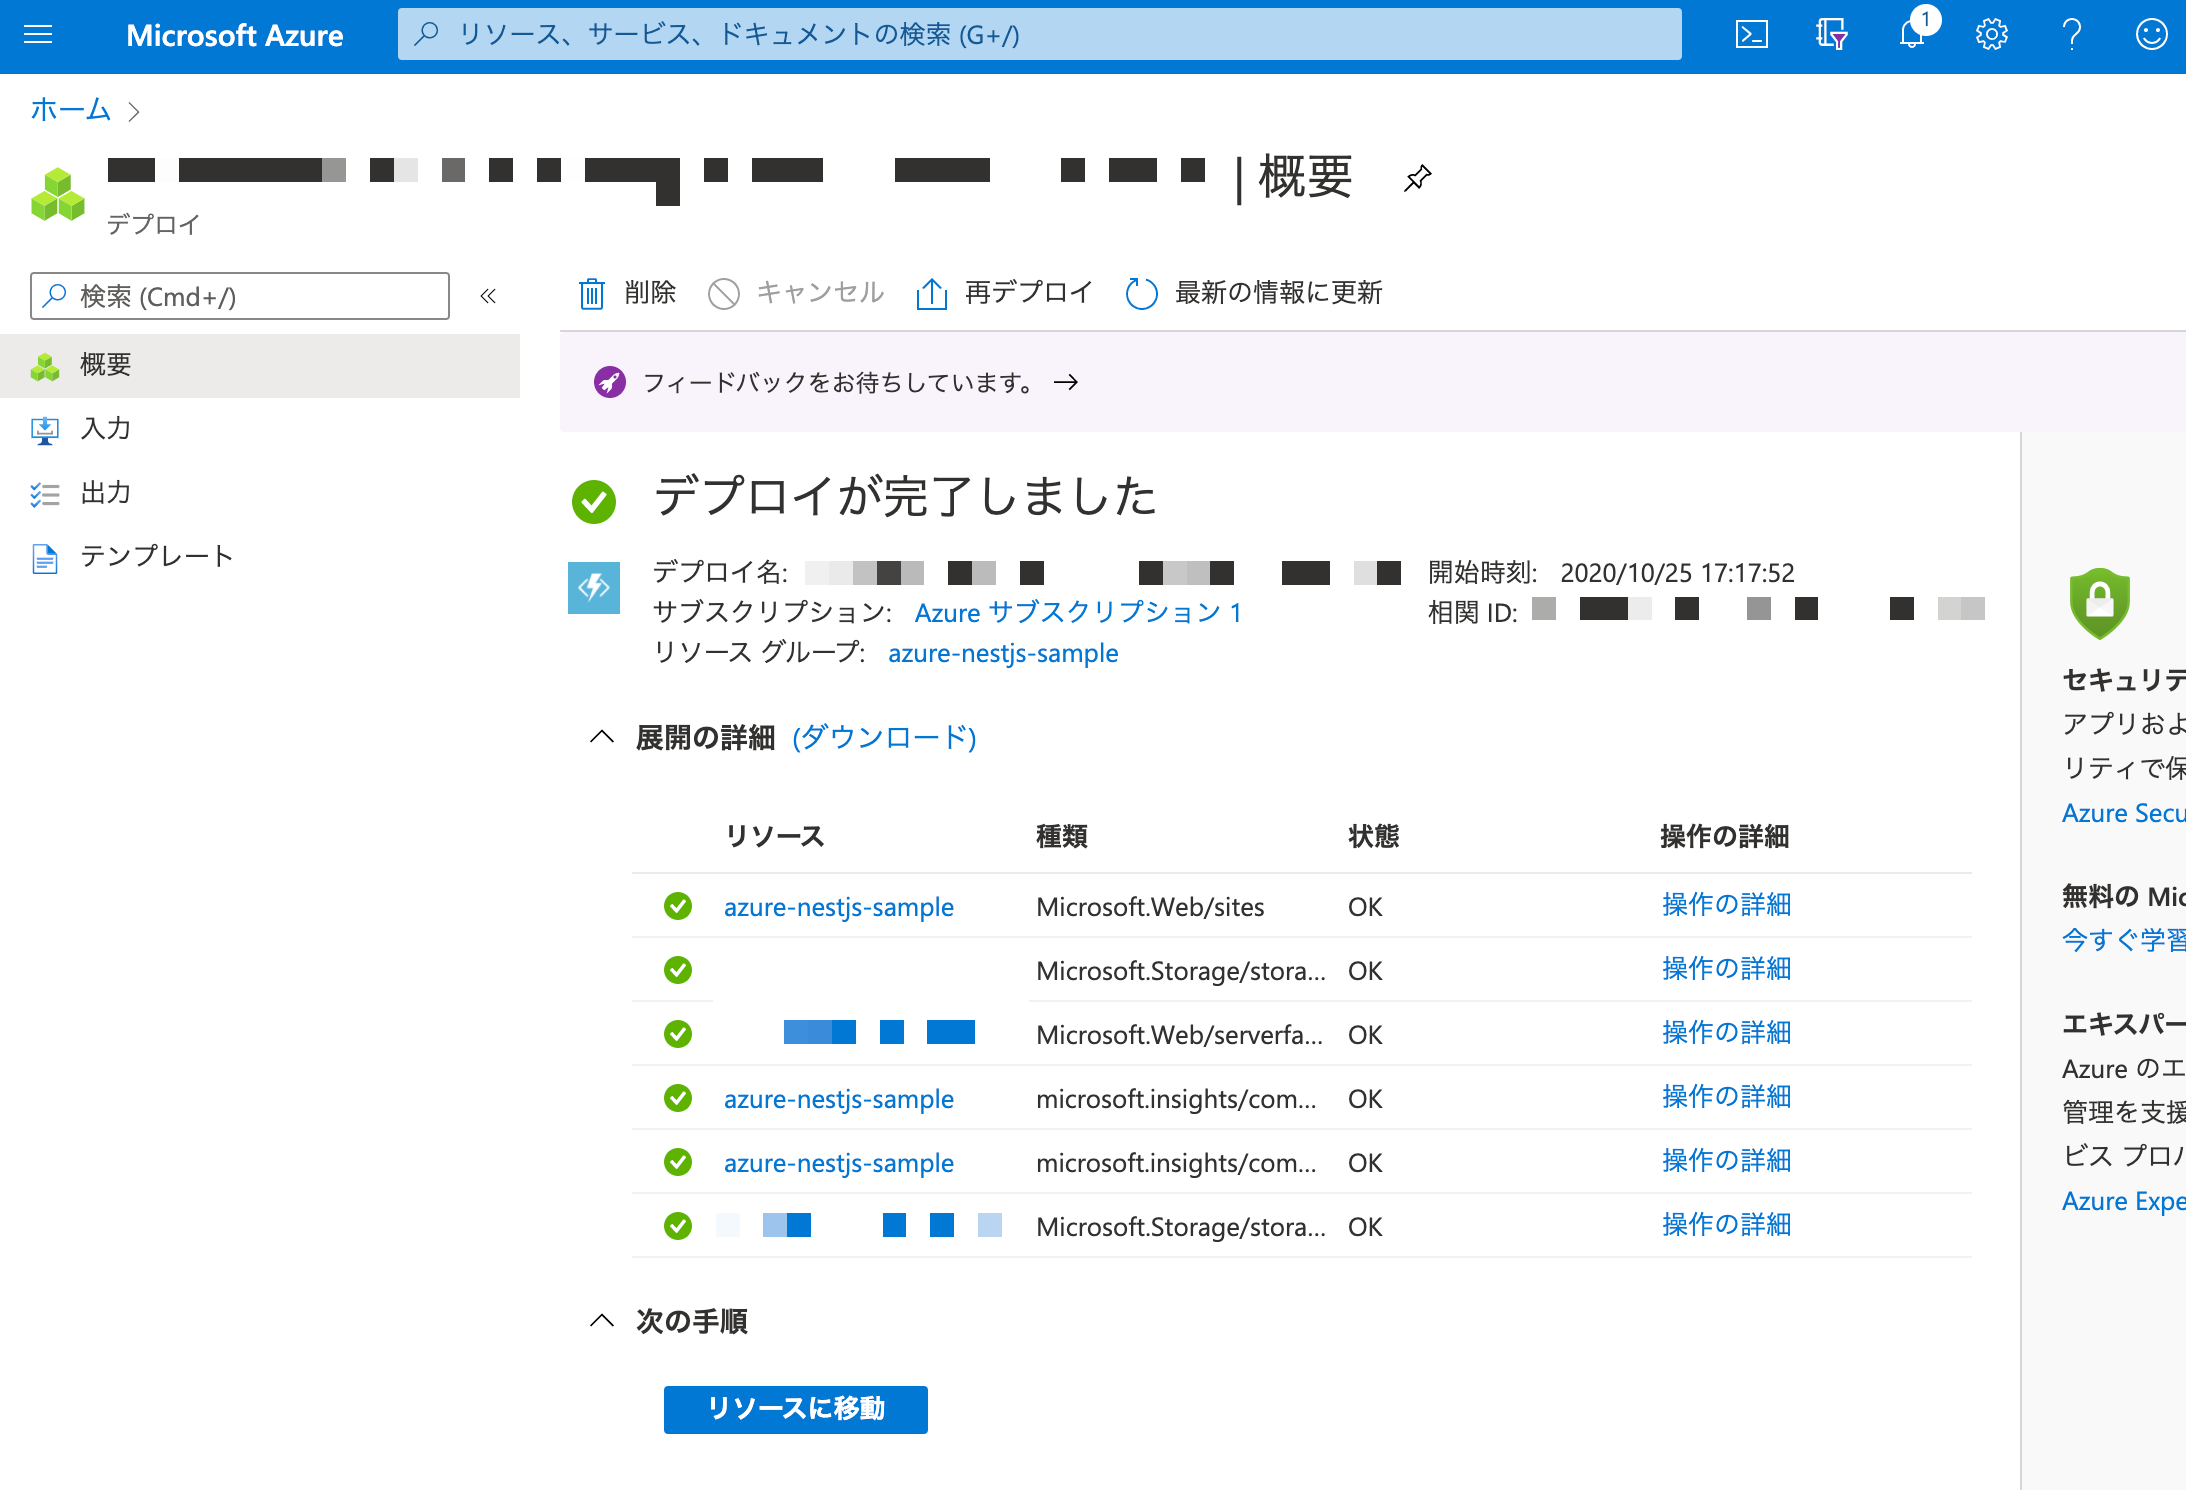
Azure Portal で Azure Funtions のデプロイ先を作成する
既に Azure アカウントは作成済み前提で進めていきます。まず Azure Portal のトップページにアクセスして、Azure Functions (関数アプリ) のページに遷移してから下記の作業します。
-
関数アプリの新規作成ページ から関数アプリを作成する
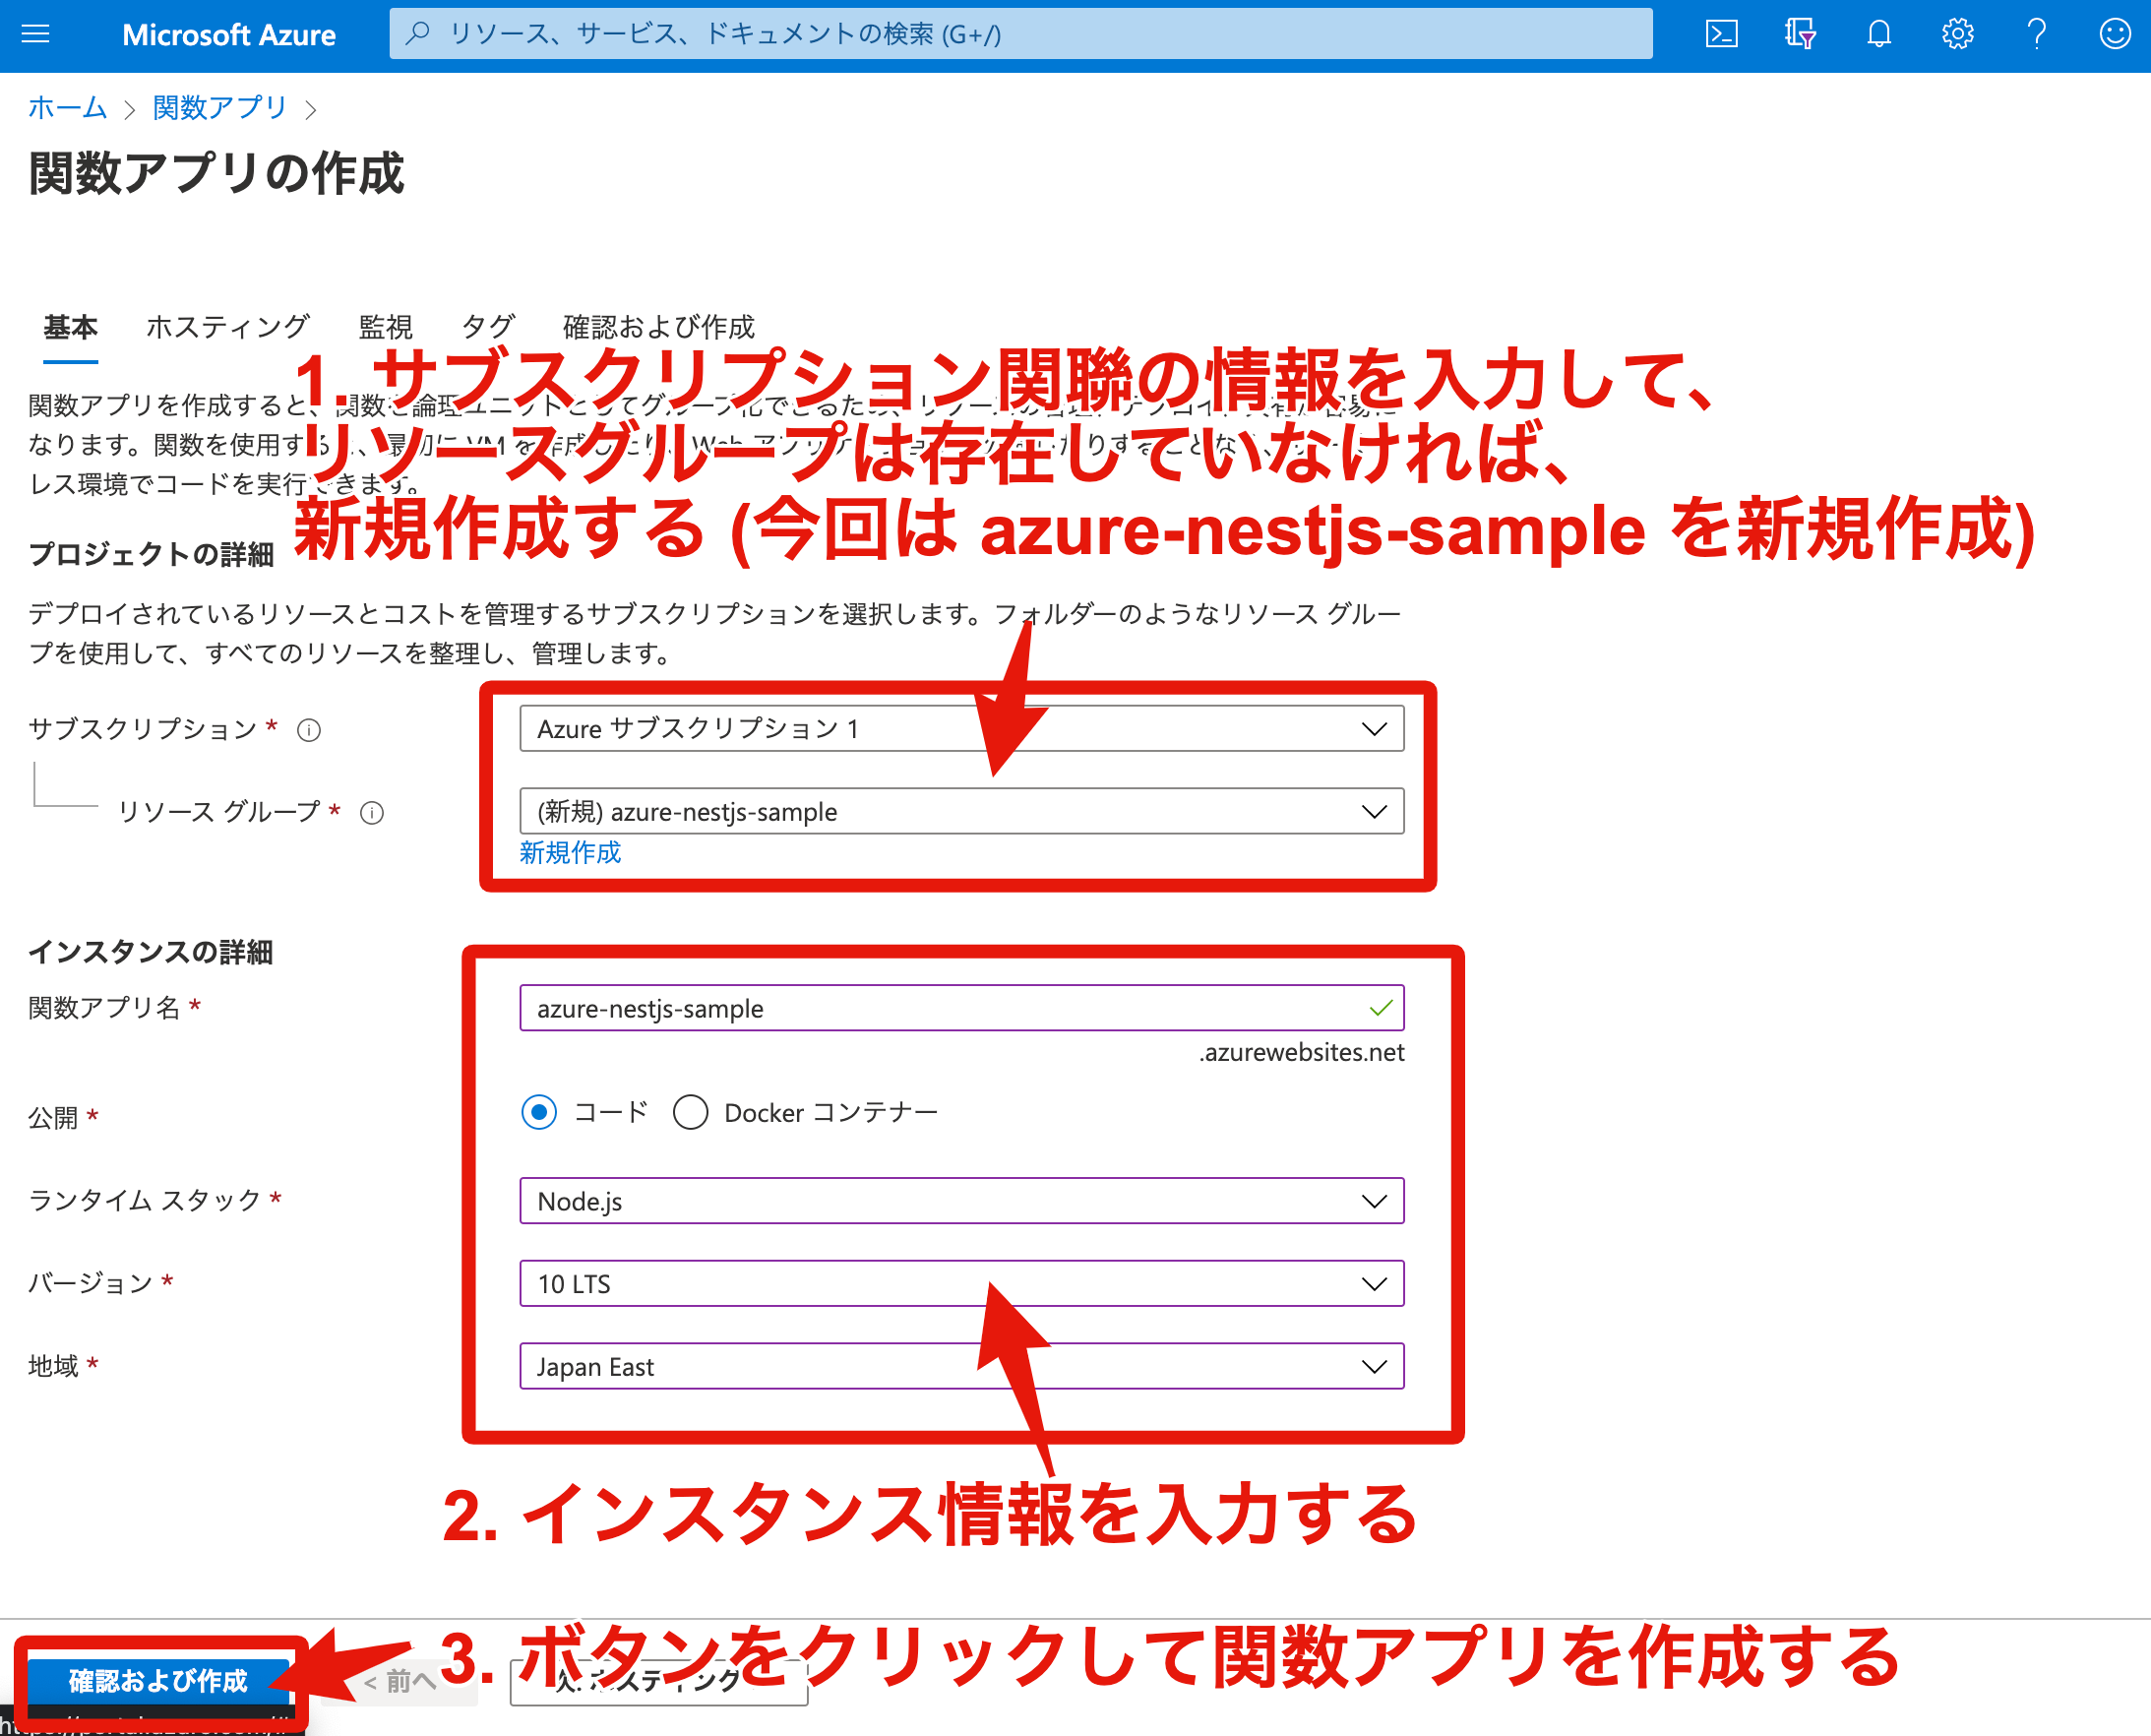
Azure Functions の環境をセットアップする
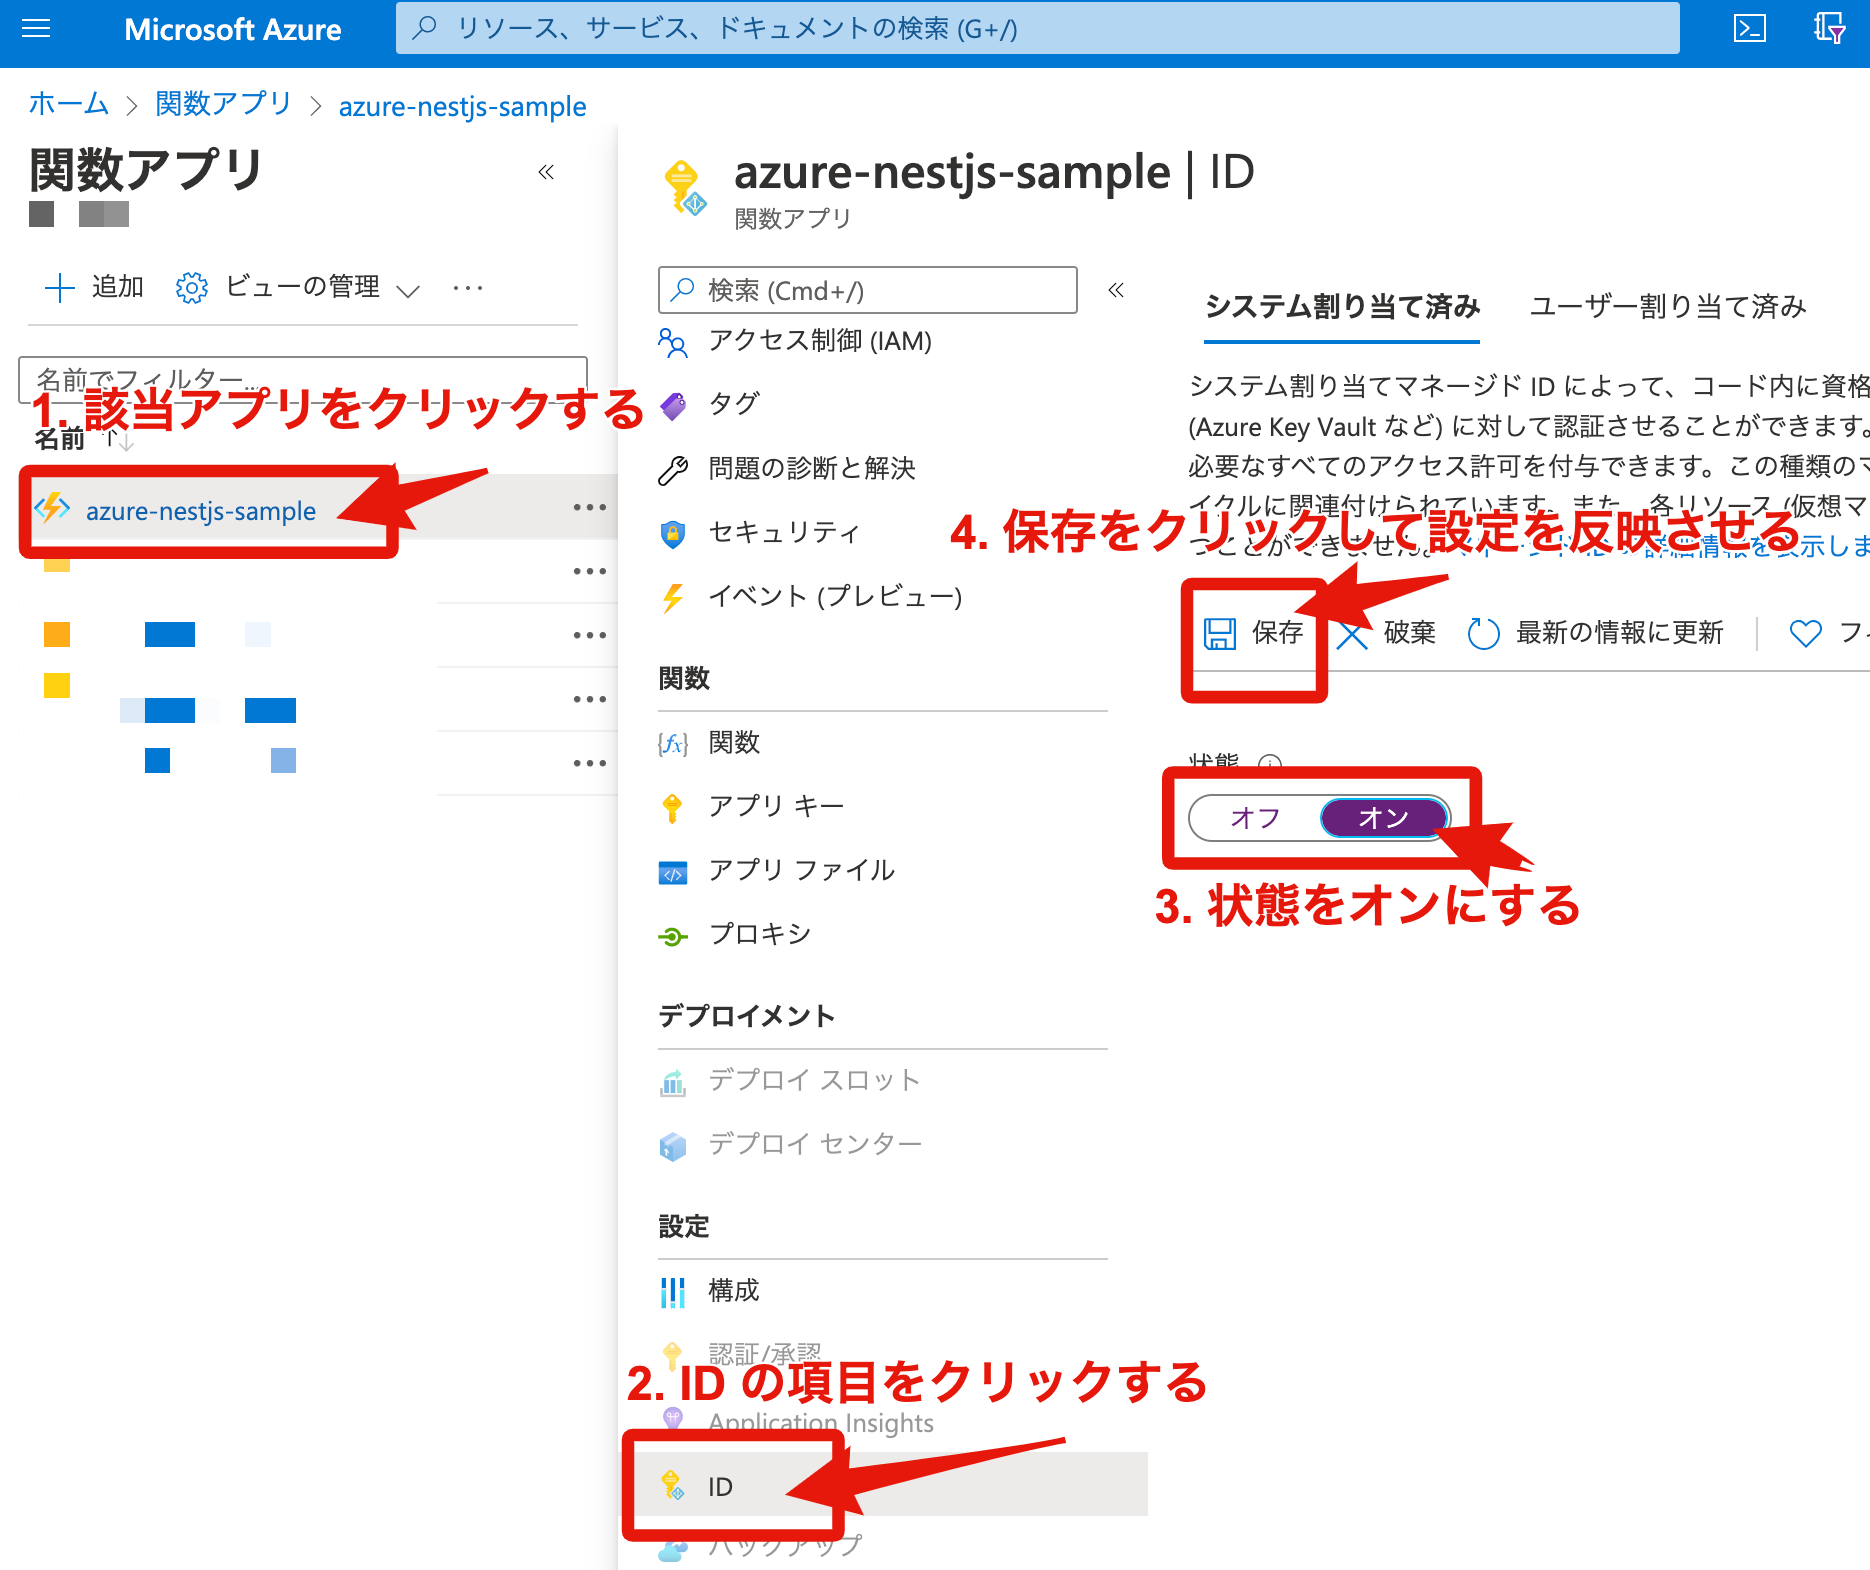
Azure Cosmos DB アカウントを作成した後、MONGODB_URI をシークレットとして Azure KeyVault に設定します。Azure KeyVault で設定した値を Azure Functinos (関数アプリ) に環境変数としてセットして利用可能にします。
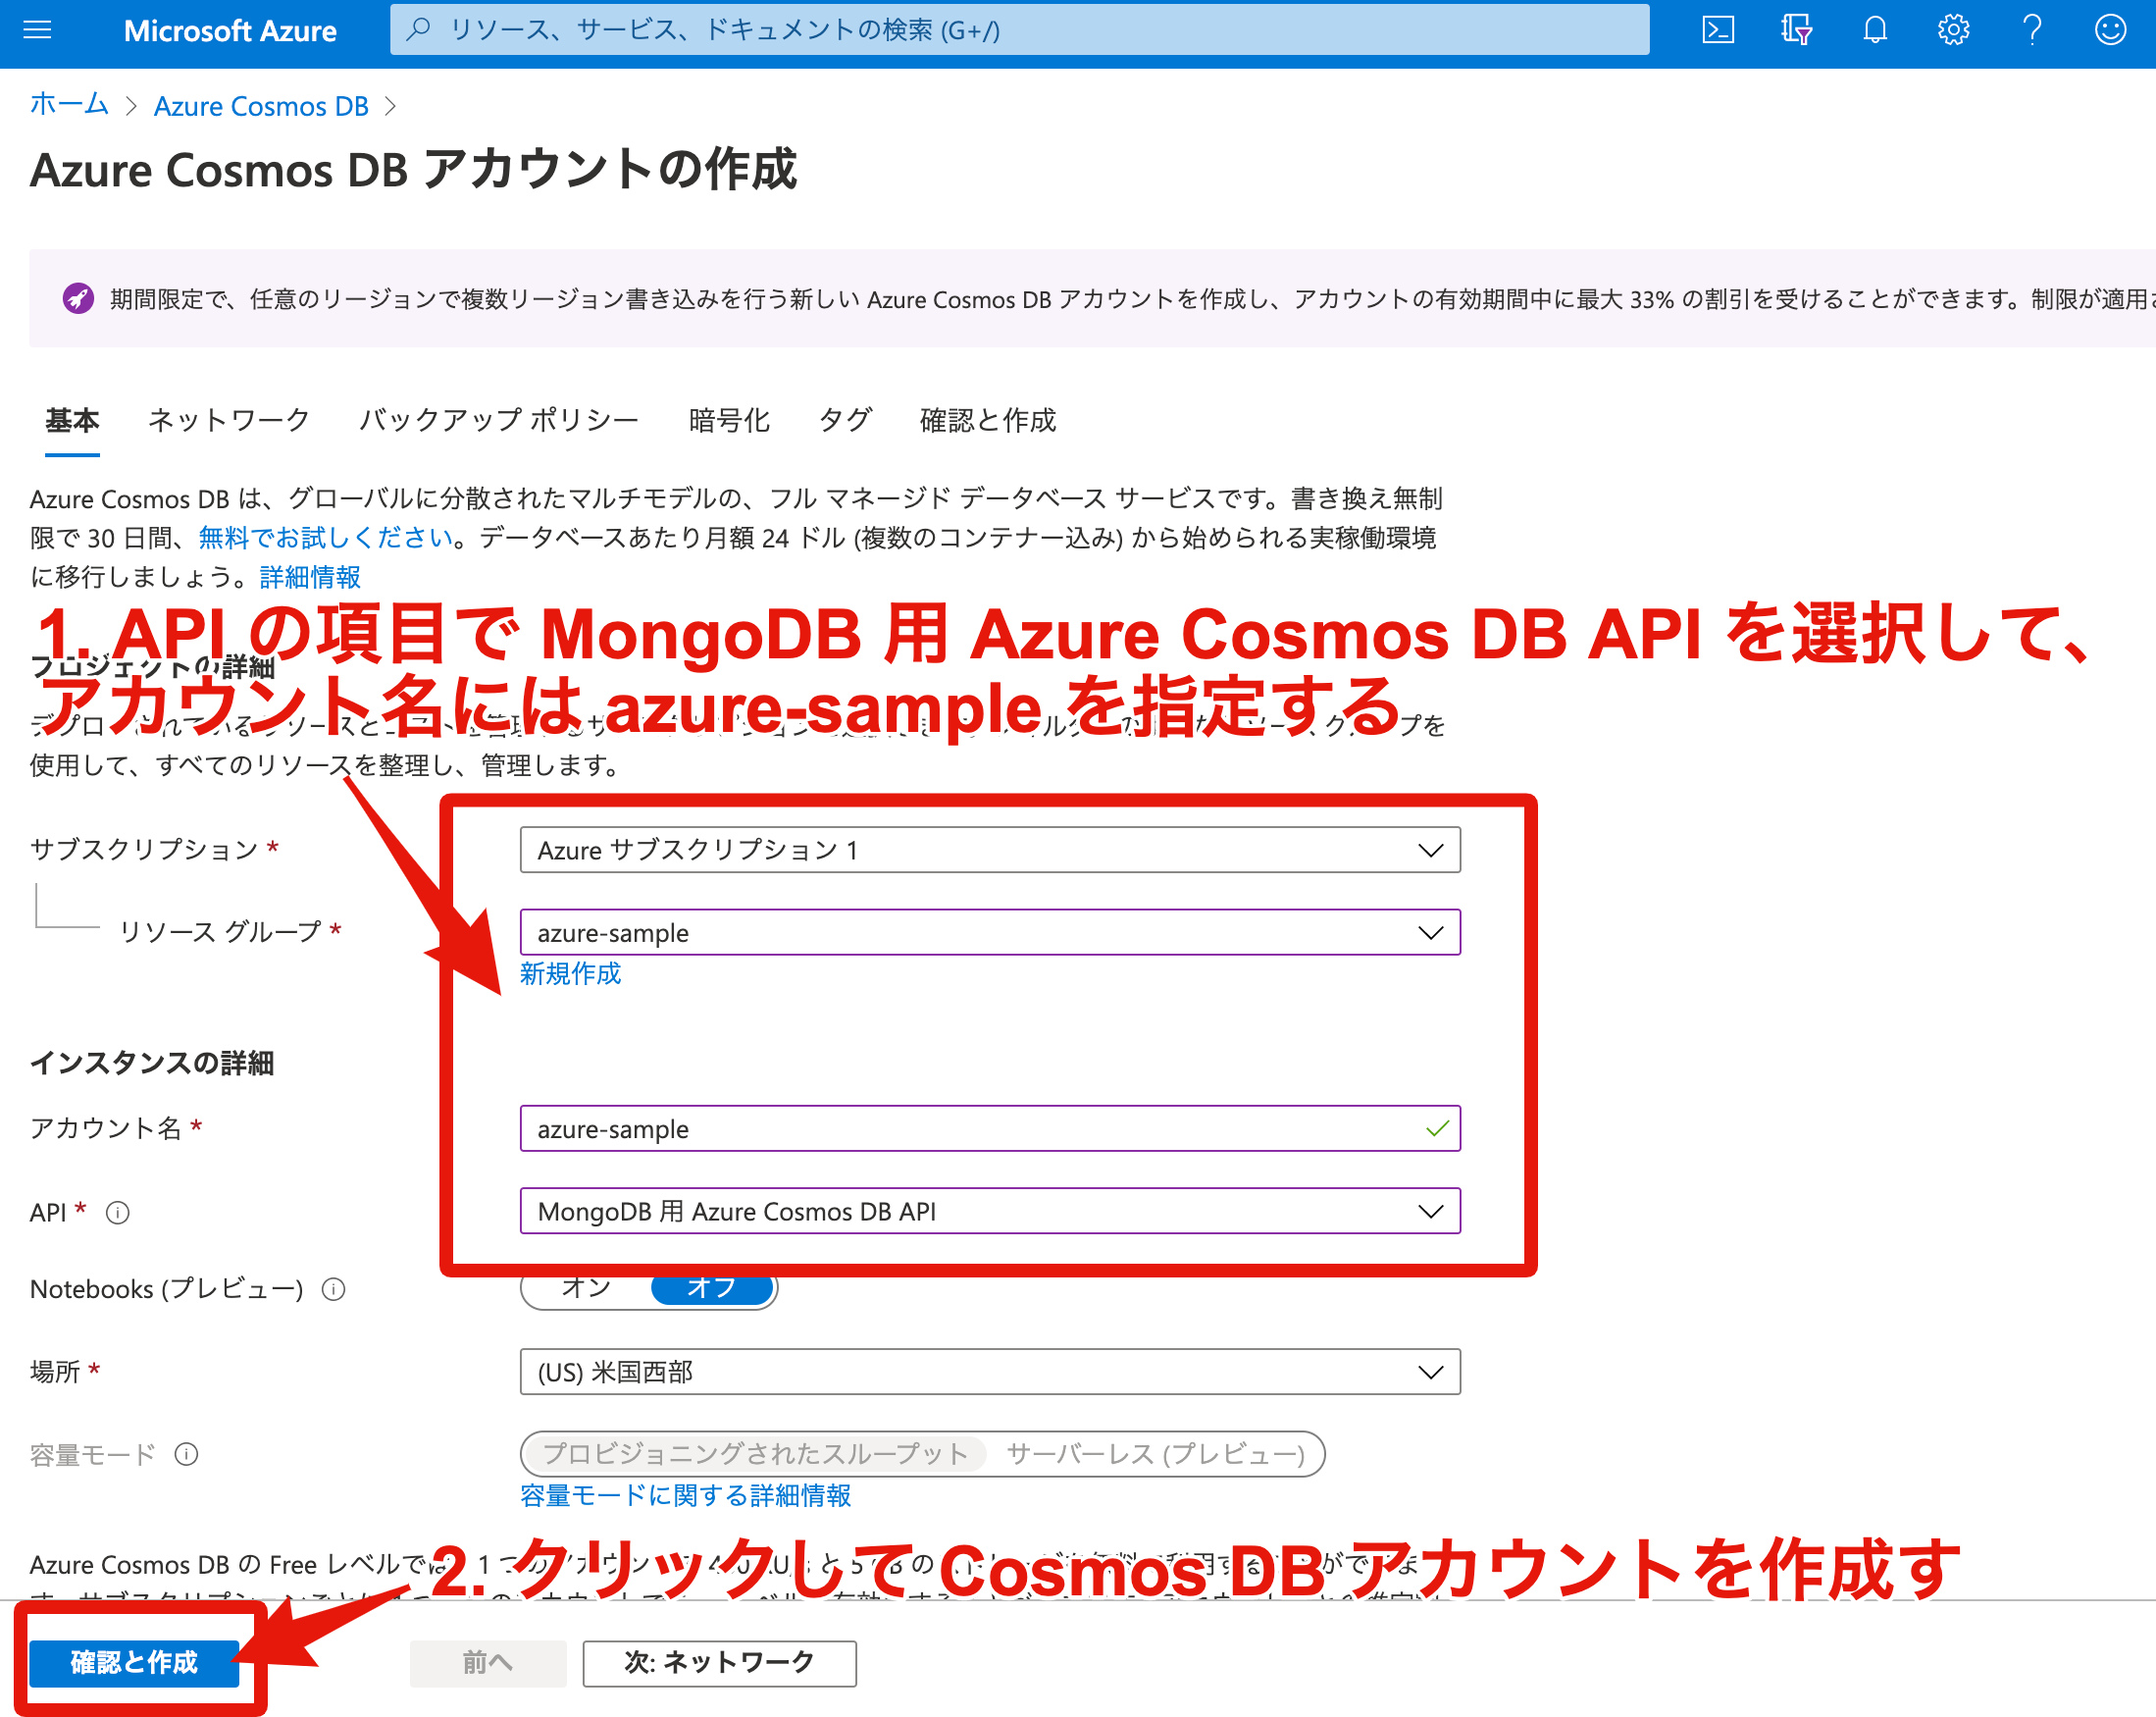
Azure Cosmos DB アカウントを作成する
-
Azure Cosmos DB アカウントの作成ページからアカウント作成する。API には
MongoDB~を選択する。
-
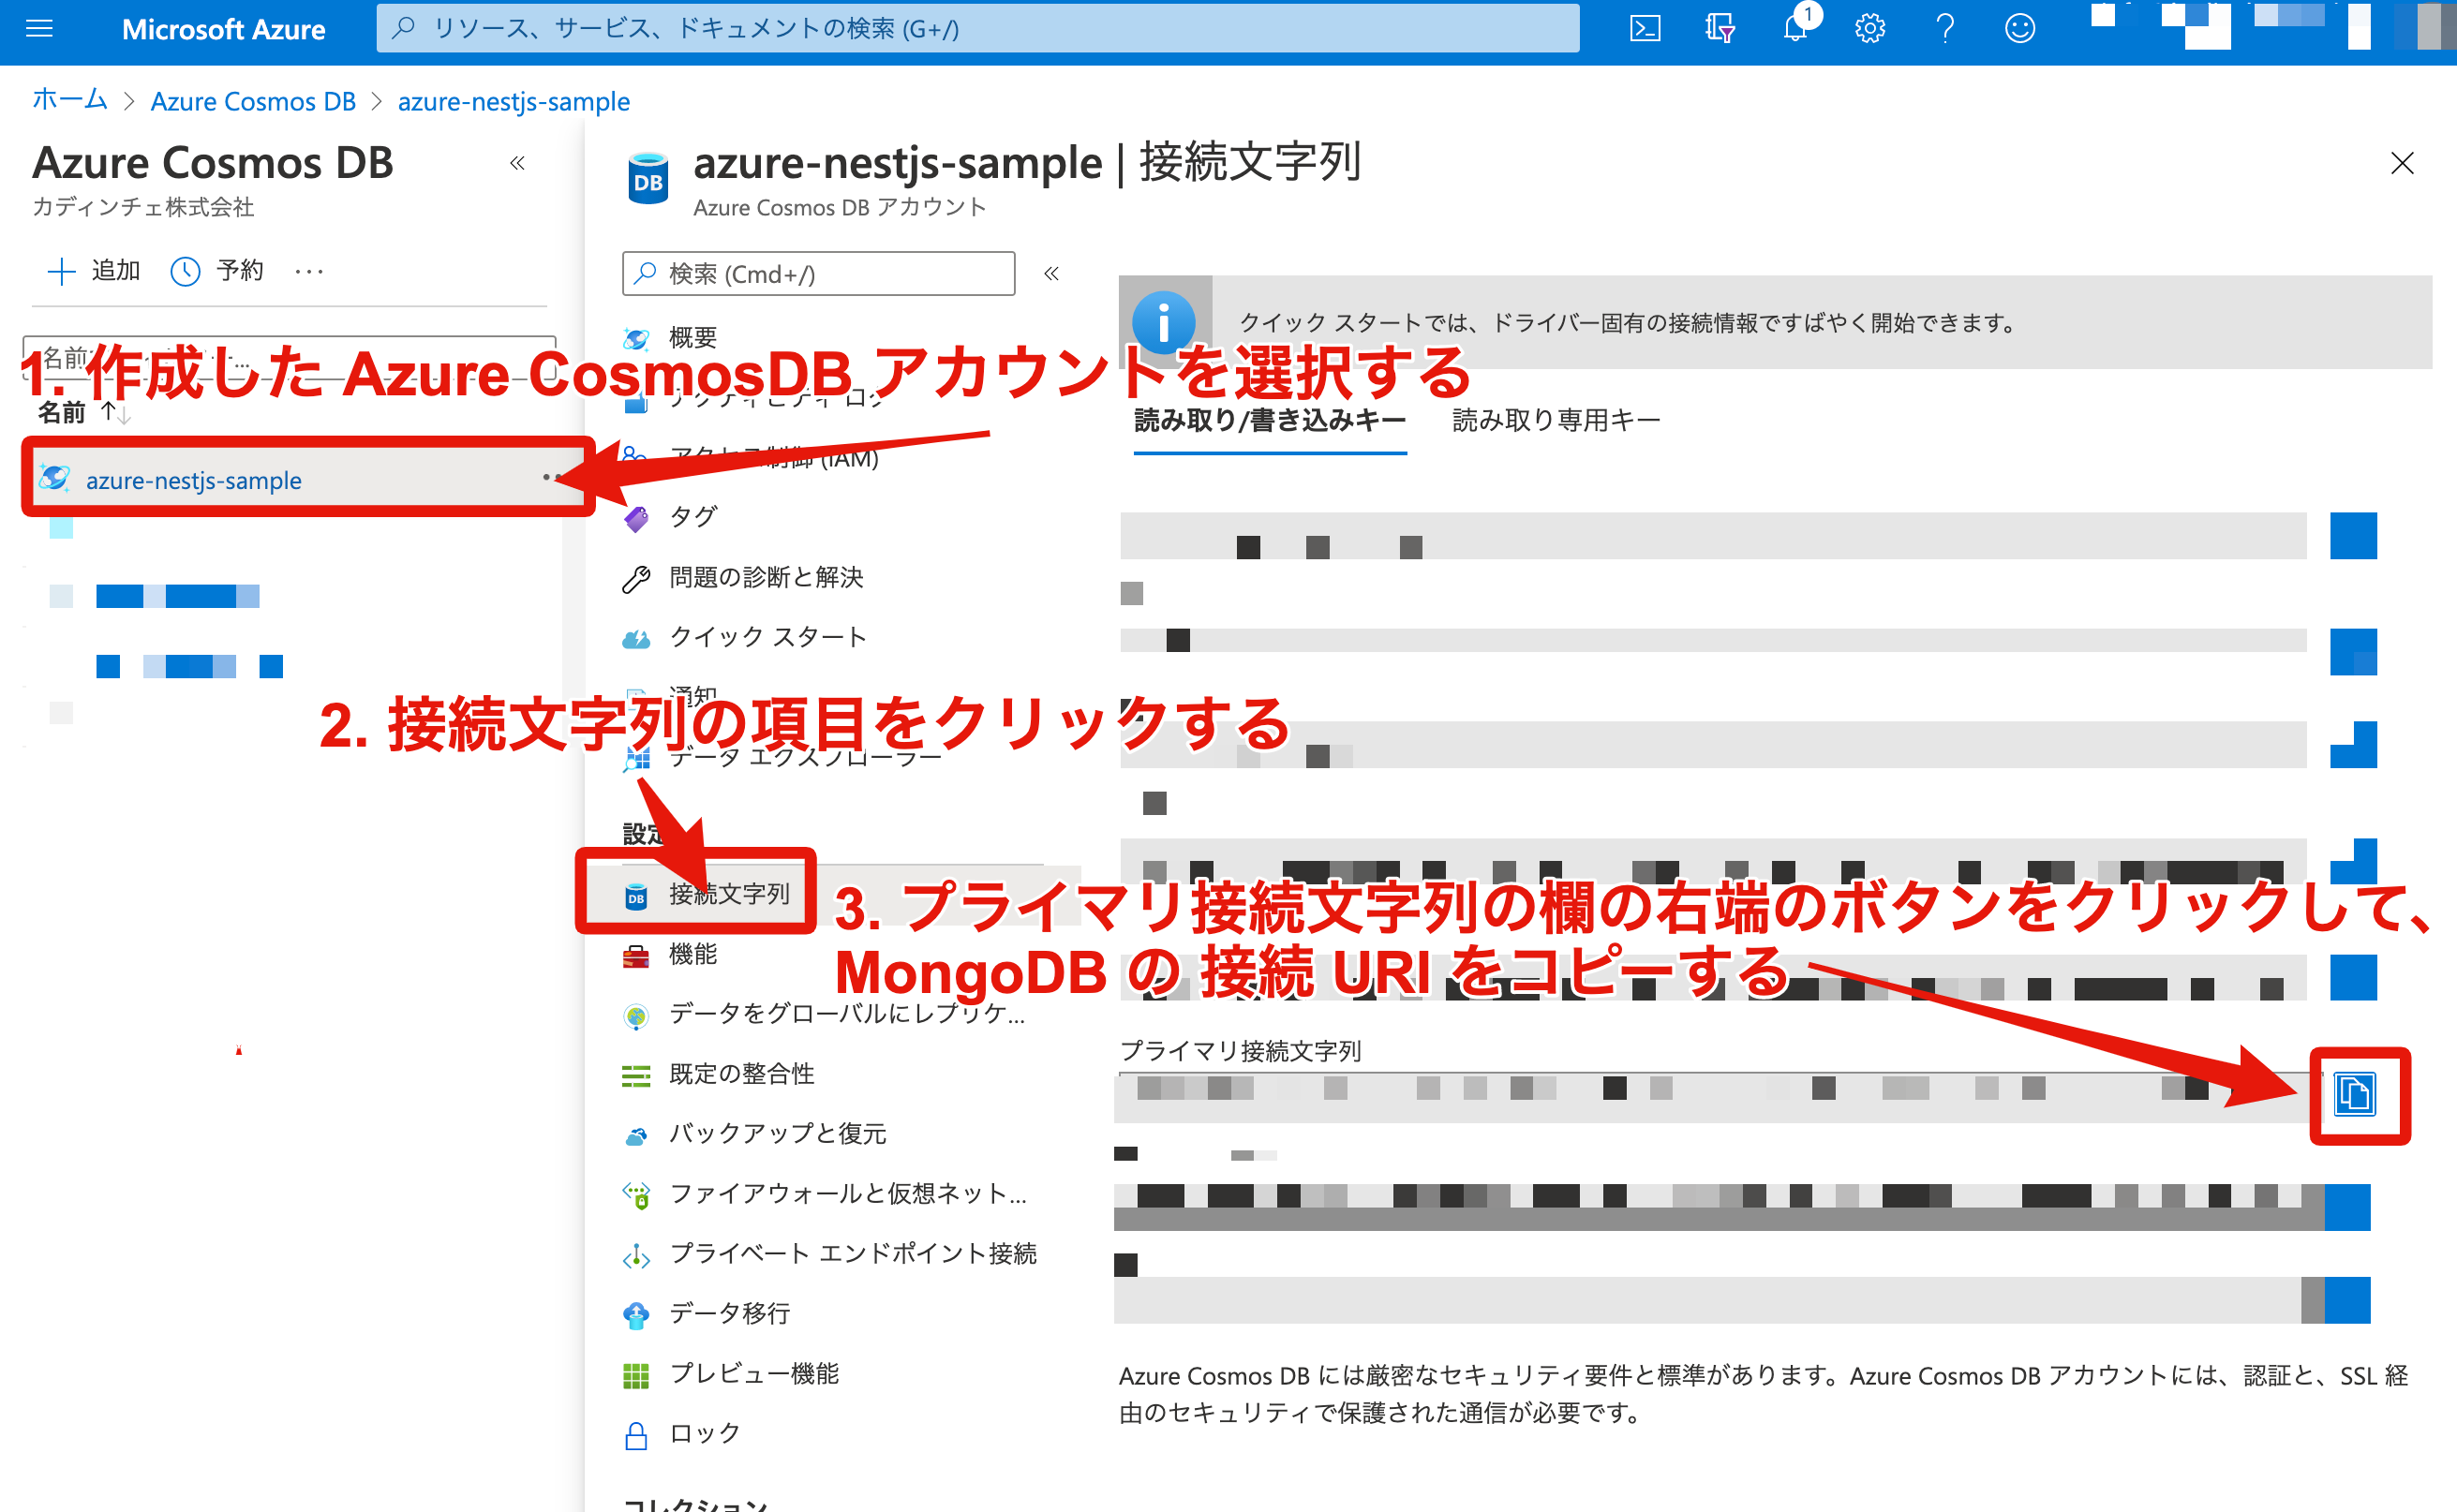
作成した Azure Cosmos DB アカウントのプライマリ接続文字列 (MongoDB URI) を取得して控えておく
プライマリ接続文字列を Azure KeyVault でシークレットに登録する
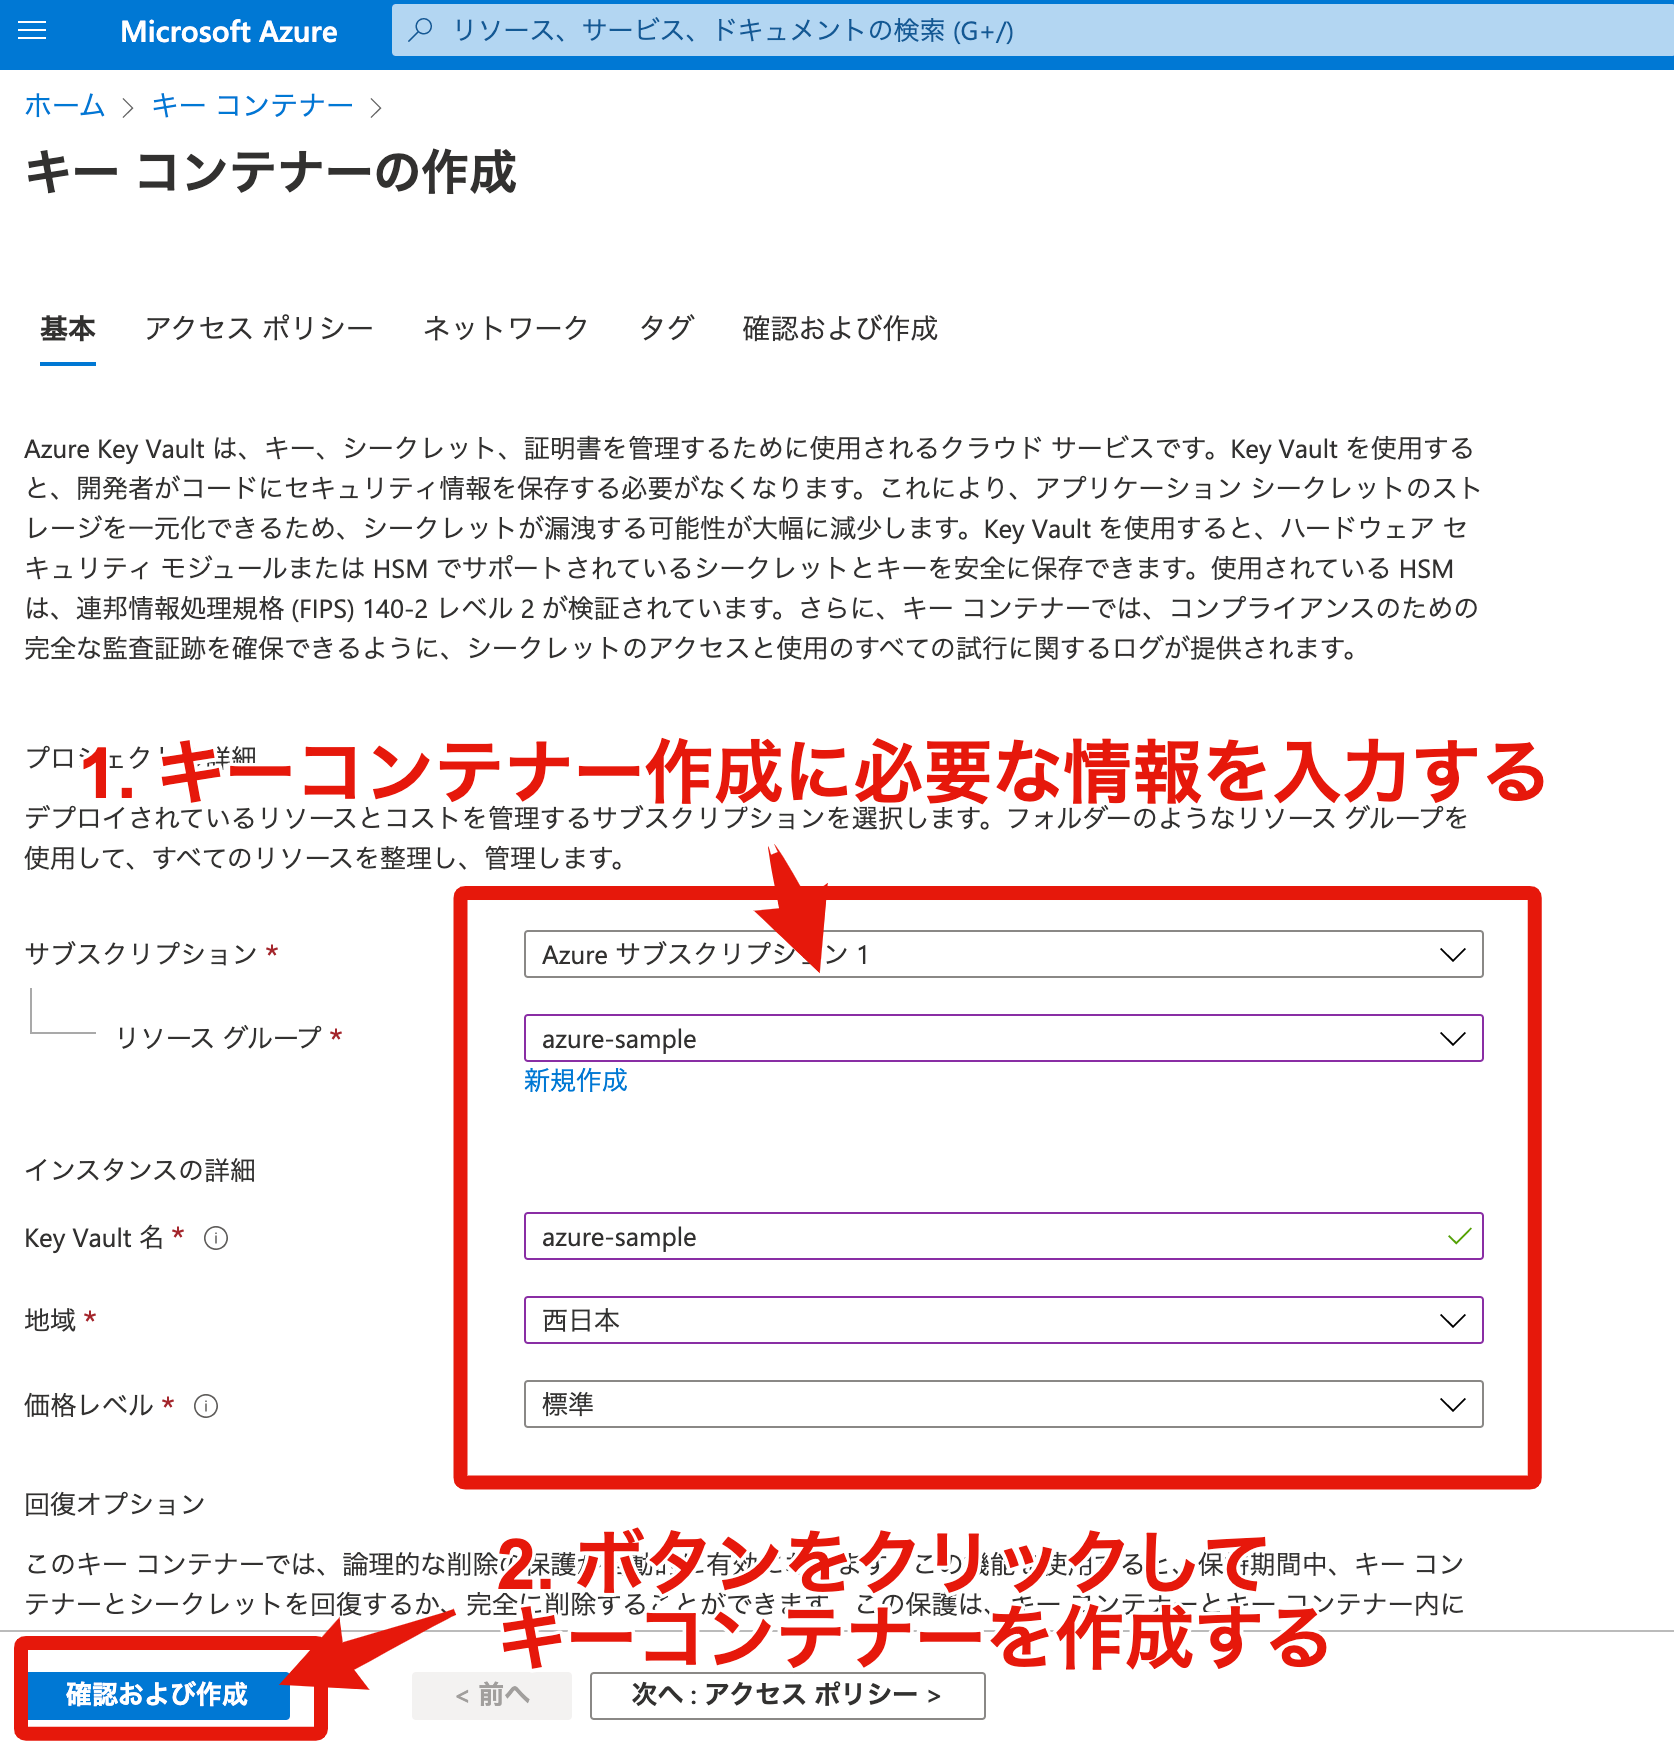
Azure Cosmos DB のプライマリ接続文字列はセキュアな情報なので Azure KeyVault (キーコンテナー) で管理します。
-
キーコンテナーの作成ページからキーコンテナーを作成する
-
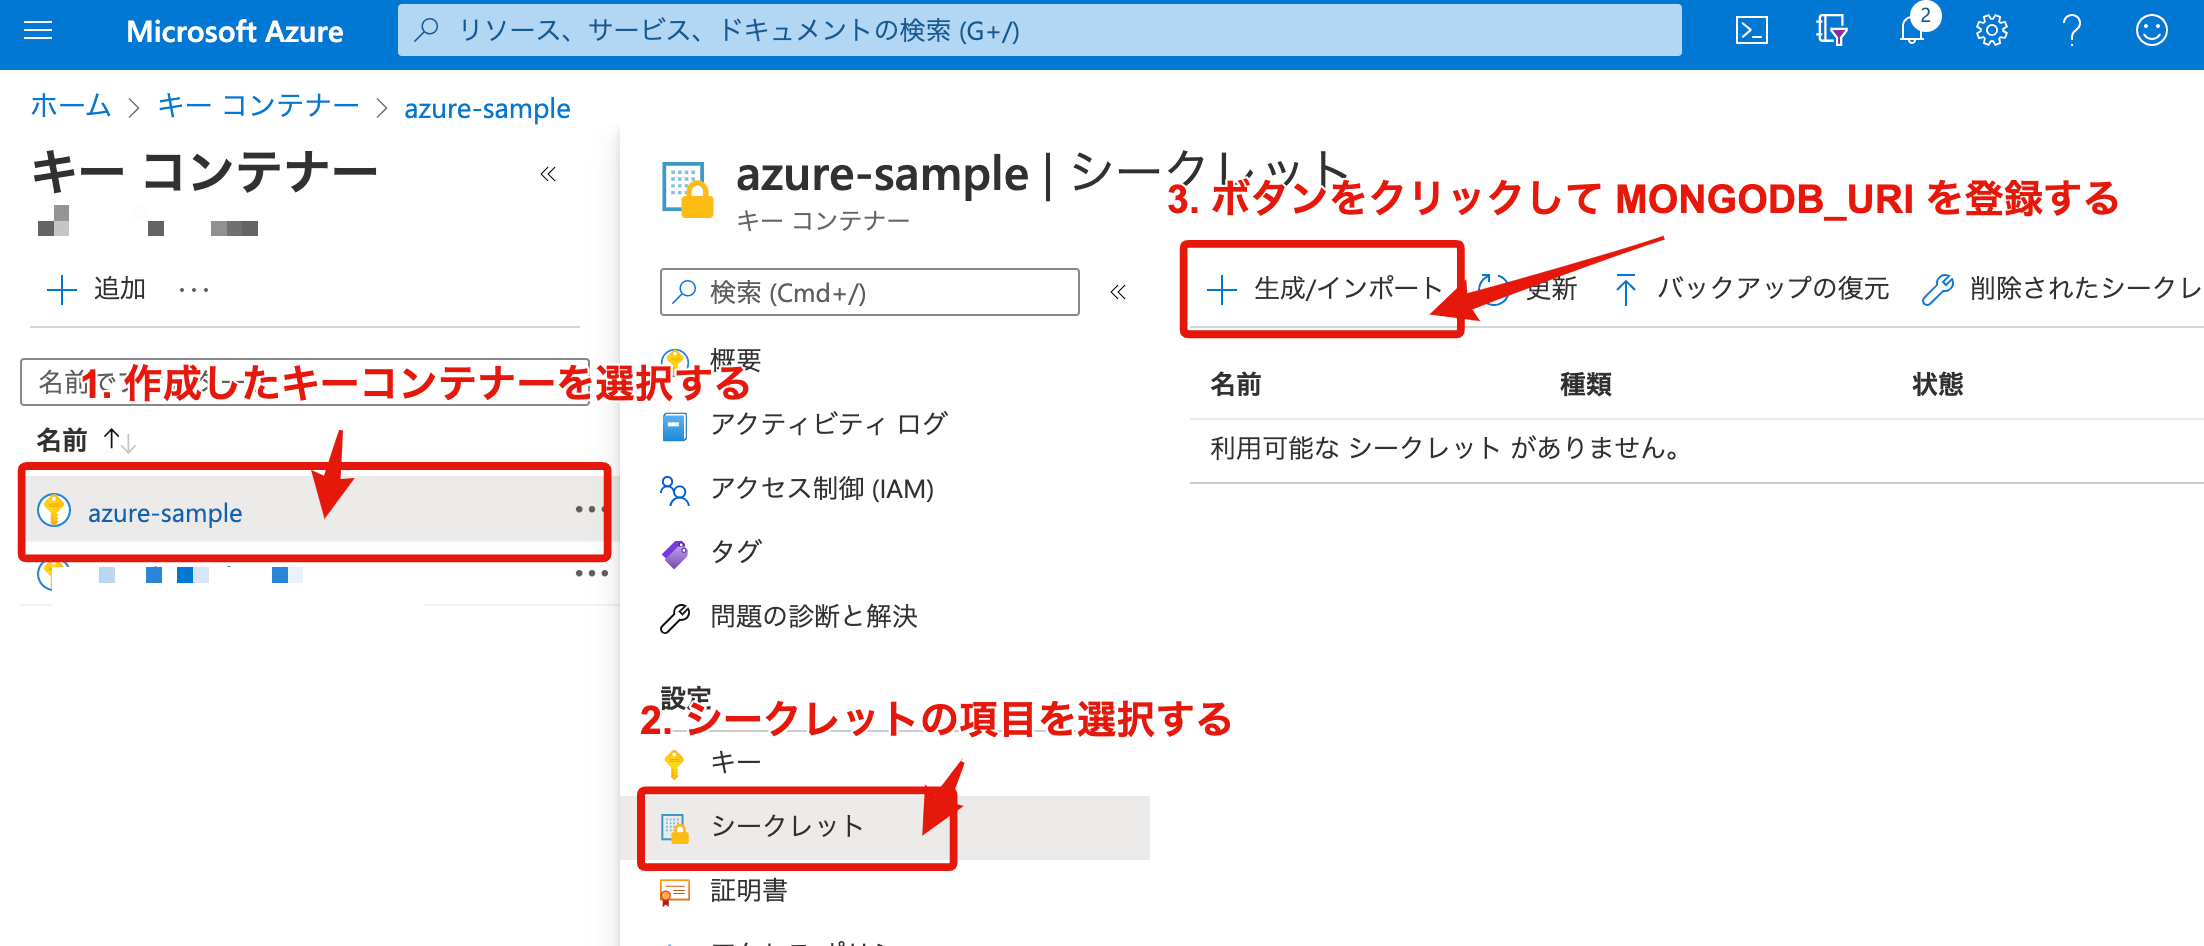
控えておいた Azure Cosmos DB のプライマリ文字列 (MongoDB URI) をシークレットに登録する
 -
後に関数アプリで値を設定するため、登録したシークレットの識別子を控えておく

Azure Functions から Azure KeyVault が参照できるようにする
Azure Functions (関数アプリ) では、Azure KeyVault の値を環境変数の設定が可能です。公式ページの手順に沿って設定作業を進めていきます。
-
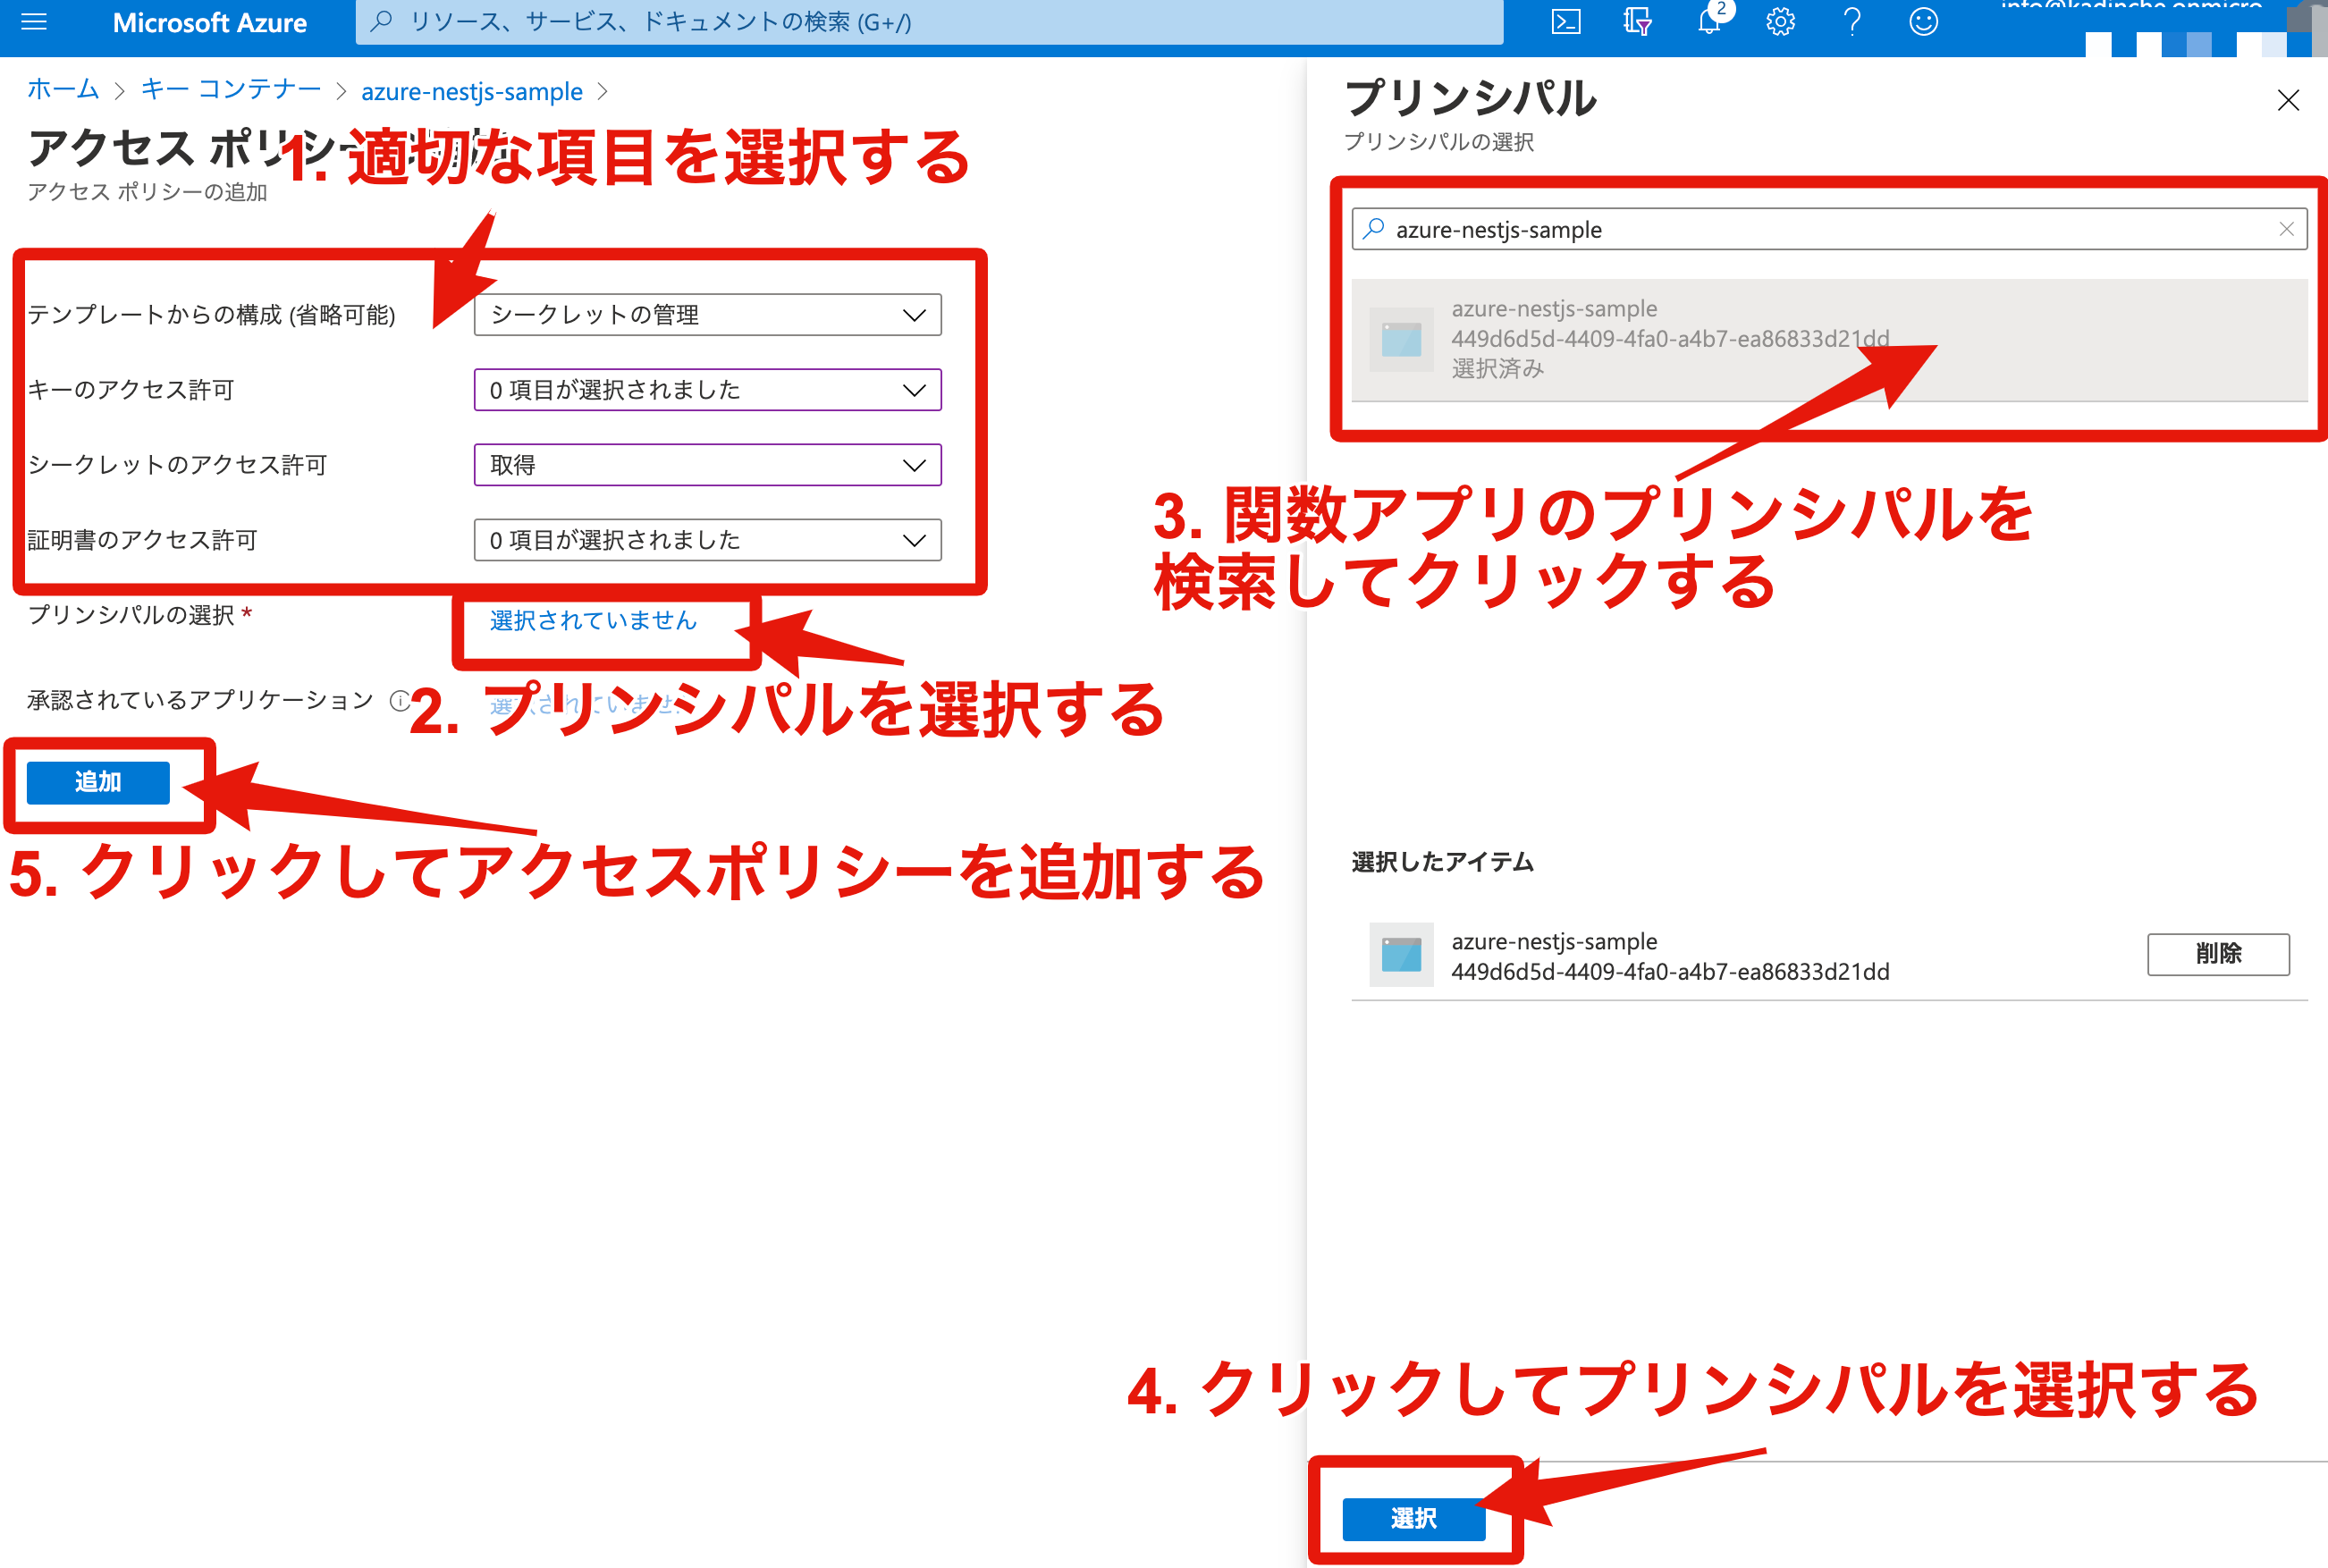
キーコンテナーの一覧ページ から該当するキーコンテナーのアクセスポリシー追加画面に遷移する
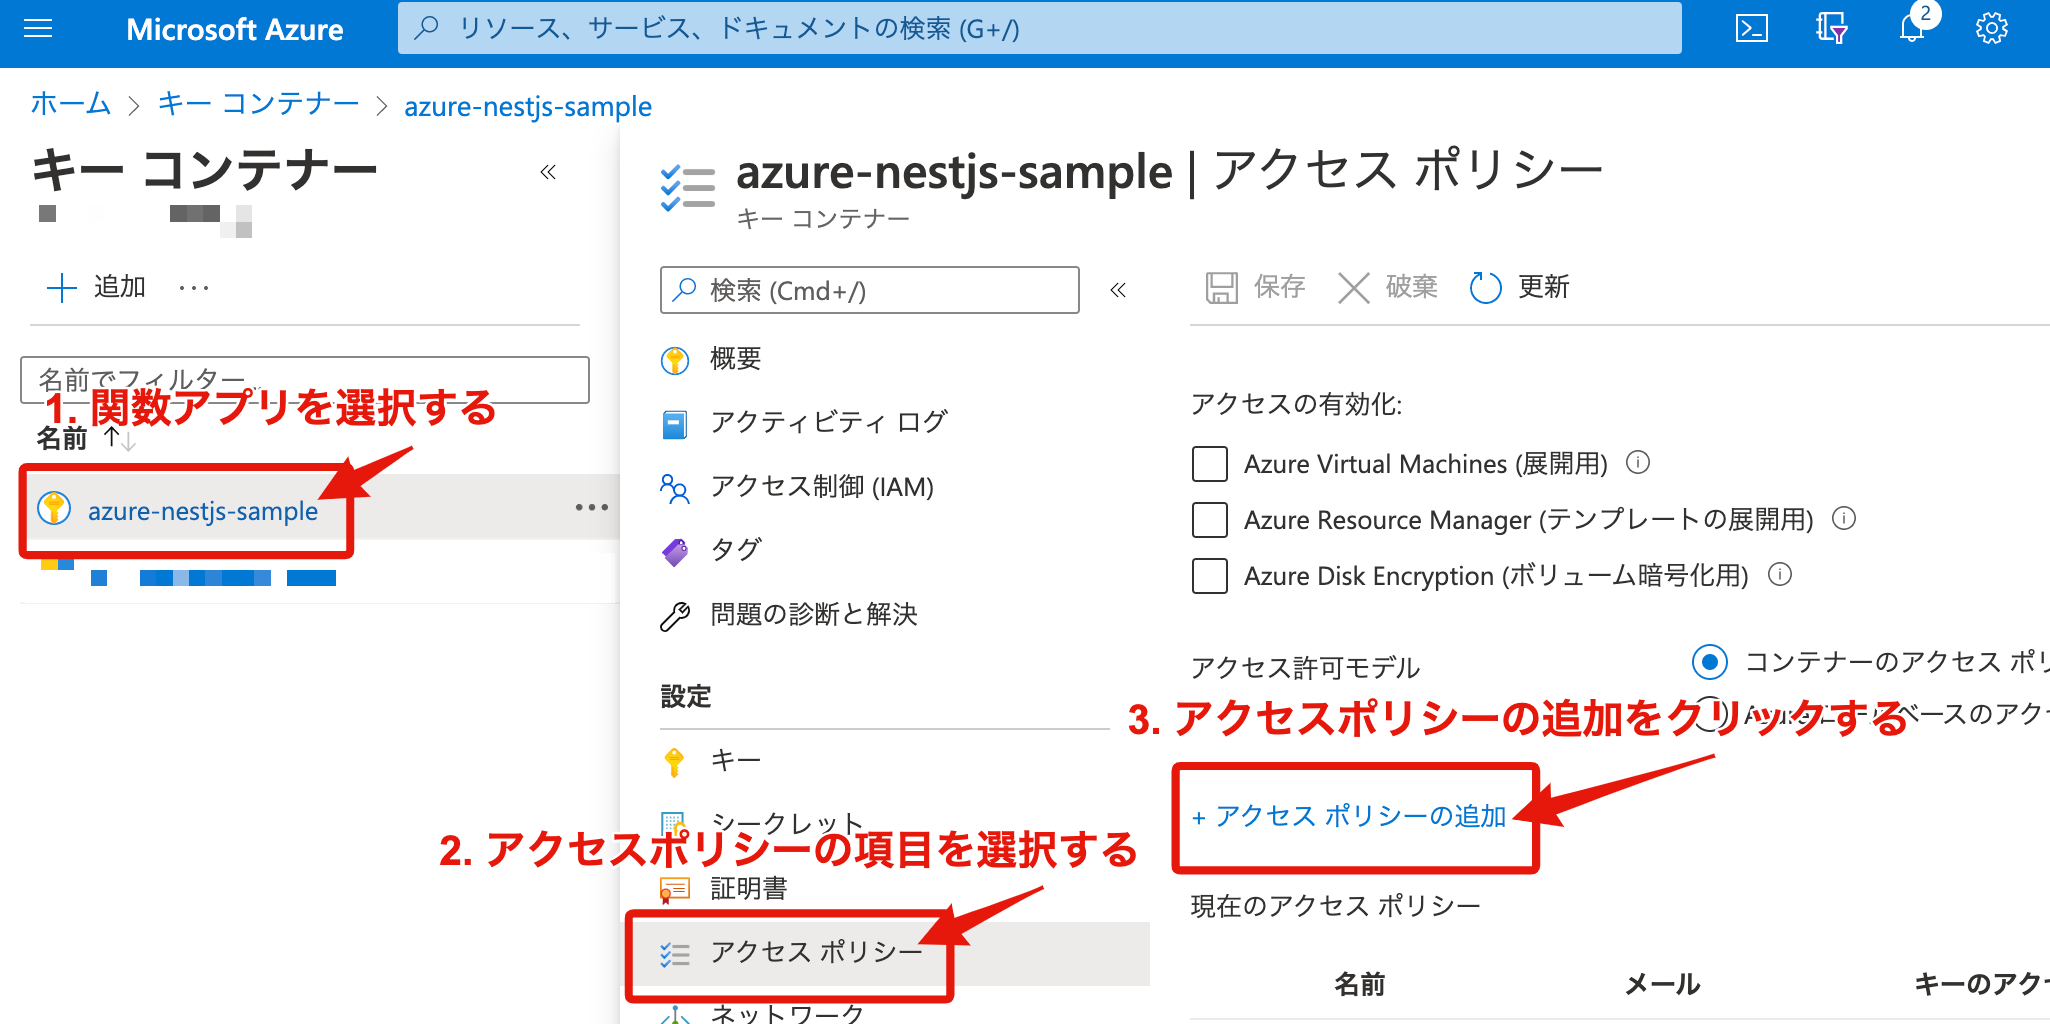
アクセスポリシー設定時に 承認されているアプリケーション の設定項目がありますが、ここには何も設定しないでください。設定してしまうと関数アプリから KeyVault のアプリケーション設定が読み込めないためです。
Azure KeyVault に登録した値を Azure Functions から参照する
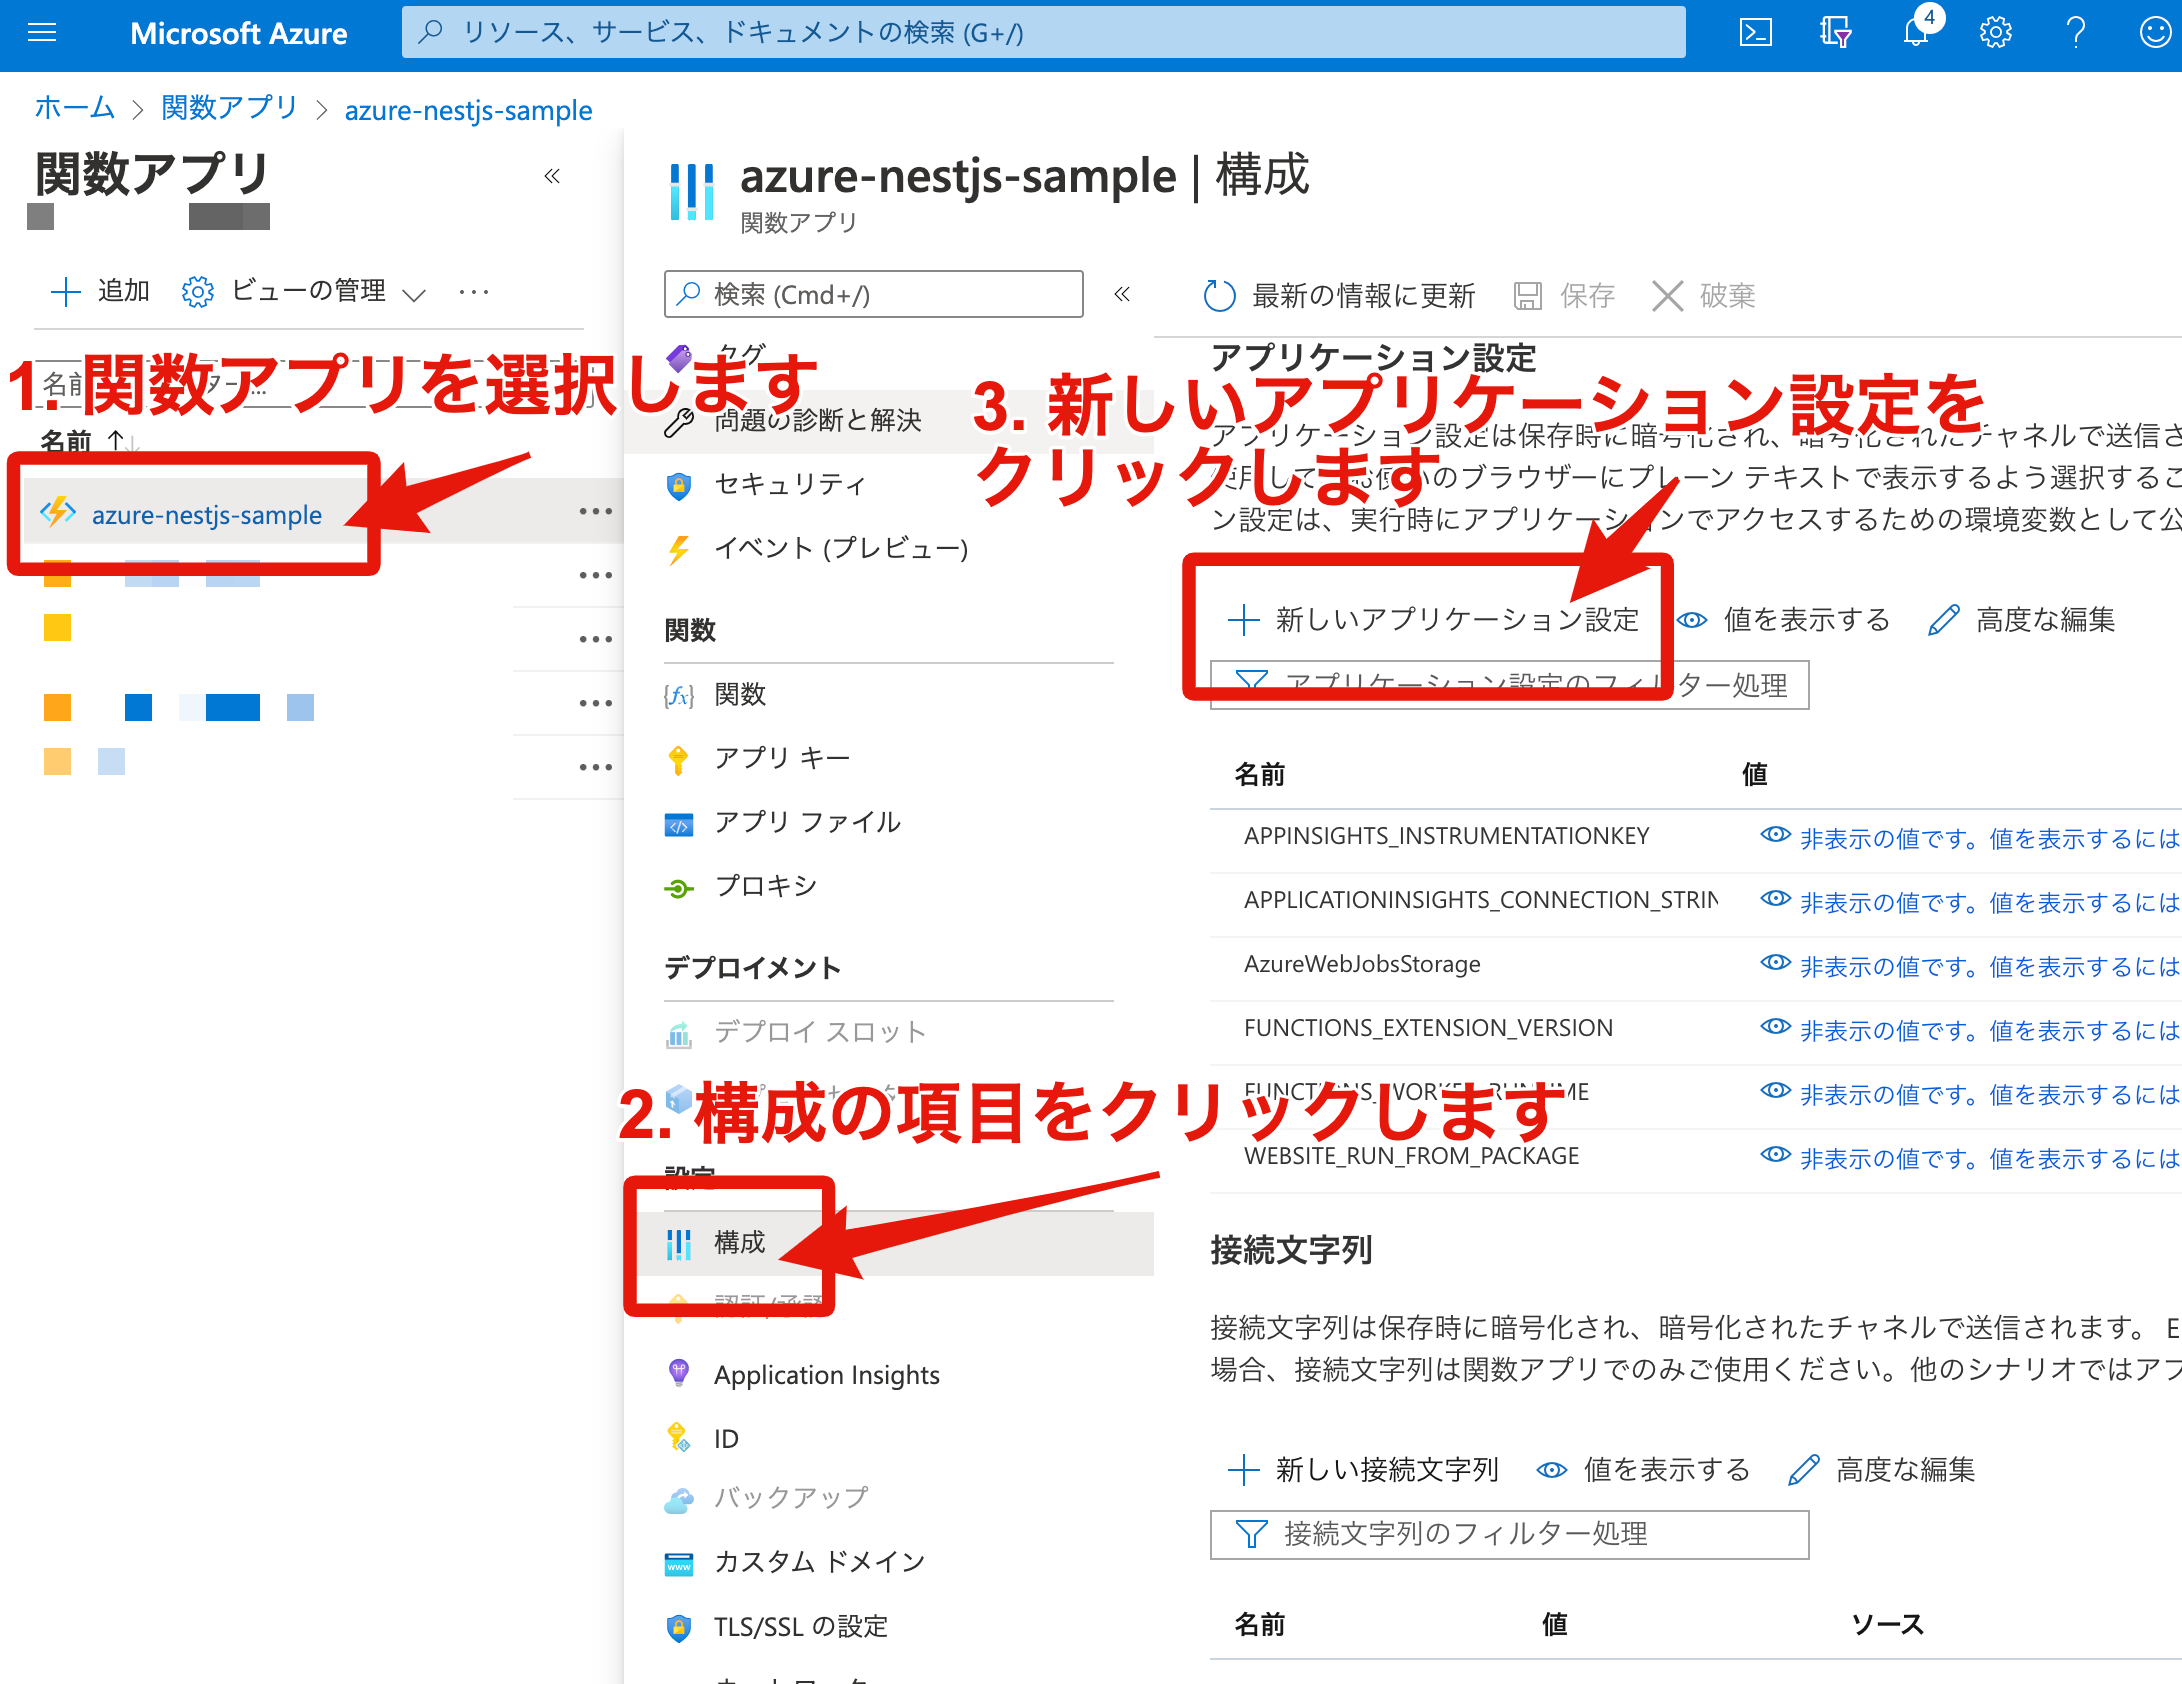
-
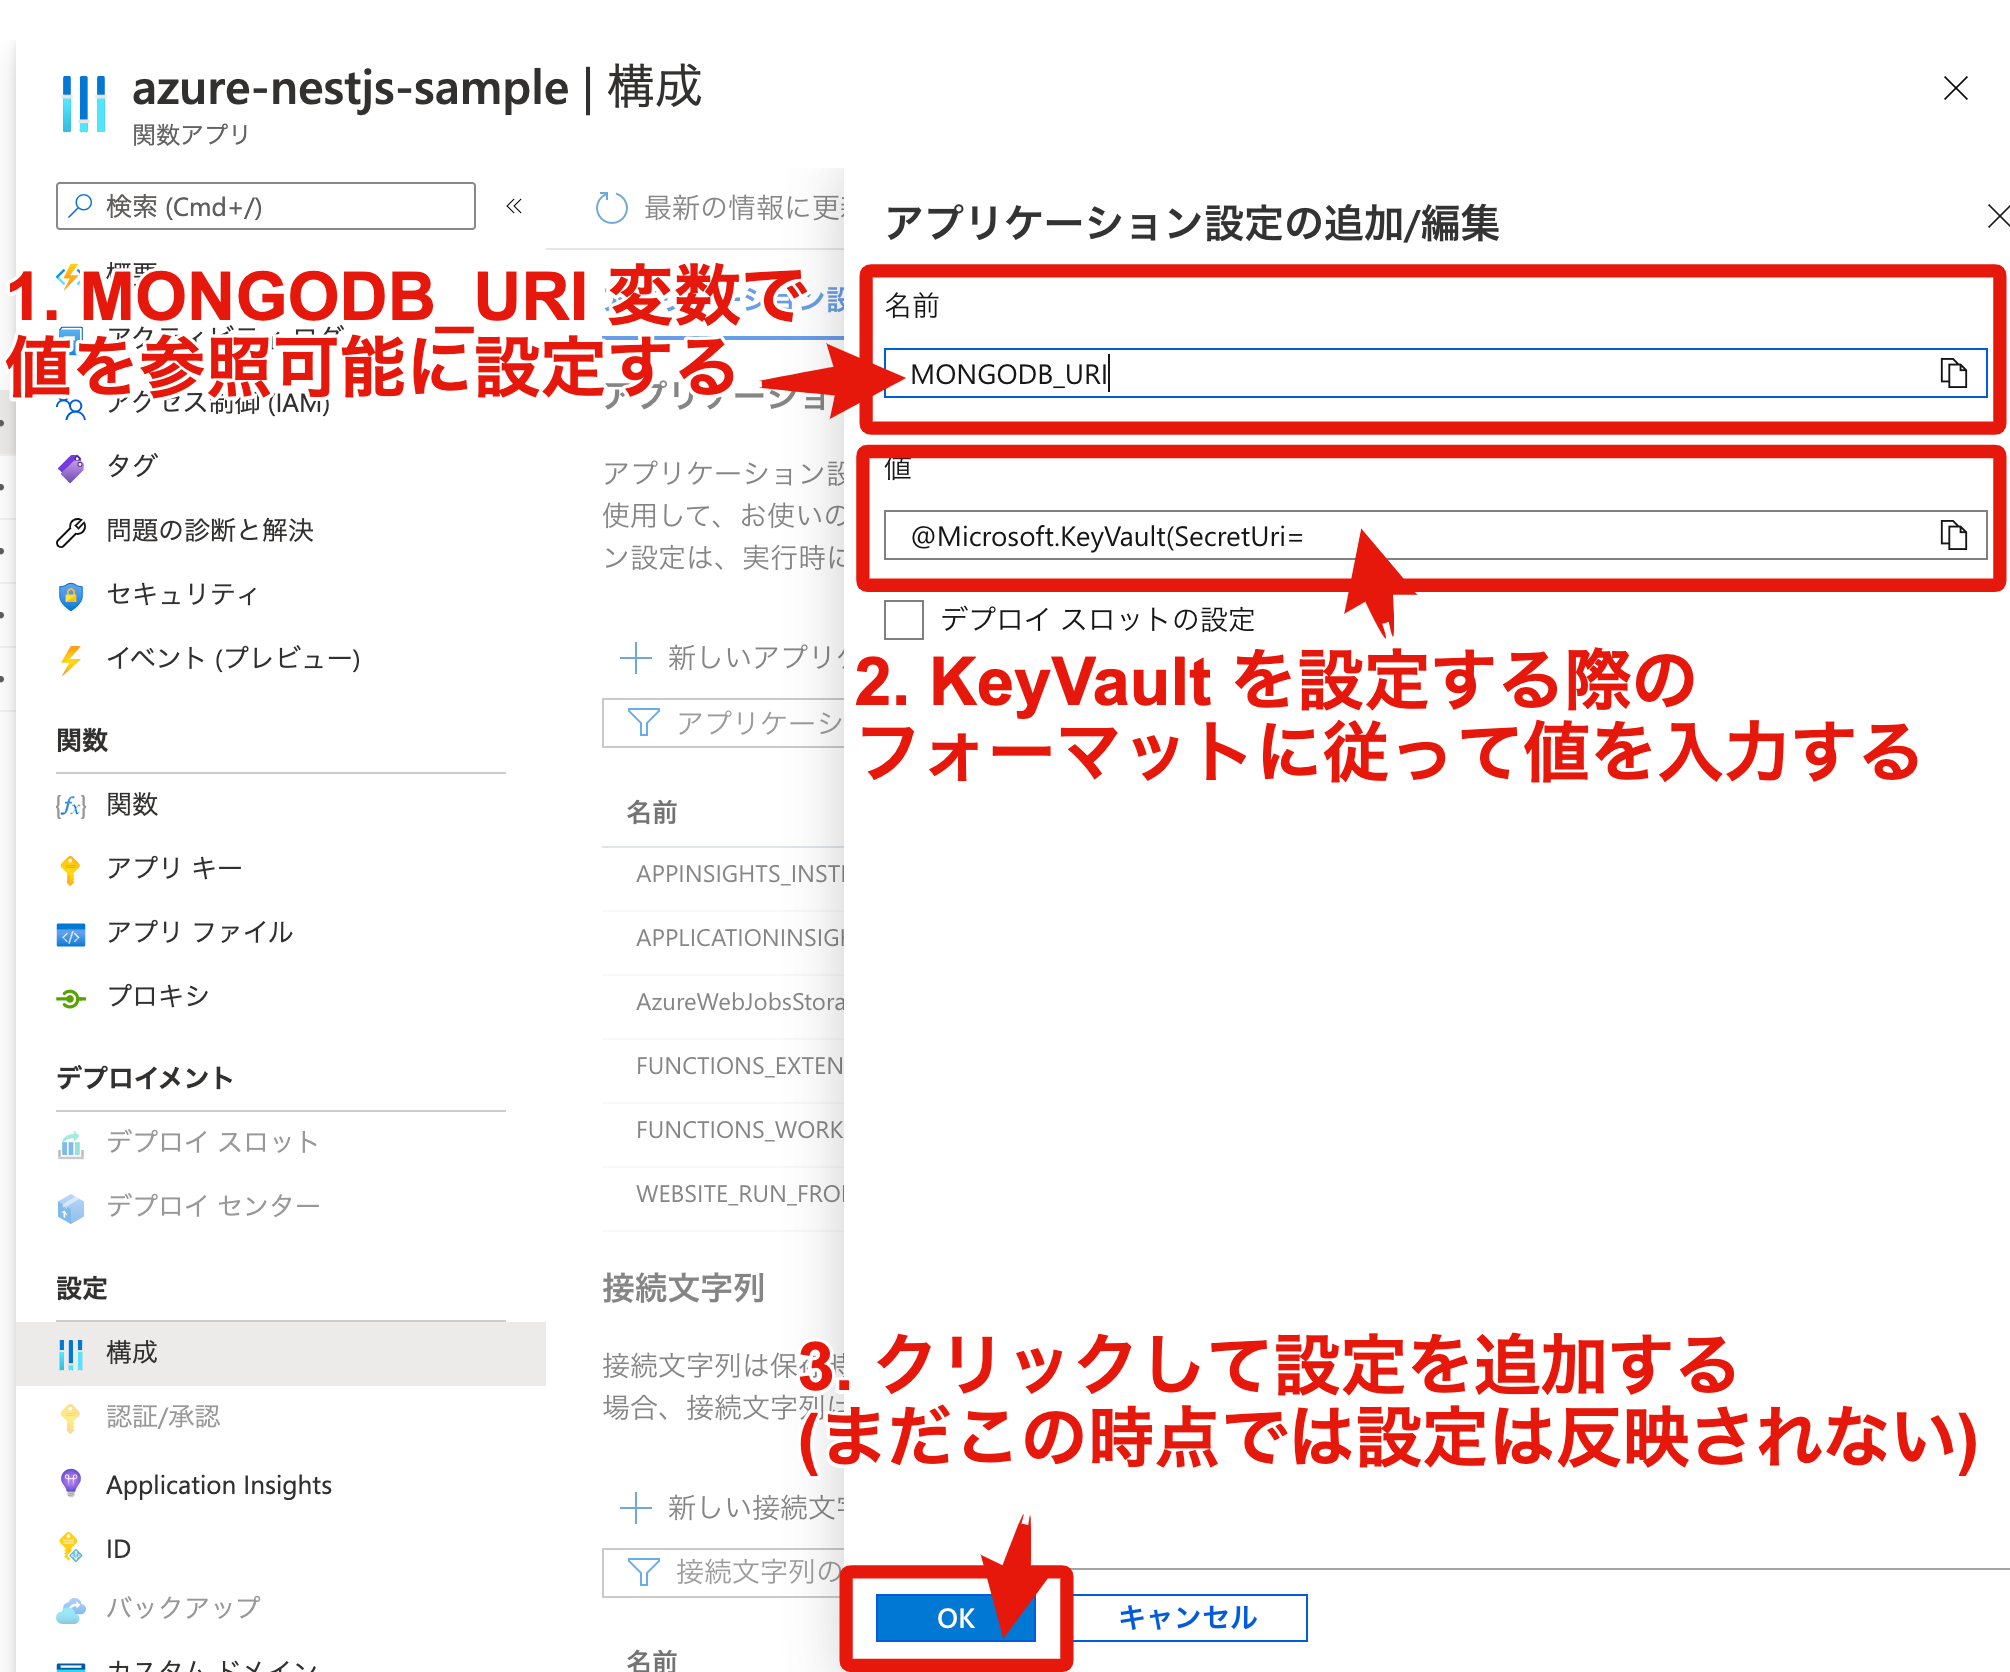
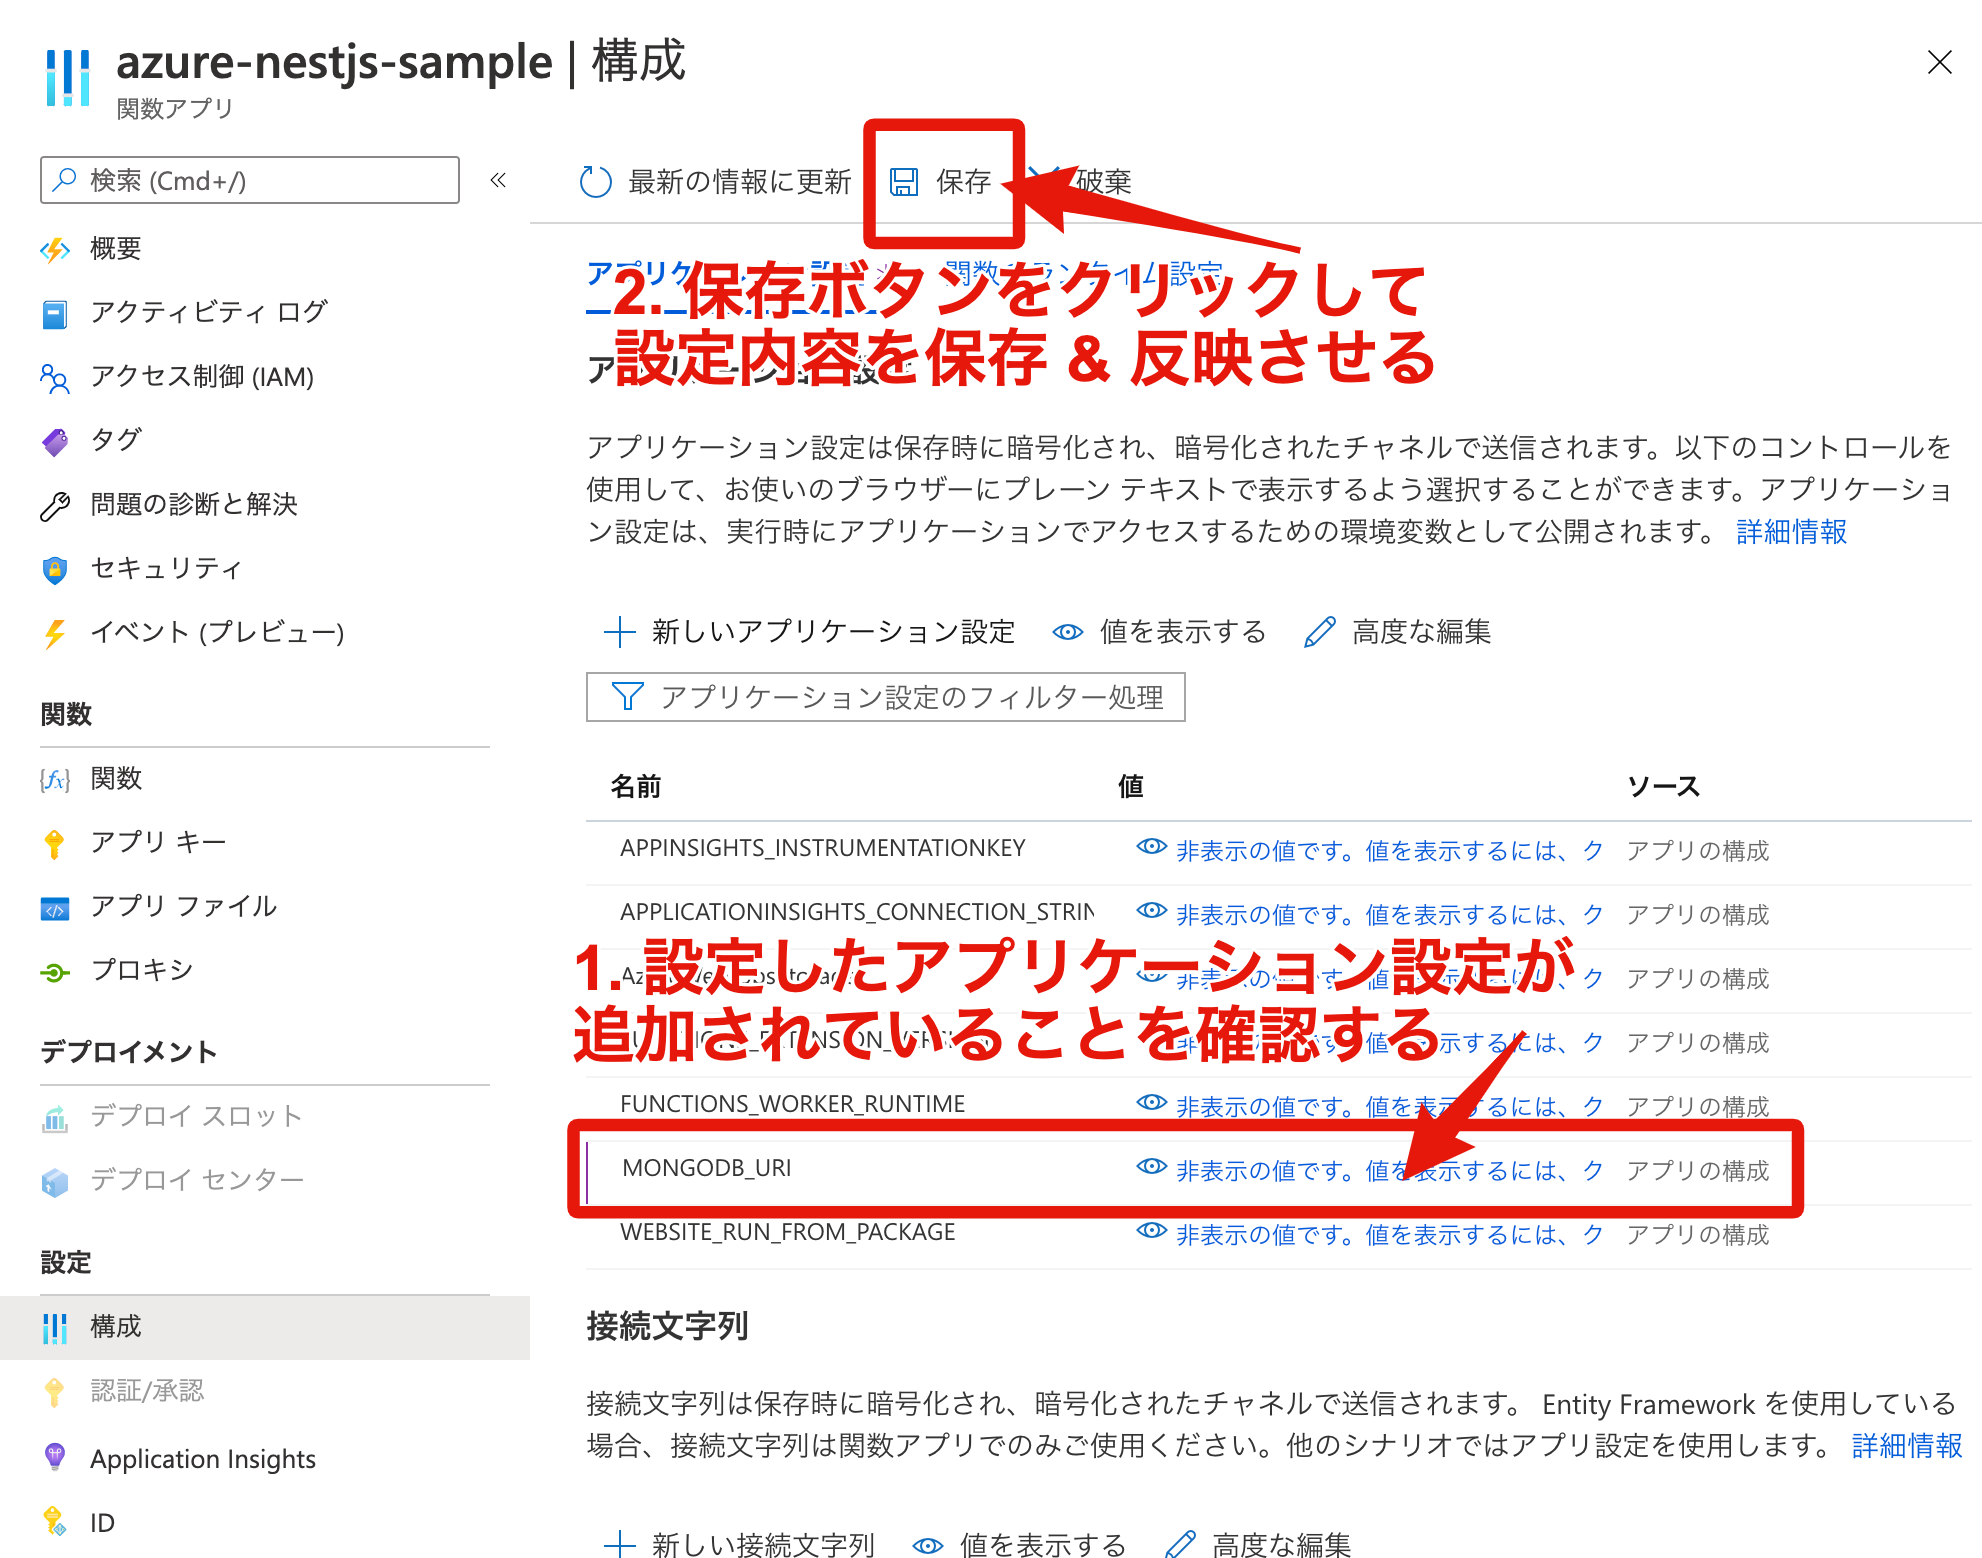
該当する関数アプリのアプリケーション設定追加画面に遷移する。
キーコンテナーのシークレットをアプリケーション設定から追加する際、値のフォーマットは@Microsoft.KeyVault(SecretUri=<KeyVault で値を設定した時に取得可能なシークレット識別子>)になります。
GitHub Actions で Azure Functions にデプロイする
Azure Functions へのデプロイも GitHub Actions で行えるようにするため、GitHub Actions から Azure Functions へのデプロイ時に必要になる関数アプリの発行プロファイルを下記からダウンロードします。
発行プロファイルを取得したら、ダウンロードしたファイル内容をコピー&ペーストで GitHub の Secrets に登録します。
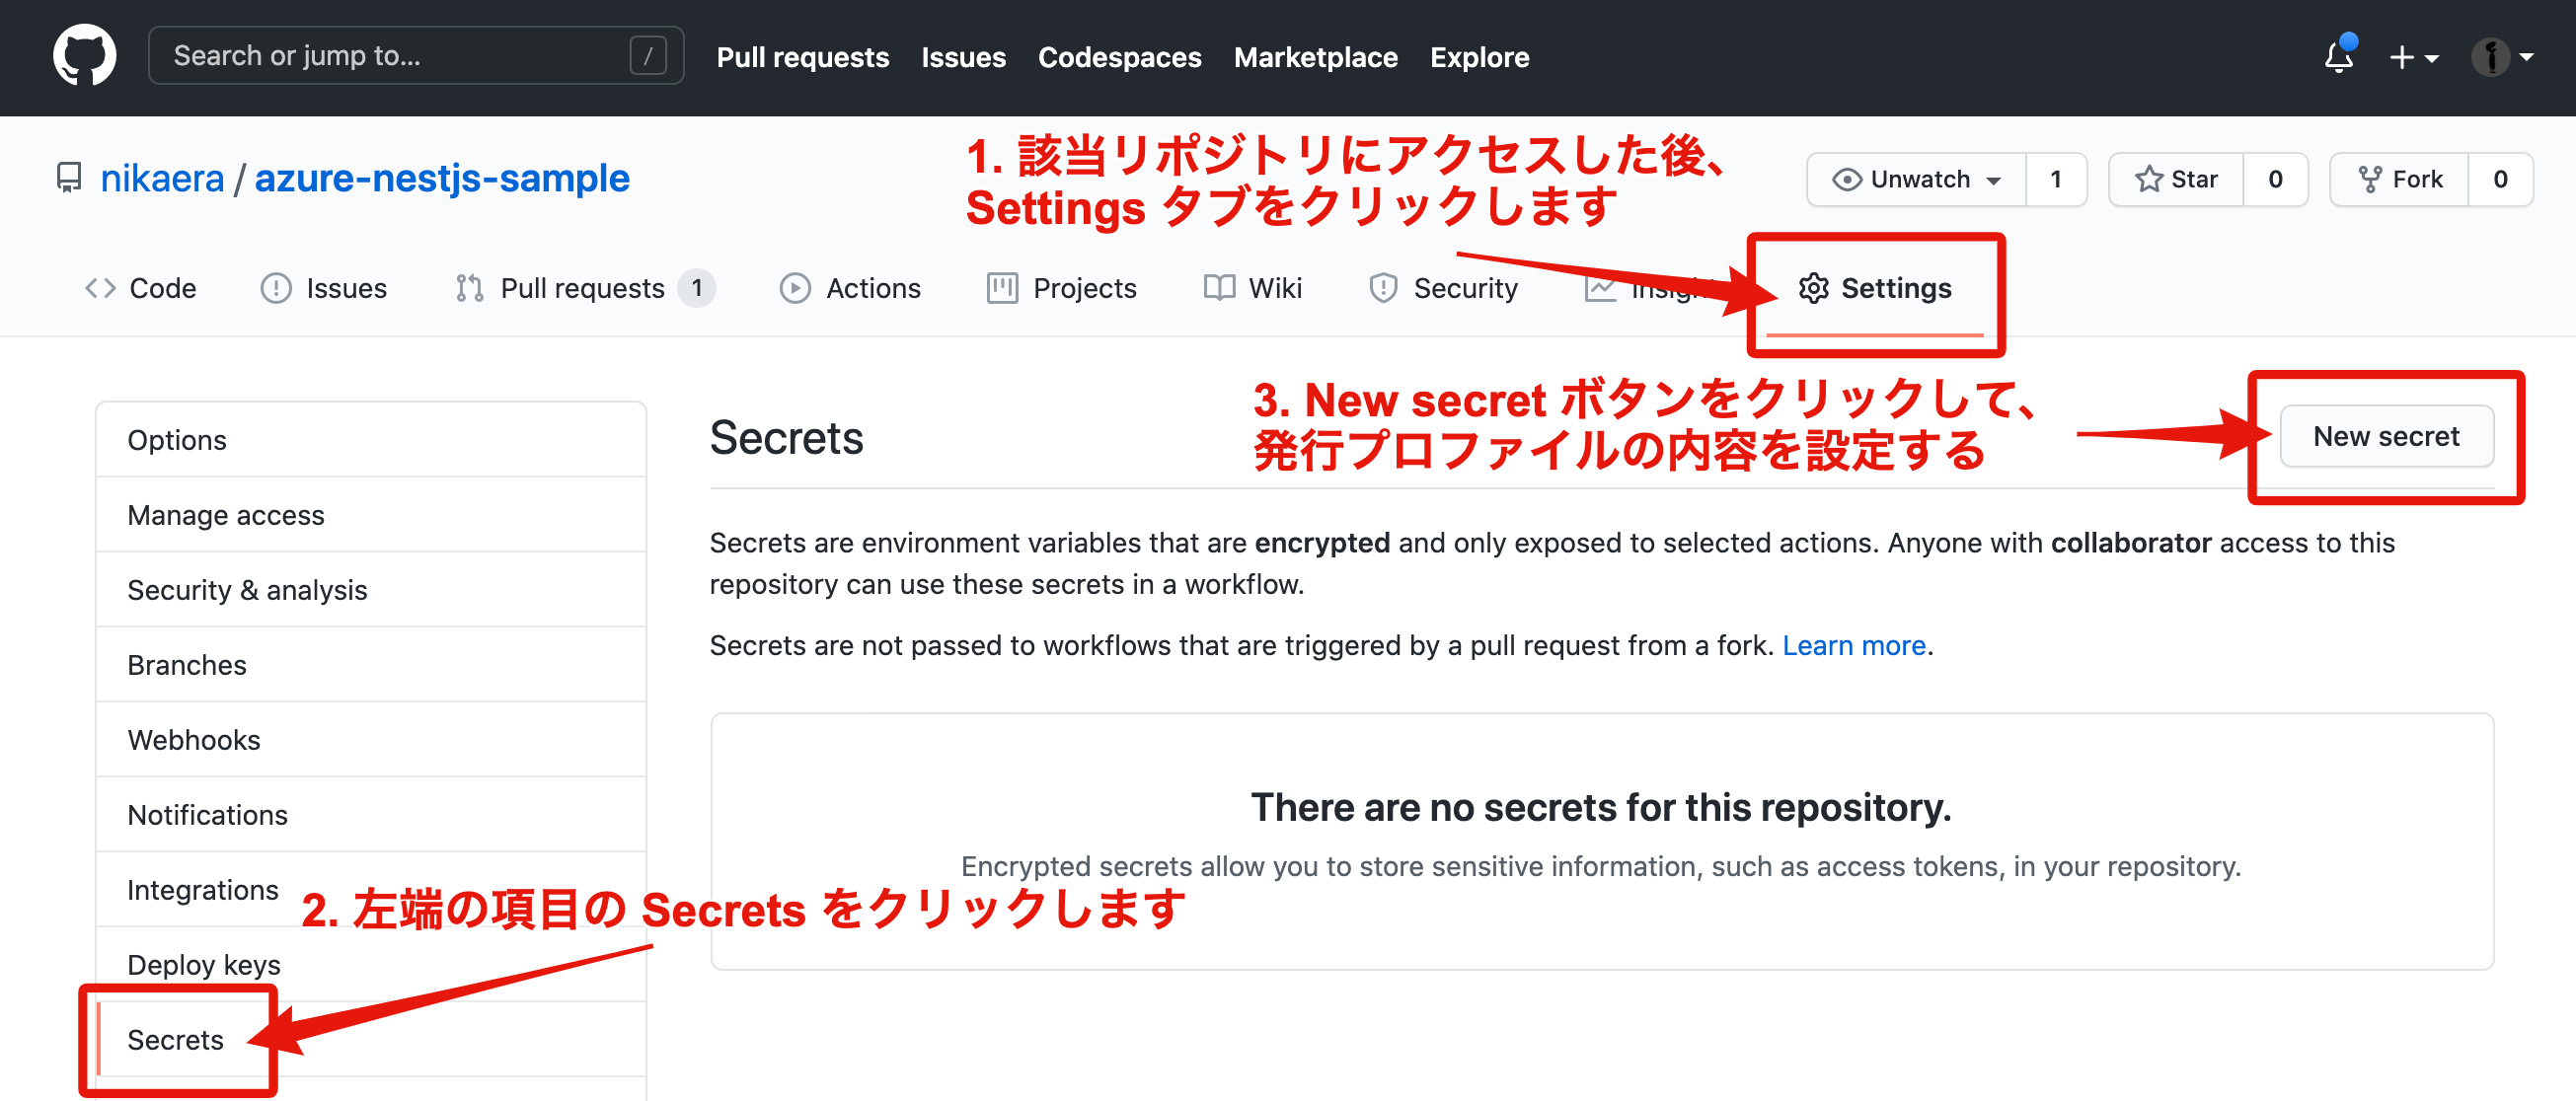
2. GitHub リポジトリの Secrets の登録画面に遷移する

3. GitHub リポジトリの Secrets に発行プロファイルを登録する
上記が完了したら Azure Functions へデプロイするための GitHub Actions のワークフローファイル .github/workflows/deploy-azure.yml を作成して、main ブランチに push します。
# main ブランチに何らかの commit が追加されたら走らせる
on:
  push:
    branches:
      - main

env:
  AZURE_FUNCTIONAPP_NAME: azure-nestjs-sample
  AZURE_FUNCTIONAPP_PACKAGE_PATH: '.'
  NODE_VERSION: '10.x'

jobs:
  build-and-deploy:
    runs-on: ubuntu-latest
    steps:
    - name: 'Checkout GitHub Action'
      uses: actions/checkout@master

    - name: Setup Node ${{ env.NODE_VERSION }} Environment
      uses: actions/setup-node@v1
      with:
        node-version: ${{ env.NODE_VERSION }}
    - name: 'Resolve Project Dependencies Using Npm'
      shell: bash
      run: |
        pushd './${{ env.AZURE_FUNCTIONAPP_PACKAGE_PATH }}'
        npm install
        npm run build --if-present
        popd
    - name: 'Run Azure Functions Action'
      uses: Azure/functions-action@v1
      id: fa
      with:
        app-name: ${{ env.AZURE_FUNCTIONAPP_NAME }}
        package: ${{ env.AZURE_FUNCTIONAPP_PACKAGE_PATH }}
        publish-profile: ${{ secrets.AZURE_FUNCTIONAPP_PUBLISH_PROFILE }}

# For more samples to get started with GitHub Action workflows to deploy to Azure, refer to https://github.com/Azure/actions-workflow-samples
main ブランチに push 後、実際に GitHub Actions が動作しているか Actions タブから確認します。
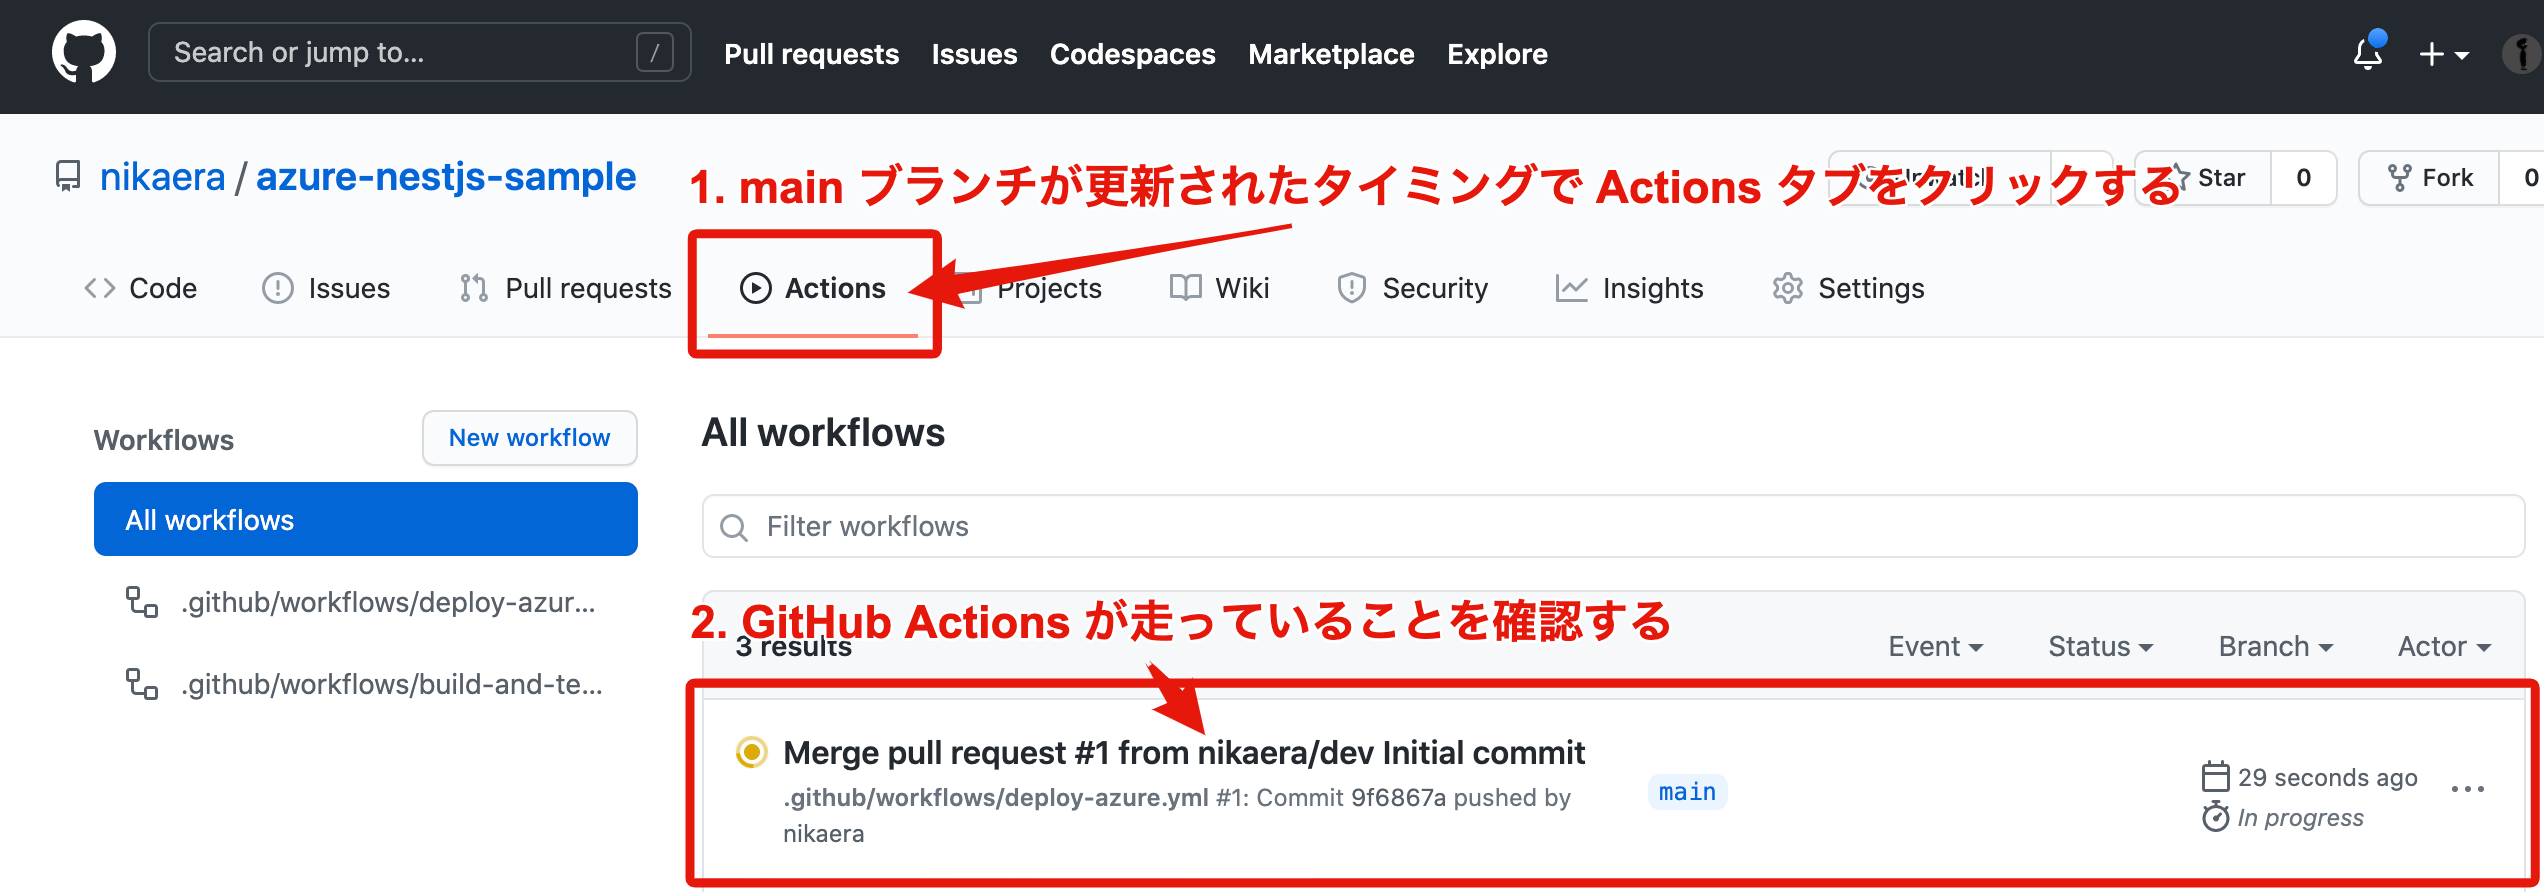
main ブランチが更新された後、GitHub Actions を確認する
関数アプリのアプリケーション設定に WEBSITE_RUN_FROM_PACKAGE が設定されていると、デプロイに失敗する時があります。失敗したらアプリケーション設定から WEBSITE_RUN_FROM_PACKAGE を削除して再度 GitHub Actions を実行してみてください。
最後にデプロイした先の API が正常に動作していそうか curl で確認してみます。デフォルトでは HTTP Trigger の authLevelは anonymouse になっているので URL 直打ちでアクセス可能です。
PlayFab の CloudScript から Azure Functions を実行する際の authLevel は function が推奨されています。また、CloudScript から Azure Functions を呼び出す際は必ず POST Method で HTTP リクエストされます。
# POST events でデータ登録出来るか確認してみる
curl -X POST -H "Content-Type: application/json" -d '{"name": "test-event"}' https://azure-nestjs-sample.azurewebsites.net/api/events

{"_id":"5f963d6d2867990052b9bac8","name":"test-event","__v":0}
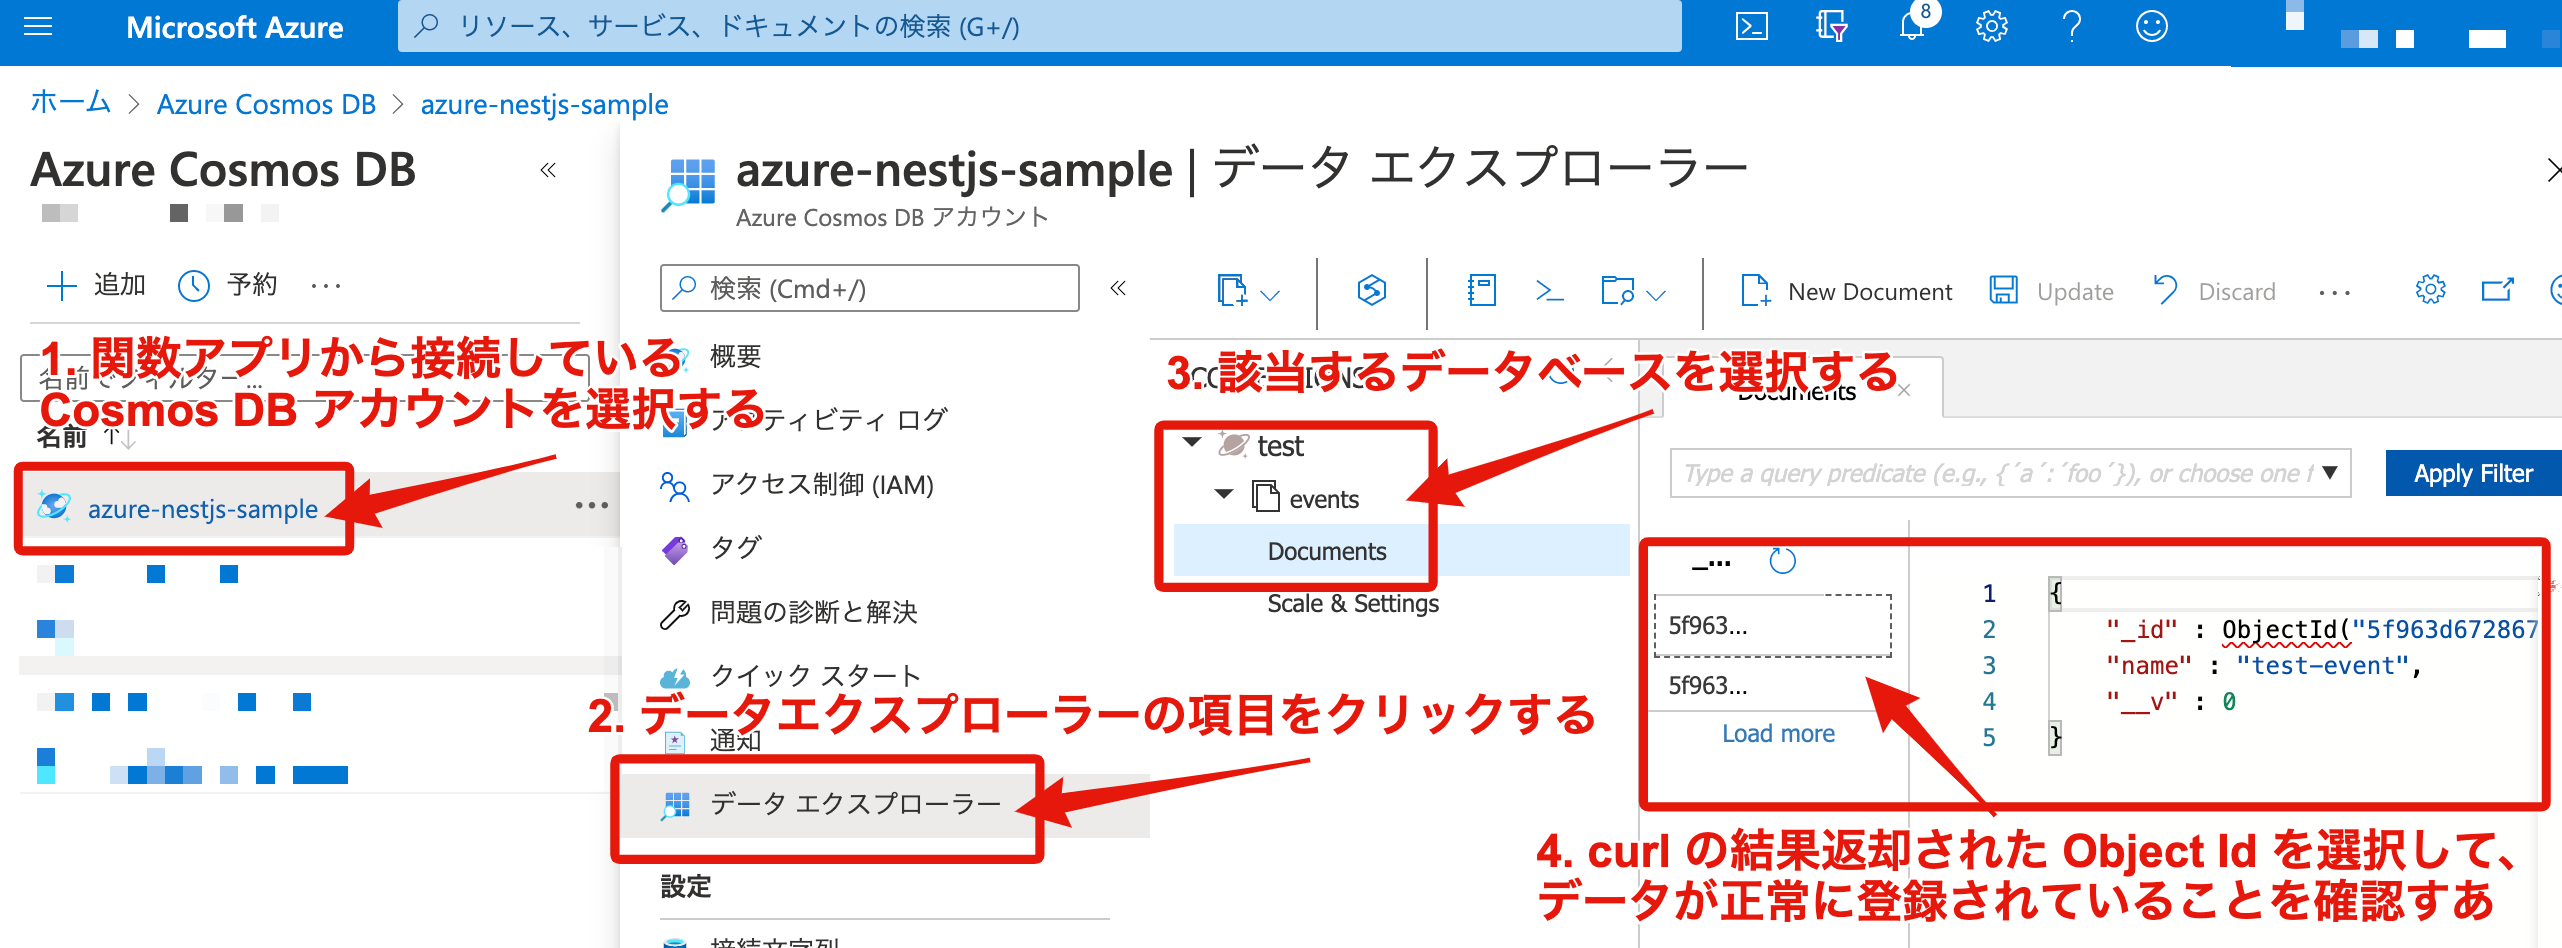
Azure Cosmos DB にデータが正常に登録されていることを確認する
無事にデータが登録されていることが確認出来れば OK です。
おわりに
今回は NestJS を用いて Azure Functions の開発手順についてまとめました。他にも Open API にも対応したのですが、どこかのタイミングでそれらの記事も追加したいと考えております。
Azure 関連のサービスも触るのは初めてだったのですが、ドキュメントを参照しながら進めれば、特に引っかかる箇所無く環境構築できました。
記事内容について、誤りや改善点等ございましたらご指摘頂けますと大変ありがたいです。
最後までお読みいただきありがとうございました。
参考リンク
- Documentation | NestJS - A progressive Node.js framework
- Azure Functions のドキュメント | Microsoft Docs
- Azure Cosmos DB の MongoDB 用 API の概要 | Microsoft Docs
- nestjs/azure-func-http: Azure Functions HTTP adapter for Nest framework (node.js) 🌥
- nestjs/typeorm: TypeORM module for Nest framework (node.js) 🍇
- MongoDB | NestJS - A progressive Node.js framework
- Azure Portal で初めての関数を作成する | Microsoft Docs
- Key Vault 参照を使用する - Azure App Service | Microsoft Docs
- actions-workflow-samples/linux-node.js-functionapp-on-azure.yml at master · Azure/actions-workflow-samples
- OpenAPI (Swagger) | NestJS - A progressive Node.js framework
