はじめに
この記事はdbt Advent Calendar 202414日目の記事になります。
弊社では2024年5月に、DWH環境にdbt-coreを導入して、AWSの環境で運用しています。
同じようなシチュエーションでdbt-core環境を構築したい方向けに私が行った方法を記載しようと思います。参考になれば幸いです。
9割方CloudFormation テンプレート形式でコードを保存していますので、少しの手作業ですぐ環境構築ができます。
構築用のリポジトリは以下になります。forkして進めていってください。
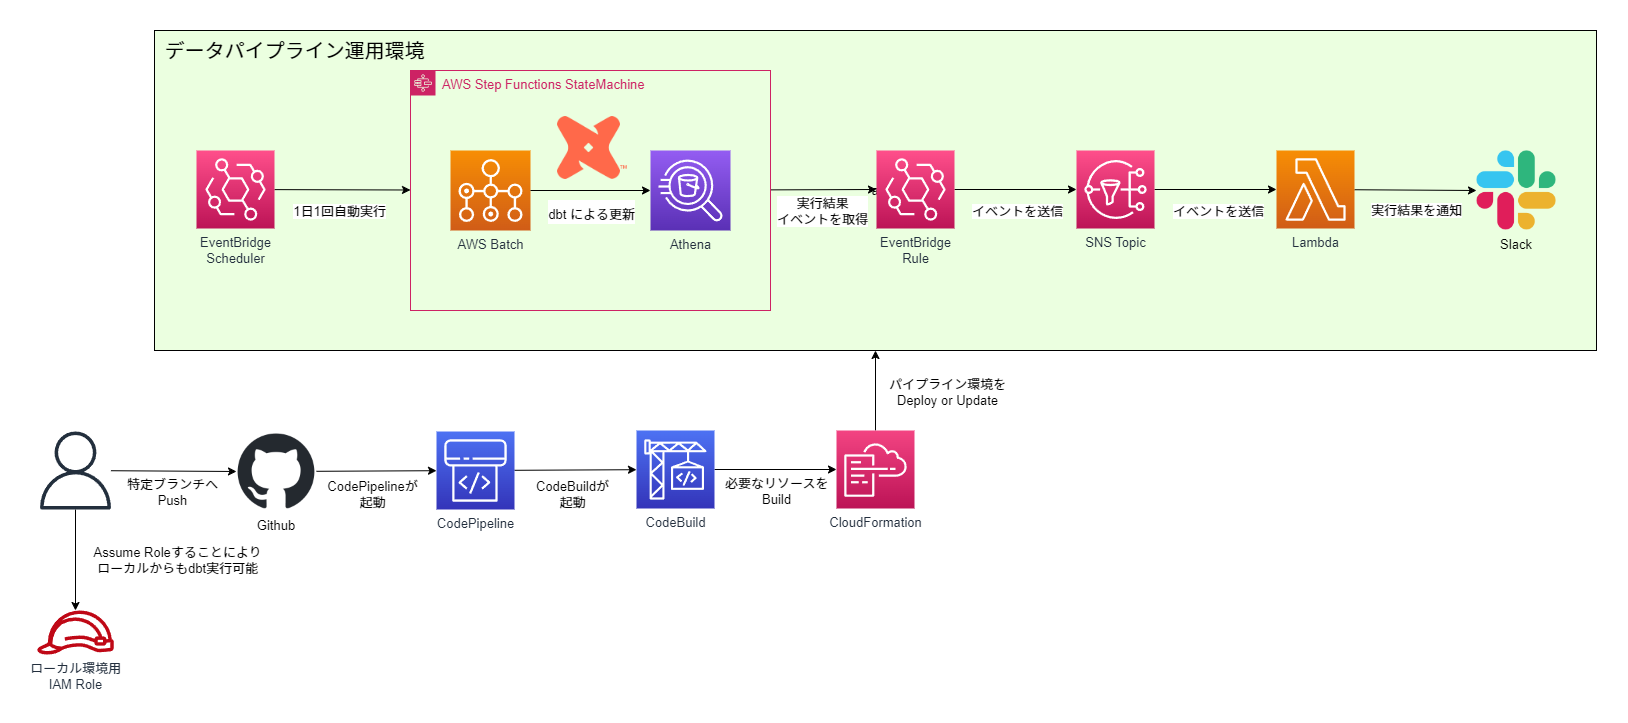
全体構成
- dbt-coreを用いてテーブルを更新する先はAthenaです。dbt-athenaとdbt-coreを一緒に使います
- 1日1回のバッチ処理の更新を想定しています
- ソースコードの管理はGithubで行います
- 実行結果がSlackに通知されます
- ローカルからもdbtが実行可能なRoleを用意しています(これによる操作範囲はお好みで)
ライブラリ詳細
パッケージ管理ライブラリ、ryeを使っています。
Pythonバージョンは3.11.4で行いました。
dbt-athena-community==1.8.4
dbt-core==1.8.7 (dbt-athena-community 1.8.4を入れたら自動で入ります)
dbt-osmosis==0.13.2
isort==5.13.2
black==24.10.0
pre-commit==4.0.1
jinja2==3.1.4
ryeとリポジトリの環境は以下でインストールします。
$ curl -sSf https://rye.astral.sh/get | RYE_NO_AUTO_INSTALL=1 RYE_INSTALL_OPTION="--yes" bash
$ . "$HOME/.rye/env"
$ rye --version
$ rye sync
環境構築
ではさっそく初めて行きます。
dbt設定
今回はAWSサンプルデータベースのTickitを使い、dbtを使ったデータパイプライン環境を構築します。
dbtの細かい内容についてはdbt Advent Calendarの他の方の記事で沢山上がると思いますので、こちらではサクッと進めていきます。
7つのテーブルから成るデータ群のサンプルです。データはここからダウンロード可能です。
dbtのseed機能を使ってダウンロードしたデータのテーブルを作っていきます。
seedsフォルダの下に.csvファイルを置き、dbt seedするとテーブルを作ってくれます。
ダウンロードしたデータは最初.txtなので、csvに書き換えておきます。
このように配置します。
└── tickit
    ├── seeds
    │   ├── allevents_pipe.csv
    │   ├── allusers_pipe.csv
    │   ├── category_pipe.csv
    │   ├── date2008_pipe.csv
    │   ├── listings_pipe.csv
    │   ├── properties.yml
    │   ├── sales_tab.csv
    │   └── venue_pipe.csv
それぞれのデータには、1行目にカラムがありません。以下をコピーして1行目に張り付けてください。
eventid|venueid|catid|dateid|eventname|starttime
userid|username|firstname|lastname|city|state|email|phone|likesports|liketheatre|likeconcerts|likejazz|likeclassical|likeopera|likerock|likevegas|likebroadway|likemusicals
catid|catgroup|catname|catdesc
dateid|caldate|day|week|month|qtr|year|holiday
listid|sellerid|eventid|dateid|numtickets|priceperticket|totalprice|listtime
salesid listid sellerid buyerid eventid dateid qtysold pricepaid commission saletime
venueid|venuename|venuecity|venuestate|venueseats
ファイルそれぞれのdelimiterやquote、カラムの型について設定する必要がありますが、設定済みです。
version: 2

seeds:
  - name: allevents_pipe
    config:
      delimiter: "|"
  - name: allusers_pipe
    config:
      delimiter: "|"
  - name: category_pipe
    config:
      delimiter: "|"
  - name: date2008_pipe
    config:
      delimiter: "|"
  - name: listings_pipe
    config:
      delimiter: "|"
      column_types:
        totalprice: decimal(8,2)
        priceperticket: decimal(8,2)
  - name: sales_tab
    config:
      delimiter: "\t"
  - name: venue_pipe
    config:
      delimiter: "|"
# 一部抜粋
seeds:
  +quote_columns: false
dbt seedは実行せず、次に進みます。
profiles.ymlは以下のようになっています。特に弄る必要はありません。
tickit:
  outputs:
    prod:
      database: awsdatacatalog # AthenaのCatalog
      region_name: ap-northeast-1
      s3_data_dir: "s3://{{ env_var('DBT_TABLE_RESOURCE_S3_BUCKET') }}"
      s3_staging_dir: "s3://{{ env_var('QUERY_OUTPUT_S3_BUCKET') }}"
      schema: tickit # AthenaのDatabase
      threads: 3 # 並列処理数。大きすぎるとAthenaのリソースが枯渇するので注意
      type: athena # Athenaを使う場合は"athena"
      work_group: dbt # Athenaのworkgroup
      num_retries: 0 # 実行失敗時のリトライ回数
      num_boto3_retries: 1 # boto3絡みの失敗によるリトライ回数
      aws_profile_name: "{{ env_var('AWS_PROFILE_NAME') }}" # dbt実行のaws cli profile
  target: prod
profiles.ymlは、デフォルトではホームディレクトリに置かれるので、リポジトリの.dbt/profiles.ymlに置き、direnvでDBT_PROFILES_DIRの環境変数を書き換えて、.dbt/profiles.ymlの設定を読むようにしています。direnvの設定は後程説明します。
dbt_project.ymlの設定は以下です。
こちらも特に弄らずで大丈夫です。
name: 'tickit'
version: '1.0.0'
profile: 'tickit'

model-paths: ["tickit/models"]
analysis-paths: ["tickit/analyses"]
test-paths: ["tickit/tests"]
seed-paths: ["tickit/seeds"]
macro-paths: ["tickit/macros"]
snapshot-paths: ["tickit/snapshots"]

clean-targets:         # directories to be removed by `dbt clean`
  - "target"
  - "dbt_packages"

in the individual model
# files using the `{{ config(...) }}` macro.
models:
  tickit:
    +dbt-osmosis: "_{model}.yml"
    # Config indicated by + and applies to all files under models/example/
    staging:
      +materialized: view
      +schema: staging
    marts:
      +materialized: table
      +schema: marts
      +ha: true
      +format: parquet
      +write_compression: snappy
      +table_type: hive
seeds:
  +quote_columns: false
tickitフォルダを作って、その下に諸々入れています。
また、各model毎に構成ファイルが作られるように設定しています。
stagingフォルダ下はview,marts下はtableで実行されるようにしています。
構成はdbt Best practice guidesを参考にしました。
└── tickit
    ├── analyses
    ├── macros
    ├── models
    │   ├── marts
    │   │   ├── _active_user.yml
    │   │   ├── _sales.yml
    │   │   ├── active_user.sql
    │   │   └── sales.sql
    │   └── staging
    │       └── tickit
    │           ├── _stg_tickit__category.yml
    │           ├── _stg_tickit__date.yml
    │           ├── _stg_tickit__event.yml
    │           ├── _stg_tickit__listing.yml
    │           ├── _stg_tickit__sales.yml
    │           ├── _stg_tickit__users.yml
    │           ├── _stg_tickit__venue.yml
    │           ├── stg_tickit__category.sql
    │           ├── stg_tickit__date.sql
    │           ├── stg_tickit__event.sql
    │           ├── stg_tickit__listing.sql
    │           ├── stg_tickit__sales.sql
    │           ├── stg_tickit__users.sql
    │           └── stg_tickit__venue.sql
    ├── seeds
    │   ├── allevents_pipe.csv
    │   ├── allusers_pipe.csv
    │   ├── category_pipe.csv
    │   ├── date2008_pipe.csv
    │   ├── listings_pipe.csv
    │   ├── properties.yml
    │   ├── sales_tab.csv
    │   └── venue_pipe.csv
    ├── snapshots
    └── tests
一部紹介すると、
--
SELECT
    userid as user_id
    , username as user_name
    , firstname as first_name
    , lastname as last_name
    , (firstname || lastname) as full_name
    , city
    , state
    , email
    , phone as phone_number
    , likesports as like_sports
    , liketheatre as like_theatre
    , likeconcerts as like_concerts
    , likejazz as like_jazz
    , likeclassical as like_classical
    , likeopera as like_opera
    , likerock as like_rock
    , likevegas as like_vegas
    , likebroadway as like_broadway
    , likemusicals as like_musicals
FROM
    {{ source('tickit','users')}}
SELECT
    d.calendar_date
    , COUNT(distinct u.user_id) as user_count
FROM
    {{ ref('stg_tickit__sales') }} as s
INNER JOIN
    {{ ref('stg_tickit__users')}} as u
ON
    s.buyer_id = u.user_id
INNER JOIN
    {{ ref('stg_tickit__date') }} as d
ON
    s.date_id = d.date_id
GROUP BY
    1
こんなかんじです。
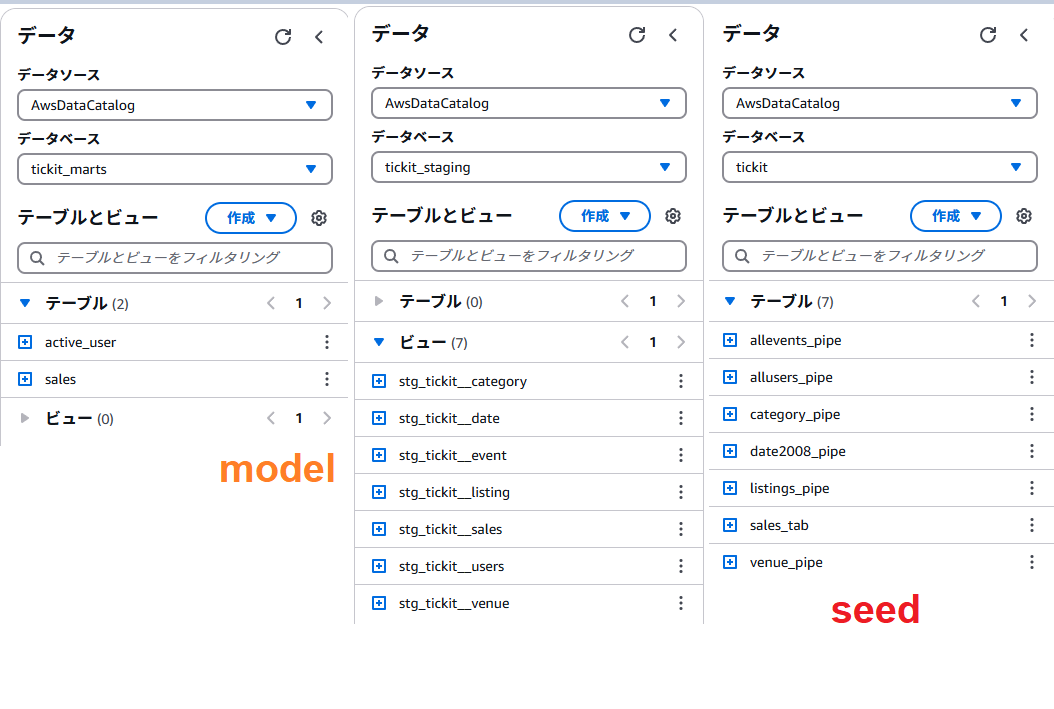
パイプラインの構築が完了すると、Athenaでは以下のようになります。(まだ実行しません)
AWSコンソール設定
次にAWSコンソールの設定です。これらはCloudFormationで作らないので、事前に手作業が必要です。
- ECSクラスターの作成
- S3バケットの作成
- Slack通知用Webhook URLを入れるSecret Manager
- CodePipelineとGithubの連携設定
- CloudFormationとパイプライン実行用 IAM ポリシー作成
ECSクラスターの作成
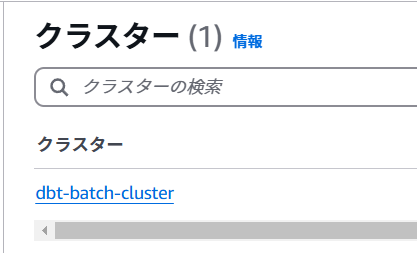
ECSサービスの画面へ行きクラスターの作成を行います。AWS Fargateのものが既にある場合は作らなくて大丈夫です。

適当な名前を入れて作成します。
完成したらOKです。たまに初回は失敗するみたいです。
S3バケットの作成
運用環境構築のためにバージョニングが有効になっているS3バケットが必要ですので、1つ作成します。
バケット名を控えておいてください。

Slack通知の準備
Slackチャンネルの右上参加人数アイコンをクリックすると上記画像がでてきます。インテグレーションから「アプリを追加する」を選択します。
Incoming Webhooksを選択します。
Incoming Webhookは現在非推奨であり、なくなる可能性があります。
Please note, this is a legacy custom integration - an outdated way for teams to integrate with Slack. These integrations lack newer features and they will be deprecated and possibly removed in the future. We do not recommend their use. Instead, we suggest that you check out their replacement: Slack apps.
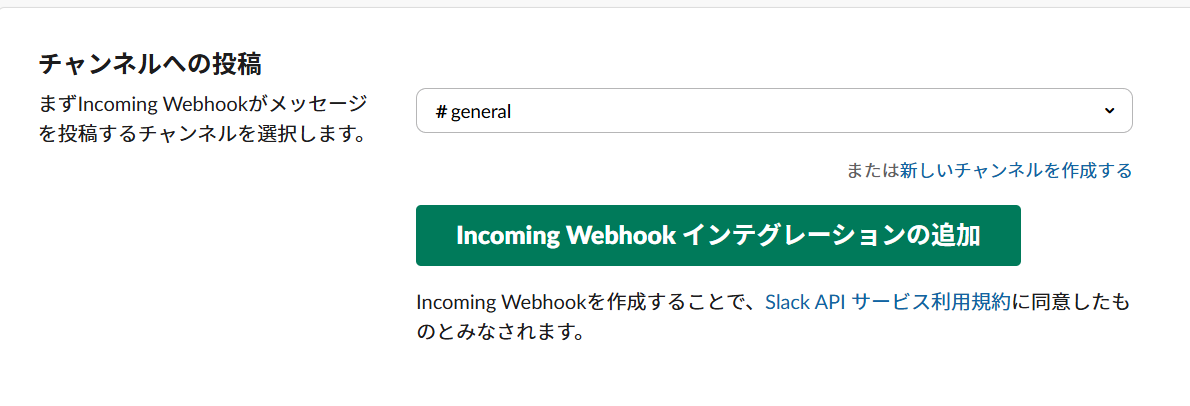
画面がブラウザに飛ぶので、「追加」ボタンを選択し、チャンネルを選択、「Incoming Webhook インテグレーションの追加」を押します。
Webhook URLが表示されますので、これをSecrets Managerに登録します。
この時ですが、シークレットキーはチャンネル名にしてください。
また、secretの名前を控えておきます。(画像の場合はslack-webhook-url)
CodePipelineとGithubとの接続設定
Githubの特定ブランチがPushされた時、CodePipelineが起動するようにします。
コンソールCodePipeline画面の設定→接続を設定から作ります。
基本指示に従っていけば接続の設定は特に苦戦せず作れるはずです。
次にパイプラインを作ります。
Build custom pipelineを選択します。
パイプラインの設定でパイプライン名を入れて、実行モードキューで進みます。
サービスロールは「新しいサービスロール」でロール名なしにしてサービスロール名の入力にチェックを入れれば、
AWSCodePipelineServiceRole-{$Region}-{$PipelineName}でロールが作られます。
ソースステージの設定です。
- 「ソースプロバイダー」でGithub(バージョン2)
- 「接続」で作成した接続を選択
- 「リポジトリ名」はdbt-athena-community-aws-resources(一覧で出てきます)
- 「デフォルトブランチ」はmain
- 「トリガー」はフィルタを指定し、「プッシュ時」を選択し、「ブランチ」にmainを書く
これでdbt-athena-community-aws-resourcesのmainブランチがプッシュされた時、このCodePipelineが起動するようになります。
ビルドステージを作ります。
Other build providersを選択して、「AWS CodeBuild」を選択します。
プロジェクト名の「プロジェクトを作成する」から新しいプロジェクトを作成します。別窓が開きます。
オペレーティングシステムをUbuntuにします。
追加設定の環境変数でAWS_ACCOUNT_ID : 自分のAWSアカウントIDを入れておきます
こちらもサービスロールは自動で作られます。この後、この作られたロールにこれらポリシーをアタッチします。
Buildspecは「buildspecファイルを使用する」でbuildspec.ymlと入れてください

そのままCodePipelineに進むを押して作成を完了してください。「ビルドステージを追加する」に戻りますので、そのまま「次に」を押します。
デプロイステージを追加するは「導入段階をスキップ」で進みます。
最後レビューで「パイプラインを作成する」で作成完了です!
CodeBuild_IAMポリシー設定
Codebuildで用いるロールのポリシーについては、リソースで作ることができないので事前に作成しておきます。
CodeBuildのサービスロールのポリシーは以下のようになっています。
作るのは画像の下2つです。
作ったら先ほど作ったCodeBuildのサービスロールにつけてください。
AmazonEC2ContainerRegistoryFullAccess
AWS Batchで使うコンテナイメージをECRにPush、リポジトリを作成するために必要です。
AWSCloudFormationFullAccess
CloudFormationをCodebuild上でdeployするのに必要です。
CodeBuildBasePolicy-dbt-athena~~~~(略)
これはCodeBuildプロジェクト作成時に自動で作られます
dbt-athena-community-resource-cfn-passrole
CodeBuildからCloudFormationを実行する際に必要です。
role/に続く名前は控えておいてください。
{
    "Version": "2012-10-17",
    "Statement": [
        {
            "Effect": "Allow",
            "Action": "iam:PassRole",
            "Resource": "arn:aws:iam::xxxxxxxxxxxx:role/cloudformation-dbt-athena-community-resources-service-role"
        }
    ]
}
s3-nijipro-dbt-resources-full-access
CloudFormation Deployの為に必要なリソースをS3に置きますので、それのアクセスポリシーです。
resourceのバケット名は最初に作ったバージョニング有のバケットにしてください
{
    "Version": "2012-10-17",
    "Statement": [
        {
            "Sid": "Statement1",
            "Effect": "Allow",
            "Action": [
                "s3:*"
            ],
            "Resource": [
                "arn:aws:s3:::nijipro-dbt-resources",
                "arn:aws:s3:::nijipro-dbt-resources/*"
            ]
        }
    ]
}
CloudFormation_IAMロール&ポリシー設定
dbt-athena-community-resource-cfn-passroleの時に記入した名前でロールを作ります。
ロールの信頼ポリシーはcloudformation.amazonaws.comにsts:AssumeRoleを許可しています。
{
    "Version": "2012-10-17",
    "Statement": [
        {
            "Sid": "Statement1",
            "Effect": "Allow",
            "Principal": {
                "Service": "cloudformation.amazonaws.com"
            },
            "Action": "sts:AssumeRole"
        }
    ]
}
cfn-nijipro-dbt-resources-create
CloudFormationによるリソース作成やロールバックに必要なアクションが含まれています。
リソースが作成された後のそれらリソースにもこのポリシーを付けていますので、実行系のアクションも含まれています。
ロールの名前は控えておいてください
ポリシー内容です。
{
    "Version": "2012-10-17",
    "Statement": [
        {
            "Effect": "Allow",
            "Action": [
                "ecr:GetRepositoryPolicy",
                "ecr:ListImages",
                "ecr:BatchGetImage",
                "ecr:GetLifecyclePolicy",
                "ecr:GetLifecyclePolicyPreview",
                "ecr:ListTagsForResource",
                "ecr:DescribeImageScanFindings",
                "ecr:GetAuthorizationToken",
                "ecr:BatchCheckLayerAvailability",
                "ecr:GetDownloadUrlForLayer",
                "ecr:DescribeRepositories",
                "ecr:DescribeImages",
                "ecs:DeleteCluster",
                "ecs:CreateCluster",
                "ecs:DescribeClusters",
                "ecs:ListClusters",
                "ecs:TagResource",
                "ecs:UntagResource",
                "ecs:UpdateCluster",
                "ecs:DescribeContainerInstances",
                "ecs:DescribeTaskDefinition",
                "ecs:DescribeTasks",
                "ecs:ListAccountSettings",
                "ecs:ListContainerInstances",
                "ecs:ListTaskDefinitionFamilies",
                "ecs:ListTaskDefinitions",
                "ecs:ListTasks",
                "ecs:RegisterTaskDefinition",
                "ecs:DeregisterTaskDefinition",
                "ecs:RunTask",
                "ecs:StartTask",
                "ecs:StopTask",
                "ecs:UpdateContainerAgent",
                "ecs:DeregisterContainerInstance",
                "iam:CreateRole",
                "iam:PutRolePolicy",
                "iam:AttachRolePolicy",
                "iam:UpdateAssumeRolePolicy",
                "iam:CreatePolicy",
                "iam:CreatePolicyVersion",
                "iam:DetachRolePolicy",
                "iam:DeleteRole",
                "iam:DeletePolicyVersion",
                "iam:GetRole",
                "iam:GetPolicy",
                "iam:GetPolicyVersion",
                "iam:PassRole",
                "iam:ListPolicyVersions",
                "iam:DeletePolicy",
                "iam:SetDefaultPolicyVersion",
                "iam:GetInstanceProfile",
                "lambda:GetFunction",
                "lambda:GetLayerVersion",
                "lambda:GetPolicy",
                "lambda:ListFunctions",
                "lambda:ListLayers",
                "lambda:CreateFunction",
                "lambda:InvokeFunction",
                "lambda:CreateFunctionUrlConfig",
                "lambda:DeleteFunction",
                "lambda:DeleteLayerVersion",
                "lambda:DeleteFunctionUrlConfig",
                "lambda:UpdateFunctionCode",
                "lambda:UpdateFunctionConfiguration",
                "lambda:PublishVersion",
                "lambda:AddPermission",
                "lambda:RemovePermission",
                "athena:CreateWorkGroup",
                "athena:GetWorkGroup",
                "athena:DeleteWorkGroup",
                "ec2:CreateVpc",
                "ec2:ModifyVpcAttribute",
                "ec2:DeleteVpc",
                "ec2:CreateSubnet",
                "ec2:DeleteSubnet",
                "ec2:CreateInternetGateway",
                "ec2:AttachInternetGateway",
                "ec2:DetachInternetGateway",
                "ec2:DeleteInternetGateway",
                "ec2:DescribeVpcs",
                "ec2:DescribeInternetGateways",
                "ec2:DescribeSecurityGroups",
                "ec2:DescribeRouteTables",
                "ec2:DescribeNetworkAcls",
                "ec2:DescribeSubnets",
                "ec2:CreateSecurityGroup",
                "ec2:DeleteSecurityGroup",
                "ec2:AuthorizeSecurityGroupIngress",
                "ec2:AuthorizeSecurityGroupEgress",
                "ec2:RevokeSecurityGroupIngress",
                "ec2:RevokeSecurityGroupEgress",
                "ec2:CreateRouteTable",
                "ec2:DeleteRouteTable",
                "ec2:AssociateRouteTable",
                "ec2:DisassociateRouteTable",
                "ec2:CreateRoute",
                "ec2:DeleteRoute",
                "ec2:ReplaceRoute",
                "ec2:ReplaceRouteTableAssociation",
                "ec2:CreateNatGateway",
                "ec2:DeleteNatGateway",
                "ec2:DescribeNatGateways",
                "ec2:CreateNetworkAcl",
                "ec2:DeleteNetworkAcl",
                "ec2:CreateNetworkAclEntry",
                "ec2:DeleteNetworkAclEntry",
                "ec2:ReplaceNetworkAclEntry",
                "ec2:ReplaceNetworkAclAssociation",
                "ec2:CreateVpcPeeringConnection",
                "ec2:AcceptVpcPeeringConnection",
                "ec2:DeleteVpcPeeringConnection",
                "ec2:DescribeVpcPeeringConnections",
                "ec2:CreateVpnConnection",
                "ec2:DeleteVpnConnection",
                "ec2:DescribeVpnConnections",
                "ec2:CreateCustomerGateway",
                "ec2:DeleteCustomerGateway",
                "ec2:DescribeCustomerGateways",
                "ec2:CreateDhcpOptions",
                "ec2:DeleteDhcpOptions",
                "ec2:AssociateDhcpOptions",
                "ec2:DescribeDhcpOptions",
                "ec2:CreateNetworkInterface",
                "ec2:DeleteNetworkInterface",
                "ec2:DescribeNetworkInterfaces",
                "ec2:DescribeAvailabilityZones",
                "ec2:CreateTags",
                "batch:CreateComputeEnvironment",
                "batch:UpdateComputeEnvironment",
                "batch:DeleteComputeEnvironment",
                "batch:RegisterJobDefinition",
                "batch:DeregisterJobDefinition",
                "batch:SubmitJob",
                "batch:CreateJobQueue",
                "batch:UpdateJobQueue",
                "batch:DeleteJobQueue",
                "batch:TagResource",
                "batch:UntagResource",
                "batch:DescribeJobs",
                "batch:DescribeJobQueues",
                "batch:DescribeJobDefinitions",
                "batch:DescribeComputeEnvironments",
                "states:CreateStateMachine",
                "states:UpdateStateMachine",
                "states:DeleteStateMachine",
                "states:TagResource",
                "states:DescribeExecution",
                "states:DescribeStateMachine",
                "states:DescribeStateMachineForExecution",
                "states:StartExecution",
                "states:GetExecutionHistory",
                "states:StartSyncExecution",
                "states:StopExecution",
                "scheduler:CreateSchedule",
                "scheduler:UpdateSchedule",
                "scheduler:DeleteSchedule",
                "scheduler:GetSchedule",
                "scheduler:ListSchedules",
                "scheduler:TagResource",
                "scheduler:UntagResource",
                "events:PutRule",
                "events:DeleteRule",
                "events:PutTargets",
                "events:RemoveTargets",
                "events:DescribeRule",
                "events:EnableRule",
                "events:DisableRule",
                "sns:CreateTopic",
                "sns:DeleteTopic",
                "sns:SetTopicAttributes",
                "sns:GetTopicAttributes",
                "sns:Subscribe",
                "sns:AddPermission",
                "sns:RemovePermission",
                "sns:Unsubscribe",
                "s3:ListBucket",
                "s3:Put*",
                "s3:Get*",
                "s3:Delete*",
                "logs:DescribeLogGroups",
                "logs:PutLogEvents",
                "logs:CreateLogStream",
                "logs:CreateLogGroup"
            ],
            "Resource": "*"
        }
    ]
}
役割はそれぞれこんなかんじです。
| アクション | 用途 |
|---|---|
| ecr | Batchによるコンテナイメージ取得 |
| ecs | Fargateを用いたBatchのタスク実行関連 |
| iam | ロールやポリシー作成削除 |
| lambda | 関数作成や実行 |
| athena | ワークグループの作成削除 |
| ec2 | BatchのVPC環境設定 |
| batch | Batch queue,definition,computing env作成やSubmit |
| states | StepFunctions ステートマシン作成削除、実行 |
| scheduler | schedulerの作成削除、実行 |
| events | Ruleの作成、イベントの送信 |
| sns | トピックの作成削除、Permissionの設定 |
| s3 | リソースの取得や書き込み |
| logs | loggroupの作成、ログの書き込み |
これでコンソール上の設定は完了です!
リポジトリ設定
リポジトリで必要な設定です。
.envrc設定
各リソースは環境変数から必要な値を参照して、作るようにしています。
direnvを使って.envrcの環境変数をリポジトリ操作時に使えるようにします。
.envrcの定数へ文字列を入れれば、direnvとjinja2を通じて各リソースに適用されます。
#!/bin/bash

REPOSITORY_DIR="$(pwd)"
export REPOSITORY_DIR

DBT_PROFILES_DIR="$(pwd)/.dbt"
export DBT_PROFILES_DIR

DBT_TABLE_RESOURCE_S3_BUCKET="nijigen-plot-dbt-tables"
export DBT_TABLE_RESOURCE_S3_BUCKET

QUERY_OUTPUT_S3_BUCKET="nijipro-query-results"
export QUERY_OUTPUT_S3_BUCKET

DATA_PIPELINE_RESOURCE_S3_BUCKET="nijipro-dbt-resources"
export DATA_PIPELINE_RESOURCE_S3_BUCKET

AWS_PROFILE_NAME="dbt-local"
export AWS_PROFILE_NAME

SLACK_WEBHOOK_URL_SECRETS_NAME="secretmanager-read-slack-webhook-url"
export SLACK_WEBHOOK_URL_SECRETS_NAME

SLACK_WEBHOOK_URL_CHANNEL_NAME="general"
export SLACK_WEBHOOK_URL_CHANNEL_NAME

CLOUDFORMATION_POLICY_NAME="cfn-nijipro-dbt-resources-create"
export CLOUDFORMATION_POLICY_NAME

CLOUDFORMATION_ROLE_NAME="cloudformation-dbt-athena-community-resources-service-role"
export CLOUDFORMATION_ROLE_NAME

LOCAL_DEV_ASSUME_ROLE_BEARER_USER_NAME="nijipro"
export LOCAL_DEV_ASSUME_ROLE_BEARER_USER_NAME

LOCAL_DEV_ROLE_NAME="LocalDevelopmentAssumeRole"
export LOCAL_DEV_ROLE_NAME
| 定数 | 用途 |
|---|---|
| REPOSITORY_DIR | リポジトリの絶対パス |
| DIR_PROFILES_DIR | dbt profiles.yml の参照先パス |
| DBT_TABLE_RESOURCE_S3_BUCKET | dbtによるAthenaテーブル作成のS3 Locationバケット |
| QUERY_OUTPUT_S3_BUCKET | クエリ実行結果保存先バケット |
| DATA_PIPELINE_RESOURCE_S3_BUCKET | データパイプライン環境構築のためのリソースバケット。S3バケットの作成でバージョニングを有効にして作ったもの |
| AWS_PROFILE_NAME | ローカル開発用のAWSプロファイル名 このままでもOK |
| SLACK_WEBHOOK_URL_SECRETS_NAME | 作成したSlack Webhook URLのSecrets Manager名 |
| SLACK_WEBHOOK_URL_CHANNEL_NAME | 作成したSlack Webhook URLのSecrets Managerのチャンネル名 |
| CLOUDFORMATION_POLICY_NAME | 先ほど作成したCloudFormation用ロールにアタッチするポリシー名 |
| CLOUDFORMATION_ROLE_NAME | 先ほど作成したCloudFormationにアタッチするロール名 |
| LOCAL_DEV_ASSUME_ROLE_BEARER_USER_NAME | ローカル開発用ロールをAssume RoleするAWS User名 |
| LOCAL_DEV_ROLE_NAME | Assume Roleさせるロール名 このままでもOK |
最後にdirenvをインストールして、適用します。
# direnvインストールと適用
$ curl -sfL https://direnv.net/install.sh | bash
$ eval "$(direnv hook bash)"
$ direnv allow
設定が完了したら、rye run python ./script/jinja_render.pyを実行しコミットして、mainにプッシュしましょう!
動作状況チェック
CodePipelineが起動し、CloudFormationからリソースが作成されます。
ローカル開発用ロールをAssume RoleするAWS User名でaws cliが実行できるようにしておき、$ bash ./script/dbt-local-assume-role.shを実行すると、ローカル開発用のAWSプロファイル名でセッションが作られ、ローカル環境からdbt seed,dbt run等のコマンドが実行できるようになります!
さっそくdbt seedしてみます。
$ bash ./script/dbt-local-assume-role.sh
quarkgabber@DESKTOP-AAUG4GU ~/Repositories/dbt-athena-community-aws-resources (main $)
$ rye run dbt seed
16:06:29  Running with dbt=1.8.7
16:06:29  Registered adapter: athena=1.8.4
16:06:30  Found 9 models, 7 seeds, 3 data tests, 455 macros
16:06:30
16:06:32  Concurrency: 3 threads (target='prod')
16:06:32
16:06:32  1 of 7 START seed file tickit.allevents_pipe ................................... [RUN]
16:06:32  2 of 7 START seed file tickit.allusers_pipe .................................... [RUN]
16:06:32  3 of 7 START seed file tickit.category_pipe .................................... [RUN]
 16:06:51  2 of 7 OK loaded seed file tickit.allusers_pipe ................................ [INSERT 49990 in 18.59s]
16:06:51  4 of 7 START seed file tickit.date2008_pipe .................................... [RUN]
16:06:51  3 of 7 OK loaded seed file tickit.category_pipe ................................ [INSERT 11 in 18.63s]
16:06:51  5 of 7 START seed file tickit.listings_pipe .................................... [RUN]
16:06:52  1 of 7 OK loaded seed file tickit.allevents_pipe ............................... [INSERT 8798 in 20.10s]
16:06:52  6 of 7 START seed file tickit.sales_tab ........................................ [RUN]
16:07:32  6 of 7 OK loaded seed file tickit.sales_tab .................................... [INSERT 172462 in 40.28s]
16:07:32  7 of 7 START seed file tickit.venue_pipe ....................................... [RUN]
16:07:33  4 of 7 OK loaded seed file tickit.date2008_pipe ................................ [INSERT 365 in 42.33s]
16:07:46  5 of 7 OK loaded seed file tickit.listings_pipe ................................ [INSERT 192500 in 54.93s]
16:07:46  7 of 7 OK loaded seed file tickit.venue_pipe ................................... [INSERT 202 in 13.40s]
16:07:46
16:07:46  Finished running 7 seeds in 0 hours 1 minutes and 16.10 seconds (76.10s).
16:07:46
16:07:46  Completed successfully
16:07:46
16:07:46  Done. PASS=7 WARN=0 ERROR=0 SKIP=0 TOTAL=7
テーブルが作成されました。
毎朝日本時間の8時に、EventBridge SchedulerがStepFunctionsを実行し、dbtコマンド群が走ります
その後、結果がSNSとLambdaを介してSlackに通知されます。
全体構成で紹介した運用環境ができました!
リポジトリのmodelやseedを、実際に使うデータに書き換えればこのまま運用できます。
その他リポジトリ内容
これらは弄らなくても特に問題無い、動作状況チェックの裏側の説明です。
興味がない方は飛ばしても大丈夫です。
buildspec.j2.yml
version: 0.2

env:
  variables:
    data_pipeline_resource_s3_bucket: {{ data_pipeline_resource_s3_bucket }}
    cloudformation_role_name: {{ cloudformation_role_name }}
    dwh_stack_name: 'dbt-infrastructure'

phases:
  install:
    runtime-versions:
      python: 3.11.4
    commands:
      - python3 --version
      - sudo apt-get update
      # ryeを入れる
      - curl -sSf https://rye.astral.sh/get | RYE_NO_AUTO_INSTALL=1 RYE_INSTALL_OPTION="--yes" bash
      - . "$HOME/.rye/env"
      - rye --version
      - rye sync --no-dev --no-lock
  pre_build:
    commands:
      - aws --version
      # StepFunctions yamlファイルをS3へsync
      - aws s3 sync --exact-timestamps --delete aws/stepfunctions/ s3://$data_pipeline_resource_s3_bucket/stepfunctions/
      # Lambda lambda_function.pyをZip化し、S3へsync
      - bash script/create_zip_files.sh
      # StepFunctions,Lambdaリソースの最新バージョンIDを取得
      - AWSServiceExecuteResultNotificationParam=$(aws s3api list-object-versions --bucket $data_pipeline_resource_s3_bucket --prefix lambda/aws_service_execute_result_notification.zip | jq -r '.Versions[0].VersionId')
      - DbtBatchParam=$(aws s3api list-object-versions --bucket $data_pipeline_resource_s3_bucket --prefix stepfunctions/dbt_batch.yml | jq -r '.Versions[0].VersionId')
  build:
    commands:
      - ORIGINAL_DIR=$(pwd)
      - echo "dbt Docker Image Build & Push"
      - echo $AWS_ACCOUNT_ID
      # Batch用イメージをPush
      - docker build -t dbt-batch .
      - >
        aws ecr get-login-password --region ap-northeast-1 |
        docker login --username AWS --password-stdin $AWS_ACCOUNT_ID.dkr.ecr.ap-northeast-1.amazonaws.com
      - docker tag dbt-batch:latest $AWS_ACCOUNT_ID.dkr.ecr.ap-northeast-1.amazonaws.com/dbt-batch:latest
      - docker push $AWS_ACCOUNT_ID.dkr.ecr.ap-northeast-1.amazonaws.com/dbt-batch:latest
      - cd $ORIGINAL_DIR
  post_build:
    commands:
      # CloudFormation スタックDeploy
      - echo deploy data pipeline infrastructure
      - aws cloudformation package --template-file aws/cloudformation/$dwh_stack_name.yml --s3-bucket $data_pipeline_resource_s3_bucket --s3-prefix cloudformation/package --output-template-file /tmp/$dwh_stack_name.yml --force-upload
      - |
        aws cloudformation deploy --no-fail-on-empty-changeset --template-file /tmp/$dwh_stack_name.yml --stack-name $dwh_stack_name --role-arn arn:aws:iam::$AWS_ACCOUNT_ID:role/$cloudformation_role_name --capabilities CAPABILITY_NAMED_IAM CAPABILITY_IAM \
        --parameter-overrides \
        "AWSServiceExecuteResultNotificationParam=$AWSServiceExecuteResultNotificationParam" \
        "DbtBatchParam=$DbtBatchParam" \
Lamdba,StepFunctionsのリソースは、S3のバージョニングを有効化して、バージョンIDを取得、それをAWS::StepFunctions::StateMachineのDefinitionS3LocationのVersionとAWS::Lambda::FunctionのS3ObjectVersionに反映します。
そうしないと、コードを変更してもリソースの変更が検知されず、修正の際コードの定義と実際の定義が違うくなるからです。
dbt_batch.j2.yml
dbt_batch.j2.ymlはStepFunctionsステートマシンの定義ファイルです。
dbt run → dbt docs generate(静的コンテンツも書き出す) →dbt testを行います。
Comment: dbt workflow with AWS Batch
StartAt: dbt run
States:
  dbt run:
    Type: Task
    Resource: arn:aws:states:::batch:submitJob.sync
    Parameters:
      JobName: dbt-run-daily
      ContainerOverrides:
        Command:
          - "/bin/bash"
          - "-c"
          - "source $HOME/.rye/env && rye run dbt run"
      JobQueue: dbt-batch-job-queue
      JobDefinition: dbt-batch-job-definition
    Next: dbt docs generate
    Catch:
      - ErrorEquals:
          - States.ALL
        Next: Fail
        ResultPath: $.Error
  dbt docs generate:
    Type: Task
    Resource: arn:aws:states:::batch:submitJob.sync
    Parameters:
      JobName: dbt-docs-generate
      ContainerOverrides:
        Command:
          - "/bin/bash"
          - "-c"
          - "source $HOME/.rye/env && rye run dbt docs generate && rye run python generate_static_html.py && aws s3 cp target/index2.html s3://{{ data_pipeline_resource_s3_bucket }}/docs.html"
      JobQueue: dbt-batch-job-queue
      JobDefinition: dbt-batch-job-definition
    Next: dbt test
    Catch:
      - ErrorEquals:
          - States.ALL
        Next: Fail
        ResultPath: $.Error
  dbt test:
    Type: Task
    Resource: arn:aws:states:::batch:submitJob.sync
    Parameters:
      JobName: dbt-test-daily
      ContainerOverrides:
        Command:
          - "/bin/bash"
          - "-c"
          - "source $HOME/.rye/env && rye run dbt test"
      JobQueue: dbt-batch-job-queue
      JobDefinition: dbt-batch-job-definition
    Next: Success
    Catch:
      - ErrorEquals:
          - States.ALL
        Next: Fail
        ResultPath: $.Error
  Success:
    Type: Succeed
  Fail:
    Type: Fail
    ErrorPath: $.Error
    CausePath: $.Error
静的コンテンツも書き出す
ですが、S3へdocsのhtmlファイルを公開して閲覧できるようにしています。
s3://{{ data_pipeline_resource_s3_bucket }}/docs.htmlに配置されます。
S3のバケットポリシーなどを利用して、社内用のドキュメントにできます!
lambda function
StepFunctionの実行結果を受け取りSlackへ通知する関数です。
その他、EventBridge RuleへAthenaやGlue Jobを追加することで、それらサービスでも通知することが可能です。
実行後はこんなかんじでSlackに通知が来ます。
dbt-infrastructure.j2.yml
CloudFormation テンプレートファイルです。
ファイル名をj2.ymlとしているのはcfn-lintが効かなくなるからです。
抜粋して解説しようと思います。全コードは以下です。
CFnで作られた各リソースにアタッチするロールです。
CFnにアタッチするポリシーを流用しています。信頼ポリシーを必要最小限にしています。
  DataPipeLineOperationRole:
    Type: AWS::IAM::Role
    DeletionPolicy: Delete
    UpdateReplacePolicy: Delete
    Properties:
      RoleName: DataPipeLineOperationRole
      AssumeRolePolicyDocument:
        Version: 2012-10-17
        Statement:
          - Effect: Allow
            Principal:
              Service:
                - states.amazonaws.com
                - scheduler.amazonaws.com
                - sns.amazonaws.com
                - glue.amazonaws.com
                - lambda.amazonaws.com
                - events.amazonaws.com
                - batch.amazonaws.com
                - ecs-tasks.amazonaws.com
            Action: sts:AssumeRole
      ManagedPolicyArns:
        - !Sub arn:${AWS::Partition}:iam::${AWS::AccountId}:policy/${CloudFormationPolicyName}
        - !Ref SlackWebhookURLSecrets
        - !Ref AthenaAccess
ローカル環境でdbtを実行するためのロールとポリシーです。
  LocalDevelopmentAssumeRole:
    Type: AWS::IAM::Role
    Properties:
      RoleName: !Sub ${LocalDevRoleName}
      AssumeRolePolicyDocument:
        Version: 2012-10-17
        Statement:
          - Effect: Allow
            Principal:
              AWS:
                - !Sub arn:${AWS::Partition}:iam::${AWS::AccountId}:user/${LocalDevAssumeRoleBearerUserName}
            Action: sts:AssumeRole
      ManagedPolicyArns:
        - !Ref AthenaAccess
  AthenaAccess:
    Type: AWS::IAM::ManagedPolicy
    DeletionPolicy: Delete
    UpdateReplacePolicy: Delete
    Properties:
      PolicyDocument:
        Version: 2012-10-17
        Statement:
          - Action:
              - s3:*
            Resource:
              - !Sub arn:${AWS::Partition}:s3:::${DbtTableResourceS3Bucket}
              - !Sub arn:${AWS::Partition}:s3:::${DbtTableResourceS3Bucket}/*
            Effect: Allow
          - Action:
              - s3:GetBucketLocation
              - s3:GetObject
              - s3:ListBucket
              - s3:ListBucketMultipartUploads
              - s3:ListMultipartUploadParts
              - s3:AbortMultipartUpload
              - s3:PutObject
              - s3:DeleteObject
            Resource:
              - !Sub arn:${AWS::Partition}:s3:::${QueryOutputS3Bucket}
              - !Sub arn:${AWS::Partition}:s3:::${QueryOutputS3Bucket}/*
            Effect: Allow
          - Action:
              - athena:StartQueryExecution
              - athena:GetQueryResults
              - athena:DeleteNamedQuery
              - athena:GetNamedQuery
              - athena:ListQueryExecutions
              - athena:StopQueryExecution
              - athena:GetQueryResultsStream
              - athena:ListNamedQueries
              - athena:CreateNamedQuery
              - athena:GetQueryExecution
              - athena:BatchGetNamedQuery
              - athena:BatchGetQueryExecution
              - athena:UpdateWorkGroup
              - athena:GetWorkGroup
              - athena:CreatePreparedStatement
              - athena:DeletePreparedStatement
              - athena:GetPreparedStatement
              - athena:UpdatePreparedStatement
            Resource:
              - !Sub arn:${AWS::Partition}:athena:ap-northeast-1:${AWS::AccountId}:workgroup/${AthenaDbtWorkgroup}
            Effect: Allow
          - Action:
              - glue:Get*
              - glue:Create*
              - glue:Delete*
              - glue:Describe*
              - glue:List*
              - glue:SearchTables
              - glue:Update*
            Resource:
              - !Sub arn:${AWS::Partition}:glue:ap-northeast-1:${AWS::AccountId}:catalog
              - !Sub arn:${AWS::Partition}:glue:ap-northeast-1:${AWS::AccountId}:database/*
              - !Sub arn:${AWS::Partition}:glue:ap-northeast-1:${AWS::AccountId}:table/*
            Effect: Allow
          - Action:
              - athena:GetDataCatalog
              - athena:GetDatabase
              - athena:GetTableMetadata
              - athena:ListDatabases
              - athena:ListTableMetadata
              - athena:UpdateDataCatalog
            Resource: !Sub arn:${AWS::Partition}:athena:ap-northeast-1:${AWS::AccountId}:datacatalog/*
            Effect: Allow
dbt-local-assume-role.sh
ローカル実行用Assume Role有効化スクリプトです。
実行すると、.envrcに記載したAssumeRoleするユーザー名に対して信頼ポリシーで許可され、profile.ymlのaws_profile_nameと同じprofile名のcredentialsができます。
#! /bin/bash

AWS_ACCOUNT_ID=$(aws sts get-caller-identity --query "Account" --output text)
ROLE_ARN="arn:aws:iam::$AWS_ACCOUNT_ID:role/$LOCAL_DEV_ROLE_NAME"
SESSION_NAME="$AWS_PROFILE_NAME"
PROFILE_NAME="$AWS_PROFILE_NAME"

CREDENTIALS=$(aws sts assume-role --role-arn "$ROLE_ARN" --role-session-name "$SESSION_NAME" )

ACCESS_KEY=$(echo "$CREDENTIALS" | jq -r '.Credentials.AccessKeyId')
SECRET_KEY=$(echo "$CREDENTIALS" | jq -r '.Credentials.SecretAccessKey')
SESSION_TOKEN=$(echo "$CREDENTIALS" | jq -r '.Credentials.SessionToken')

# ~/.aws/credentialsファイルに認証情報を追加または更新
aws configure set aws_access_key_id "$ACCESS_KEY" --profile "$PROFILE_NAME"
aws configure set aws_secret_access_key "$SECRET_KEY" --profile "$PROFILE_NAME"
aws configure set aws_session_token "$SESSION_TOKEN" --profile "$PROFILE_NAME"
aws configure set region ap-northeast-1 --profile "$PROFILE_NAME"
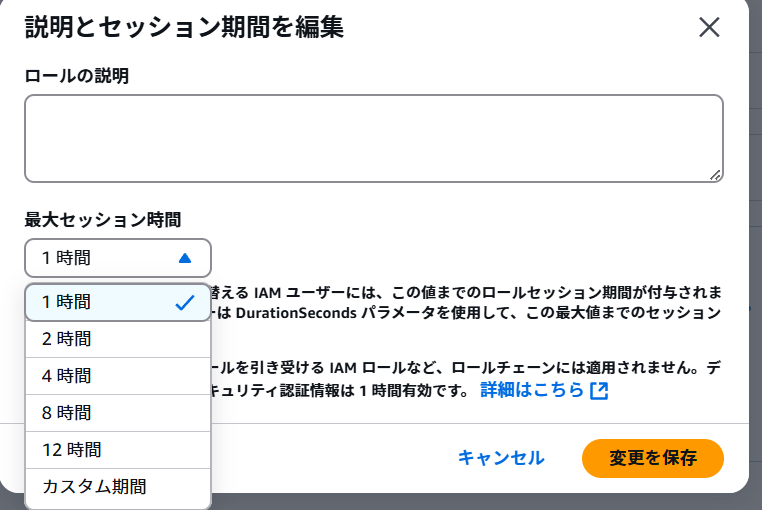
セッション時間はデフォルト1時間ですが、変更も可能です。
jinja_render.py
cloudformation,codebuildのjinja テンプレートファイルからレンダリングしてj2なしファイルに書き出します。
import os

from jinja2 import Environment, FileSystemLoader

env = Environment(loader=FileSystemLoader("."))

# cloudformation yaml template
cfn_template = env.get_template("./aws/cloudformation/dbt-infrastructure.j2.yml")
buildspec_template = env.get_template("./buildspec.j2.yml")
stepfunctions_template = env.get_template("./aws/stepfunctions/dbt_batch.j2.yml")

params = {
    "dbt_table_resource_s3_bucket": os.getenv("DBT_TABLE_RESOURCE_S3_BUCKET"),
    "query_output_s3_bucket": os.getenv("QUERY_OUTPUT_S3_BUCKET"),
    "data_pipeline_resource_s3_bucket": os.getenv("DATA_PIPELINE_RESOURCE_S3_BUCKET"),
    "slack_webhook_url_secrets_name": os.getenv("SLACK_WEBHOOK_URL_SECRETS_NAME"),
    "slack_webhook_url_channel_name": os.getenv("SLACK_WEBHOOK_URL_CHANNEL_NAME"),
    "cloudformation_policy_name": os.getenv("CLOUDFORMATION_POLICY_NAME"),
    "cloudformation_role_name": os.getenv("CLOUDFORMATION_ROLE_NAME"),
    "local_dev_assume_role_bearer_user_name": os.getenv(
        "LOCAL_DEV_ASSUME_ROLE_BEARER_USER_NAME"
    ),
    "local_dev_role_name": os.getenv("LOCAL_DEV_ROLE_NAME"),
}

with open(
    f'{os.getenv("REPOSITORY_DIR", os.path.expanduser("."))}/aws/cloudformation/dbt-infrastructure.yml',
    "w",
) as file:
    file.write(cfn_template.render(params) + "\n")
with open(
    f'{os.getenv("REPOSITORY_DIR", os.path.expanduser("."))}/buildspec.yml', "w"
) as file:
    file.write(buildspec_template.render(params) + "\n")
with open(
    f'{os.getenv("REPOSITORY_DIR", os.path.expanduser("."))}/aws/stepfunctions/dbt_batch.yml',
    "w",
) as file:
    file.write(stepfunctions_template.render(params) + "\n")
変更時は$ rye run python script/jinja_render.pyの実行が必須ですので、実行されているかはGithub ActionsのCIでチェックしています。
Github Actions CI
pre-commitによるリンターフォーマッターの実行と、jinja_render.pyが実行されているかの確認を行っています。mainブランチへPR時に走るので、mainブランチ直Pushは出来ない想定です。
name: lint

on:
  pull_request:
    branches:
      - main

jobs:
  lint:
    runs-on: ubuntu-latest
    steps:
      - uses: actions/checkout@v4.1.1
        with:
          fetch-depth: 2
      - name: Set up Python
        uses: actions/setup-python@v5.1.0
        with:
          python-version: "3.11.4"
      - name: Install pre-commit hooks
        run: |
          pip install -U pip==24.0
          pip install -U pre-commit==4.0.1
          pre-commit install
      - name: Run pre-commit hooks
        run: |
          pre-commit run --all-files
      - name: Install libraries and run jinja_render
        run: |
          pip install -U jinja2==3.1.4
          mkdir -p ~/.local/bin
          curl -sfL https://direnv.net/install.sh | bash
          direnv allow
      - name: Load PATH changes
        run: direnv exec . sh -c 'echo $PATH' > "$GITHUB_PATH"
      - name: Load other environment changes
        run: direnv export gha >> "$GITHUB_ENV"
      - name: Run jinja_render
        run: |
          mv aws/cloudformation/dbt-infrastructure.yml /tmp/dbt-infrastructure.yml
          mv buildspec.yml /tmp/buildspec.yml
          mv aws/stepfunctions/dbt_batch.yml /tmp/dbt_batch.yml
          python script/jinja_render.py
      - name: jinja render check
        run: |
          diff aws/cloudformation/dbt-infrastructure.yml /tmp/dbt-infrastructure.yml || (echo "dbt-infrastructure.yml is out of date. Run 'rye run python ./script/jinja_render.py' to update it." && exit 1)
          diff buildspec.yml /tmp/buildspec.yml || (echo "buildspec.yml is out of date. Run 'rye run python ./script/jinja_render.py' to update it." && exit 1)
          diff aws/stepfunctions/dbt_batch.yml /tmp/dbt_batch.yml || (echo "dbt_batch.yml is out of date. Run 'rye run python ./script/jinja_render.py' to update it." && exit 1)
repos:
  - repo: https://github.com/pre-commit/pre-commit-hooks
    rev: v4.6.0
    hooks:
      - id: end-of-file-fixer
      - id: trailing-whitespace
      - id: check-json
      - id: check-yaml
        exclude: |
          (?x)^(
            ^(aws/cloudformation/.*\.yml$) |
            ^(buildspec\.j2\.yml$)
          )$
      - id: detect-private-key
      - id: debug-statements
  - repo: https://github.com/shellcheck-py/shellcheck-py
    rev: v0.10.0.1
    hooks:
      - id: shellcheck
  - repo: https://github.com/psf/black
    rev: 24.10.0
    hooks:
      - id: black
        args: ["--config", "pyproject.toml"]
  - repo: https://github.com/pycqa/isort
    rev: 5.13.2
    hooks:
      - id: isort
        args: ["-sp", "pyproject.toml"]
  # - repo: https://github.com/dbt-checkpoint/dbt-checkpoint
  #   rev: 2.0.6
  #   hooks:
  #     - id: dbt-parse
exclude: ^(.*\.drawio$)
その他便利スクリプト&AWSで作っているもの
ここからは、パイプライン構築でその他作っているものや、便利スクリプトについて簡単に紹介したいと思います。
Google Drive / Sheets ETL
Google Driveのファイル群・特定ファイル・Google Spreadsheetの特定シートからLambda→S3→Glue Job→AthenaのETLパイプラインを作っています。その後dbt sourceに追加して管理しています。
これらの流れも、StepFunctionsでラップすることにより、EventBridge Ruleで実行結果をキャッチできるので、Slackで通知が可能です。
Glue Jobを使う理由ですが、「運用上スプレッドシートやGoogle Driveが好ましいが、クラウド同期もしたい」場合、カラム名やセルの型チェックなどをPythonで仕込み、エラーハンドリングする必要があるからです。
Lambda→SQS→Athena(S3) データ取得
APIを沢山飛ばすときは、APIコード生成→SQSキュー生成Lambdaとキュー受け取りLambdaを作ってS3にデータを入れ、Athenaで読み取ってテーブルを作っています。SQSを使うことにより再実行もできますし、デッドレターキューもあるので便利です。これもその後dbt sourceでdbt管理下に置いています。
AWS Cloudwatch Logs 監視用ツール
@ktatさんが作成したaws-cliラッパースクリプトaws-logsを使っています。
Batch処理中の状況を見たい時、処理時エラーの内容を見たい時など便利です。
Batchはジョブ定義でLogGroupを指定しないと/aws/batch/jobにすべてのジョブのログが溜まります。
今回のCFnテンプレートでも/aws/batch/jobに溜まるので、別の場所にしたい場合はLogConfigurationで
LogDriver: awslogs
Options:
  - awslogs-group: /dbt/job
のようにすると良いと思います。
AWS::Logs::LogGroupの追加も必要です。
あとはCFnポリシーにCloudWatch LogsのDeleteLogGroup,DescribeLogGroups,ListTagsLogGroup等追加が必要です(ロールバック時失敗するから)
AWS Athena クエリ結果表示ツール
CLIからコマンドでクエリ結果を表示したり、.sqlファイルから表示したり、2つのテーブルの集計を比較することができます。これは私がつくりました。
いちいちコンソールに行かなくてもクエリを書いて結果を得られるので便利です。Dev環境とProd環境のデータチェックにも使えます。
非管理テーブル検出ツール
dbtとAthena(Glue)で片方にしか存在しないテーブルをチェックします。
消し忘れや、dbt登録忘れのチェックに良いです。
さいごに
ここまでみていただきありがとうございました。
自分自身でも1からAWSアカウントを作って動作確認していますので、導入を検討している型は是非試してみてください!
分からない点や、フィードバック、こうすると良くなる等アドバイスいただけますと嬉しいです。
また、株式会社WANOアドベントカレンダーではデータパイプライン及びデータ利活用での非技術的な話を書きましたので、もしよければそちらも見ていただけると嬉しいです。
