記事を書いた背景
PowerAppsでアプリケーションを開発しているが、データベースとして使用しているMicrosoft Lists上のリスト(テーブル)に手動でテストデータを挿入していくのが面倒なため、Microsoft Graph APIを利用して、Excelファイルからテストデータをまとめて挿入したい。
Excelからインポートしてリスト作成とデータ挿入を同時に行うこともできるが、今回は既に存在するリストにデータを追加したかった。
動作環境
OS:Windows11 Pro(23H2)
Python:3.12.4
msgraph-sdk:1.4.0
pandas:2.2.2
openpyxl:3.1.5
Microsoft Graph APIを利用できるように設定する
参考:PythonからSharePointにファイルアップロードしたいッッ!
本設定は「Microsoft365 グローバル管理者」の役割を持つユーザーでないとできない。組織メンバーの人は管理者にお願いする。
アプリを登録する
Azure Portalにアクセスし、「Microsoft Entra ID の管理」ページにアクセスする。

「アプリの登録」→「新規登録」をクリックする。
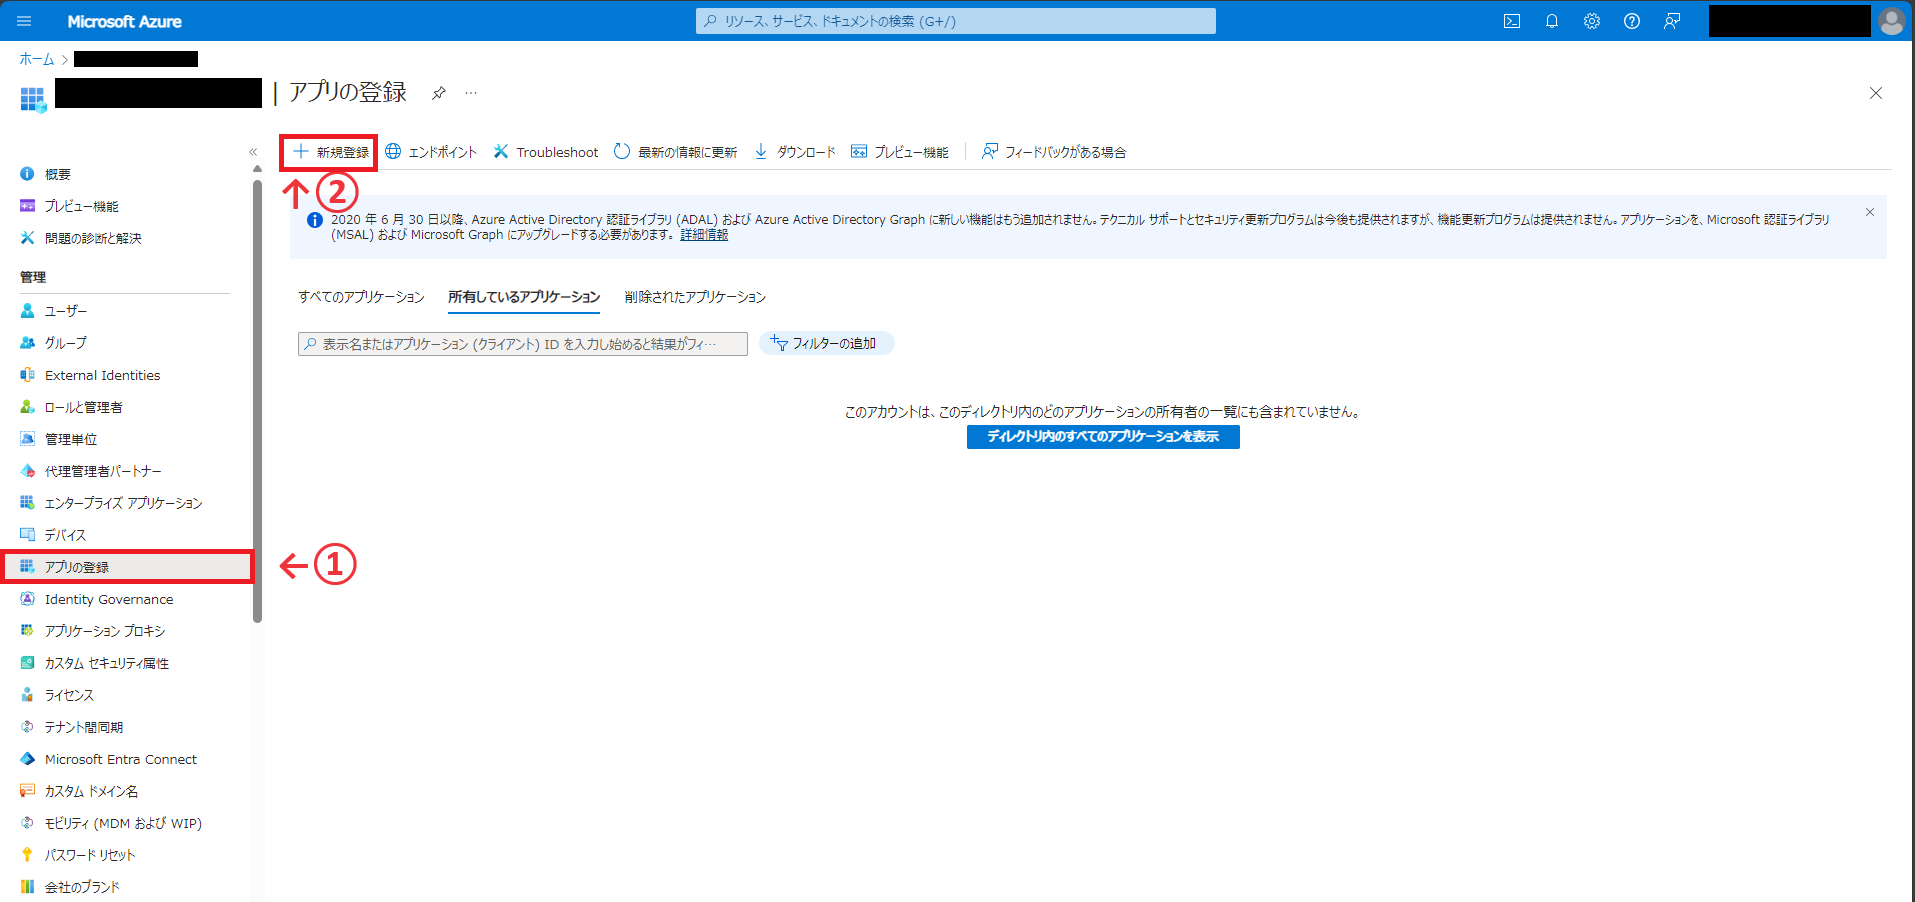
アプリケーションの名前を入力する。今回は「test-app」とした。
その他の項目は弄らずに、画面下部の「登録」ボタンを押す。

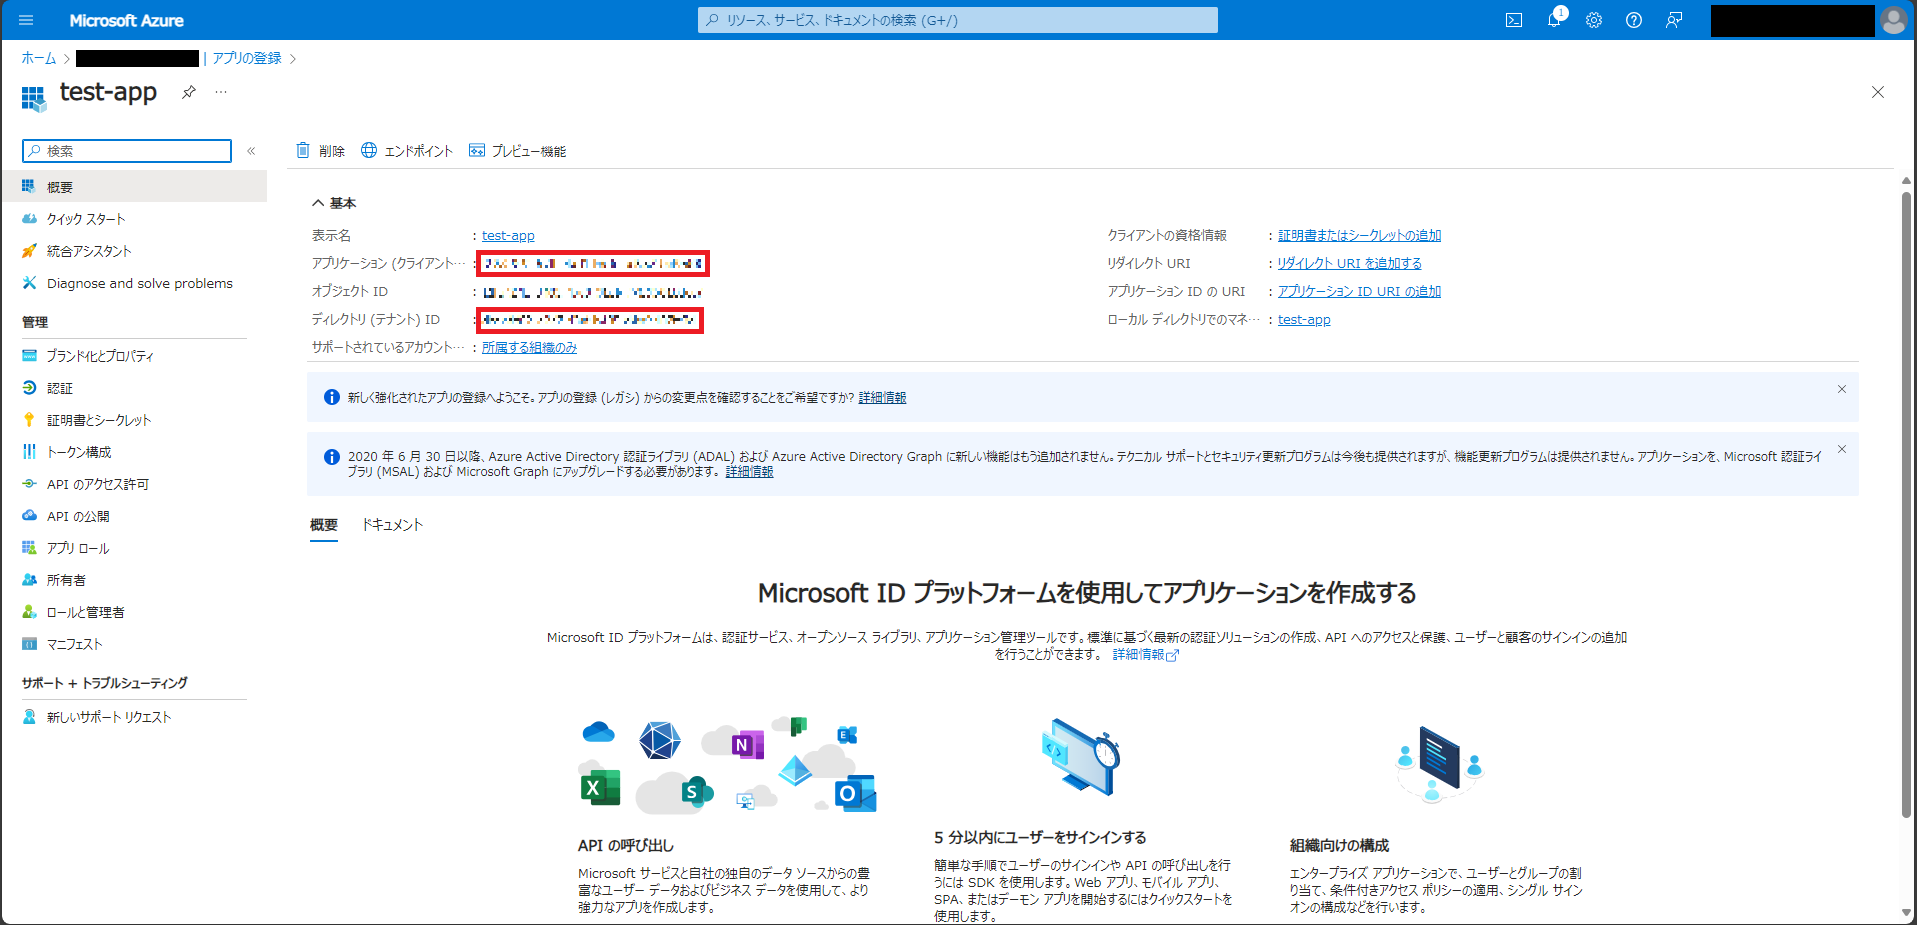
「概要」ページから必要な情報を取得する
アプリケーションの登録完了後、「概要」ページに遷移する。
Microsoft Graph APIにアクセスする際に必要な以下の情報をメモしておく。
- アプリケーション(クライアント)ID
- ディレクトリ(テナント)ID
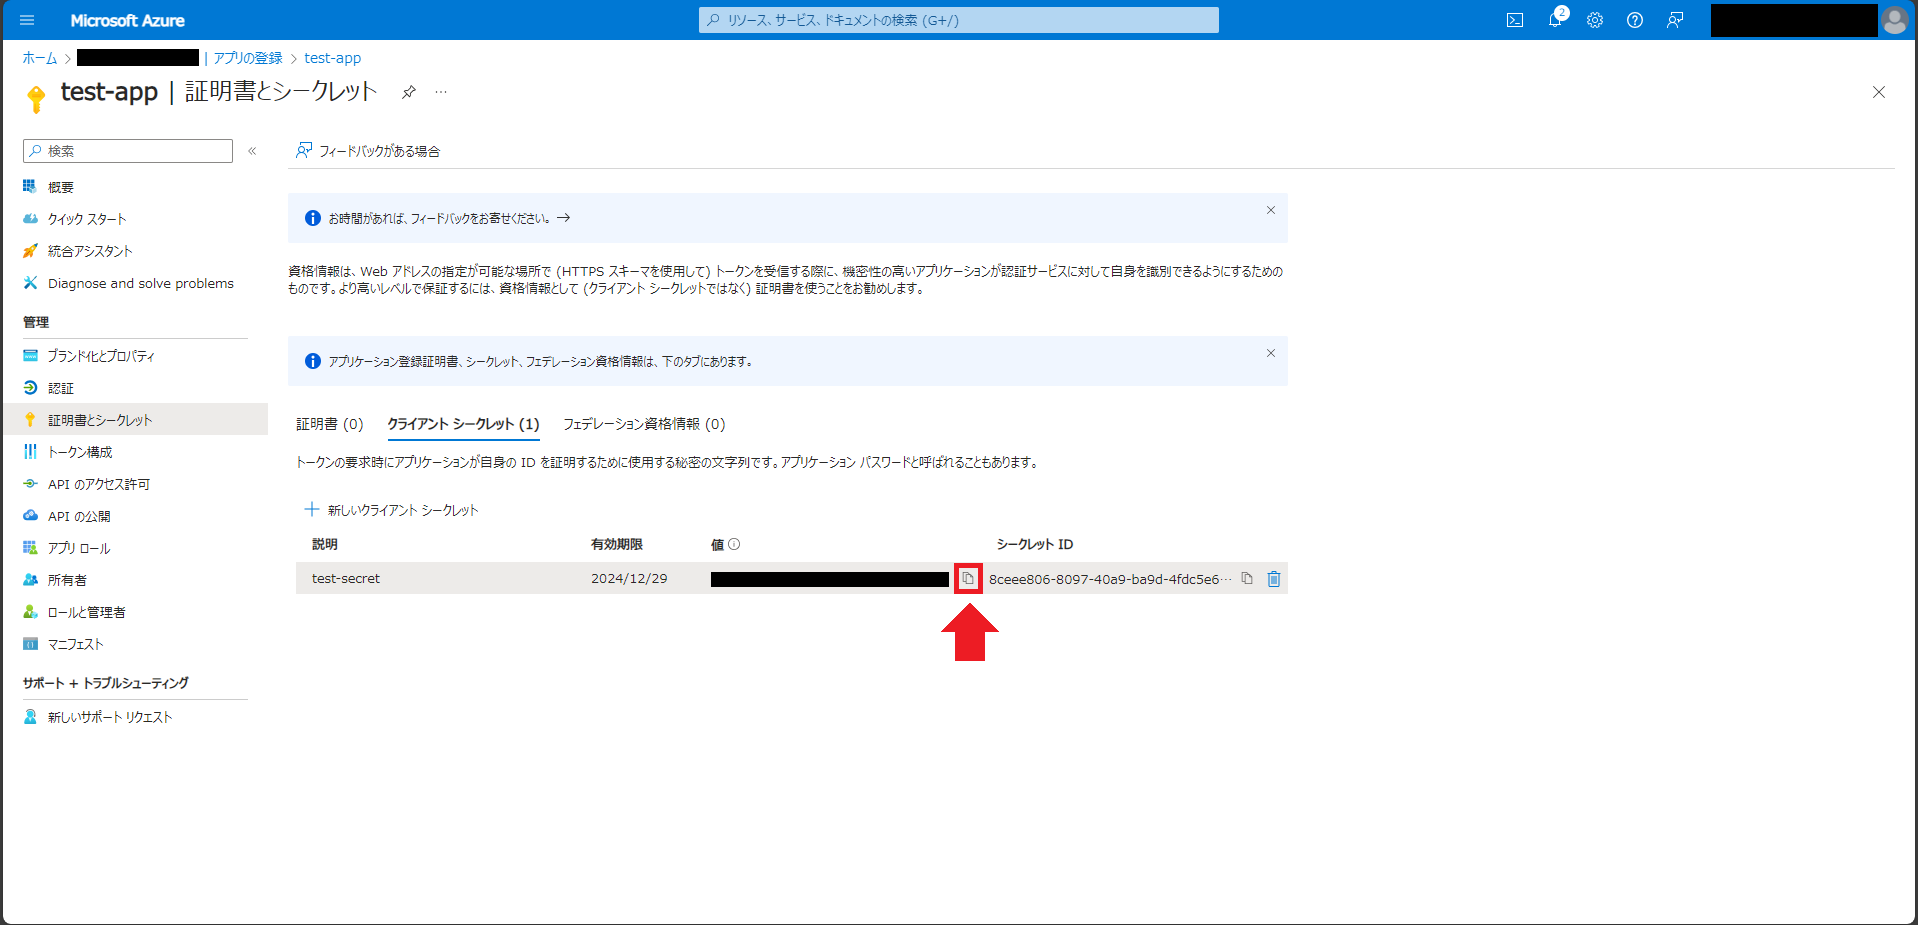
「証明書とシークレット」ページでクライアントシークレットを作成する
「証明書とシークレット」→「新しいクライアントシークレット」をクリックし、画面右側に出るサイドスクリーンにてクライアントシークレットの説明を入力し、有効期限を設定する。
今回は、説明を「test-secret」、有効期限を「推奨:180日(6か月)」にした。
サイドスクリーン下部の「追加」ボタンを押す。

作成されたクライアントシークレットの「値」をメモしておく。
クライアントシークレットの値は、作成直後以外見えなくなるので注意する。
「APIのアクセス許可」ページで適切な権限を付与し、管理者の同意を与える
PythonからMicrosoft Lists上のテーブルのアイテムを取得したり、追加・更新するために、以下のアクセス許可を追加する。
- Sites.ReadWrite.All
「APIのアクセス許可」→「アクセス許可の追加」を押し、画面右側に出るサイドスクリーンにて「Microsoft Graph」を選択する。

「アプリケーションの許可」を選択する。
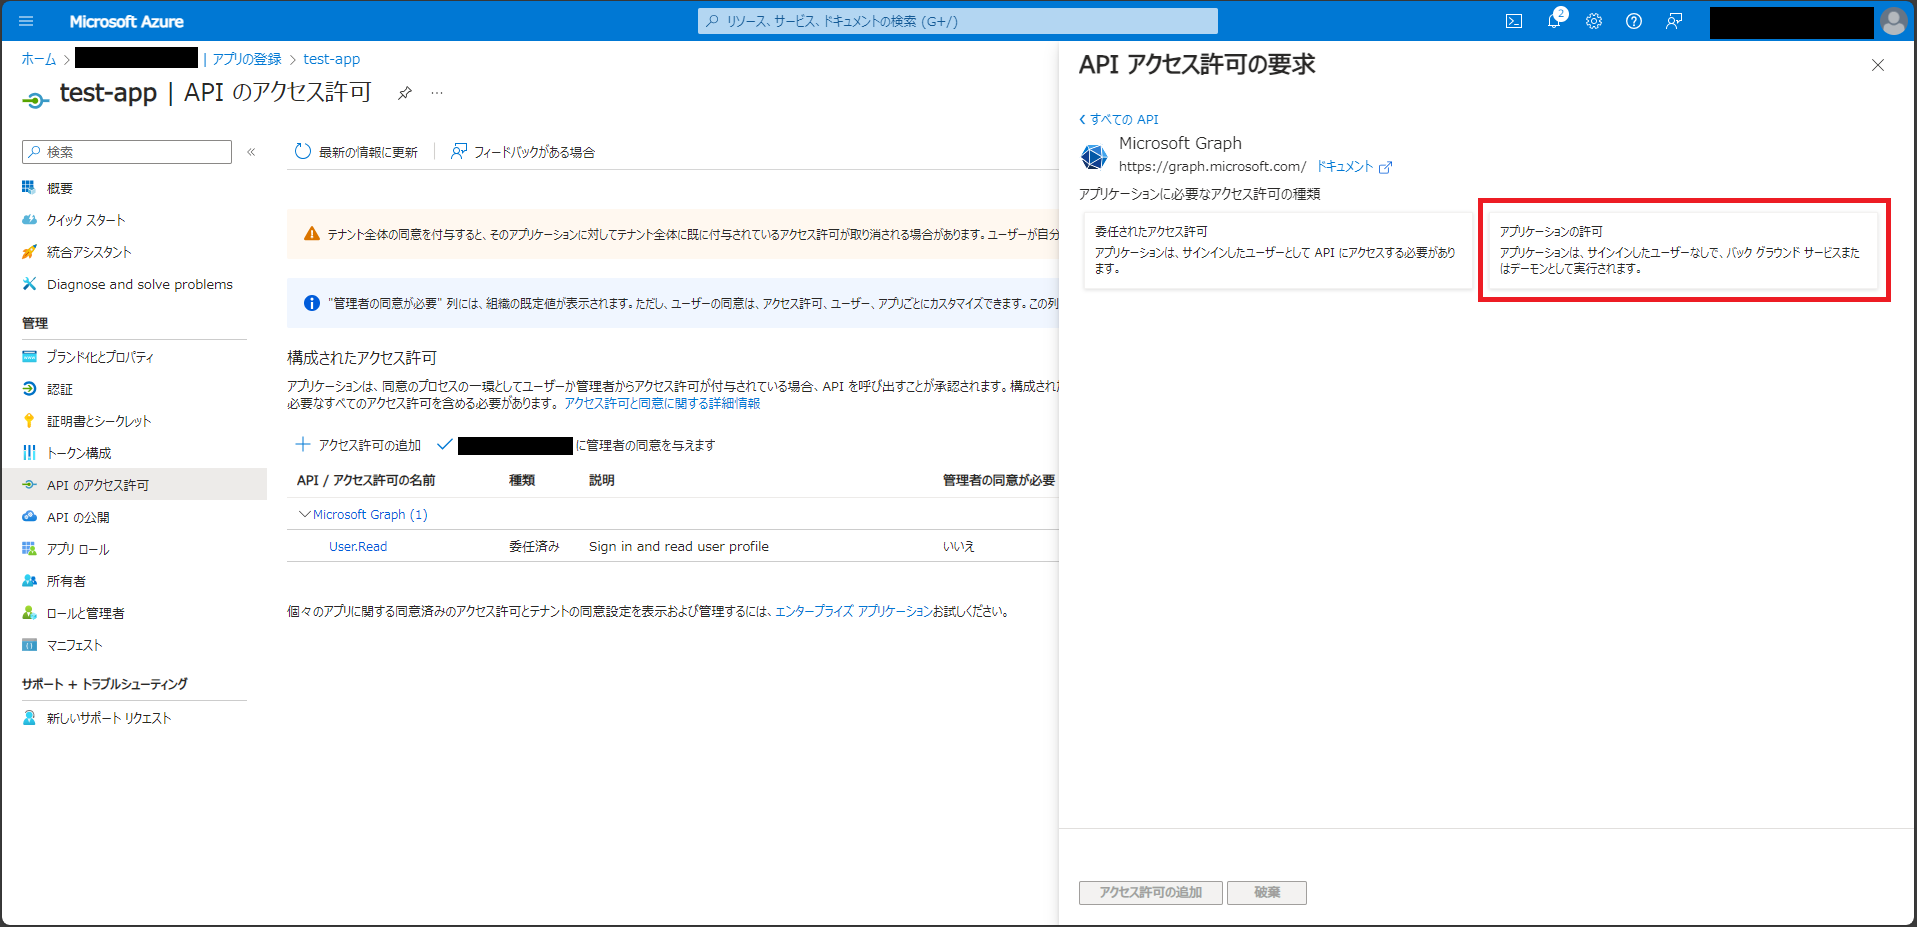
検索窓で「Sites」と検索し、Sitesタブを開きSites.ReadWrite.Allにチェックを入れる。
サイドスクリーン下部の「アクセス許可の追加」ボタンを押す。

追加したアクセス許可は、管理者の同意が必要となる。画面中央の「[組織名]に管理者の同意を与えます」ボタンを押し、ダイアログの「はい」を押す。
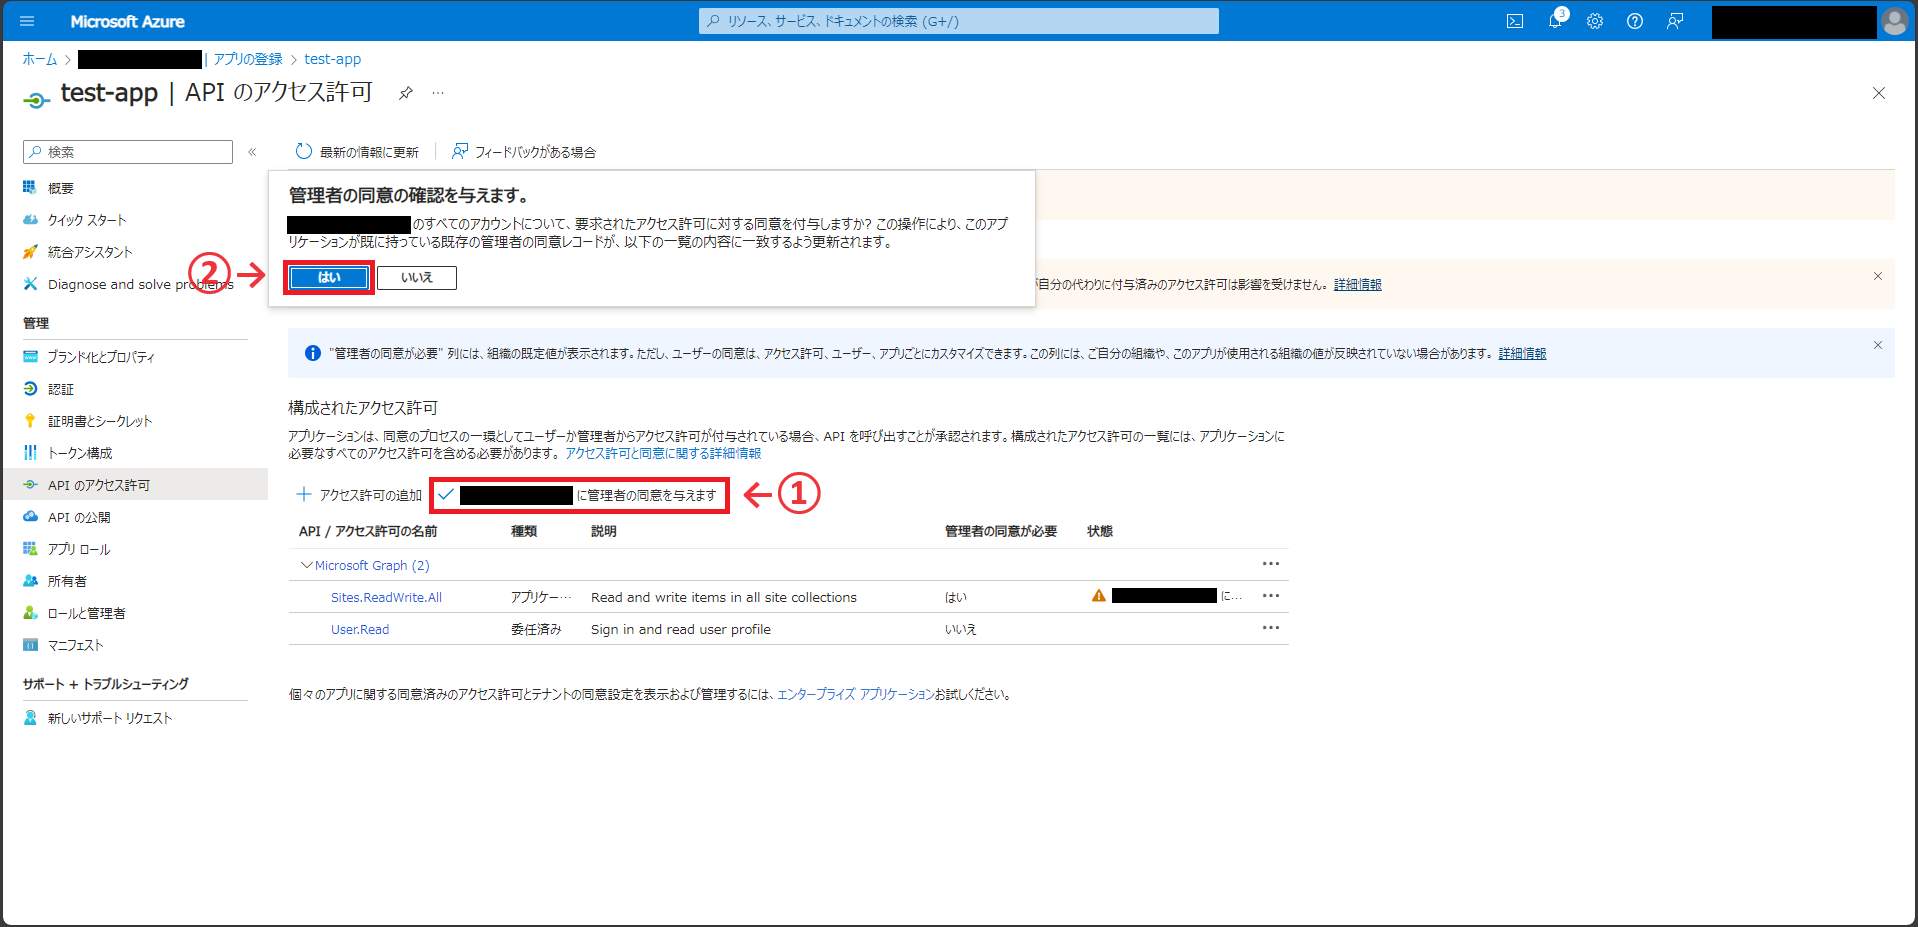
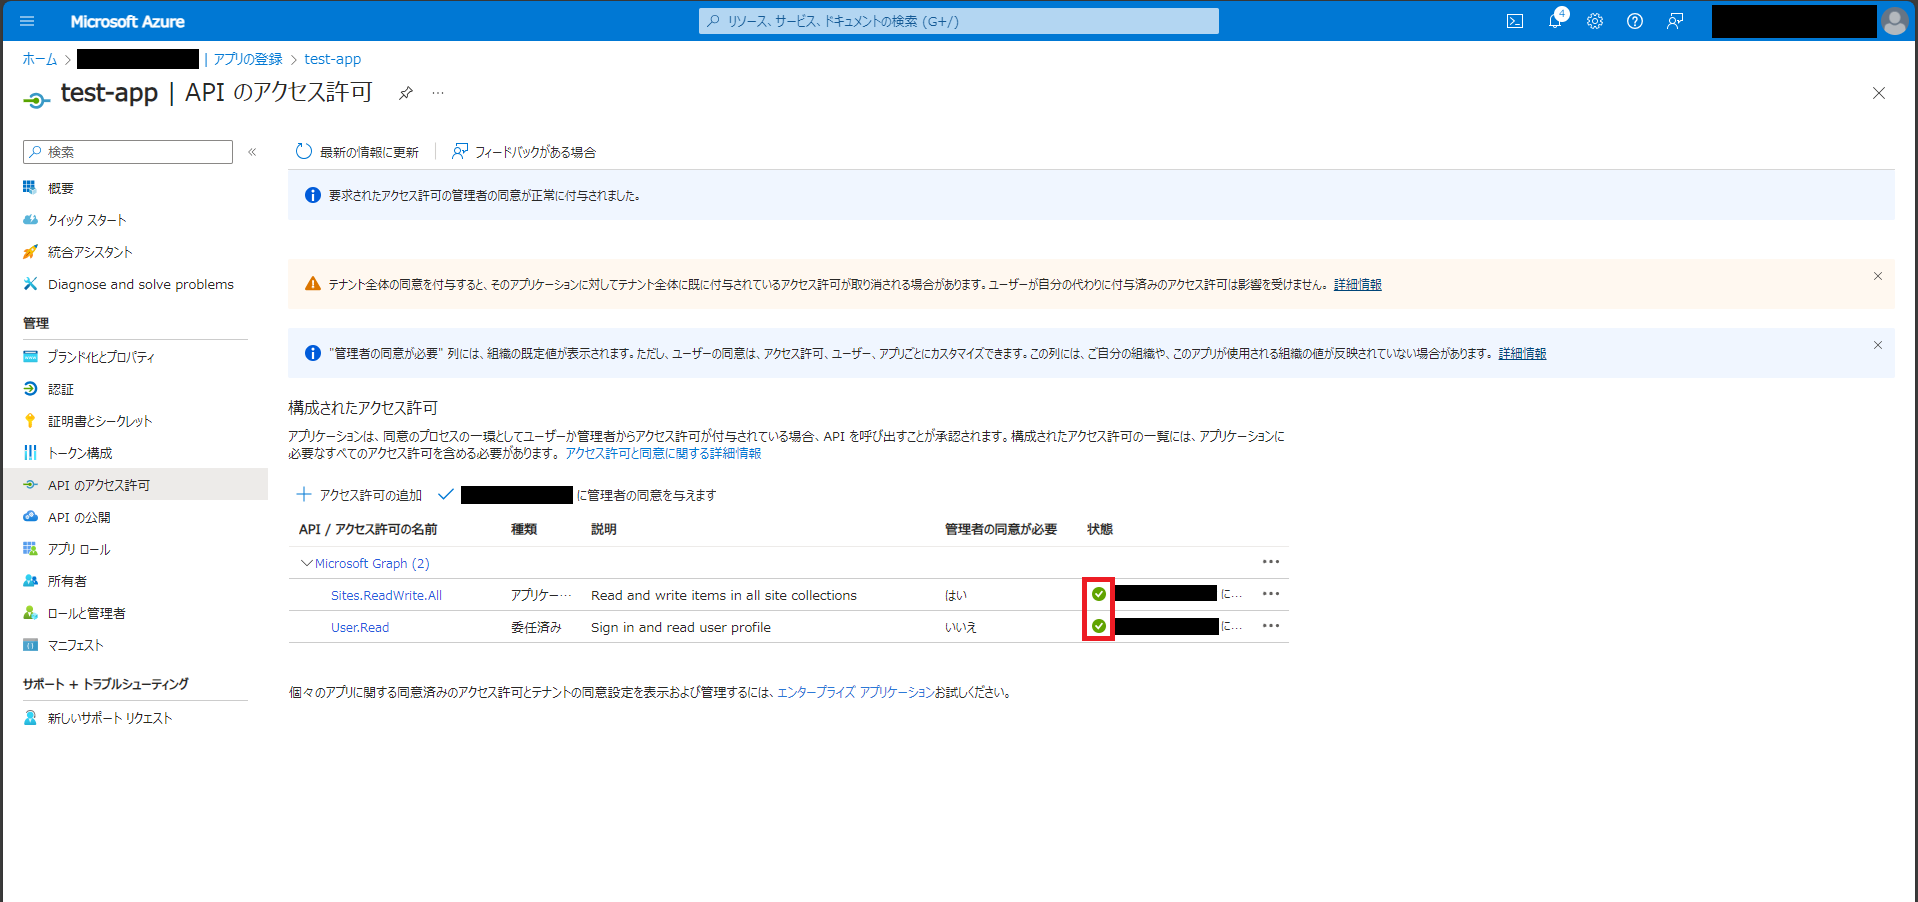
追加したアクセス許可の状態が「[組織名]に付与されました」となっていれば成功。
グローバル管理者しかできない操作はここまでである。
ここまでの操作でメモしておいた以下の3つの値はプログラム側で使用するので、開発者に渡しておく。
- アプリケーション(クライアント)ID → client_id
- ディレクトリ(テナント)ID → tenant_id
- クライアントシークレットの「値」 → client_secret
先で取得したclient_id、tenant_id、client_secretの値が流出すると危険なので、必要最低限のメンバーにのみ共有し、情報を受け取ったメンバーは厳重に管理すること。
Python環境構築
参考:GitHub - microsoftgraph/msgraph-sdk-python
PowerShellを立ち上げ適当なフォルダに移動し、以下のコマンドを実行してPython仮想環境を作成し、仮想環境に入る。
> mkdir graph_ql
> cd graph_ql
> python -m venv graph_ql
> .\graph_ql\Scripts\Activate.ps1
仮想環境内でMicrosoft Graph SDK for Pythonをインストールする。サイズが大きいので数分かかる場合がある。
(graph_ql) > pip install msgraph-sdk==1.4.0
OSError によりパッケージをインストールできないエラーが発生した場合は、Windowsのレジストリエディターでパスの長さの制限(MAX_PATH)を変更する。
Windows 10 で既定の 256 文字のパスの長さ制限 (MAX_PATH) を変更する方法
「config.json」ファイルを作成し、次のように編集する。
Microsoft Entra IDの操作で取得したclient_id, tenant_id, client_secretの値を使用する。
{
    "tenant_id" : "TENANT_ID",
    "client_id" : "CLIENT_ID",
    "client_secret" : "CLIENT_SECRET"
}
TENANT_IDなどの大文字部分を先ほど取得した文字列に置き換える。
ファイル構成
ファイル構成を以下に示す。
Pythonファイルはこれから作成する。
graph_ql
│  config.json
│  create_item.py
│  create_item2.py
│  get_items.py
│  get_lists.py
│  get_sites.py
│  get_sites2.py
│
└─graph_ql ※仮想環境のフォルダ
    └─…省略
site_idを取得
参考:GitHub - microsoftgraph/msgraph-sdk-python
参考:サイトを一覧表示する - Microsoft Graph v1.0 | Microsoft Learn
以下のコードですべてのサイトの情報を取得できる。取得結果はコンソールに標準出力される。
なお、Graph ExplorerではMicrosoft Listsのsite_idがうまく取得できなかったので、コードを使用して取得する。
import json
import asyncio
from azure.identity.aio import ClientSecretCredential
from msgraph import GraphServiceClient

config = json.load(open("config.json"))
tenant_id = config["tenant_id"]
client_id = config["client_id"]
client_secret = config["client_secret"]

credentials = ClientSecretCredential(
    tenant_id,
    client_id,
    client_secret)
scopes = ['https://graph.microsoft.com/.default']

graph_client = GraphServiceClient(credentials=credentials, scopes=scopes)

async def get_sites():
    # 全部取得する
    result = await graph_client.sites.get()

    # 結果を表示する
    print(result)

asyncio.run(get_sites())
次のコマンドで実行する。
(graph_ql) > python .\get_sites.py
↓実行結果の例
実行結果から、目的のMicrosoft Listsのsite_idを取得する。
今回は名無権兵衛さんのMicrosoft Listsのsite_idを取得した。
id='nanashi-my.sharepoint.com,a95b341e-fd22-5c8a-a10c-6b82f46c3c47,3aee6fb9-cd41-5b8d-97af-9deeff2acc82'のような感じで書いてある。
SiteCollectionResponse(additional_data={'@odata.context': 'https://graph.microsoft.com/v1.0/$metadata#sites'}, odata_count=None, odata_next_link=None, value=[Site(additional_data={}, id='nanashi-my.sharepoint.com,a95b341e-fd22-5c8a-a10c-6b82f46c3c47,3aee6fb9-cd41-5b8d-97af-9deeff2acc82', odata_type='#microsoft.graph.site', created_by=None, created_by_user=None, created_date_time=DateTime(2024, 7, 1, 6, 14, 19, tzinfo=Timezone('UTC')), description=None, e_tag=None, last_modified_by=None, last_modified_by_user=None, last_modified_date_time=None, name='名無権兵衛', parent_reference=None, web_url='https://nanashi-my.sharepoint.com/personal/nn0123_nanashi_onmicrosoft_com', analytics=None, columns=None, content_types=None, display_name='名無権兵衛', drive=None, drives=None, error=None, external_columns=None, is_personal_site=True, items=None, lists=None, onenote=None, operations=None, pages=None, permissions=None, root=Root(additional_data={}, odata_type=None), sharepoint_ids=None, site_collection=SiteCollection(additional_data={}, data_location_code=None, hostname='nanashi-my.sharepoint.com', odata_type=None, root=None), sites=None, term_store=None, term_stores=None), ...])
実行結果が見づらいので、必要(そう)な情報のみ取り出してJSONに書き出した。
import json
import asyncio
from azure.identity.aio import ClientSecretCredential
from msgraph import GraphServiceClient

config = json.load(open("config.json"))
tenant_id = config["tenant_id"]
client_id = config["client_id"]
client_secret = config["client_secret"]

credentials = ClientSecretCredential(
    tenant_id,
    client_id,
    client_secret)
scopes = ['https://graph.microsoft.com/.default']

graph_client = GraphServiceClient(credentials=credentials, scopes=scopes)

async def get_sites():
    # 全部取得する
    result = await graph_client.sites.get()

    # 結果をJSON化
    lists_data = []
    if result and result.value:
        for list_item in result.value:
            list_data = {
                "id": list_item.id,
                "name": list_item.name,
                "description": list_item.description,
                "web_url": list_item.web_url
            }
            lists_data.append(list_data)

    # 結果を出力
    with open('sites.json', 'w', encoding='utf-8') as f:
        json.dump(lists_data, f, indent=4, ensure_ascii=False)

asyncio.run(get_sites())
次のコマンドで実行する。
(graph_ql) > python .\get_sites2.py
↓実行結果例
こちらの方がわかりやすい。
[
    {
        "id": "nanashi-my.sharepoint.com,a95b341e-fd22-5c8a-a10c-6b82f46c3c47,3aee6fb9-cd41-5b8d-97af-9deeff2acc82",
        "name": "名無権兵衛",
        "description": null,
        "web_url": "https://nanashi-my.sharepoint.com/personal/nn0123_nanashi_onmicrosoft_com"
    },
    ...
]
list_idを取得
参考:サイト内のリストを取得する - Microsoft Graph v1.0 | Microsoft Learn
操作したいリスト(テーブル)のlist_idを取得したい。
変数site_idには、前項で取得したsite_idの値を入れておく。
以下のコードで、指定サイト(Microsoft Lists)内の全てのリスト情報を取得できる。
なお、取得したデータ(result)はJSON化して出力した。
import json
import asyncio
from azure.identity.aio import ClientSecretCredential
from msgraph import GraphServiceClient

config = json.load(open("config.json"))
tenant_id = config["tenant_id"]
client_id = config["client_id"]
client_secret = config["client_secret"]

credentials = ClientSecretCredential(
    tenant_id,
    client_id,
    client_secret)
scopes = ['https://graph.microsoft.com/.default']

graph_client = GraphServiceClient(credentials=credentials, scopes=scopes)

async def get_lists():
    # さっき取得したsite_id
    site_id = 'nanashi-my.sharepoint.com,a95b341e-fd22-5c8a-a10c-6b82f46c3c47,3aee6fb9-cd41-5b8d-97af-9deeff2acc82'

    # 全部取得する
    result = await graph_client.sites.by_site_id(site_id).lists.get()

    # 結果をJSON化
    lists_data = []
    if result and result.value:
        for list_item in result.value:
            list_data = {
                "id": list_item.id,
                "name": list_item.name,
                "description": list_item.description,
                "web_url": list_item.web_url
            }
            lists_data.append(list_data)

    # 結果を出力
    with open('lists.json', 'w', encoding='utf-8') as f:
        json.dump(lists_data, f, indent=4, ensure_ascii=False)

asyncio.run(get_lists())
次のコマンドで実行する。
(graph_ql) > python .\get_lists.py
↓出力結果の例
今回はK01Tbl_Departmentsという名前のリストを操作したいため、idの値をメモしておく。
→"id": "a3bde829-ea15-52g7-9d14-c671e9f5298a"
[
    {
        "id": "a3bde829-ea15-52g7-9d14-c671e9f5298a",
        "name": "K01Tbl_Departments",
        "description": "",
        "web_url": "https://nanashi-my.sharepoint.com/personal/n_gonbe_nanashi_co_jp/Lists/K01Tbl_Departments"
    },
    ...
]
リストのアイテムを取得
参考:SharePoint リストからアイテムを取得する - Microsoft Graph v1.0 | Microsoft Learn
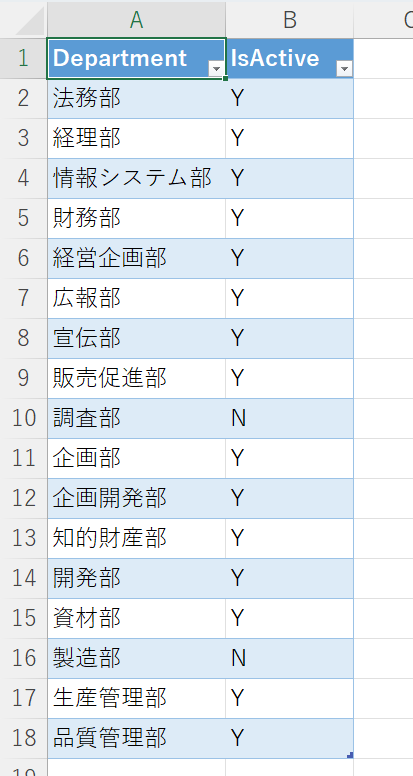
Microsoft Lists上のK01Tbl_Departmentsリスト(テーブル)のアイテム(レコード)を取得する。
↓このようなリスト(テーブル)からデータを取得する。

クエリパラメータを指定して、ID列、Department列、IsActive列を取得する。
結果はJSON化して出力した。
変数site_idとlist_idには、取得した値を設定しておくのを忘れずに。
import json
import asyncio
from azure.identity.aio import ClientSecretCredential
from msgraph import GraphServiceClient
from msgraph.generated.sites.item.lists.item.items.items_request_builder import ItemsRequestBuilder
from kiota_abstractions.base_request_configuration import RequestConfiguration

config = json.load(open("config.json"))
tenant_id = config["tenant_id"]
client_id = config["client_id"]
client_secret = config["client_secret"]

credentials = ClientSecretCredential(
    tenant_id,
    client_id,
    client_secret)
scopes = ['https://graph.microsoft.com/.default']

graph_client = GraphServiceClient(credentials=credentials, scopes=scopes)

async def get_lists():
    # さっき取得したsite_id、list_id
    site_id = 'nanashi-my.sharepoint.com,a95b341e-fd22-5c8a-a10c-6b82f46c3c47,3aee6fb9-cd41-5b8d-97af-9deeff2acc82'
    list_id = 'a3bde829-ea15-52g7-9d14-c671e9f5298a'

    query_params = ItemsRequestBuilder.ItemsRequestBuilderGetQueryParameters(
		expand = ["fields($select=ID,Department,IsActive)"],
    )
    request_configuration = RequestConfiguration(
        query_parameters = query_params,
    )

    # 全部取得する
    result = await graph_client.sites.by_site_id(site_id).lists.by_list_id(list_id).items.get(request_configuration = request_configuration)

    # 結果をJSON化
    lists_data = []
    if result and result.value:
        for list_item in result.value:
            list_data = {
                "id": list_item.id,
                "web_url": list_item.web_url,
                "department": list_item.fields.additional_data["Department"],
                "is_active": list_item.fields.additional_data["IsActive"],
            }
            lists_data.append(list_data)

    # 結果を出力
    with open('items.json', 'w', encoding='utf-8') as f:
        json.dump(lists_data, f, indent=4, ensure_ascii=False)

asyncio.run(get_lists())
次のコマンドで実行する。
(graph_ql) > python .\get_items.py
JSONファイルは次のようになる。取得できていることが確認できる。
[
    {
        "id": "1",
        "web_url": "https://nanashi-my.sharepoint.com/personal/n_gonbe_nanashi_co_jp/Lists/K01Tbl_Departments/1_.000",
        "department": "営業部",
        "is_active": "Y"
    },
    {
        "id": "3",
        "web_url": "https://nanashi-my.sharepoint.com/personal/n_gonbe_nanashi_co_jp/Lists/K01Tbl_Departments/3_.000",
        "department": "購買部",
        "is_active": "Y"
    },
    {
        "id": "4",
        "web_url": "https://nanashi-my.sharepoint.com/personal/n_gonbe_nanashi_co_jp/Lists/K01Tbl_Departments/4_.000",
        "department": "人事部",
        "is_active": "Y"
    },
    {
        "id": "5",
        "web_url": "https://nanashi-my.sharepoint.com/personal/n_gonbe_nanashi_co_jp/Lists/K01Tbl_Departments/5_.000",
        "department": "技術部",
        "is_active": "Y"
    }
]
リストに新規アイテムを作成
参考:SharePoint リストに新しいエントリを作成する - Microsoft Graph v1.0 | Microsoft Learn
いよいよ本題に入る。
Department列が総務部、IsActive列がYのアイテム(レコード)を新規追加する。
アイテム取得時と同様に、変数site_idとlist_idには、取得した値を設定しておくのを忘れない。
import json
import asyncio
from azure.identity.aio import ClientSecretCredential
from msgraph import GraphServiceClient
from msgraph.generated.models.list_item import ListItem
from msgraph.generated.models.field_value_set import FieldValueSet

config = json.load(open("config.json"))
tenant_id = config["tenant_id"]
client_id = config["client_id"]
client_secret = config["client_secret"]

credentials = ClientSecretCredential(
    tenant_id,
    client_id,
    client_secret)
scopes = ['https://graph.microsoft.com/.default']

graph_client = GraphServiceClient(credentials=credentials, scopes=scopes)

async def create_item():
    # さっき取得したsite_id、list_id
    site_id = 'nanashi-my.sharepoint.com,a95b341e-fd22-5c8a-a10c-6b82f46c3c47,3aee6fb9-cd41-5b8d-97af-9deeff2acc82'
    list_id = 'a3bde829-ea15-52g7-9d14-c671e9f5298a'

    request_body = ListItem(
        fields = FieldValueSet(
            additional_data = {
                    "Department" : "総務部",
                    "IsActive" : "Y",
            }
        ),
    )

    await graph_client.sites.by_site_id(site_id).lists.by_list_id(list_id).items.post(request_body)


asyncio.run(create_item())
以下のコマンドで実行する。
(graph_ql) > python .\create_item.py
アイテム(レコード)が新たに追加された。

ちなみに、APIで追加したアイテムの登録者は、SharePointアプリになるようだ。

リストに新規アイテムを複数作成する
Excelファイルを読み込んで、リストに複数のアイテムを追加したい。
Department.xlsxに、リストに挿入したいデータを予め入力しておく。
Excelファイルの読み込みにpandasとopenpyxlを使うので、インストールしておく。
(graph_ql) > pip install pandas==2.2.2 openpyxl==3.1.5
pandasのread_excel関数でExcelファイルを読み込み、データフレームdfに格納する。
dfをitertuplesで1行ずつ取得して、create_item関数にdepartmentとis_activeを渡している。
変数site_idとlist_idには、取得した値を設定しておくのを忘れずに。
import json
import asyncio
from azure.identity.aio import ClientSecretCredential
from msgraph import GraphServiceClient
from msgraph.generated.models.list_item import ListItem
from msgraph.generated.models.field_value_set import FieldValueSet
import pandas as pd

config = json.load(open("config.json"))
tenant_id = config["tenant_id"]
client_id = config["client_id"]
client_secret = config["client_secret"]

credentials = ClientSecretCredential(
    tenant_id,
    client_id,
    client_secret)
scopes = ['https://graph.microsoft.com/.default']

graph_client = GraphServiceClient(credentials=credentials, scopes=scopes)

async def create_item(department, is_active):
    # さっき取得したsite_id、list_id
    site_id = 'nanashi-my.sharepoint.com,a95b341e-fd22-5c8a-a10c-6b82f46c3c47,3aee6fb9-cd41-5b8d-97af-9deeff2acc82'
    list_id = 'a3bde829-ea15-52g7-9d14-c671e9f5298a'

    request_body = ListItem(
        fields = FieldValueSet(
            additional_data = {
                "Department" : department,
                "IsActive" : is_active,
            },
        ),
    )

    await graph_client.sites.by_site_id(site_id).lists.by_list_id(list_id).items.post(request_body)

df = pd.read_excel("Department.xlsx", index_col=None, header=0)

async def main():
    for row in df.itertuples():
        await create_item(row[1], row[2])

asyncio.run(main())
以下のコマンドで実行する。
(graph_ql) > python .\create_item2.py
複数の項目が追加されている。(IDが飛んでいるのは一度ミスったため)
