それWebでできるよ!
こんにちは皆さん
スマホのカメラを使って写真を撮ると、なんと文字列が返ってくる。
そんなアプリがあるような気がするのですが、現在ではブラウザでもカメラにアクセスできるので、わざわざアプリにする必要もなく ( OSの差異にあまり煩わされることなく ) Webアプリで簡単に作ることができるのではなかろうか、と考えました。
考えたらやるしか無いでしょう。
休日を利用して、ちゃっちゃか作ってみました。
あ、いつものようにPHP使いますね
TL;DR
今回の見所は以下のとおりです。
- HTML + JavaScriptでカメラを取る
- tesseract-ocrをインストールしたコンテナを作る
- PHPでOCRする
何がやりたいのか
掲示板とかで無線wifiのssidとか貼ってあるとき、いちいち手打ちするの面倒なんで、カメラで取ってそのままはっつけられるようになったら嬉しいのになぁっていう話がちょこっとあったので、とりあえず検証してみようかなって思いました。
なんで、手書きの文字が読めなくとも、プリントされた文字を読んでコピーできる程度にできればいいかなって思いました。
OCRについては@re-fort さんが、DarkroomJSとTesseract.jsを組み合わせてOCRするって言う記事を書いていますが、今回は違うアプローチで行きたいと思います。
HTMLでカメラにアクセスする
video タグ + mediaDevices
HTMLで動画を扱う際に、ソースを指定するだけで再生してくれる標準のタグがvideoタグなのですが、このソースに自分のマシンのカメラを指定することで、カメラに写った映像を画面に写すことができます。
Web RTCを実現するために使われる技術ですね。
マシン間の差異を吸収し、ブラウザで共通でカメラにアクセスするためには、mediaDevices.getUserMediaを使用します。
実装
では、とっとと実装しましょう。
まずはHTMLの部分です。
<!DOCTYPE html>
<html lang="ja" dir="ltr" itemscope itemtype="http://schema.org/Article">
<head>
  <meta charset="utf-8">
</head>
<body>
    <div class="camera">
        <video id="video">Video stream not available.</video>
    </div><br>
    <button id="startbutton">Take photo</button><br>
    <canvas id="canvas">
    <textarea id="readStr"></textarea>
    </canvas>
<!-- 続く -->
ファイル名に突っ込むのは後で。
さて、ここで問題になるようなところは殆ど無いでしょう。
続いて、javascriptの部分を作ります。ちょっと長いですが、我慢してみてみましょう。
<!-- 続き -->
<script>
let width = 320    // We will scale the photo width to this
let height = 0     // This will be computed based on the input stream

let streaming = false

let video = null
let canvas = null
let photo = null
let startbutton = null
let constrains = { video: true, audio: false }

/**
 * ユーザーのデバイスによるカメラ表示を開始し、
 * 各ボタンの挙動を設定する
 *
 */
function startup() {
  video = document.getElementById('video')
  canvas = document.getElementById('canvas')
  photo = document.getElementById('photo')
  startbutton = document.getElementById('startbutton')

  videoStart()

  video.addEventListener('canplay', function(ev){
    if (!streaming) {
      height = video.videoHeight / (video.videoWidth/width)

      video.setAttribute('width', width)
      video.setAttribute('height', height)
      canvas.setAttribute('width', width)
      canvas.setAttribute('height', height)
      streaming = true
    }
  }, false)

  // 「take photo」ボタンをとる挙動を定義
  startbutton.addEventListener('click', function(ev){
    takepicture()
    ev.preventDefault()
  }, false);

  clearphoto()
}

/**
 * カメラ操作を開始する
 */
function videoStart() {
  streaming = false
  navigator.mediaDevices.getUserMedia(constrains)
  .then(function(stream) {
      video.srcObject = stream
      video.play()
  })
  .catch(function(err) {
      console.log("An error occured! " + err)
  })
}
// 続く
これに近いコードは記事の末に示したリンクにありますので、詳しくはそちらを。
さて、このコードですが、関数startUpが呼び出されるとgetUserMedia関数が呼び出され、ユーザーのカメラへアクセスした後、そのカメラからストリーミングで映像を取得し、videoに流すように設定します。
今回は写真をとることが目的なので、getUserMedia関数に渡すconstraintには、{video: true, audio: false}を設定しています。
さて、続きを書きましょう。
// 続き
/**
 * canvasの写真領域を初期化する
 */
function clearphoto() {
  let context = canvas.getContext('2d')
  context.fillStyle = "#AAA"
  context.fillRect(0, 0, canvas.width, canvas.height)
}

/**
 * カメラに表示されている現在の状況を撮影する
 */
function takepicture() {
  let context = canvas.getContext('2d')
  if (width && height) {
    canvas.width = width
    canvas.height = height
    context.drawImage(video, 0, 0, width, height)
    send()
  } else {
    clearphoto()
  }
}
まず、clearphoto関数はcanvasの情報を一旦リセットする関数です。
takepicture関数はvideoに表示されている内容をcanvas上に描画し、その情報をサーバに送信します。
ここまでで写真を撮る処理は完了です。
// 続き
function send() {
    data = canvas.toDataURL('image/png').replace(/^.*,/, '')
    $.ajax('/read.php',{
        method: 'POST',
        data: {image: data}
    }).then(res => {
        $('#readStr').val(res)
    })
}

startup()

</script>
</body>
最後にサーバに送信する関数を書きます。
今回も例によってjQueryを使っているので、どこかで読み込んでおく必要があります。
内容はとても簡単で、canvasに表示された内容をpngデータに出力し、その文字列情報を背後のサーバにPOST送信します。
toDataURL関数は不要なヘッダが付いてしまうので、replace関数で取り除いています。
返ってきたレスポンスは、そのままテキストエリアに書き出す感じです。
動かしてみる
HTMLができたので、動かしてみようということになるのですが、ここで少々の縛りが出ます。
それはChromeさんなどで動かすと、以下のいずれかの状態でなければなりません。
- localhostでアクセスしている
- httpsでアクセスしている
上述してきたHTMLがPHPファイルになっているのは、ブラウザからlocalhostでアクセスできるようにしたいからです。
というわけで
$ php -S 0.0.0.0:8000
でビルトインサーバを立てて、localhost:8000 にアクセスすれば、カメラを使用したシーンが確認できます。
phpでtesseract-ocrを動かす
php + tesseract-ocrイメージの作成
次に、サーバ側でocrできるようにします。
例によってdockerでphpとtesseract-ocrが共存したイメージを作ります。
なんとか軽量化したいので、alpine使いましょう。
FROM php:fpm-alpine

RUN set -x && \
  apk update && \
  # tesseract is in testing repo
  echo 'http://dl-cdn.alpinelinux.org/alpine/edge/testing' >> /etc/apk/repositories && \
  echo 'http://dl-cdn.alpinelinux.org/alpine/edge/community' >> /etc/apk/repositories && \
  echo 'http://dl-cdn.alpinelinux.org/alpine/edge/main' >> /etc/apk/repositories && \
  apk update && \
  apk add --no-cache tesseract-ocr && \
  # download traineddata
  # english
  cd /usr/share/tessdata && \
  curl -LO https://github.com/tesseract-ocr/tessdata/raw/3.04.00/eng.cube.bigrams && \
  curl -LO https://github.com/tesseract-ocr/tessdata/raw/3.04.00/eng.cube.fold && \
  curl -LO https://github.com/tesseract-ocr/tessdata/raw/3.04.00/eng.cube.lm && \
  curl -LO https://github.com/tesseract-ocr/tessdata/raw/3.04.00/eng.cube.nn && \
  curl -LO https://github.com/tesseract-ocr/tessdata/raw/3.04.00/eng.cube.params && \
  curl -LO https://github.com/tesseract-ocr/tessdata/raw/3.04.00/eng.cube.size && \
  curl -LO https://github.com/tesseract-ocr/tessdata/raw/3.04.00/eng.cube.word-freq && \
  curl -LO https://github.com/tesseract-ocr/tessdata/raw/3.04.00/eng.tesseract_cube.nn && \
  curl -LO https://github.com/tesseract-ocr/tessdata/raw/3.04.00/eng.traineddata && \
  # japanese
  curl -LO https://github.com/tesseract-ocr/tessdata/raw/3.04.00/jpn.traineddata && \
  # enable to use hocr option
  curl -LO https://github.com/tesseract-ocr/tessdata/raw/3.04.00/osd.traineddata
こちらも記事下部の参考に示した、alpineで動くDockerfileを参考にしています。
ここで注意すべきは、パッケージ参照先の追加をしている部分で、tesseract-ocrが必要としているパッケージが、tesseract-ocrがおいてあるリポジトリ以外のリポジトリにあるため、都合3つのリポジトリを追加することになっています。
また、もとは参考記事ではmasterを参照していましたが、現在はブランチを指定して上げる必要があります。
fpmのイメージ使っているのは、将来的にはちゃんとしたwebサービスにつなげたいからですね。
PHPのパッケージの導入
tesseract-ocrをPHPで操作するためのラッパーを導入します。
$ composer require thiagoalessio/tesseract_ocr
ちょっと試してみましょう。
<?php
require 'vendor/autoload.php';

$str = (new TesseractOCR('test.png'))
    ->quietMode(true)
    ->lang('eng', 'jpn')->psm(4)->run();

echo $str;
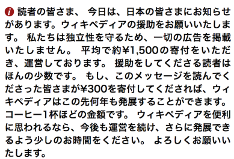
とりあえず、wikipediaの魂の叫びを

$ php ocr.php
Dear readers,

Today, we have an announcement to make to the readers of J apan. We ask you to help
Wikipedia. To protect our independence, we'll never run ads. We're sustained by
donations averaging about ¥1,500. Only a tiny portion of our readers give. If everyone
reading this gave ¥300, we could keep Wikipedia thriving for years to come. The price of
a cup of coffee is all we need. If Wikipedia is useful to you, please take one minute to
keep it online and ad-free. We're a non-profit with the costs of a top website: servers,
staff and programs. We serve millions of readers, but we run on a fraction of what other
top sites spend. We believe knowledge is a foundation. A foundation for human
potential, freedom and opportunity. We believe everyone should have access to
knowledge—for free, without restriction or limitation. Please help keep Wikipedia online
and growing. Thank you.
普通にコピればいいじゃんて感じですがね。
日本語もやってみます
$ php ocr.php
0読者の皆さま、 今日は、 日本の皆さまにぉ知らせ
がぁります。 ウイキペデイアの援助をお願いいたしま
す。 私たちは独立性を守るため 、一切の広告を掲載
いたしません。 平均で約\ー,500の寄付をいただ

、 運営しております。 援助をして〈ださる読者は
ほんの少数です。 もし、 このメツセ_ジを読んで〈
ナ萱さつナこ皆さまヵヾ\300を寄付して〈プ三され~ま、 ウイ
キぺデイアはこの先何年も発展することヵ`できます。
コーヒ一ー杯ほどの金額です。 ウイキぺデイアを便利
に思われるなら、 今後も運営を続け、 さらに発展でき
るよう少しのお時聞を〈ださい。 よろし〈お願いい
たします。
う、うーん、どうだろう?
読めなくもないかな?
変なミスプリ部分で、絶妙に文章が理解しにくくなってるけど。
PHPのコード
動作検証が終わったので、リーダー部分のコードを書くだけですね。
<?php
require 'vendor/autoload.php';

$data = $_POST['image'];

$filename = tempnam('/tmp', 'ocr');
file_put_contents($filename, base64_decode($data));

$str = (new TesseractOCR($filename))
    ->quietMode(true)
    ->lang('eng', 'jpn')->psm(4)->run();

echo $str;
unlink($filename);
tesseractパッケージの仕様として、ファイル名を渡す形式になっていたので、こんな実装になりました。
これで、カメラから取得した写真をサーバに送り、サーバでocrで読み出した文字をフロントに返す実装が完成しました。
まとめ
というわけで、カメラで取った写真から文字を編集可能な状態で出力するwebアプリの実装をしてみました。
休日に行うプチハッカソンとしてはいい感じかなって思いました。(実装難易度、および微妙なハマりどころがあるところとか)
ちなみに、いい感じの角度で撮ってあげないと、すぐに変な読まれ方してしまいます。
v4からLSTMつかってトレーニングできるみたいなので、それでチューニングするのも一考かしらって思います。
何にせよ、今回の主眼はブラウザからカメラにアクセスすることです。
わざわざネイティブアプリで作らんでもWebアプリで十分代用できまっせって感じで。
今回はそんなところです。
参考
videoタグから写真を撮るチュートリアル
Canvasで描画した画像を送信してサーバに保存する
tesseract-ocrを導入するための参考にしたもの
