はじめに
この記事はHoudini Advent Calendar 2025 25日目の記事です。
時短を目指した自作ツールの紹介記事になります。
詳しい理論に関する説明は省いているため、
学習というよりはかなり実務寄りな内容になっています。
単純作業は、できるだけ考えずに済ませたい
Houdini で作業していると、
- カメラを切り替える
- 背景色を変える
- ディスプレイオプションを開く
- ネットワークにメモを書く
といった 「考えなくていい操作」 に、意外と時間を取られていると感じることがありました。
この記事では、そうした発想から作った
自作の作業時短ツール をいくつか紹介します。
今回紹介するツール一覧
今回は、普段の作業で実際に使っている時短ツールの中から以下の 8 つを紹介します。
検証環境:Houdini 19.5.403
| ツール名 | 内容 |
|---|---|
| Select Cam from Button | ボタンUIでカメラ切り替え |
| Change BG Color | 背景色を Light / Dark で切替 |
| Quick Display Option | よく使う表示設定だけをUI化 |
| Sticky Note Pad | 高機能 StickyNote 作成UI |
| Travel Playbar | 任意のフレームへワンクリックで移動 |
| Screenshot to BG Image | ビューポートをキャプチャし、Network View へ配置 |
| Paste as Obj Merges | コピーしたノードを Object Merge ノードとしてペースト |
| Paste as Fetches | コピーしたノードを ROP Fetch ノードとしてペースト |
使い方(導入方法)
すべてのツールは Shelf Tool として登録する前提です。
コードはそのまま コピペで動作 します。
とりあえず使うための登録手順
- Shelf 上で右クリック → New Tool
- Script タブへ記事内のコードをそのまま貼り付け
- Optionsタブでアイコンや名前を設定
- Hotkeysタブでショートカットを設定
(競合してない割り当てを探るのは面倒なので、参考までに私個人のHotkey設定を記載してます。)
1. Select Cam from Button
カメラを探さない。押すだけ。
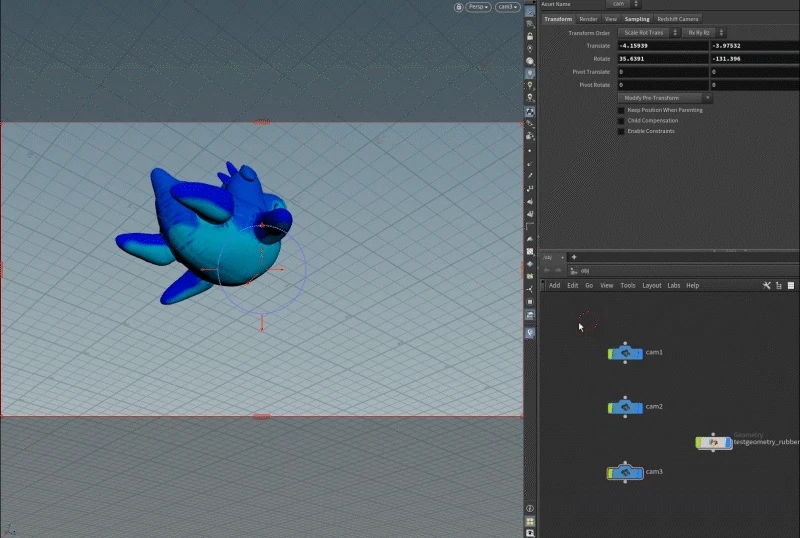
何をするツールか
シーン内のカメラを一覧表示し、
ワンクリックでビューポートのカメラを切り替えます。
どんなときに有効か
例えば、mayaからAlembicでカメラを取り込んだとき、階層が深くてカメラ名が追いづらいケースなどで便利です。
どうやって実現しているか
カメラ切り替えツールの肝は「可変数のカメラを毎回スキャンして、同数のボタンを動的生成する」点です。
ボタン生成は for cam in cams: のループで行い、lambda cam=cam でクリック時に参照するカメラを固定しています。
from PySide2 import QtWidgets

def create_camera_selection_dialog(cams):
    dialog = QtWidgets.QDialog()
    dialog.setWindowTitle("Select Camera")
    layout = QtWidgets.QVBoxLayout(dialog)

    for cam in cams:
        btn = QtWidgets.QPushButton(cam.name())
        layout.addWidget(btn)

        # 重要:lambda の「cam=cam」で、その時点の cam をボタンに閉じ込める
        btn.clicked.connect(lambda checked=False, cam=cam: (set_viewport(cam), dialog.close()))

    dialog.exec_()
補足
自作HDAのカメラがある場合は、
find_cameras関数に下記を追加することで拾うことが出来ます。
例:”sse_scenescaledcamera”というHDAの場合
    sse_scenescaledcamera_nodes = [node for node in hou.node("/obj").children() if node.type().name().startswith('sse_scenescaledcamera')]
    cams += sse_scenescaledcamera_nodes
挿入例
def find_cameras():
    """
    シーン内のカメラを見つける関数
    """
    cams = list(hou.nodeType(hou.objNodeTypeCategory(), 'cam').instances())

    # 例:独自HDAカメラも拾いたい場合はここで追加
    sse_scenescaledcamera_nodes = [node for node in hou.node("/obj").children() if node.type().name().startswith('sse_scenescaledcamera')]
    cams += sse_scenescaledcamera_nodes

    return cams
Hotkey登録の一例:Alt + Ctrl + T (Global)
おすすめアイコン:TOOLS_view_mode_camera
フルコード(クリックで展開)
import hou
from PySide2 import QtWidgets

def set_viewport(cam):
    """
    現在のビューポートにカメラを設定する関数
    """
    scene_view = hou.ui.paneTabOfType(hou.paneTabType.SceneViewer)
    viewport = scene_view.curViewport()
    viewport.setCamera(cam)

def find_cameras():
    """
    シーン内のカメラを見つける関数
    """
    cams = list(hou.nodeType(hou.objNodeTypeCategory(), 'cam').instances())
    return cams

def create_camera_selection_dialog(cams):
    """
    カメラ選択ダイアログを作成する関数
    """
    app = QtWidgets.QApplication.instance()
    if not app:
        app = QtWidgets.QApplication([])

    if cams:
        dialog = QtWidgets.QDialog()
        layout = QtWidgets.QVBoxLayout()
        dialog.setLayout(layout)
        dialog.setWindowTitle("Select Camera")

        for cam in cams:
            button = QtWidgets.QPushButton(cam.name())
            button.clicked.connect(lambda checked=False, cam=cam: (set_viewport(cam), dialog.close()))
            layout.addWidget(button)

        dialog.exec_()
    else:
        hou.ui.displayMessage("No Camera in Scene", buttons=("OK",))

def main():
    """
    メイン関数
    """
    cams = find_cameras()
    create_camera_selection_dialog(cams)

main()
2. Change BG Color
見づらいと思った瞬間に、切り替える
何をするツールか
ビューポートの背景色を
Light / Dark の2パターンでトグル切り替えします。
(個人的に、実際に使うのはこの2色だけなので)
どうやって実現しているか
- 切り替え状態は
hou.sessionに保持 - 背景色の変更は hscript ベースの
viewdisplay -Bを使用
→「特定のビューポート」ではなく、すべてのビューポートに同じ設定が適用される
Hotkey登録の一例:Alt + Ctrl + B (Global)
おすすめアイコン:VIEW_display_background
フルコード(クリックで展開)
import sys
import toolutils
import hou

def toggle_background():
    try:
        bg = hou.session.bg
    except AttributeError:
        hou.session.bg = 'dark'
        bg = 'dark'

    if bg == 'dark':
        hou.session.bg = 'light'
    else:
        hou.session.bg = 'dark'

    hou.hscript("viewdisplay -B %s *" % hou.session.bg)
    hou.ui.setStatusMessage("Toggled background to %s" % hou.session.bg.upper())

toggle_background()
3. Quick Display Option
Display Option は多すぎる
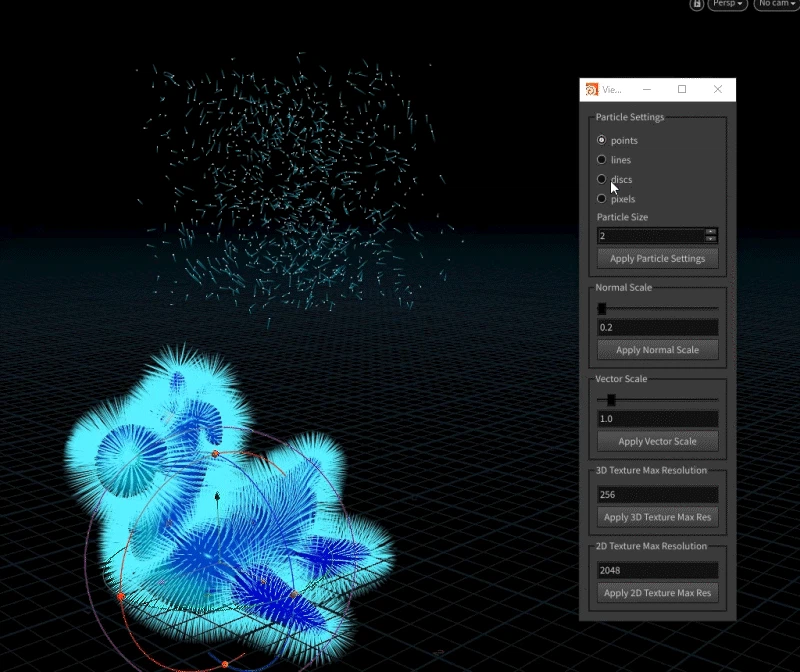
何をするツールか
Display Option の中から、
実務でよく使う項目だけを抜き出してUI化しました。
- Particle 表示タイプ/サイズ
- Normal Scale
- Vector Scale
- Texture Max Resolution(2D / 3D)
どうやって実現しているか①: Texture サイズの扱い
- 2D Texture は本来
(width, height) - 3D Texture は
(width, height, depth)
ですが、実用上は 同じ値を入れるケースがほとんどなので、
- 入力は 1つの数値
- 内部で 2D / 3D に応じてチャンネル数を分けて適用
という割り切りをしています。
どうやって実現しているか②: パーティクル表示
-
パーティクルの表示タイプ・サイズは
python内でhscript(
viewdisplay)を使用して制御
Hotkey登録の一例:Alt + Ctrl + G (Global)
おすすめアイコン:BUTTONS_displayoptions
フルコード(クリックで展開)
from PySide2 import QtWidgets, QtCore, QtGui
import hou

class MyWidget(QtWidgets.QWidget):
    def __init__(self):
        super(MyWidget, self).__init__()
        self.setWindowFlags(self.windowFlags() | QtCore.Qt.WindowStaysOnTopHint)
        self.setWindowTitle("Viewport Display Option")

        main_layout = QtWidgets.QVBoxLayout()

        # ビューポートの設定を取得
        settings = self.get_viewport_settings()

        # 初期値の取得(ビューポートが取得できない場合はデフォルト値)
        if settings:
            initial_normal = settings.normalScale()
            initial_vector = settings.vectorScale()
            initial_tex2d = settings.textureMaxRes2D()[0]  # 2D は (width, height) のタプルなので width を使用
            initial_tex3d = settings.textureMaxRes3D()[0]  # 3D は (w, h, d) のタプルなので w を使用
        else:
            initial_normal = 0.2
            initial_vector = 1.0
            initial_tex2d = 2048
            initial_tex3d = 256

        # --- Particle Settings (GroupBox) ---
        particle_group = QtWidgets.QGroupBox("Particle Settings")
        particle_layout = QtWidgets.QVBoxLayout()

        self.ptypes = ['points', 'lines', 'discs', 'pixels']
        self.radio_buttons = {ptype: QtWidgets.QRadioButton(ptype) for ptype in self.ptypes}
        self.radio_buttons['points'].setChecked(True)

        for rb in self.radio_buttons.values():
            particle_layout.addWidget(rb)

        self.size_input = QtWidgets.QSpinBox()
        self.size_input.setMinimum(1)
        self.size_input.setMaximum(100)
        self.size_input.setValue(2)

        self.apply_particle_button = QtWidgets.QPushButton("Apply Particle Settings")
        self.apply_particle_button.clicked.connect(self.apply_particle_settings)

        particle_layout.addWidget(QtWidgets.QLabel("Particle Size"))
        particle_layout.addWidget(self.size_input)
        particle_layout.addWidget(self.apply_particle_button)

        particle_group.setLayout(particle_layout)
        main_layout.addWidget(particle_group)

        # --- Normal Scale (GroupBox) ---
        normal_group = QtWidgets.QGroupBox("Normal Scale")
        normal_layout = QtWidgets.QVBoxLayout()

        self.normal_scale_slider = QtWidgets.QSlider(QtCore.Qt.Horizontal)
        self.normal_scale_slider.setMinimum(1)
        self.normal_scale_slider.setMaximum(100)
        self.normal_scale_slider.setValue(int(initial_normal * 10))

        self.normal_scale_input = QtWidgets.QLineEdit(f"{initial_normal:.1f}")
        self.normal_scale_input.setValidator(QtGui.QDoubleValidator(0.1, 100.0, 3))

        self.apply_normal_button = QtWidgets.QPushButton("Apply Normal Scale")
        self.apply_normal_button.clicked.connect(self.apply_normal_scale)

        normal_layout.addWidget(self.normal_scale_slider)
        normal_layout.addWidget(self.normal_scale_input)
        normal_layout.addWidget(self.apply_normal_button)

        normal_group.setLayout(normal_layout)
        main_layout.addWidget(normal_group)

        # --- Vector Scale (GroupBox) ---
        vector_group = QtWidgets.QGroupBox("Vector Scale")
        vector_layout = QtWidgets.QVBoxLayout()

        self.vector_scale_slider = QtWidgets.QSlider(QtCore.Qt.Horizontal)
        self.vector_scale_slider.setMinimum(1)
        self.vector_scale_slider.setMaximum(100)
        self.vector_scale_slider.setValue(int(initial_vector * 10))

        self.vector_scale_input = QtWidgets.QLineEdit(f"{initial_vector:.1f}")
        self.vector_scale_input.setValidator(QtGui.QDoubleValidator(0.1, 100.0, 3))

        self.apply_vector_button = QtWidgets.QPushButton("Apply Vector Scale")
        self.apply_vector_button.clicked.connect(self.apply_vector_scale)

        vector_layout.addWidget(self.vector_scale_slider)
        vector_layout.addWidget(self.vector_scale_input)
        vector_layout.addWidget(self.apply_vector_button)

        vector_group.setLayout(vector_layout)
        main_layout.addWidget(vector_group)

        # --- 3D Texture (GroupBox) ---
        texture_3d_group = QtWidgets.QGroupBox("3D Texture Max Resolution")
        texture_3d_layout = QtWidgets.QVBoxLayout()

        self.texture_3d_input = QtWidgets.QLineEdit(str(initial_tex3d))
        self.texture_3d_input.setValidator(QtGui.QIntValidator(64, 4096))

        self.apply_texture_3d_button = QtWidgets.QPushButton("Apply 3D Texture Max Res")
        self.apply_texture_3d_button.clicked.connect(self.apply_texture_3d)

        texture_3d_layout.addWidget(self.texture_3d_input)
        texture_3d_layout.addWidget(self.apply_texture_3d_button)

        texture_3d_group.setLayout(texture_3d_layout)
        main_layout.addWidget(texture_3d_group)

        # --- 2D Texture (GroupBox) ---
        texture_2d_group = QtWidgets.QGroupBox("2D Texture Max Resolution")
        texture_2d_layout = QtWidgets.QVBoxLayout()

        self.texture_2d_input = QtWidgets.QLineEdit(str(initial_tex2d))
        self.texture_2d_input.setValidator(QtGui.QIntValidator(64, 4096))

        self.apply_texture_2d_button = QtWidgets.QPushButton("Apply 2D Texture Max Res")
        self.apply_texture_2d_button.clicked.connect(self.apply_texture_2d)

        texture_2d_layout.addWidget(self.texture_2d_input)
        texture_2d_layout.addWidget(self.apply_texture_2d_button)

        texture_2d_group.setLayout(texture_2d_layout)
        main_layout.addWidget(texture_2d_group)

        self.setLayout(main_layout)

        # スライダーと数値入力の同期
        self.normal_scale_slider.valueChanged.connect(self.update_normal_scale_input)
        self.normal_scale_input.textChanged.connect(self.update_normal_scale_slider)

        self.vector_scale_slider.valueChanged.connect(self.update_vector_scale_input)
        self.vector_scale_input.textChanged.connect(self.update_vector_scale_slider)

    def get_viewport_settings(self):
        """ビューポートの設定オブジェクトを取得"""
        scene_viewer = hou.ui.paneTabOfType(hou.paneTabType.SceneViewer)
        if not scene_viewer:
            QtWidgets.QMessageBox.warning(self, "エラー", "SceneViewer が見つかりません。")
            return None
        return scene_viewer.curViewport().settings()

    def update_normal_scale_input(self, value):
        """スライダー変更時に QLineEdit を更新"""
        self.normal_scale_input.setText(f"{value / 10.0:.1f}")

    def update_normal_scale_slider(self):
        """QLineEdit 変更時にスライダーを更新"""
        try:
            value = float(self.normal_scale_input.text())
            self.normal_scale_slider.setValue(int(value * 10))
        except ValueError:
            pass  # 数値変換エラー時は無視

    def update_vector_scale_input(self, value):
        """スライダー変更時に QLineEdit を更新"""
        self.vector_scale_input.setText(f"{value / 10.0:.1f}")

    def update_vector_scale_slider(self):
        """QLineEdit 変更時にスライダーを更新"""
        try:
            value = float(self.vector_scale_input.text())
            self.vector_scale_slider.setValue(int(value * 10))
        except ValueError:
            pass  # 数値変換エラー時は無視

    def apply_particle_settings(self):
        """パーティクルの表示タイプとサイズを適用"""
        ptype = [ptype for ptype, rb in self.radio_buttons.items() if rb.isChecked()][0]
        hou.hscript(f"viewdisplay -P {ptype} *")

        psize = self.size_input.value()
        hou.hscript(f"viewdisplay -p {psize} *")

        #print(f"Particle Type: {ptype}, Size: {psize} を適用しました。")

    def apply_normal_scale(self):
        """Scale Normal を適用"""
        settings = self.get_viewport_settings()
        if settings:
            normal_scale = float(self.normal_scale_input.text())
            settings.setNormalScale(normal_scale)
            #print(f"Normal Scale を {normal_scale} に設定しました。")

    def apply_vector_scale(self):
        """Scale Vectors を適用"""
        settings = self.get_viewport_settings()
        if settings:
            vector_scale = float(self.vector_scale_input.text())
            settings.setVectorScale(vector_scale)
            #print(f"Vector Scale を {vector_scale} に設定しました。")

    def apply_texture_3d(self):
        """3D Texture Max Resolution を適用"""
        settings = self.get_viewport_settings()
        if settings:
            tex_3d_res = int(self.texture_3d_input.text())  # 1つの入力を取得
            settings.setTextureMaxRes3D((tex_3d_res, tex_3d_res, tex_3d_res))  # (width, height, depth) に適用
            #print(f"3D Texture Max Res を ({tex_3d_res}, {tex_3d_res}, {tex_3d_res}) に設定しました。")

    def apply_texture_2d(self):
        """2D Texture Max Resolution を適用"""
        settings = self.get_viewport_settings()
        if settings:
            tex_2d_res = int(self.texture_2d_input.text())  # 1つの入力を取得
            settings.setTextureMaxRes2D((tex_2d_res, tex_2d_res))  # (width, height) に適用
            #print(f"2D Texture Max Res を ({tex_2d_res}, {tex_2d_res}) に設定しました。")

widget = MyWidget()
widget.show()
4. Sticky Note Pad
StickyNote の“地味な不満”を潰す

何をするツールか
StickyNote 作成専用の UI です。
- 文字サイズ/文字色/背景色を指定
- テキスト量に応じて 表示枠を自動調整
- 選択ノードの近くに配置
デメリット(正直に)
- 作成位置の基準としてノード選択が必須
デフォルトの StickyNote のように
「何も選ばずに作成」したかったのですが、
今回は“選択ノード基準”で置く実装にしています。
(カーソル位置だけで安定させる方法が見つからず)
どうやって実現しているか
表示枠サイズの計算には、
いくつかのマジックナンバーを使っています。
フォントサイズや表示倍率によって最適な値が変わるため、
実用上それっぽく見える値を採用しています。
より安定したサイズ算出方法や、
ノード選択なしで配置する良い方法をご存じの方がいれば、
教えていただけると助かります。
# StickyNoteのサイズ計算
lines = text.split('\n')
max_line_length = max(len(line) for line in lines)
sticky_note_width = max_line_length * font_size * 0.55  # 表示枠に収める係数(幅)
ticky_note_height = len(lines) * font_size * 1.5       # 表示枠に収める係数(高さ)
Hotkey登録の一例:Ctrl + Shift + P (Network Pane)
※ デフォルトのStickyNoteはShift + P
おすすめアイコン:BUTTONS_network_sticky
フルコード(クリックで展開)
from PySide2 import QtWidgets, QtGui, QtCore
import hou

class StickyNoteCreator(QtWidgets.QDialog):
    def __init__(self, parent=None):
        super(StickyNoteCreator, self).__init__(parent)
        self.setWindowTitle("Sticky Note Pad")

        # ウィンドウを常に最前面に表示するフラグを設定
        self.setWindowFlags(self.windowFlags() | QtCore.Qt.WindowStaysOnTopHint)

        self.text_edit = QtWidgets.QTextEdit()
        self.hide_background_check = QtWidgets.QCheckBox("Hide Background")

        # フォントサイズスピンボックスを作成
        self.font_size_spinbox = QtWidgets.QDoubleSpinBox()
        self.font_size_spinbox.setRange(0.5, 100.0)  # 修正: 0.1 から 100.0 に変更
        self.font_size_spinbox.setValue(2.0) #1.0=Large, 3.0=ExtraLarge
        self.font_size_spinbox.setDecimals(1)
        self.font_size_spinbox.setFixedWidth(70)

        # フォントサイズラベルとスピンボックスのレイアウト
        self.font_size_layout = QtWidgets.QHBoxLayout()
        self.font_size_label = QtWidgets.QLabel("Font Size :")
        self.font_size_layout.addWidget(self.font_size_label)
        self.font_size_layout.addStretch()  # 右詰めにするためのスペーサー
        self.font_size_layout.addWidget(self.font_size_spinbox)

        # 背景色ラベルとボタンのレイアウト
        self.background_color_layout = QtWidgets.QHBoxLayout()
        self.background_color_label = QtWidgets.QLabel("Background Color :")
        self.background_color_button = QtWidgets.QPushButton()
        self.background_color_button.setFixedWidth(70)
        self.background_color_button.clicked.connect(self.select_background_color)
        self.background_color_layout.addWidget(self.background_color_label)
        self.background_color_layout.addStretch()  # 右詰めにするためのスペーサー
        self.background_color_layout.addWidget(self.background_color_button)

        # 文字色ラベルとボタンのレイアウト
        self.text_color_layout = QtWidgets.QHBoxLayout()
        self.text_color_label = QtWidgets.QLabel("Text Color :")
        self.text_color_button = QtWidgets.QPushButton()
        self.text_color_button.setFixedWidth(70)
        self.text_color_button.clicked.connect(self.select_text_color)
        self.text_color_layout.addWidget(self.text_color_label)
        self.text_color_layout.addStretch()  # 右詰めにするためのスペーサー
        self.text_color_layout.addWidget(self.text_color_button)

        # 全体のレイアウト設定
        self.layout = QtWidgets.QVBoxLayout()
        self.layout.addWidget(self.text_edit)
        self.layout.addWidget(self.hide_background_check)
        self.layout.addLayout(self.font_size_layout)  # フォントサイズレイアウトを追加
        self.layout.addLayout(self.background_color_layout)
        self.layout.addLayout(self.text_color_layout)

        # OK/キャンセルボタン
        self.button_box = QtWidgets.QDialogButtonBox(QtWidgets.QDialogButtonBox.Ok | QtWidgets.QDialogButtonBox.Cancel)
        self.button_box.accepted.connect(self.accept)
        self.button_box.rejected.connect(self.reject)
        self.layout.addWidget(self.button_box)

        self.setLayout(self.layout)

        # 初期背景色と文字色の設定
        self.background_color = QtGui.QColor(82, 82, 82)
        self.text_color = QtGui.QColor(214, 214, 214)
        self.update_button_color(self.background_color_button, self.background_color)
        self.update_button_color(self.text_color_button, self.text_color)

    def update_button_color(self, button, color):
        pixmap = QtGui.QPixmap(30, 30)
        pixmap.fill(color)
        button.setIcon(QtGui.QIcon(pixmap))

    def select_background_color(self):
        color = QtWidgets.QColorDialog.getColor(self.background_color, self)
        if color.isValid():
            self.background_color = color
            self.update_button_color(self.background_color_button, color)

    def select_text_color(self):
        color = QtWidgets.QColorDialog.getColor(self.text_color, self)
        if color.isValid():
            self.text_color = color
            self.update_button_color(self.text_color_button, color)

    def accept(self):
        text = self.text_edit.toPlainText()
        hide_background = not self.hide_background_check.isChecked()
        font_size = self.font_size_spinbox.value()

        # 親ノードの取得
        selected_nodes = hou.selectedNodes()
        if not selected_nodes:
            print("Please select some nodes.")
            return
        parent = selected_nodes[0].parent()

        # 中心位置の計算
        list_x_of_selected_nodes = [node.position().x() for node in selected_nodes]
        list_y_of_selected_nodes = [node.position().y() for node in selected_nodes]
        center_x = sum(list_x_of_selected_nodes) / len(selected_nodes)
        center_y = sum(list_y_of_selected_nodes) / len(selected_nodes)

        # StickyNoteのサイズ計算
        lines = text.split('\n')
        max_line_length = max(len(line) for line in lines)
        sticky_note_width = max_line_length * font_size * 0.55  # 表示枠に収める係数(幅)
        sticky_note_height = len(lines) * font_size * 1.5       # 表示枠に収める係数(高さ)

        # StickyNoteの作成
        sticky_note = parent.createStickyNote()
        sticky_note.setPosition(hou.Vector2(center_x, center_y))
        sticky_note.setText(text)
        sticky_note.setTextSize(font_size)
        sticky_note.setSize(hou.Vector2(sticky_note_width, sticky_note_height))
        sticky_note.setTextColor(hou.Color(self.text_color.redF(), self.text_color.greenF(), self.text_color.blueF()))
        sticky_note.setColor(hou.Color(self.background_color.redF(), self.background_color.greenF(), self.background_color.blueF()))
        sticky_note.setDrawBackground(hide_background)

        # StickyNoteの位置調整
        left_most_x = min(list_x_of_selected_nodes)
        up_most_y = max(list_y_of_selected_nodes)
        sticky_note_position_x = left_most_x
        sticky_note_position_y = up_most_y + sticky_note_height * 0.1
        sticky_note_position = hou.Vector2(sticky_note_position_x, sticky_note_position_y)
        sticky_note.setPosition(sticky_note_position)

"""
DESCRIPTION : StickyNote作成インターフェイスを表示
"""
app = QtWidgets.QApplication.instance()
if not app:
    app = QtWidgets.QApplication([])
dialog = StickyNoteCreator()
dialog.show()
5. Travel Playbar
フレーム比較をパカパカやる用
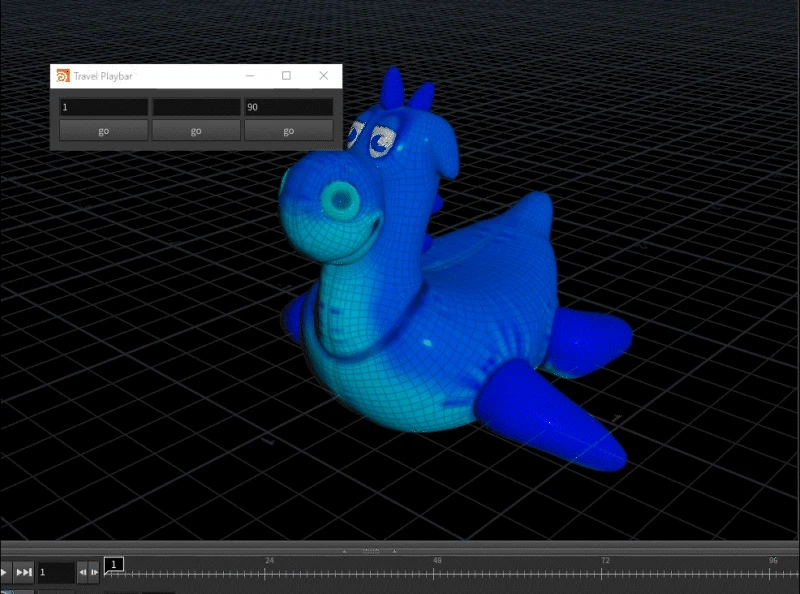
何をするツールか
任意のフレーム番号を入力し、
ボタンを押すだけでそのフレームへ移動するシンプルなツールです。
どんなときに有効か
異なるフレーム間を パカパカ切り替えながら比較したいときに便利です。
補足
入力欄を 3 つ用意していますが、どれも機能としては同じです。
Hotkey登録の一例:Alt + Shift + B (Global)
おすすめアイコン:PLAYBAR_editable_keys
フルコード(クリックで展開)
import hou
from PySide2 import QtWidgets, QtCore, QtGui

class MyWindow(QtWidgets.QWidget):
    def __init__(self):
        super(MyWindow, self).__init__()
        self.setWindowTitle("Travel Playbar")
        self.setWindowFlags(self.windowFlags() | QtCore.Qt.WindowStaysOnTopHint)

        self.button_a = QtWidgets.QPushButton('go', self)
        self.button_b = QtWidgets.QPushButton('go', self)
        self.button_c = QtWidgets.QPushButton('go', self)

        start_frame = int(hou.playbar.playbackRange()[0])
        end_frame = int(hou.playbar.playbackRange()[1])

        self.input_a = QtWidgets.QLineEdit(str(start_frame), self)
        self.input_b = QtWidgets.QLineEdit(self)
        self.input_c = QtWidgets.QLineEdit(str(end_frame), self)

        self.layout = QtWidgets.QVBoxLayout(self)

        self.input_layout = QtWidgets.QHBoxLayout()
        self.input_layout.addWidget(self.input_a)
        self.input_layout.addWidget(self.input_b)
        self.input_layout.addWidget(self.input_c)

        self.button_layout = QtWidgets.QHBoxLayout()
        self.button_layout.addWidget(self.button_a)
        self.button_layout.addWidget(self.button_b)
        self.button_layout.addWidget(self.button_c)

        self.layout.addLayout(self.input_layout)
        self.layout.addLayout(self.button_layout)

        self.button_a.clicked.connect(self.on_button_a_clicked)
        self.button_b.clicked.connect(self.on_button_b_clicked)
        self.button_c.clicked.connect(self.on_button_c_clicked)

    def on_button_a_clicked(self):
        target_frame = int(self.input_a.text())
        hou.setFrame(target_frame)

    def on_button_b_clicked(self):
        target_frame = int(self.input_b.text())
        hou.setFrame(target_frame)

    def on_button_c_clicked(self):
        target_frame = int(self.input_c.text())
        hou.setFrame(target_frame)

ui = MyWindow()
ui.show()
6. Screenshot to BG Image
ビューポートをコピペする
何をするツールか
現在のビューポートをキャプチャし、
その画像を Network View の Background Image として配置します。
どんなときに有効か
-
レイアウトの意図を残したいとき
-
ノード構成と見た目を対応づけたいとき
-
後から見返すためのスナップショット
といった用途を想定しています。
仕様
-
Network Image と Null ノードを対応づけて管理
-
ノード削除・フラグ変更に応じて背景画像も追従
-
画像は $HIP/screenshots 以下に保存
-
Null ノードのコメントに日時とフレーム番号を付与
「背景画像を貼る」だけで終わらせず、
後から整理・削除しやすい構成にしています。
元ネタ
このツールは、以下のページにあるコードをベースにしています。
Houdini Python – bernie’s
https://berniebernie.fr/wiki/Houdini_Python#screenshot_to_background_image
元のコードでは外部ツールによるキャプチャを使用していますが、
Houdini 内で完結するように調整しています。
おすすめアイコン:BUTTONS_capture
フルコード(クリックで展開)
import hou
import os
import subprocess
import datetime
import nodegraphutils as utils
from time import gmtime, strftime

widthRatio = 4

def takeScreenShot(systempath):
    # ビューポートのカメラパスを取得
    cur_desktop = hou.ui.curDesktop()
    desktop = cur_desktop.name()
    viewer = hou.paneTabType.SceneViewer
    panetab = cur_desktop.paneTabOfType(viewer).name()
    persp = cur_desktop.paneTabOfType(viewer).curViewport().name()
    camera_path = desktop + '.' + panetab + '.' + 'world.' + persp

    # スクリーンショットのファイル名を作成
    filename = systempath

    # スクリーンショットを撮影
    if filename is not None:
        frame = hou.frame()
        hou.hscript("viewwrite -f %d %d %s '%s'" % (frame, frame, camera_path, filename))

    return filename

def removeBackgroundImage(**kwargs):
    ''' erases bg image from tuples of backgroundImages() if it can find it, updates bg '''
    deletingNode = [x[1] for x in  kwargs.items()][0]
    image = deletingNode.parm('houdinipath').eval()
    editor = hou.ui.paneTabOfType(hou.paneTabType.NetworkEditor)
    backgroundImagesDic = editor.backgroundImages()
    backgroundImagesDic = tuple(x for x in backgroundImagesDic if x.path() != image)
    editor.setBackgroundImages(backgroundImagesDic)
    utils.saveBackgroundImages(editor.pwd(), backgroundImagesDic)

def changeBackgroundImageBrightness(event_type,**kwargs):
    ''' changes brightness/visibility if template or bypass flags are checked -- its poorly written/thought but i was tired'''
    nullNode = [x[1] for x in  kwargs.items()][0]
    image = nullNode.parm('houdinipath').eval()
    brightness = 1.0
    if nullNode.isBypassed():
        brightness = 0.0
    elif nullNode.isTemplateFlagSet():
        brightness = 0.5
    editor = hou.ui.paneTabOfType(hou.paneTabType.NetworkEditor)
    backgroundImagesDic = editor.backgroundImages()
    i = 0
    for item in backgroundImagesDic:
        if item.path() == image:
            backgroundImagesDic[i].setBrightness(brightness)
            break
        i = i + 1
    editor.setBackgroundImages(backgroundImagesDic)
    utils.saveBackgroundImages(editor.pwd(), backgroundImagesDic)

#generate unique(ish) path for screenshot
timestamp = strftime('%Y%m%d_%H%M%S', gmtime())
hipname = str(hou.getenv('HIPNAME'))
hippath = str(hou.getenv('HIP')) + '/screenshots'
screenshotName = hipname + '.' + timestamp + '.jpg'
systempath = hippath + '\\' + screenshotName
houdinipath = '$HIP/screenshots/'+screenshotName
try:
    os.makedirs(os.path.dirname(systempath))
except OSError:
    if not os.path.isdir(os.path.dirname(systempath)):
        raise

#take screenshot with capture region
takeScreenShot(systempath)


#set up background image plane
editor = hou.ui.paneTabOfType(hou.paneTabType.NetworkEditor)
image = hou.NetworkImage()
image.setPath(houdinipath)
sel = hou.selectedNodes()
nullNode = ''


if sel:
    lastSel = sel[-1]
    nullNode = lastSel.parent().createNode('null','screenshot')
    if lastSel.outputConnections():
        nullNode.setInput(0,lastSel)

else:
    nullNode = editor.pwd().createNode('null','screenshot')
    nullNode.moveToGoodPosition()
    lastSel = nullNode

# for New Null
# 現在の日時を取得
time = datetime.datetime.now()
# 日時を文字列に変換
time_str = time.strftime("%Y.%m.%d__%H:%M:%S")
current_frame = hou.frame()

#configure image plane placement
nullNode.setUserData('nodeshape','camera')
nullNode.setPosition(lastSel.position())
nullNode.setColor(hou.Color(.3,.3,.3))
nullNode.setComment(time_str + "__" + str(current_frame) + "F")  # コメントに日時を設定
nullNode.setGenericFlag(hou.nodeFlag.DisplayComment,True)  # コメントをネットワークビューで表示
nullNode.move([lastSel.size()[0]*2,-lastSel.size()[1]*2])

rez = hou.imageResolution(systempath)
ratio = 1.0*rez[1]/rez[0]
rect = hou.BoundingRect(0,-lastSel.size()[1]*1.1-0.5,widthRatio,-widthRatio*ratio-lastSel.size()[1]*1.1-0.5)
image.setRelativeToPath(nullNode.path())
image.setRect(rect)

hou_parm_template_group = hou.ParmTemplateGroup()
hou_parm_template = hou.LabelParmTemplate("houdinipath", "Label", column_labels=(['\\'+houdinipath]))
hou_parm_template.hideLabel(True)
hou_parm_template_group.append(hou_parm_template)
nullNode.setParmTemplateGroup(hou_parm_template_group)


nullNode.addEventCallback((hou.nodeEventType.BeingDeleted,), removeBackgroundImage)

#attach a function to change visibility or opacity if corresponding node flags are changed
nullNode.addEventCallback((hou.nodeEventType.FlagChanged,), changeBackgroundImageBrightness)

#add image to network background
backgroundImagesDic = editor.backgroundImages()
backgroundImagesDic = backgroundImagesDic + (image,)
editor.setBackgroundImages(backgroundImagesDic)
utils.saveBackgroundImages(editor.pwd(), backgroundImagesDic)
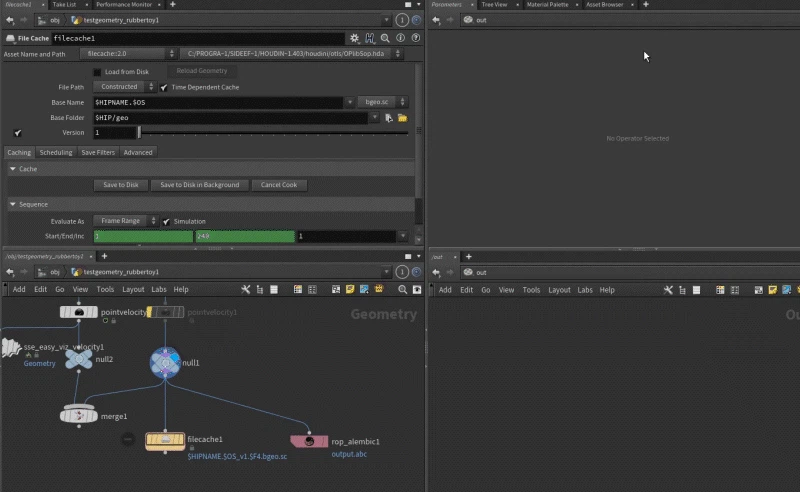
7. Paste as Obj Merges
何も考えずノードをコピペしたい (Object Merge編)
何をするツールか
クリップボードにコピーしたノードパスを元に、
Object Merge ノードとしてまとめて生成します。
元ネタ
このツールも" 6. Screenshot to BG Image " と同様に、下記から流用させてもらっています。
Houdini Python – bernie’s
https://berniebernie.fr/wiki/Houdini_Python#screenshot_to_background_image
補足
- 貼り付け位置はマウスポインタの位置が基準になるため、Hotkey 実行前提です。
Hotkey登録の一例:Alt + Ctrl + V (Network Pane)
おすすめアイコン:SOP_object_merge
フルコード(クリックで展開)
import hou

def main():
    network = hou.ui.curDesktop().paneTabUnderCursor()
    networkpath = network.pwd().path()
    pos = network.cursorPosition()

    clipboard = hou.ui.getTextFromClipboard()

    n = 0

    if clipboard:
        list = clipboard.split()
        for item in list:
            if hou.node(item) != None:
                merge = hou.node(networkpath).createNode('object_merge','merge_'+item.split('/')[-1])
                merge.parm('objpath1').set(str(item))
                merge.setPosition(pos)
                merge.move([n*2,0])
                if n == 0:
                    merge.setSelected(True,True)
                else:
                    merge.setSelected(True,False)
                n = n + 1

main()
8. Paste as Fetches
何も考えずノードをコピペしたい (ROP Fetch編)
何をするツールか
クリップボードにあるノードパスを元に、
Fetch ノードを自動生成します。
どうやって実現しているか
Fetch ノードの source パラメータは、
ノードタイプによって参照すべきパスが異なるため、
コピー元のノードタイプに応じて自動で切り替えるようにしています。
具体的には:
-
filecache / vellumio / rbdio
→ 実行用ノードが一段下にあるため、/render を付与 -
ROP Alembic Output など
→ そのままノードパスを指定
という形で分岐しています。
補足1
現時点で /render の自動付与に対応しているのは以下のノードのみです。
-
filecache
-
vellumio
-
rbdio
補足2
自作HDA含む、他のノードも対応させたい場合、elifで下記の条件を追加してください。
"sse_AET_exporter"という自作HDAの例
            elif is_node_type(node, "sse_AET_exporter"):
                source_param = node.path() + "/for_Dive/export_alembic"
挿入例
        for item in items:
            node = hou.node(item)
            if node is None:
            # Pythonの推奨スタイル(PEP8)では is not None を使用します。
            # 流用元では if node != None:が使用されていた。
                continue
            # 選択したノードのタイプに基づいてsourceパラメータを設定
            if is_node_type(node, "filecache"):
                source_param = node.path() + "/render"
            elif is_node_type(node, "vellumio") or is_node_type(node, "kinefx::characterio") or is_node_type(node, "rbdio"):
                source_param = node.path() + "/filecache/render"

            # 例:独自HDAも拾いたい場合はここで追加
            elif is_node_type(node, "sse_AET_exporter"):
                source_param = node.path() + "/for_Dive/export_alembic"

            else:
                source_param = node.path()
補足3
- 貼り付け位置はマウスポインタの位置が基準になるため、Hotkey 実行前提です。
Hotkey登録の一例:Alt + Ctrl + F (Network Pane)
おすすめアイコン:COP2_fetch
フルコード(クリックで展開)
import hou
import re

def pasteAsFetches():
    network = hou.ui.curDesktop().paneTabUnderCursor()
    if not hasattr(network, "pwd"):
        raise RuntimeError("Mouse must be over a network editor.")

    networkpath = network.pwd().path()
    pos = network.cursorPosition()
    clipboard = hou.ui.getTextFromClipboard()
    n = 0

    def is_node_type(node, base_type):
        node_type_name = node.type().name()
        pattern = re.compile(f"^{base_type}(::\d+\.\d+)?$")
        return bool(pattern.match(node_type_name))

    if clipboard:
        items = clipboard.split() # list はPythonの組み込み型名と衝突するため、誤動作や補完の妨げになります。わかりやすく items に変更しました。

        for item in items:
            node = hou.node(item)
            if node is None: # Pythonの推奨スタイル(PEP8)では is not None を使用します。(old: if node != None:)
                continue
            # 選択したノードのタイプに基づいてsourceパラメータを設定
            if is_node_type(node, "filecache"):
                source_param = node.path() + "/render"
            elif is_node_type(node, "vellumio") or is_node_type(node, "kinefx::characterio") or is_node_type(node, "rbdio"):
                source_param = node.path() + "/filecache/render"
            else:
                source_param = node.path()
            # /out階層にfetchノードを作成
            fetch = hou.node(networkpath).createNode("fetch", "fetch_" + item.split('/')[-1])
            # sourceパラメータを設定
            fetch.parm("source").set(source_param)
            # ノードの位置を設定(重ならないようにする)
            fetch.setPosition(pos)
            fetch.move([n * 2, 0])
            fetch.setSelected(True, clear_all_selected=(n == 0))
            n += 1

pasteAsFetches()
おわりに
今回紹介したツールは、
どれも目新しいことをしているわけではありません。
普段作業している中で、
「毎回やっているけど、地味に面倒だな」と感じた操作を、
そのままツールにしてみたり、流用したりしただけのものです。
自分の作業を少しでも止めないために作ったものですが、
似たような作業をしている方の手元でも、
何か一つでも役に立てば嬉しいです。
ここまで読んでいただき、ありがとうございました。