はじめに
Cognito記事第二弾。
前回記事では、自分でログインページを実装したが、実はMFA認証とかを考えるとあれだけでは全然足りず、全部自前で実装するとそこそこのコストになるため、「面倒な処理はマネージドサービスにやらせてしまえ!」という考え方のもと、CognitoのHosted UIを使ってみる。
前提知識としては、前回文に加えて、BlackBeltの資料の内容は知っておくと入りやすいと思う。
やりたいこと&構成図
構成図は前回と変わらない。ログイン画面がHosted UIに代わる程度だ。
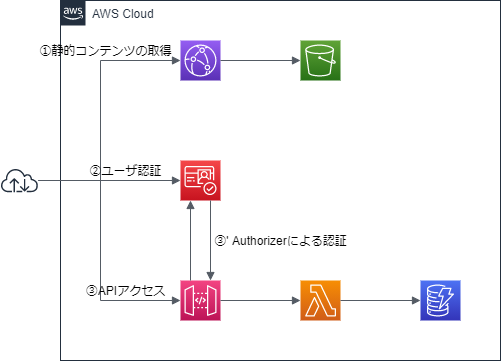
なお、前回はImplicit grantで認証を行ったが、今回は、BlackBeltの記事でも推奨されているAuthorization code grantを使う。
ログイン周りの複雑な処理を、業務系機能の中で意識させたくないので、ログイン用のリダイレクトページを用意しておく。
一番左が、Hosted UIのログインページだ。
前回からの変更点
まずは、Authorization code grantを使うために、aws_cognito_user_pool_client を以下のように変更する。
resource "aws_cognito_user_pool_client" "example" {
  user_pool_id = aws_cognito_user_pool.example.id
  name         = local.cognito_client_name

  supported_identity_providers         = ["COGNITO"]
  allowed_oauth_flows_user_pool_client = true
  allowed_oauth_flows                  = ["code"] # ★変更点
  allowed_oauth_scopes                 = ["openid", "aws.cognito.signin.user.admin"]
  explicit_auth_flows = [
    "ALLOW_CUSTOM_AUTH",
    "ALLOW_REFRESH_TOKEN_AUTH",
    "ALLOW_USER_SRP_AUTH",
  ]
  callback_urls = ["https://${aws_cloudfront_distribution.s3_contents.domain_name}/redirect.html"] # ★変更点
}
で、Hosted UIを使うために、以下のリソースをTerraformに追加する。
これにより、https://[任意のドメイン名].auth.ap-northeast-1.amazoncognito.com/login でログインができるようになる。
resource "aws_cognito_user_pool_domain" "example" {
  user_pool_id = aws_cognito_user_pool.example.id
  domain       = local.cognito_domain_name
}
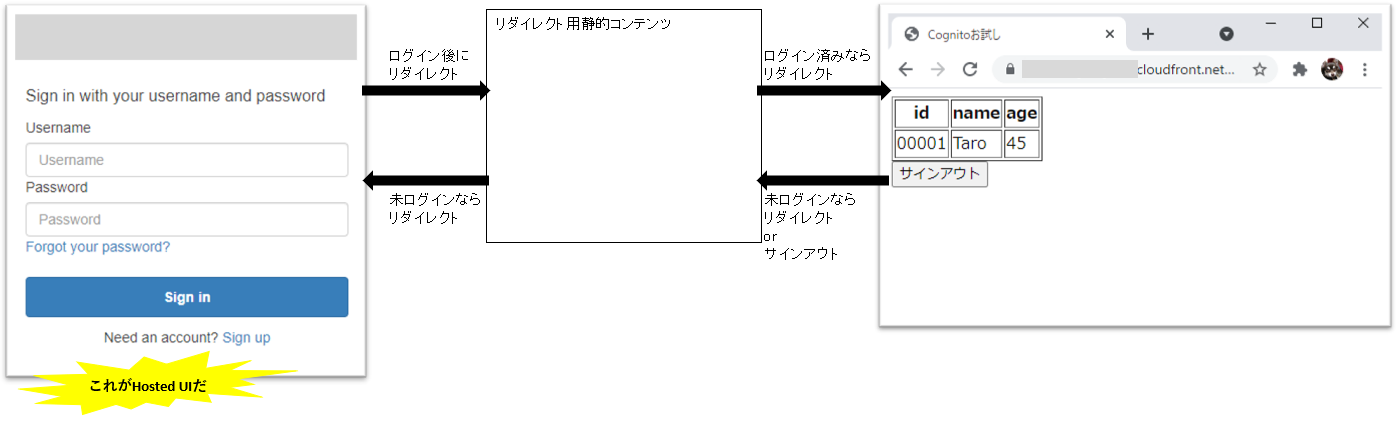
前回は、サインイン用のコンテンツでCognitoのAPIを実行してトークン情報を保存していたが、Hosted UIにはクエリで認証情報を渡さなくてはいけない。このため、前回は未ログイン時のリダイレクト先URLはシンプルな静的コンテンツで良かったが、今回は以下のようなかたちでリダイレクトをする。
いちいちJavascript内に転記するのは面倒なので、Terraformから値を参照して渡そう。
window.location.href = '${cognito_signin_uri}'
data "template_file" "contents_redirect_app" {
  template = file("../contents_template/redirect.js")

  vars = {
    (中略)
    cognito_signin_uri = "https://${aws_cognito_user_pool_domain.example.id}.auth.${data.aws_region.current.name}.amazoncognito.com/login?client_id=${aws_cognito_user_pool_client.example.id}&response_type=code&scope=openid+aws.cognito.signin.user.admin&redirect_uri=https://${aws_cloudfront_distribution.s3_contents.domain_name}/redirect.html"
    (中略)
  }
}
リダイレクト用コンテンツ
CognitoのAPIを実行してユーザ認証を行う場合、APIがSession Storageにトークン情報を保存してくれていたが、Hosted UIでは、リダイレクト先にHTTPのクエリでコードを渡してくれるものの、トークンの保存をしてくれない。このため、自分でクエリのcodeからOAuth2.0のトークンエンドポイントを実行してトークンを取得して保存する必要がある(保存しなくても良いが、各コンテンツでの認証が煩雑になってしまう……)。
基本は前回同様、cognitoUserをSession Storageから取得して、できなければログインさせるというもの。
const app = new Vue({
  el: '#myapp',
  created: async function () {
    AWS.config.region = 'ap-northeast-1'
    AWS.config.credentials = new AWS.CognitoIdentityCredentials({
      IdentityPoolId: '${cognito_identity_pool_id}'
    })

    const poolData = {
      UserPoolId: '${cognito_user_pool_id}',
      ClientId: '${cognito_user_pool_client_id}',
      Storage: sessionStorage
    }
    const userPool = new AmazonCognitoIdentity.CognitoUserPool(poolData)
    const cognitoUser = userPool.getCurrentUser()

    if (cognitoUser == null) {
      const code = (() => {
        const params = new URLSearchParams(location.search.substring(1))
        return params.get('code')
      })()

      if (!code) {
        window.location.href = '${cognito_signin_uri}'
      }

      const token = await (async () => {
        try {
          var params = new URLSearchParams()
          params.append('grant_type', 'authorization_code')
          params.append('client_id', '${cognito_user_pool_client_id}')
          params.append('code', code)
          params.append('redirect_uri', '${cognito_redirect_uri}')
          const response = await axios.post('${cognito_tokenauth_uri}', params)

          return response.data
        } catch (err) {
          console.log(err.response.data)
        }
      })()

      const username = (() => {
        const tokens = token.id_token.split('.')
        const obj = JSON.parse(atob(tokens[1]))
        return obj['cognito:username']
      })()

      sessionStorage.setItem('CognitoIdentityServiceProvider.${cognito_user_pool_client_id}.' + username + '.idToken', token.id_token)
      sessionStorage.setItem('CognitoIdentityServiceProvider.${cognito_user_pool_client_id}.LastAuthUser', username)
      sessionStorage.setItem('CognitoIdentityServiceProvider.${cognito_user_pool_client_id}.' + username + '.accessToken', token.access_token)
      sessionStorage.setItem('CognitoIdentityServiceProvider.${cognito_user_pool_client_id}.' + username + '.refreshToken', token.refresh_token)
      sessionStorage.setItem('CognitoIdentityServiceProvider.${cognito_user_pool_client_id}.' + username + '.clockDrift', '0')

      window.location.href = 'redirect.html'
    } else {
      window.location.href = 'index.html'
    }
  }
})

app.$mount('#myapp')
キモになるのが、以下の部分で、AxiosでCognitoのトークン認証エンドポイントを実行している。
トークン認証エンドポイントの詳細は、AWS公式のデベロッパーガイドを確認しよう。
      var params = new URLSearchParams()
      params.append('grant_type', 'authorization_code')
      params.append('client_id', '${cognito_user_pool_client_id}')
      params.append('code', code)
      params.append('redirect_uri', '${cognito_redirect_uri}')
      await axios
        .post('${cognito_tokenauth_uri}', params)
        .then(response => {
          token.idToken = response.data.id_token
          token.accessToken = response.data.access_token
          token.refreshToken = response.data.refresh_token
          token.expiresIn = response.data.expires_in
          token.tokenType = response.data.token_type
        }).catch(err => {
          console.log(err.response.data)
        })
これでトークンを取得できれば、あとはCognitoのAPIで扱えるかたちでSession Storageにアクセスしてあげれば良い。
なお、今回の実装では、BlackBeltの資料に記載されていたstateを扱っていない。CSRF対策のためにも、stateをSession Storageに格納したうえでHosted UIに飛ばし、stateをリダイレクトしてもらい検証をしよう。
サインアウト
サインアウトは、ボタンを押したときに以下のコードを呼ぶようにしている。
      cognitoUser.signOut()
      window.location.href = 'redirect.html'
これをすることで、Session Storageからトークンに関する情報を削除することができる。
補足
今回の実装は、Implicit grantでも同様に実装することができる。
この場合、アクセストークンとIDトークンがリダイレクトのクエリに設定されてくるので、これを持ち回ろう。
ただし、Implicit grantで渡される場合、リフレッシュトークンが発行されない。
リフレッシュが必要な場合は、Authorization code grantでリフレッシュトークンを取得し、リフレッシュ処理を実装しよう。リフレッシュ処理もトークンエンドポイントにリフレッシュトークンを渡すことで対応可能だ。