はじめに
記事タイトルの通り、CognitoはWebアプリ等の認証機能をサーバレスでお手軽に作ることができる。
では、実際どれくらいお手軽に作れるかを試してみよう。
なお、Cognito自体はお手軽なものの、Webアプリの基本の部分は結構使うことになる。
過去、記事でまとめた基本要素は、記事中に都度リンクを貼るので、今回は詳しくは説明しない。
前提となる基本知識としては以下だ。
- Vue.jsの基本
- API GatewayにおけるCORSの対応
- S3の静的コンテンツのウェブサイトホスティングの基本
やりたいこと&構成図
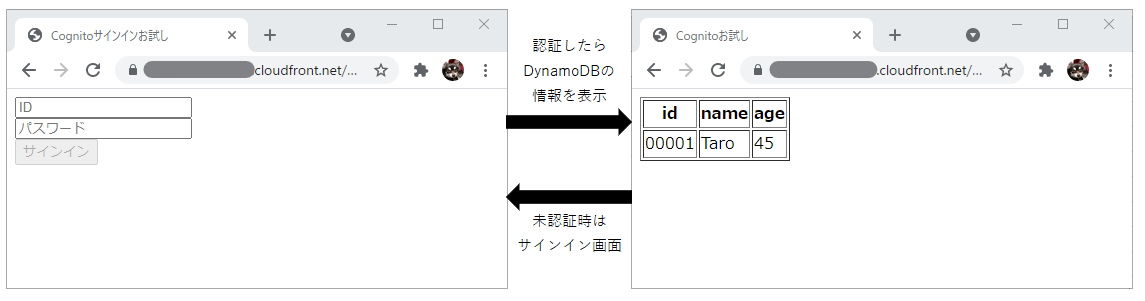
今回はシンプルに作るため、未認証時にはログイン画面を表示し、あらかじめCognitoに登録しているユーザIDで認証をしたら、該当ユーザの情報をDynamoDBから取得して画面に表示するといった簡単なアプリにする。
これを、以下のような構成で作っていく。
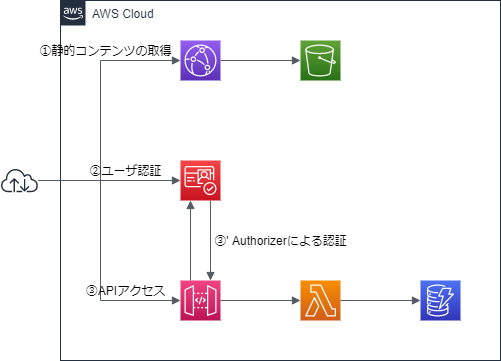
①静的コンテンツ
静的コンテンツは、S3のウェブサイトホスティング機能を使う。
今回やりたいことからすると必須ではないが、CloudFrontを使ってS3のPrivateの状態のまま使えるようにしておこう。
このあたりの設定方法は、以下の記事を参考にしていただきたい。
今回のコンテンツは、
- サインイン後のコンテンツ: index.html
- 上記のWebアプリ定義: app.js
- サインイン用のコンテンツ: signin.html
- 上記のWebアプリ定義: signin.js
とする。Vue.js使うのにシングルページじゃないのかよ!というツッコミは無用で……。
簡易に対応するために、CDN版のVue.jsを使っている。
なお、あまり参考にならないかもしれないが、Vue.jsの基本は以下の記事あたりで解説している。
サインイン後のコンテンツ
<html>
  <head>
    <style>
      [v-cloak] { display: none }
    </style>
    <meta charset="utf-8">
    <title>Cognitoお試し</title>
  </head>
  <body>
    <div id="myapp">
      <table border="1" v-if="employee_info" v-cloak>
        <tr><th>id</th><th>name</th><th>age</th></tr>
        <tr v-for="item in items"><td>{{ item['id'] }}</td><td>{{ item['name'] }}</td><td>{{ item['age'] }}</td></tr>
      </table>
    </div>

    <!-- Vue.js/axios を読み込む -->
    <script src="https://cdn.jsdelivr.net/npm/vue/dist/vue.js"></script>
    <script src="https://cdn.jsdelivr.net/npm/axios/dist/axios.js"></script>
    <script src="https://cdn.jsdelivr.net/npm/aws-sdk/dist/aws-sdk.js"></script>
    <script src="https://cdn.jsdelivr.net/npm/amazon-cognito-identity-js/dist/amazon-cognito-identity.js"></script>
    <script src="app.js"></script>
  </body>
</html>
これ自体は特別なことはしていない。
この後使う機能で、AWSとCognitoのSDKを使うことになるので、上記のようにCDNからそれぞれロードしておく。
const app = new Vue({
  el: '#myapp',
  data: function () {
    return {
      employee_info: false,
      items: null,
      token: '',
      cognito_userdata: {}
    }
  },
  created: function () {
    AWS.config.region = 'ap-northeast-1'
    AWS.config.credentials = new AWS.CognitoIdentityCredentials({
      IdentityPoolId: '${cognito_identity_pool_id}'
    })

    const poolData = {
      UserPoolId: '${cognito_user_pool_id}',
      ClientId: '${cognito_user_pool_client_id}',
      Storage: sessionStorage
    }
    const userPool = new AmazonCognitoIdentity.CognitoUserPool(poolData)
    const cognitoUser = userPool.getCurrentUser()

    if (cognitoUser == null) {
      window.location.href = 'signin.html'
    } else {
      cognitoUser.getSession((err, session) => {
        if (err != null) {
          console.log(err)
          window.location.href = 'signin.html'
        } else {
          this.token = session.idToken.jwtToken

          cognitoUser.getUserAttributes((err, result) => {
            if (err) {
              console.log(err)
              window.location.href = 'signin.html'
            } else {
              for (let i = 0; i < result.length; i++) {
                this.$set(this.cognito_userdata, result[i].getName(), result[i].getValue())
              }

              axios
                .get('${apigateway_invoke_url}/employee', {
                  headers: {
                    Authorization: this.token
                  },
                  params: {
                    id: this.cognito_userdata['custom:id']
                  }
                })
                .then(response => {
                  this.items = response.data
                  this.employee_info = true
                })
            }
          })
        }
      })
    }
  }
})

app.$mount('#myapp')
さて、ここではSDKを使いまくっている。
まずは、以下の部分で接続の設定を行う。
IdentityPoolId は②で取得するのでそこで解説する。なお、都度コンテンツを書き直すのは面倒なので、${cognito_identity_pool_id} の部分は、Terraformのtemplate_fileを使って、作成したリソースを参照した値で置換してS3にアップロードするようにしておくと楽で良い。
    AWS.config.region = 'ap-northeast-1'
    AWS.config.credentials = new AWS.CognitoIdentityCredentials({
      IdentityPoolId: '${cognito_identity_pool_id}'
    })
次に、認証状態の確認だ。
認証ができていると、AmazonCognitoIdentity.CognitoUserPool() でCognitoのユーザプールを参照し、ユーザプールに接続している現在のユーザの情報をuserPool.getCurrentUser() で取得する。
未認証の場合は、この戻り値がnullになるため、それをハンドリングすることで、認証時と未認証時の動作を振り分けることが可能だ。
今回は、未認証の場合は、signin.htmlを表示するようにしている。
ちなみに、amazon-cognito-identity.jsではデフォルトでCognitoの認証情報をLocal Storageに格納してしまうが、これは世間一般では推奨されないらしいので、一応、以下のようにしてSession Storageに格納するように切り替えてあげよう。これで、タブやブラウザを閉じたときにはセッション情報がクリアされるようになる。
なお、${cognito_user_pool_id}と${cognito_user_pool_client_id}もTerraformのtemplate_fileで参照を行うと楽だ。
    const poolData = {
      UserPoolId: '${cognito_user_pool_id}',
      ClientId: '${cognito_user_pool_client_id}',
      Storage: sessionStorage
    }
    const userPool = new AmazonCognitoIdentity.CognitoUserPool(poolData)
    const cognitoUser = userPool.getCurrentUser()

    if (cognitoUser == null) {
      window.location.href = 'signin.html'
    } else {
さて、認証ができていた場合は、getSession() でセッション情報を取得できる。
セッション情報には、CognitoのIDトークン、アクセストークン、リフレッシュトークンが入っている。APIアクセスではIDトークンが必要になるので、session.idToken.jwtTokenをdataのトークン情報に入れておこう。
      cognitoUser.getSession((err, session) => {
        if (err != null) {
          console.log(err)
          window.location.href = 'signin.html'
        } else {
          this.token = session.idToken.jwtToken
さらに、getUserAttributes()でトークンに入っているユーザ情報から属性を取り出すことができる。
resultはJSON形式ではないので、ここで使いやすくJSON形式にしておいてあげよう。
          cognitoUser.getUserAttributes((err, result) => {
            if (err) {
              console.log(err)
              window.location.href = 'signin.html'
            } else {
              for (let i = 0; i < result.length; i++) {
                this.$set(this.cognito_userdata, result[i].getName(), result[i].getValue())
              }
最後に、ここで取得したトークンとユーザIDをAPIに送ることで、認証後のコンテンツの画面を表示することが可能だ。
サインイン用のコンテンツ
<html>
  <head>
    <style>
      [v-cloak] { display: none }
    </style>
    <meta charset="utf-8">
    <title>Cognitoサインインお試し</title>
  </head>
  <body>
    <div id="myapp">
      <div>
        <input type="text" v-model="cognito_id" placeholder="ID">
      </div>
      <div>
        <input type="text" v-model="cognito_pwd" placeholder="パスワード">
      </div>
      <button v-on:click="signin" v-bind:disabled="is_invalid">サインイン</button>
    </div>

    <!-- Vue.js/axios を読み込む -->
    <script src="https://cdn.jsdelivr.net/npm/vue/dist/vue.js"></script>
    <script src="https://cdn.jsdelivr.net/npm/aws-sdk/dist/aws-sdk.js"></script>
    <script src="https://cdn.jsdelivr.net/npm/amazon-cognito-identity-js/dist/amazon-cognito-identity.js"></script>
    <script src="signin.js"></script>
  </body>
</html>
const app = new Vue({
  el: '#myapp',
  data: {
    cognito_id: '',
    cognito_pwd: '',
    is_invalid: true
  },
  watch: {
    cognito_id: function (newVal, oldVal) {
      this.is_invalid = (newVal.length === 0 && this.cognito_pwd.length)
    },
    cognito_pwd: function (newVal, oldVal) {
      this.is_invalid = (newVal.length === 0 && this.cognito_id.length)
    }
  },
  methods: {
    signin: function () {
      AWS.config.region = 'ap-northeast-1'
      AWS.config.credentials = new AWS.CognitoIdentityCredentials({
        IdentityPoolId: '${cognito_identity_pool_id}'
      })

      const poolData = {
        UserPoolId: '${cognito_user_pool_id}',
        ClientId: '${cognito_user_pool_client_id}',
        Storage: sessionStorage
      }
      const userPool = new AmazonCognitoIdentity.CognitoUserPool(poolData)

      const authenticationData = {
        Username: this.cognito_id,
        Password: this.cognito_pwd,
      }
      const authenticationDetails = new AmazonCognitoIdentity.AuthenticationDetails(authenticationData)

      const userData = {
        Username: this.cognito_id,
        Pool: userPool,
        Storage: sessionStorage
      }
      const cognitoUser = new AmazonCognitoIdentity.CognitoUser(userData)
      cognitoUser.authenticateUser(authenticationDetails, {
        onSuccess: function (result) {
          window.location.href = 'index.html'
        },
        onFailure: function (err) {
          console.log(err)
        }
      })
    }
  }
})

app.$mount('#myapp')
``

こちらも app.js 同様に、

```Javascript
      AWS.config.region = 'ap-northeast-1'
      AWS.config.credentials = new AWS.CognitoIdentityCredentials({
        IdentityPoolId: '${cognito_identity_pool_id}'
      })

      const poolData = {
        UserPoolId: '${cognito_user_pool_id}',
        ClientId: '${cognito_user_pool_client_id}',
        Storage: sessionStorage
      }
      const userPool = new AmazonCognitoIdentity.CognitoUserPool(poolData)
でユーザプールにアクセスする。
その後、以下のようにして認証を行い、成功時は元のコンテンツに飛ばすようにすれば良い。
      const authenticationData = {
        Username: this.cognito_id,
        Password: this.cognito_pwd
      }
      const authenticationDetails = new AmazonCognitoIdentity.AuthenticationDetails(authenticationData)

      const userData = {
        Username: this.cognito_id,
        Pool: userPool,
        Storage: sessionStorage
      }
      const cognitoUser = new AmazonCognitoIdentity.CognitoUser(userData)
      cognitoUser.authenticateUser(authenticationDetails, {
②ユーザ認証
さて、ここからが本番のCognitoのTerraformの記述となる。
まずは、以下のようにユーザプールを作成する。
IDについては、sub という払い出しIDが作成されるが、自分で払い出したい場合は以下のように schema で定義しよう。
なお、developer_only_attribute を true にすると、トークン情報に入らなくなるので注意しよう。
また、自分で定義したスキーマ情報については、custom:id といったかたちでトークン情報に入るため、注意しよう。
aws_cognito_user_poolのリソースでは、パスワードポリシーやMFAの設定等、細かい設定が可能だが、今回は簡略化のためにほぼデフォルトの設定のままとする。
resource "aws_cognito_user_pool" "example" {
  name = local.cognito_userpool_name

  schema {
    name                     = "id"
    attribute_data_type      = "String"
    developer_only_attribute = false
    mutable                  = true
    required                 = false
    string_attribute_constraints {
      min_length = 5
      max_length = 5
    }
  }
}
今回は、以下のようにCLIを使ってあらかじめユーザを払い出しておくようにする。
id は、この後定義する DynamoDB に合わせておく。
locals {
  cognito_users = [
    { "user_name" = "sampleuser00001@google.com", "id" = "00001" },
    { "user_name" = "sampleuser00002@google.com", "id" = "00002" },
    { "user_name" = "sampleuser00003@google.com", "id" = "00003" },
    { "user_name" = "sampleuser00004@google.com", "id" = "00004" },
    { "user_name" = "sampleuser00005@google.com", "id" = "00005" },
  ]
}

resource "null_resource" "create_user" {
  depends_on = [aws_cognito_user_pool.example]
  for_each = { for cognito_user in local.cognito_users : cognito_user.id => {
    user_name   = cognito_user.user_name
    id = cognito_user.id
    }
  }

  provisioner "local-exec" {
    command = <<-EOF
      aws cognito-idp admin-create-user --user-pool-id ${aws_cognito_user_pool.example.id} --username ${each.value.user_name} --user-attributes Name=custom:id,Value=${each.value.id} &&
      aws cognito-idp admin-set-user-password --user-pool-id ${aws_cognito_user_pool.example.id} --username ${each.value.user_name} --password Pass1234! --permanent
    EOF
    on_failure = fail
  }
}
次に、クライアント(アプリ情報)の登録をする。
ここで払い出されたクライアントIDと、IDプールが、先ほどのVue.js内で設定した情報とリンクするのである。
なお、aws_cognito_user_pool_clientのsupported_identity_providers は、他のIdPも指定可能だが、今回はCognitoの機能を利用するため以下の通りとする。OpenID2.0の認証をするためには、以下の通り設定しておけば良い。
resource "aws_cognito_user_pool_client" "example" {
  user_pool_id = aws_cognito_user_pool.example.id
  name         = local.cognito_client_name

  supported_identity_providers         = ["COGNITO"]
  allowed_oauth_flows_user_pool_client = true
  allowed_oauth_flows                  = ["implicit"]
  allowed_oauth_scopes                 = ["openid"]
  explicit_auth_flows = [
    "ALLOW_CUSTOM_AUTH",
    "ALLOW_REFRESH_TOKEN_AUTH",
    "ALLOW_USER_SRP_AUTH",
  ]
  callback_urls = ["https://${aws_cloudfront_distribution.s3_contents.domain_name}/"]
}

resource "aws_cognito_identity_pool" "example" {
  identity_pool_name               = local.cognito_idpool_name
  allow_unauthenticated_identities = true
  allow_classic_flow               = false

  cognito_identity_providers {
    client_id     = aws_cognito_user_pool_client.example.id
    provider_name = aws_cognito_user_pool.example.endpoint
  }
}
③API アクセス
APIアクセス特に難しいことはしていない。
今回は、GETリクエストを飛ばしてくるので、Lambda側でCORSの対応が必要なのと、Chromeは今回のアクセスパターンでもOPTIONSのプリフライトリクエストを飛ばしてきたので、モック統合を使って処理できるようにしておこう。
モック統合によるOPTIONSメソッドのCORS対応は、以下の記事を参照。
また、Lambdaは以下のようにPythonでテキトーに定義した。
DynamoDBのテーブル名とCORSのオリジン名は、環境変数で渡して書き換え不要にしてある。
import os
import json
import boto3
from boto3.dynamodb.conditions import Key

dynamodb = boto3.resource('dynamodb')
table    = dynamodb.Table(os.environ['DYNAMODB_TABLE_NAME'])

def get_item(id):
    try:
        response = table.query(
            KeyConditionExpression=Key('id').eq(id)
        )
        return response['Items']
    except Exception as error:
        print(error)
        raise Exception('DynamoDB Error')

def lambda_handler(event, context):
    print(event)

    status_code = 200
    items = {}

    try:
        event['queryStringParameters']['id']
    except:
        status_code = 400

    if status_code == 200:
        try:
            items = get_item(event['queryStringParameters']['id'])
        except:
            status_code = 500

    return {
        'isBase64Encoded': False,
        'statusCode': status_code,
        'headers': {
            "Access-Control-Allow-Headers" : "*",
            "Access-Control-Allow-Origin": os.environ['CORS_ORIGIN'],
            "Access-Control-Allow-Methods": "GET"
        },
        'body': json.dumps(items)
    }
DynamoDBは以下のように定義している。
resource "aws_dynamodb_table" "employee" {
  name         = local.dynamodb_table_name
  billing_mode = "PAY_PER_REQUEST"
  hash_key     = "id"

  attribute {
    name = "id"
    type = "S"
  }
}

locals {
  dynamodb_items = [
    { "id" = "00001", "name" = "Taro", "age" = "45" },
    { "id" = "00002", "name" = "Jiro", "age" = "42" },
    { "id" = "00003", "name" = "Saburo", "age" = "40" },
    { "id" = "00004", "name" = "Shiro", "age" = "35" },
    { "id" = "00005", "name" = "Goro", "age" = "30" },
  ]
}

resource "aws_dynamodb_table_item" "employee" {
  for_each = { for dynamodb_item in local.dynamodb_items : dynamodb_item.id => {
    id   = dynamodb_item.id
    name = dynamodb_item.name
    age  = dynamodb_item.age
    }
  }

  table_name = aws_dynamodb_table.employee.name
  hash_key   = aws_dynamodb_table.employee.hash_key
  range_key  = aws_dynamodb_table.employee.range_key

  item = <<ITEM
{
  "id": {"S": "${each.value.id}"},
  "name": {"S": "${each.value.name}"},
  "age": {"S": "${each.value.age}"}
}
ITEM
}
最後に、API GatewayのAPIを直接実行してしまうことができないように、APIにオーソライザーを設定しよう。
resource "aws_api_gateway_method" "employee_get" {
  rest_api_id   = aws_api_gateway_rest_api.contents.id
  resource_id   = aws_api_gateway_resource.employee.id
  http_method   = "GET"
  authorization = "COGNITO_USER_POOLS"
  authorizer_id = aws_api_gateway_authorizer.cognito.id
}

resource "aws_api_gateway_authorizer" "cognito" {
  rest_api_id   = aws_api_gateway_rest_api.contents.id
  name          = "CognitoAuthorizer"
  type          = "COGNITO_USER_POOLS"
  provider_arns = [aws_cognito_user_pool.example.arn]
}
これで、直接APIを実行しても
$ curl -i https://xxxxxxxxxx.execute-api.ap-northeast-1.amazonaws.com/prod/employee?id=00005
HTTP/2 401
date: Sun, 13 Jun 2021 12:34:59 GMT
content-type: application/json
content-length: 26
x-amzn-requestid: xxxxxxxx-xxxx-xxxx-xxxx-xxxxxxxxxxxx
x-amzn-errortype: UnauthorizedException
x-amz-apigw-id: xxxxxxxxxxxxxxxx

{"message":"Unauthorized"}
と、エラーになるようになった。もちろん、トークンを直接貼り付ければアクセスできるし、トークンを改ざんしてアクセスしようとすると、{"Message":"Access Denied"}が返されるようになった(HTTPステータスコードは403)。この時の応答は、APIに入ってくる前なので、何もしないとCORS対応のヘッダが設定されない。必要であれば、aws_api_gateway_gateway_responseで返却するようにしておこう。