以下の記事を参考に、Laravel 7.16.1でTwitterっぽいSNSツールを作成します。
基本的にエラーが起きた箇所のみ書いていきます。
【全6回】Laravel5.8でTwitterっぽいSNSツールを作る
第1回:DB設計とMigration
第2回:Seeder->ログイン/新規登録
第3回:ユーザ関連とフォロー機能
第4回:ツイートのCRUD機能
第5回:ツイートのCRUD機能 編集と削除
第6回:コメントといいね機能
作業環境
OS:Windows 10 HOME Edition(ver.2004)
Laravel:7.15.0
Xampp:7.4.6
Composer:1.10.7
Node.js:13.9.0
第0回:環境構築
今回はXamppを使い、MySQLで環境構築します。エディタはVSCodeを使用しています。
Laravelのインストール
下記のコマンドを実行すると、Laravelのインストールができます。
cd c:\xampp\htdocs
composer create-project laravel/laravel twitter_clone --prefer-dist
今回は「twitter_clone」というアプリ名にしました。
Application key set successfully.
と表示されれば、laravelのインストールは完了です。
以前の記事でLaravelの初期設定について書いてあるので、今回は変更した箇所のみ記述します。
Laravelのタイムゾーンと言語設定
「config/app.php」を編集します。
70行目 'timezone' => 'Asia/Tokyo',
83行目 'locale' => 'ja',
データベースの言語設定
「config/database.php」を編集します。
55行目 'charset' => 'utf8',
56行目 'collation' => 'utf8_unicode_ci',
データベースの設定
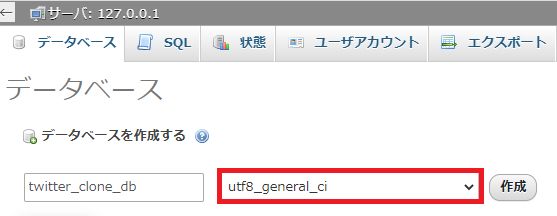
xamppのMySqlのAdminボタンを押してphpMyAdminを起動し、今回使用するデータベースを作成します。
今回はデータベース名は「twitter_clone_db」としていますが、任意の名前でOKです。だたし、言語は「utf8_general_ci」を選ぶ点に注意してください。
下記を参考に、データベースの設定を「.env」ファイルに追記します。
 9行目 DB_CONNECTION=mysql
10行目 DB_HOST=127.0.0.1
11行目 DB_PORT=3306
12行目 DB_DATABASE=データベース名
13行目 DB_USERNAME=ユーザー名
14行目 DB_PASSWORD=パスワード
デバックバーのインストール
以下のコマンドを実行して、デバックバーのインストールします。
composer require barryvdh/laravel-debugbar
Laravelの日本語化
Laravel7を日本語化する方法
上記の記事を参考に、Laravelを日本語化します。
1.以下からZipファイルをダウンロードします。
https://github.com/caouecs/Laravel-lang
2.解凍したLaravel-lang-masterフォルダのjson/ja.jsonを、プロジェクトフォルダの resources/langに移動します。
3.Laravel-lang-master/src内のjaフォルダを、プロジェクト内のresources/langに移動します。最終的に下の画像になればOKです。
第1回:DB設計とMigration
Migration(マイグレーション)
Migrationを実際に書いていく
外部キーの指定方法などが変わっているので、下記のように変更します。
Users
Schema::create('users', function (Blueprint $table) {
            $table->id();
            $table->string('screen_name')->unique()->null()->comment('アカウント名');
            $table->string('name')->null()->comment('ユーザ名');
            $table->string('profile_image')->nullable()->comment('プロフィール画像');
            $table->string('email')->unique();
            $table->timestamp('email_verified_at')->nullable();
            $table->string('password');
            $table->rememberToken();
            $table->timestamps();
});
Tweets
Schema::create('tweets', function (Blueprint $table) {
            $table->id();
            $table->foreignId('user_id')
                ->comment('ユーザID')
                ->constrained()
                ->onDelete('cascade')
                ->onUpdate('cascade');
            $table->string('text')->comment('本文');
            $table->softDeletes();
            $table->timestamps();

            $table->index('id');
            $table->index('user_id');
            $table->index('text');
});
Comments
Schema::create('comments', function (Blueprint $table) {
          $table->id();
          $table->foreignId('user_id')
              ->comment('ユーザID')
              ->constrained()
              ->onDelete('cascade')
              ->onUpdate('cascade');
          $table->foreignId('tweet_id')
              ->comment('ツイートID')
              ->constrained()
              ->onDelete('cascade')
              ->onUpdate('cascade');
          $table->string('text')->comment('本文');
          $table->softDeletes();
          $table->timestamps();

          $table->index('id');
          $table->index('user_id');
          $table->index('tweet_id');
});
Favorites
Schema::create('favorites', function (Blueprint $table) {
            $table->id();
            $table->foreignId('user_id')
                ->comment('ユーザID')
                ->constrained()
                ->onDelete('cascade')
                ->onUpdate('cascade');
            $table->foreignId('tweet_id')
                ->comment('ツイートID')
                ->constrained()
                ->onDelete('cascade')
                ->onUpdate('cascade');

            $table->index('id');
            $table->index('user_id');
            $table->index('tweet_id');

            $table->unique([
                'user_id',
                'tweet_id'
            ]);
});
Followers
Schema::create('followers', function (Blueprint $table) {
            $table->unsignedInteger('following_id')->comment('フォローしているユーザID');
            $table->unsignedInteger('followed_id')->comment('フォローされているユーザID');

            $table->index('following_id');
            $table->index('followed_id');

            $table->unique([
                'following_id',
                'followed_id'
            ]);
});
Migration実行!
php artisan migrate
これでDBの用意が完了しました。
第2回:Seeder->ログイン/新規登録
Seeder実行
php artisan db:seed
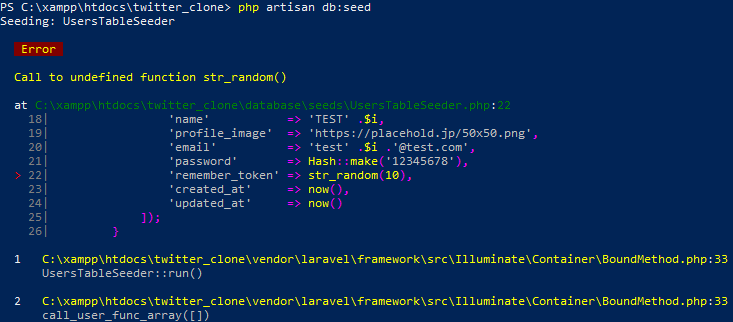
Seederの実行するために上記のコマンドを実行すると、下記のようなエラーが出てきました。
「database/seeds/UsersTableSeeder.php」を以下のように変更します。
変更前
'remember_token' => str_random(10),

変更後
'remember_token' => Str::random(10),
もう1度コマンドを実行すると、テストデータの登録は完了です。
ログイン/新規登録
Laravel 6以上ではphp artisan make:authが利用できないので、この部分は全く違う手順となります。
詳しい解説はしませんが、下記のコマンドを順に実行すればOKです。
composer require laravel/ui --dev
php artisan ui bootstrap --auth
npm install
npm run dev
別のターミナルを起動し、下記のコマンドを実行します。
php artisan serve
http://127.0.0.1:8000/ にアクセスすると、右上に「LOGIN」と「REGISTER」が追加されているのが確認できます。
第3回:ユーザ関連とフォロー機能
フォロー関連の処理
View
変更前
<form action="{{ route('unfollow', ['id' => $user->id]) }}" method="POST">

<form action="{{ route('follow', ['id' => $user->id]) }}" method="POST">

変更後
<form action="{{ route('unfollow', [$user->id]) }}" method="POST">

<form action="{{ route('follow', [$user->id]) }}" method="POST">
後はエラーは出ませんでした。
この部分が終わったら、一度下記のコマンドを実行するのがおすすめです。
composer dump-autoload
npm run dev
第4回:ツイートのCRUD機能
エラーは出ませんでした。
第5回:ツイートのCRUD機能 編集と削除
リダイレクト先
以下のように変更します。
変更前
RouteServiceProvider::HOME

変更後
'/tweets'
Update(ツイート編集機能)
View
変更前
<form method="POST" action="{{ route('tweets.update', ['tweets' => $tweets]) }}">

変更後
<form method="POST" action="{{ route('tweets.update', [$tweets]) }}">
この部分が終わったら、先程と同様に一度下記のコマンドを実行するのがおすすめです。
composer dump-autoload
npm run dev
第6回:コメントといいね機能
エラーは特にありませんでした。
この部分が終わったら、先程と同様に一度下記のコマンドを実行するのがおすすめです。
composer dump-autoload
npm run dev
番外編:デプロイ
HerokuにLaravelで作ったアプリをデプロイする方法(MySQL編)を公開しました。
Herokuでデプロイするときに追加した項目を書いていきます。
DBは「ClearDB MySQL」、メールサーバーは「Mailgun」を使用しています。
Mailgunを利用する準備
MailgunはSMTPではなくWeb APIを利用するので、下記のコマンドを利用してguzzleをインストールします。
composer require guzzlehttp/guzzle
続いてテストメール送信用のコードを追加していきます。
Mailableクラスを生成します。
php artisan make:mail Test
作成されたTest.phpを下記のように修正します。
<?php

namespace App\Mail;

use Illuminate\Bus\Queueable;
use Illuminate\Contracts\Queue\ShouldQueue;
use Illuminate\Mail\Mailable;
use Illuminate\Queue\SerializesModels;

class Test extends Mailable
{
    use Queueable, SerializesModels;

    /**
     * Create a new message instance.
     *
     * @return void
     */
    public function __construct()
    {
        //
    }

    /**
     * Build the message.
     *
     * @return $this
     */
    public function build()
    {
        return $this->view('emails.test');
    }
}
メール用のView用のファイル「resources/views/emails/test.blade.php」を作成し、以下の内容にします。
<!DOCTYPE html>
<html lang="en-US">
  <head>
    <meta charset="utf-8">
  </head>
  <body>This mail was sent with mailgun.</body>
</html>
お疲れさまでした。
今回のソースコードはhttps://github.com/neneta0921/twitter_clone にて公開しているので、よければ参考にしてください。


